Instrukcja obsługi Acer RX321QUP
Przeczytaj poniżej 📖 instrukcję obsługi w języku polskim dla Acer RX321QUP (2 stron) w kategorii monitor. Ta instrukcja była pomocna dla 51 osób i została oceniona przez 3 użytkowników na średnio 4.4 gwiazdek
Strona 1/2
LCD Monitor Quick Setup Guide
English
$FHU/&'0RQLWRU4XLFN6WDUW*XLGH46*
Important safety instructions
Please read the followinginstructions carefully.
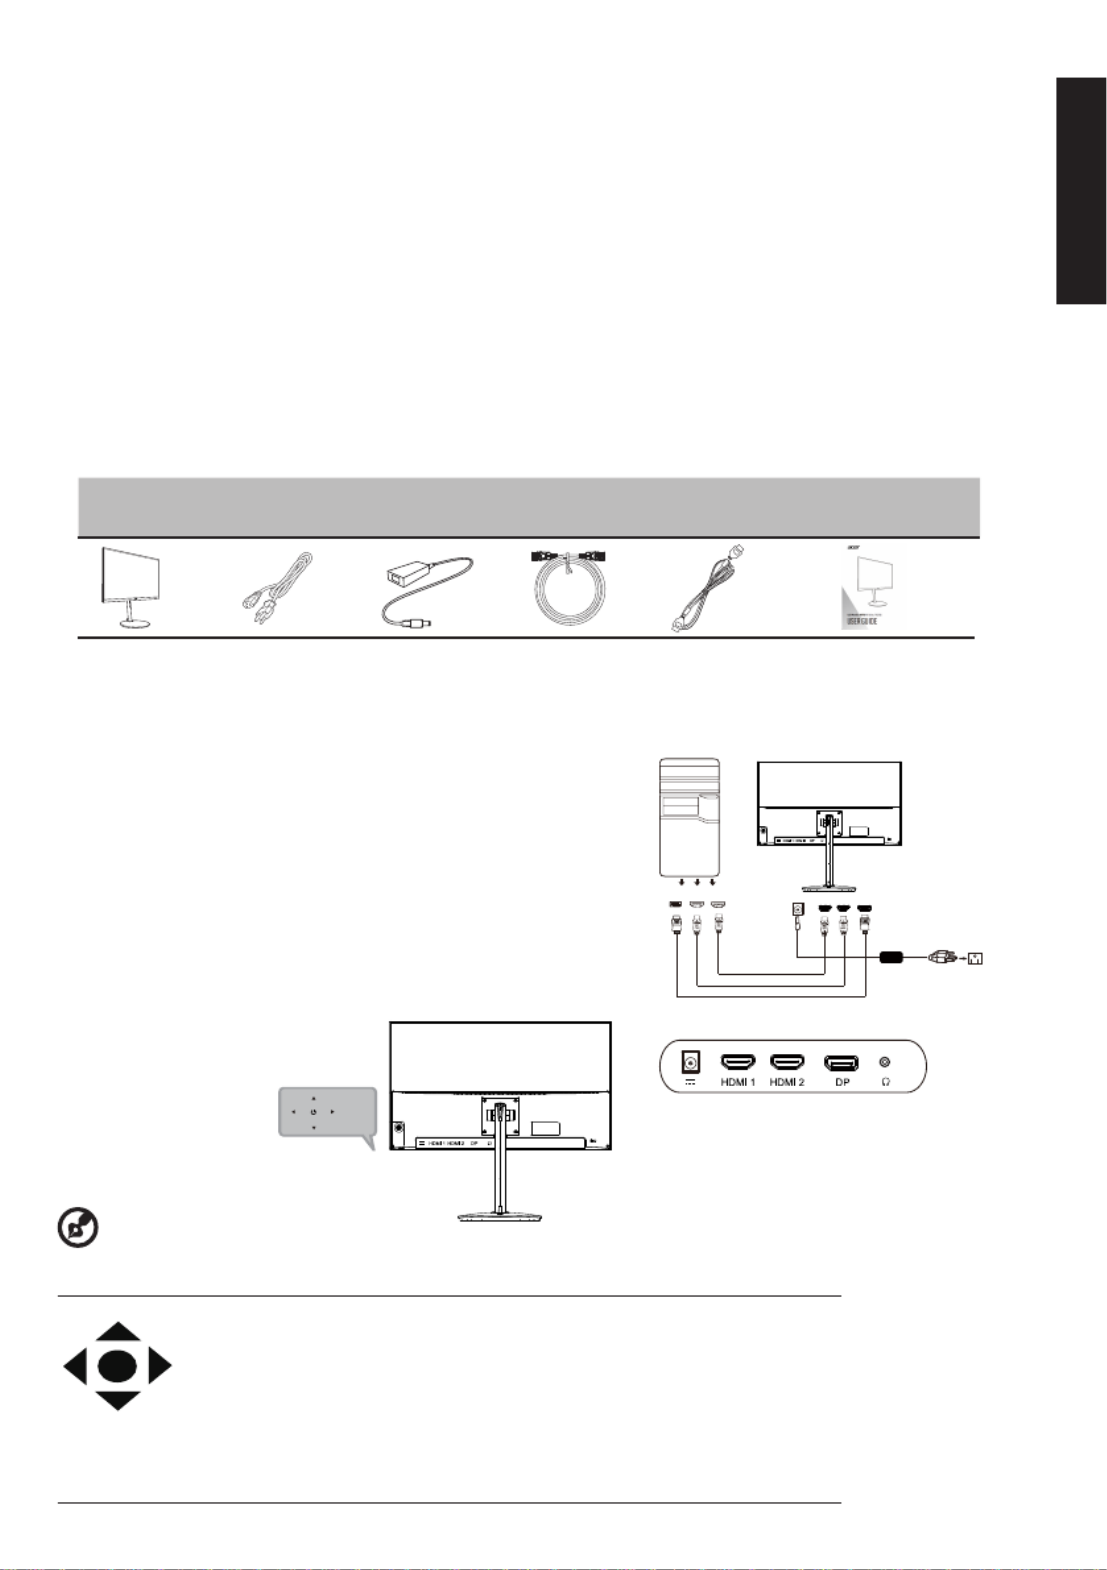
Package contents
LCD monitor
Power cord
DPcable
(Optional)
HDMI cable
(Optional)
Quick start
guide
Attaching the monitor to the base
1. Remove the monitor from the packaging.
2. Attach the footstand to the base. (for selected models)
3. Turn to lock clockwise by turning the screw using the integrated tab or a suitable coin.
Connecting Your Monitor to a Computer
Adapter
1. To clean the LCD monitor screen: Be sure that your monitor is electrically rated to operate with the AC power available in your location.
• T ofurn f the LCD monitor and unplug the power cord.
• Spray a non-solvent cleaning solution onto a rag and clean the screen gently.
•
•
•
• • NEVER
NEVER
NEVER
NEVERNEVER SPRAY OR POUR
SPRAY OR POUR
SPRAY OR POUR
SPRAY OR POURSPRAY OR POURLIQUID
LIQUID
LIQUID
LIQUIDLIQUID CTLY ONTO
CTLY ONTO
CTLY ONTO
CTLY ONTOCTLY ONTO THE
THE
THE
THETHE N
N
N
NN R
R
R
RR
ANY
ANY
ANY
ANY ANY DIRE
DIRE
DIRE
DIRE DIRE
SCREE
SCREE
SCREE
SCREE SCREE O
O
O
O O CASE
CASE
CASE
CASE CASE.
•
•
•
• • PLEASE DO NOT
PLEASE DO NOT
PLEASE DO NOT
PLEASE DO NOT PLEASE DO NOT USE ANY AMMONIA OR AL
USE ANY AMMONIA OR AL
USE ANY AMMONIA OR AL
USE ANY AMMONIA OR ALUSE ANY AMMONIA OR ALCOHOL-BASED CLEAN
COHOL-BASED CLEAN
COHOL-BASED CLEAN
COHOL-BASED CLEANCOHOL-BASED CLEANERS ON THE LCD DISPLAY
ERS ON THE LCD DISPLAY
ERS ON THE LCD DISPLAY
ERS ON THE LCD DISPLAY ERS ON THE LCD DISPLAY SCREEN OR CASE.
SCREEN OR CASE.
SCREEN OR CASE.
SCREEN OR CASE.SCREEN OR CASE.
• Acer will not be liable for damage resulting from use of any ammonia or alcohol-based cleaners.
2. Do not place the LCD monitor near a window. Exposing the monitor to rain, moisture or sunlight can severely damage it.
3. Do not apply pressure to the LCD screen. Excessive pressure may cause permanent damage to the display.
4. Do not remove the cover or attempt to service this unit yourself. An authorized technician should perform servicing of any nature.
5. Store the LCD monitor in a room with a temperature of -20° to 60°C (-4° to 140°F). Storing the LCD monitor outside this range may result
in permanent damage.
6. Immediately unplug your monitor and call an authorized technician if any of the following circumstances occur:
• Monitor-to-PC signal cable is frayed or damaged.
• Liquid spills onto the LCD monitor or the monitor is exposed to rain.
• The LCD monitor or case is damaged.
1.Turn off your monitor your and unplug computer’s power cord.
2.2-1 Connect DP cable(Optional, Only DP-input model)
a. powered-OFF.Make sure both the monitor and computer are
b. Connect the DP cable to the computer
2 -2 Connect HDMI Cable (OptionalOnly HDMI-input model),
a. Make sboth tare powered-OFF. ure he monitor and computer
b. Connect the HDMI cable to the computer.
3.Insert the the port the monitor power cable into power at back of the
monitor.
4.Plug the a power computer monitor cords your of and your into nearby
electrical outlet.
External controls
Function keyMonitor power off status Press to switch power on. In the normal display, a.
anytime to Press more than 5 seconds switch to turn off the power.
b. Blue indicates power on. Amber flickerindicates standby/power
saving mode. No light display indicates Power off.
c. Press to any directions switch key to display First Menu. Press again to enter
next function in the First Menu.
d. The single toggle button on the backside of the Display bezel operates like
a joystick. To move the cursor, simply toggle the button in four directions.
Press the button to select desires option. In Main Menu The red indicates
operable, Grey indicates inoperable.
7• The adapter is only used for this monitor, do not use it for other purpose.
Please make sure to connect the adapter to main socket with protective earthing
Note: Audio output is only for audio outputmodel.Please check user manual for more instruction.
Adapter
DP
HDMI1
HDMI2
Specyfikacje produktu
| Marka: | Acer |
| Kategoria: | monitor |
| Model: | RX321QUP |
Potrzebujesz pomocy?
Jeśli potrzebujesz pomocy z Acer RX321QUP, zadaj pytanie poniżej, a inni użytkownicy Ci odpowiedzą
Instrukcje monitor Acer

8 Kwietnia 2025
14 Marca 2025
14 Marca 2025
14 Marca 2025
14 Marca 2025
2 Marca 2025
26 Lutego 2025
20 Lutego 2025
7 Lutego 2025
28 Stycznia 2025
Instrukcje monitor
Najnowsze instrukcje dla monitor
8 Kwietnia 2025
8 Kwietnia 2025
7 Kwietnia 2025
5 Kwietnia 2025
4 Kwietnia 2025
4 Kwietnia 2025
3 Kwietnia 2025
2 Kwietnia 2025
2 Kwietnia 2025
2 Kwietnia 2025