Instrukcja obsługi Atdec L-PB
Przeczytaj poniżej 📖 instrukcję obsługi w języku polskim dla Atdec L-PB (4 stron) w kategorii Wsparcie dla płaskich paneli. Ta instrukcja była pomocna dla 16 osób i została oceniona przez 8 użytkowników na średnio 4.6 gwiazdek
Strona 1/4
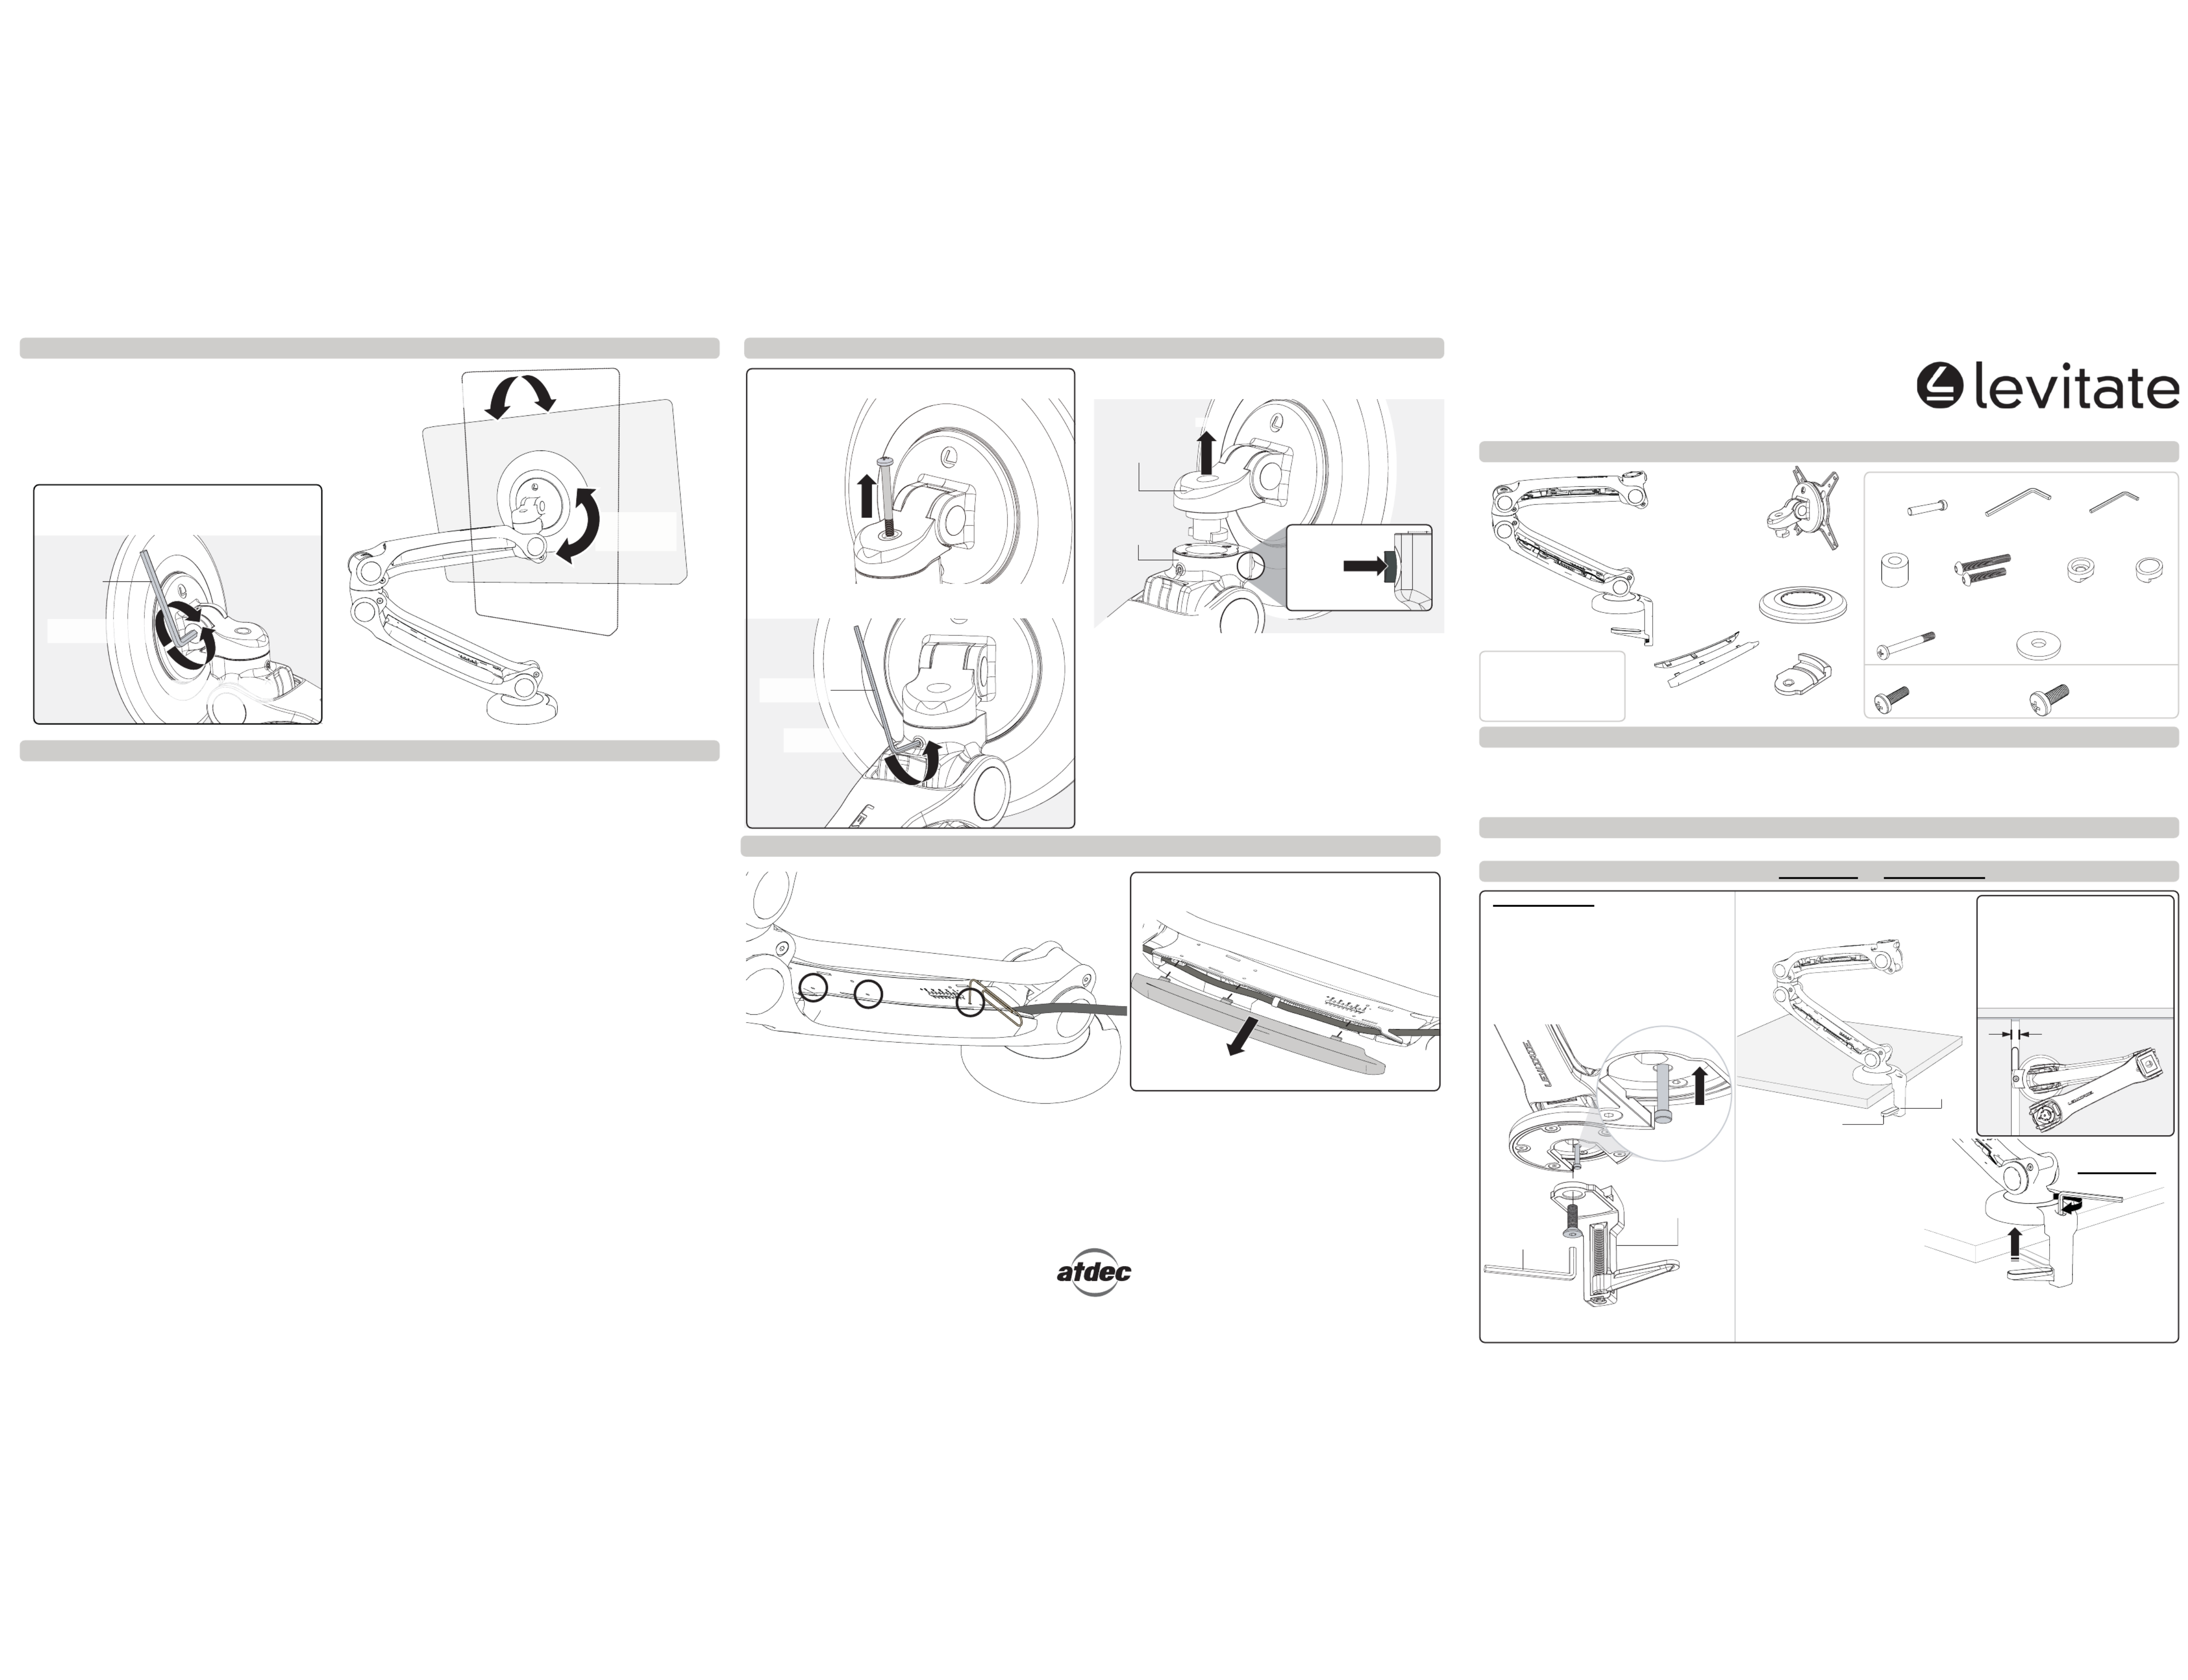
Step 2. Fasten Base to Work Surface - Choose DESK CLAMP OR BOLT THROUGH option (PTO...)
Component Checklist
A - DESK CLAMP
The default base setup allows of 360°
rotation of the Lower Arm around the base.
If you want to limit the Lower Arm rotation to
180° go to A1, if not skip to A2.
A1. OPTIONAL 180° ROTATION
To limit the Lower Arm rotation to insert 180°
the Brake Pin underneath the Desk Clamp.
Brake
Pin (x1)
5mm Allen
Key (x1)
2mm Allen
Key (x1)
Spacer
Bush (x4)
45mm/60mm
Bolts (x1 each)
Security
Washer (x1)
Head
Cap (x1)
Security
Screw (x1)
Bolt Through
Washers (x3)
M4 x 12mm (x4)
M4 x 16mm (x4)
M5 x 12mm (x4)
M5 x 16mm (x4)
Mounting
Head
Cover Plate
Base Plate
Display Mounting Screws (BAG B)
Hardware (BAG A)
Arm Assembly
(with pre-assembled Desk Clamp)
Tools Required:
Phillips Head Screwdriver
Power drill
8mm (5/”) drill bit16
IMPORTANT INFORMATION
! IMPORTANT - Install Levitate Single Monitor Arm as per Installation Instructions
! This product supports a maximum weight of 9kg (19.5lbs).
! This product supports VESA mounting hole configurations 75 x 75mm and 100 x 100mm.
! The manufacturer accepts no responsibility for incorrect installation.
Check you have received all parts against the Component Checklist and Hardware.
Step 1. Check Components
L-PB
L-PW
Desk | Single
Installation Instructions
Cable Covers
(x2 sets)
Insert
Brake Pin
PUSH
Desk Clamp
5mm Allen
Key
A2. Position Arm Assembly on the work
surface so that the Desk Clamp hangs over
the edge.
TOP LOADING ATTACHMENT
TIP:When sliding the Desk Clamp
between two work surfaces, ensure
that the Clamp Pad is fully open
and parallel with the edge of the
work surface.
Min. gap=18mm (0.71”)
Work Surface
(top view)
Desk
Clamp
A3. Using the 5mm Allen Key, close
the Desk Clamp to grip the work
surface. Tighten very firmly.
NOTE:The unique top loading Desk Clamp allows product installation/removal
without having to gain access to the underside of the work surface.
A4.Desk Clamp is now installed, please skip to Step 3 (PTO>>>).
The Clamp Pad will automatically
rotate under the work surface
when tightened.
Remove and re-install the Desk Clamp, using
the 5mm Allen Key supplied. Then go to A2.
No portion of this document or any artwork contained herein should be reproduced in any way without the express written consent of Atdec Pty Ltd.
Due to the continuing product development, the manufacturer reserves the right to alter specifications without notice. Published 22.07.11 ©
INSTALLATION COMPLETE - Refer to the User Operator Guide for user adjustments
How to remove the MonitorStep 8. Monitor Orientation
TIGHTEN
VERY FIRMLY
(clockwise)
Clamp Pad
1. Rotate the monitor to Portrait or Landscape position
depending on user requirements.
NOTE: The monitor will only rotate 90° clockwise from
the starting position (when facing the screen).
2. Tilt the monitor up or down to suit the user.
TIP:Depending on the weight of the monitor, make
adjustments to the tilt tension using the 5mm Allen
Key if necessary.
5mm Allen
Key
MORE TENSION
(clockwise)
LESS TENSION
(anti-clockwise)
How to remove Cable Covers
1. If you inserted the Security Screw in Step 5, remove it
using a Phillips head screwdriver.
REMOVE
(anti-clockwise)
LIFT
Mounting Head
Quick Release
Coupling
1. Using a paper clip or a ball point pen press in
the three tabs holding the Cable Cover in place.
2. Pull the Cable Cover away from the Arm. Repeat this
process for each Cable Cover.
REMOVE
TIP:Access the tabs through the three
pinholes nearest the Cable Cover you
want to remove (e.g. A,B,C).
2. If you tightened the swivel tension in Step 5, loosen the
screw (do not remove) using the 2mm Allen Key supplied.
3. Unlock the Quick Release coupling (as shown below), and lift
the Monitor away from the Arm Assembly.
LESS TENSION
(anti-clockwise)
2mm Allen
Key
NOTE:When you press in the black inner button, the white outer
button will pop out to indicate the lock has been disengaged.
ABC
Upward/
Downward Tilt
Portrait/
Landscape
Rotation
Press in BLACK
inner button
TO UNLOCK
Specyfikacje produktu
| Marka: | Atdec |
| Kategoria: | Wsparcie dla płaskich paneli |
| Model: | L-PB |
Potrzebujesz pomocy?
Jeśli potrzebujesz pomocy z Atdec L-PB, zadaj pytanie poniżej, a inni użytkownicy Ci odpowiedzą
Instrukcje Wsparcie dla płaskich paneli Atdec

7 Grudnia 2024
7 Grudnia 2024
7 Grudnia 2024
7 Grudnia 2024
7 Grudnia 2024
7 Grudnia 2024
7 Grudnia 2024
7 Grudnia 2024
7 Grudnia 2024
22 Września 2024
Instrukcje Wsparcie dla płaskich paneli
Najnowsze instrukcje dla Wsparcie dla płaskich paneli
29 Stycznia 2025
29 Stycznia 2025
29 Stycznia 2025
29 Stycznia 2025
28 Stycznia 2025
28 Stycznia 2025
16 Stycznia 2025
16 Stycznia 2025
16 Stycznia 2025
16 Stycznia 2025