Instrukcja obsługi Canon VIXIA HF R52
Przeczytaj poniżej 📖 instrukcję obsługi w języku polskim dla Canon VIXIA HF R52 (3 stron) w kategorii kamera. Ta instrukcja była pomocna dla 37 osób i została oceniona przez 7 użytkowników na średnio 4.6 gwiazdek
Strona 1/3
5 6
HD Camcorder
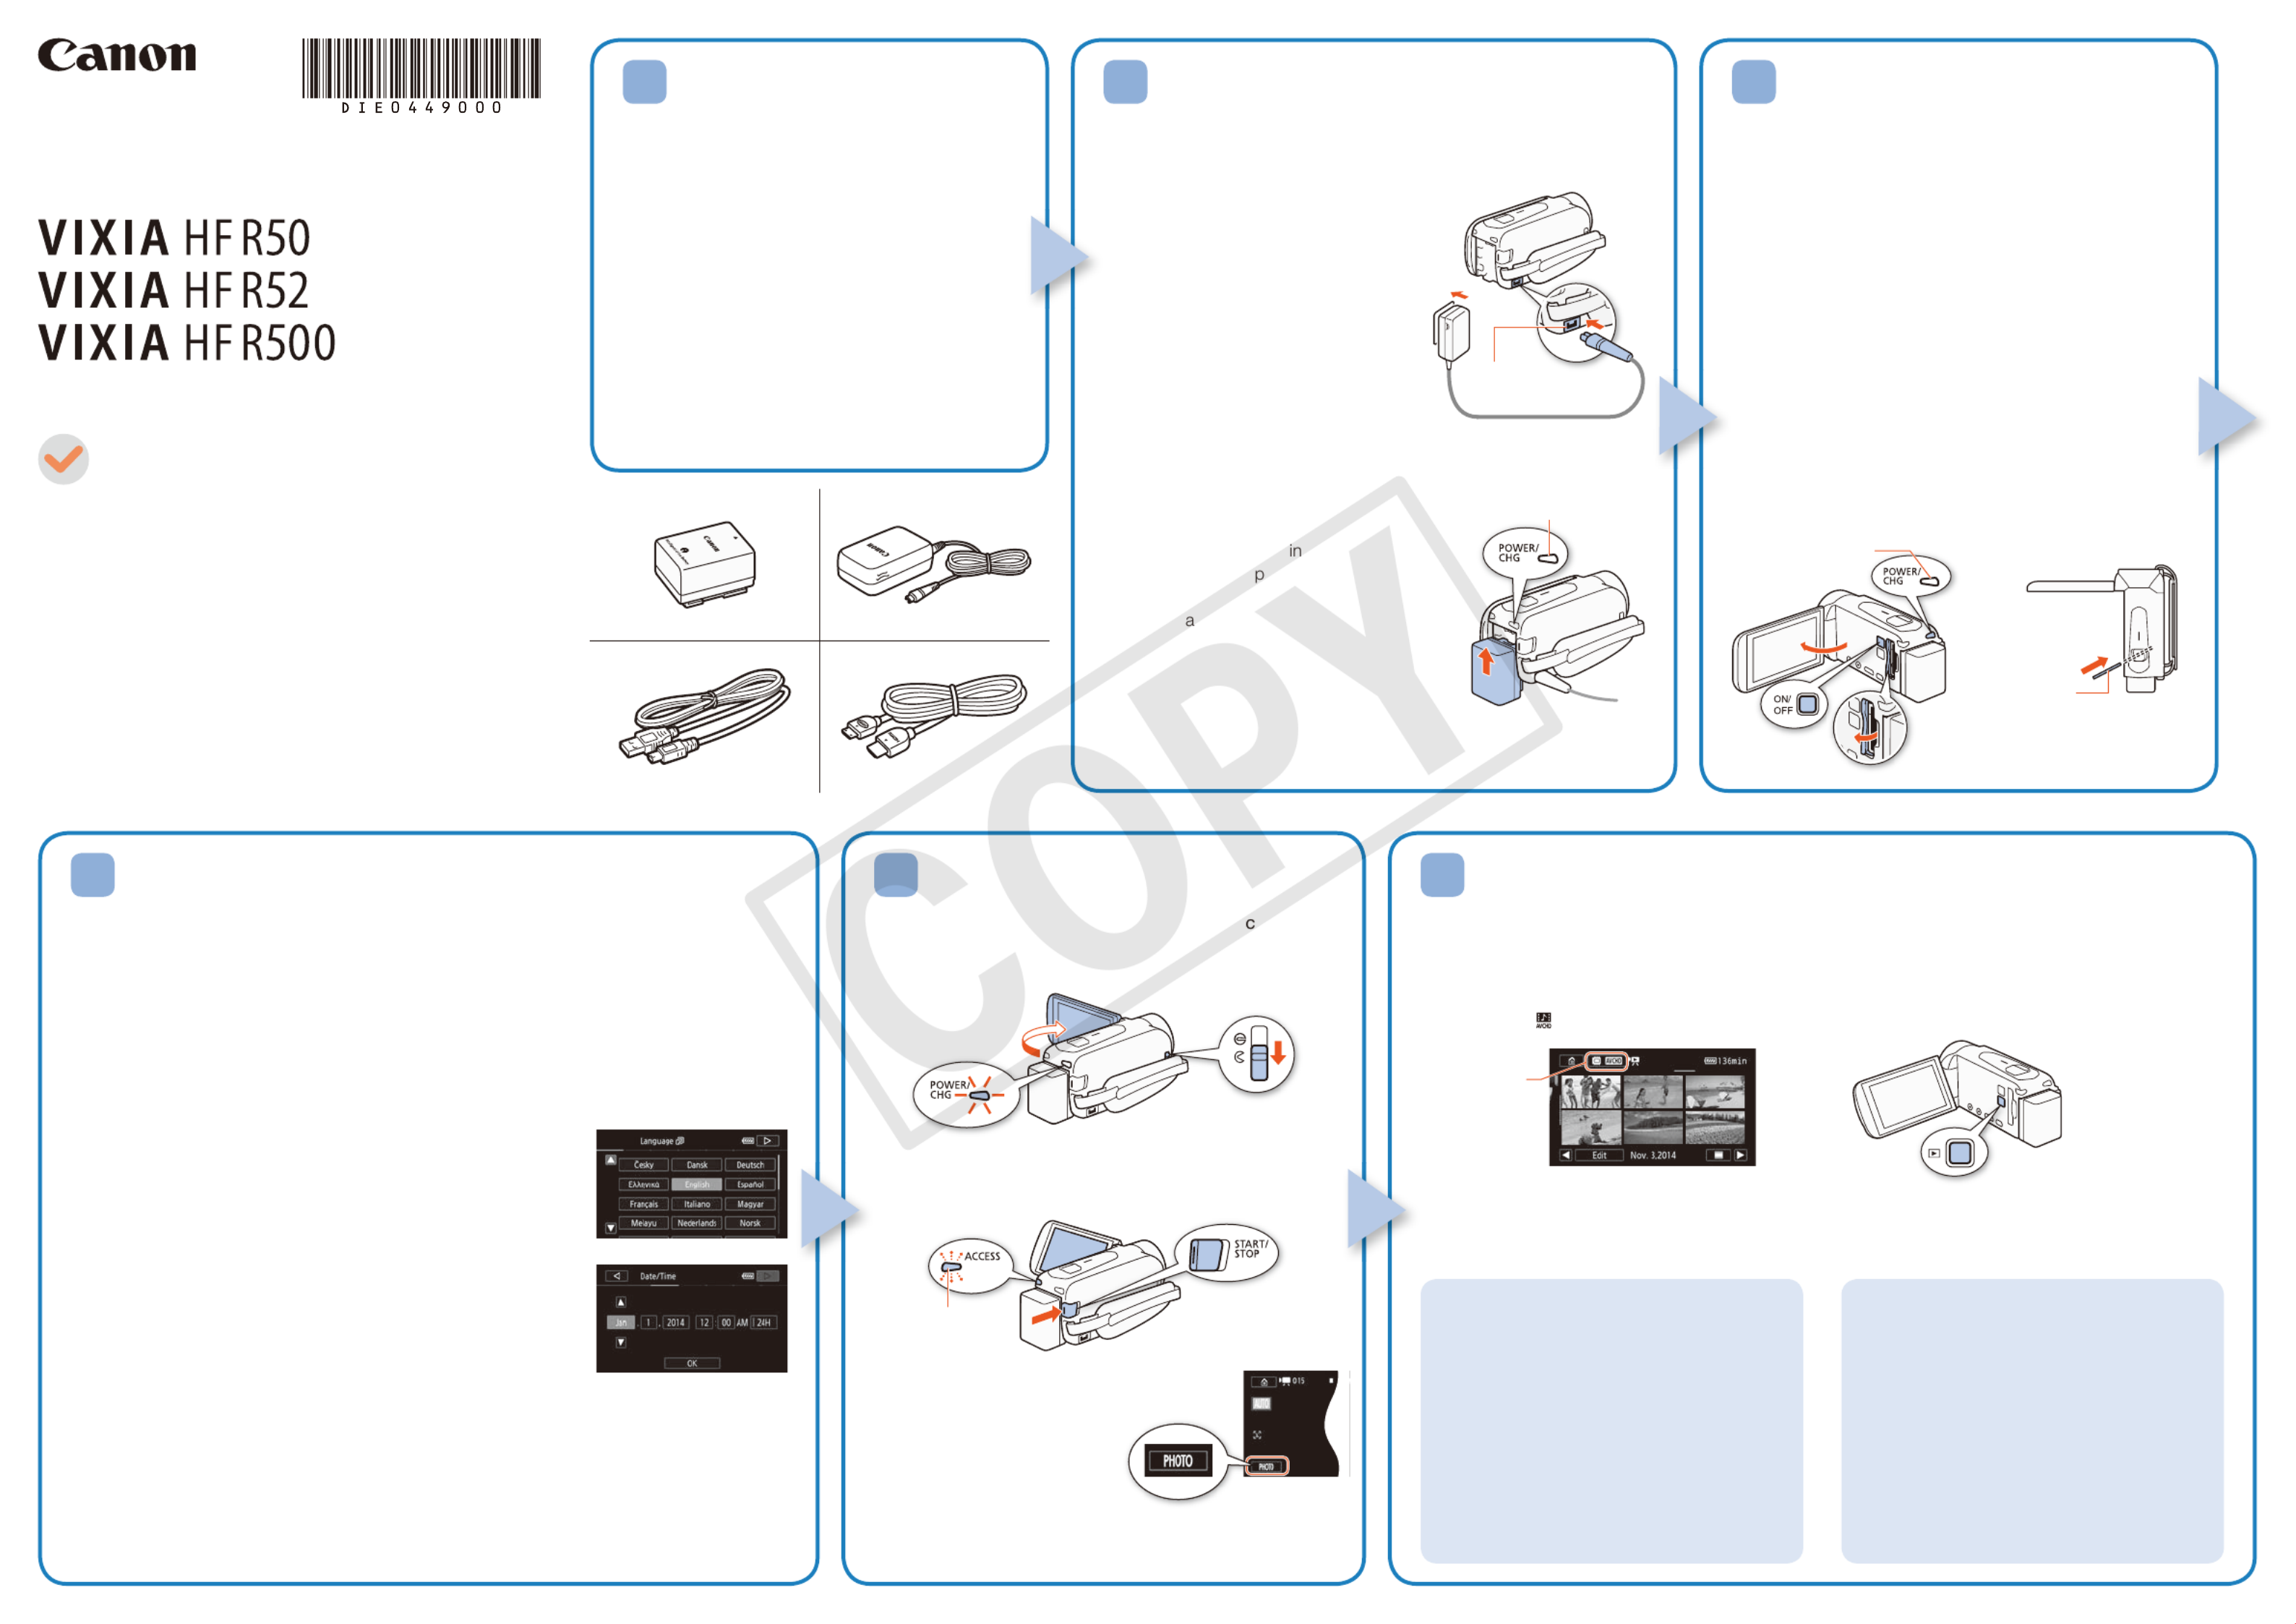
Charging the Battery Pack
Charge the supplied battery pack in advance. Fully charging the
supplied battery pack will take about 5 hours 35 minutes.
1. Plug the compact power adapter
into a power outlet and connect it
to the camcorder’s DC IN terminal.
• For Asia only: Connect the power
cord to the compact power adapter
before plugging the power cord into
the power outlet.
2. Attach the battery pack to the
camcorder.
• Press the battery pack softly into
the battery attachment unit and
slide it up until it clicks in place.
3. Charging will start when the
camcorder is turned off.
• The POWER/CHG dicator will turn on
in red (battery ack charging). When the
red POWER/CHG indicator goes out,
the bttery pack is fully charged.
4. When the battery pack is fully charged,
disconnect the compact power
adapter from the camcorder and then
from the power outlet.
DC IN terminal
POWER/CHG (charge) indicator
PUB. DIE-0449-000
HD Camcorder
VIXIA HF R50 / VIXIA HF R52 / VIXIA HF R500
BP-718 Battery Pack []
CA-110 Compact Power Adapter []
(CA-110E, including power cord, in Asia)
IFC-300PCU/S USB Cable []
HTC-100/S High Speed HDMI Cable []
Transfer Utility LE Startup Guide
Package Contents
2
Basic Setup
The first time you turn on the camcorder, you will be guided by the camcorder’s basic
setup screens to select the camcorder’s initial settings, such as the language, date and
time, movie format, etc.
1. Turn on the camcorder.
• Open the LCD panel or press [.
2. Touch the desired language for onscreen displays and then touch [].æ
3. Touch the desired date/time format and then touch [].æ
4. Set the date and time.
• Touch a field you want to change and touch [] or [Í Î] to
change. Repeat as necessary.
• Touch [24H] to use 24-hour clock or leave untouched to use
AM/PM.
5 Touch [OK] and then touch [].æ
6 Touch [· ¸] or [] to select the movie format and then
touch [].æ
• B After you select the movie format, you need to
select the memory to be used for recording movies (step 7)
and photos (step 8).
• @ No further settings are necessary. Skip to step 9.
7 Touch [& 8] (built-in memory) or [] (memory card) and then touch [].æ
8 Touch [& 8] (built-in memory) or [] (memory card) and then touch [].æ
9. Touch [OK] to complete the basic setup and close the setup screen.
4
Inserting a Memory Card
You can use commercially available SD, SDHC and
SDXC cards with this camcorder. We recommend using
memory cards rated SD Speed Class 4, 6 or 10. Initialize
a memory card before using it with the camcorder for the
first time ().;Initializing the Memory
1. Open the LCD panel.
• The camcorder will turn on and the first screen of the
initial setup will appear.
2. Press [ to turn off the camcorder.
• Make sure the POWER/CHG indicator is off.
3. Open the memory card slot cover and insert the
memory card.
• Insert the memory card at a slight angle, with the label
facing toward the lens.
4. Close the memory card slot cover.
3
1. Turn on the camcorder and open the lens over.
• Open the LCD panel or press and then slide [
down the lens cover switch.
2. Video: Press to start recording video. Y
Press again to stop recording.
Touch [PHOTO] to record a Photos:
photo.
3. When you finish recording, close the lens cover and
turn off the camcorder.
Shooting Video and Taking PhotosPlaying Back Video and Viewing Photos
1. Press the ^ button.
• The [y] index screen will open. To play back different content, change the index screen.
[] [0> } Photo Playback] for the [}] (photos) index screen.
[] [0>9 Baby Album] for the [9] index screen (only scenes recorded in Baby mode).
[] [0> Video Snapshot] for the [¦] index screen (only AVCHD video snapshot scenes).
To change the memoryor video format*
From the index screen:
1. Touch the index screen button (next to
the (Home) button).0
2. Select the memory* ( or ) and/& 8
or movie format ( or ) of the · ¸
recordings you wish to play back and
then touch [OK].
* only.B
To delete recordings
From the index screen:
1. Touch [Edit] > [Delete].
2. Select whether to delete all the scenes/
photos in the same folder, selected
scenes/photos, or all scenes/photos.
• To select individual recordings: touch all
the scenes/photos you wish to delete to
mark them with a , then touch [OK]."
3. Touch [Yes] > [OK].
2. Touch the thumbnail of the scene or photo you want to play back.
• During playback, touch the screen to display the playback controls.
Installing the Camcorder’s
Instruction Manual (PDF File)
This guide only introduces the most basic
functions of the camcorder to get you started.
To learn more about your camcorder, to read
important handling precautions and to consult
the troubleshooting section if an error message
is displayed, be sure to read the full-version
Instruction Manual (PDF file*). Access the
following Web site. Click on your country/region
and follow the onscreen instructions to download
the PDF file.
* Adobe® Reader® 6 or later is required to view the PDF
file.
http://www.canon.com/icpd/
1
Getting Started
Flashes while recording
Index screen button
Top view
Memory Card
Lens
POWER/CHG
indicator is off
Specyfikacje produktu
| Marka: | Canon |
| Kategoria: | kamera |
| Model: | VIXIA HF R52 |
| Kolor produktu: | Czarny |
| Wbudowany wyświetlacz: | Tak |
| Wysokość produktu: | 57 mm |
| Szerokość produktu: | 53 mm |
| Głębokość produktu: | 116 mm |
| Waga produktu: | 285 g |
| Wyjścia słuchawkowe: | 1 |
| Typ HD: | Full HD |
| Pojemność baterii: | 1840 mAh |
| Technologia baterii: | Litowo-jonowa (Li-Ion) |
| Typ ekranu: | LCD |
| Rozdzielczość wyświetlacza aparatu: | 23000 px |
| Długość przekątnej ekranu: | 3 " |
| Obsługiwane typy kart pamięci: | SD, SDHC, SDXC |
| Pojemność pamięci wewnętrznej: | - GB |
| Zakres temperatur (eksploatacja): | 0 - 40 °C |
| Zakres wilgotności względnej: | 0 - 60 % |
| Ekran dotykowy: | Tak |
| Obsługiwane formaty plików wideo: | AVCHD, MPEG4 |
| Przewody: | HDMI, USB |
| Kompatybilność 3D: | Nie |
| Rodzaj baterii: | BP-718 |
| Zakres temperatur (przechowywanie): | -5 - 45 °C |
| Dopuszczalna wilgotność względna: | 0 - 85 % |
| Liczba baterii: | 1 |
| Baterie w zestawie: | Tak |
| HDMI: | Tak |
| System dźwięku: | Dolby Digital 2.0 |
| Długość ogniskowa: | 2.8 - 89.6 mm |
| Obsługa typów dysków: | Nie |
| Cyfrowe zbliżenie: | 1140 x |
| Zespolony sygnał wizji: | 1 |
| Czas pracy na zasilaniu akumulatorowym: | 17.2 h |
| Wbudowany mikrofon: | Tak |
| Typ przetwornika obrazu: | CMOS |
| Maksymalna rozdzielczość obrazu: | 1920 x 1080 px |
| Stabilizator obrazu: | Tak |
| Suma megapikseli: | 3.28 MP |
| Rozdzielczości wideo: | 1280 x 720,1440 x 1080,1920 x 1080 px |
| Maksymalna rozdzielczość filmu: | 1920 x 1080 px |
| Zoom optyczny: | 32 x |
| Regulator ostrości: | Automatyczne/Ręczne |
| Najmniejsza odległość ogniskowa: | 0.1 m |
| Balans bieli: | Auto, Daylight, Tungsten |
| Tryby scenerii: | Beach, Fireworks, Night, Snow, Sports, Spotlight, Sunset |
| Opóżnienie samowyzwalacza: | 10 s |
| Wizjer: | Niedostępny |
| Wbudowany flesz: | Nie |
| Min. Oświetlenie: | 5 lx |
| Gniazda pamięci: | 1 |
| Ilość portów Mini-USB 2.0: | 1 |
| Pamięć Flash: | 32 GB |
| Wbudowane światło: | Nie |
| Wielkość czujnika CCD: | 1/4.85 " |
| Maksymalna przesłona: | 4.5 |
| Szybkość migawki: | 1/2000 s |
| Kompensacja oświetlenia tylnego: | Tak |
| Minimalna przesłona: | 1.8 |
| Minimalna ogniskowa (35mm equiv): | 32.5 mm |
| Maksymalna ogniskowa (35mm equiv): | 1853 mm |
| Odpowiednik soczewki optycznej 35 mm: | 32.5 - 1853 mm |
| Megapiksele efektywne (film): | 2.07 MP |
| Typ stabilizatora obrazu: | Optical Image Stabilization (OIS) |
| Rodzaj kamery: | Ręczna |
| Rodzaj taśmy kamery wideo: | Nie |
| Typ nośnika kamery: | Karta pamięci |
| Megapiksele efektywne (zdjęcie): | 2.07 MP |
| Liczba portów Mini HDMI: | 1 |
| Zapis wstępny: | Tak |
| Podwójne ujęcie (film &zdjęcie): | Tak |
Potrzebujesz pomocy?
Jeśli potrzebujesz pomocy z Canon VIXIA HF R52, zadaj pytanie poniżej, a inni użytkownicy Ci odpowiedzą
Instrukcje kamera Canon

28 Lutego 2025
13 Stycznia 2025
14 Grudnia 2024
5 Października 2024
3 Października 2024
29 Września 2024
29 Września 2024
29 Września 2024
29 Września 2024
28 Września 2024
Instrukcje kamera
Najnowsze instrukcje dla kamera
9 Kwietnia 2025
9 Kwietnia 2025
3 Kwietnia 2025
2 Kwietnia 2025
1 Kwietnia 2025
29 Marca 2025
29 Marca 2025
27 Marca 2025
27 Marca 2025
27 Marca 2025