Instrukcja obsługi Easypix W1024
Przeczytaj poniżej 📖 instrukcję obsługi w języku polskim dla Easypix W1024 (2 stron) w kategorii kamera. Ta instrukcja była pomocna dla 17 osób i została oceniona przez 4 użytkowników na średnio 4.4 gwiazdek
Strona 1/2
Manual
IMPORTANT
- Don’t open the battery door under water.
- Close the battery door properly for best water sealing.
- Rinse the camera with clean water after used and keep it dry for
storage.
1.camera ting to know your Get
3m waterproof design
10.0 Mega pixels resolution sensor
D igital still camera
Digital video recorder
Built- f inlash light
4 x digital zoom
2.4 " TFT color display
M icro SD card support
2 x AAA alkaline batteries
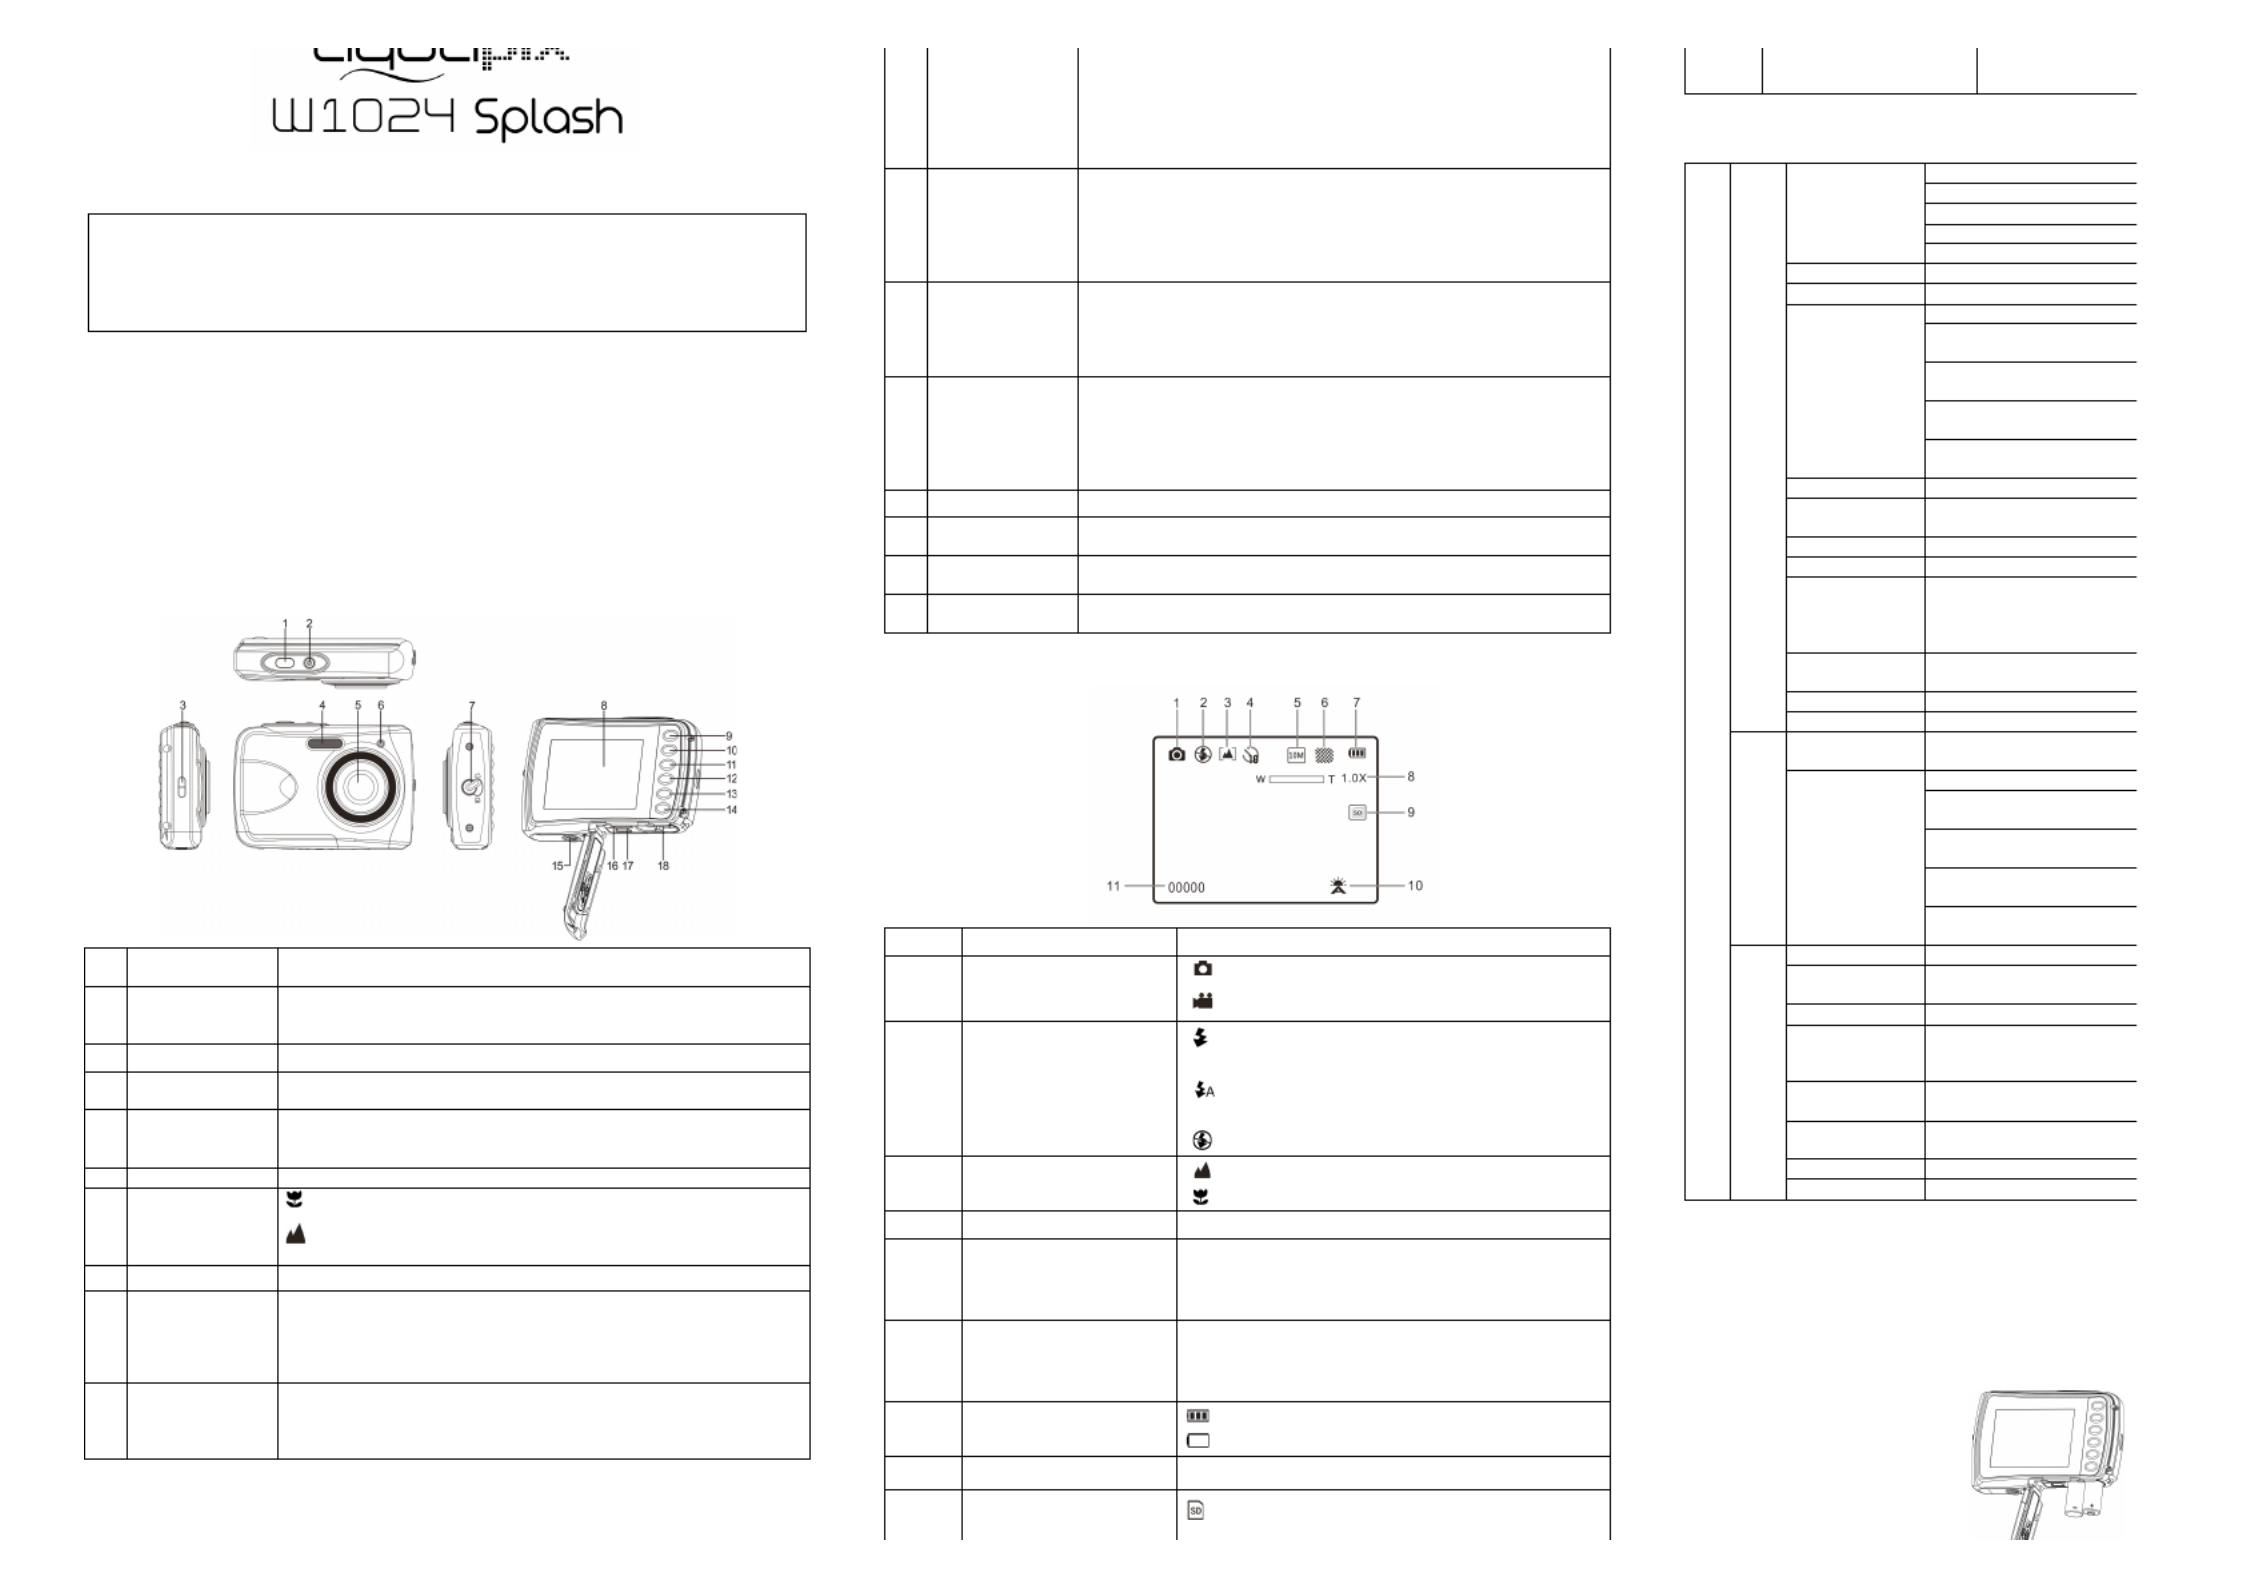
2. Functional parts
1
Shutter
Press this button to take photographs or to start /stop recording
a . video clip, or to confirm changes in menu mode
2
Power on/off
button
Press this button to switch on and press it for at least 2 seconds to
shut off. Or press it to hide/display the status icon on the LCD
screen.
3
Strap hook
Hook for attaching the wrist strap to the camera.
4
Flash light
Use the built- in flash to give the subject extra lighting if it is in dark
surrounding(the best flash distance is recommended within 1.5m).
5
Lens
Records the image to be taken.
Note: Keep the lens clean. Dirt and fingerprints will affect the quality
of the picture.
6
Busy indicator
When the indicator is blinking, the camera is busy.
7
M acro switch
Macro mode: S-elect this mode to take closeup photographs
(distance 11cm - 18cm).
Normal mode: Select this mode to take photographs from
0.5m - infinity.
8
LCD screen
Display photographs, video clips, camera setting and menu.
9
Up/Tele
In Preview mode: press this button to Tele (zoom in);
In Menu mode: press this button to up the selection bar.
In Playback mode: (photo)press this button to zoom in.
In playback (Video playing) mode: press it to start/pause the video.
10
Down/Wide
In Preview mode: press this button to Wide (zoom out);
In Menu mode: press this button to down the selection bar.
In Playback mode: press this button to zoom out.(photo)
I n Playback mode: press this button to get into the thumbnail mode
11
Left F / lash light
In Playback mode: press this button to the previous one;
In Photo infinite Preview mode:
press this button to switch Flash modes; (the flash light cannot be
used in macro mode)
In Photo (zoom in) Playback mode : press it to move to the left area
of the photo.
In playback (Video playing) mode: press it to fast rewind.
12
Right / Playback
Press this button to get into Playback mode;
In Playback mode: press this button to the next one;
In Menu mode: press this button for the right selection;
In Photo (zoom in) Playback mode: press it to move to the right area
of the photo.
In playback (Video playing) mode: press it to fast forward.
13
Mode
Press this button to switch between movie and still capture mode;
In Playback modepress this button to exit.:
In Photo (zoom in) Playback mode:press it to move to the up area
of the photo. In playback (Video playing) mode: press it to stop the
video.
14
Menu / Delete
In Preview mode: press it to enter the settings Menus.
In Playback mode:
Press it for a short time to enter “Delete single/ all files” mode;
Press it for a long time to enter file compiling and system setting
menu. In Photo (zoom in) Playback mode: press it to move to the
down area of the photo.
15
Tripod connector
To fix the camera on tripod.
16
Micro SD card
slot
M s . icro SD cardtorage location
17
USB interface
Via this connection, you can download photographs and video clips
to a computer.
18
Battery
compartment
Compartment for 2 xatteries AAA alkaline b
3. Explanation of the status icons
Item
Function
Description
1
M odeselected
P hotographs mode.
V ideos mode.
2
Flash indicator
Force flash: The flash is on in any
environment.
Auto flash: The camera determines if
the flash should be used or not.
No flash: The flash is turned off.
3
Normal/Macro
mode indicator
N– . ormal mode (0.5m infinity)
Macro mode (11cm – . 18cm)
4
S- elftimer
Shows selected Self- timer setting
5
Selected r esolution
16M = 608456; 10M = 648736;4x33x2;
5M2592443M = 2048x1536; = x19;
VGA = 640x480
6
Picture quality
Super fine.
Fine.
Normal.
7
Battery indicator
The batteries are full.
The batteries are empty.
8
Zoom indicator
S hows the zoom ratio in preview mode
9
The micro SD card
indication
The micro SD card is inserted and will be used
as storagefor PHOTOandVIDEO
11
Photo/Video counter
Photo mode: No. o
Video mode: Reco
4. Details for camera setting
Settings
Photo
Resolution
16M pixel resolution
10.0M pixel resolution
5.0M pixel resolution
3.0M pixel resolution
VGA resolution
Quality
Super Fine/Fine/Normal
Metering
Center/Multi/Spot
White balance
Auto
Daylight
Cloudy
Tungsten
Fluorescent
ISO
Auto/100/200/400/800
Exposure
±2.0, ±1.71.30.7, ±, ±1.0, ±
± 0.3, 0
Self Timer
On/Off
Sharpness
Hard/ Normal/ Soft
Effect (Preview)
Normal/ B&W/ Sepia
Negative/ Lomo/ Penc
Sketch/ Red/ Green/ Blue
Vivid
Effect
(Playback)
B&W/Sepia/Negative/Mosa
ic/Red/Green/Blue
Date Stamp
On/ Off
Quick View
On/ Off
Video
Movie Size
VGA 640 x 480
QVGA 320 x 240
White balance
Auto
Daylight
Cloudy
Tungsten
Fluorescent
Setup
Sounds
Off/On
Frequency
50Hz / 60Hz
Power Save
Off / 1Minute / 3 Minutes
Language
English/German/Italian/
Portuguese/French/Spanis
h/ Japanese
Date/Time
YY/MM/DD;DD/MM/YY
MM/DD/YY;
Format
Yes/ No
Reset All
Yes/ No
Version
Note: The camera will remain the last setting when it is t
5. Using the camera
5.1 Installing the batteries
1.
Open the battery door.
2.2 x Insert AAA alkaline batteries into the camera.
3. Close the battery door.
Specyfikacje produktu
| Marka: | Easypix |
| Kategoria: | kamera |
| Model: | W1024 |
Potrzebujesz pomocy?
Jeśli potrzebujesz pomocy z Easypix W1024, zadaj pytanie poniżej, a inni użytkownicy Ci odpowiedzą
Instrukcje kamera Easypix

10 Października 2024
2 Października 2024
28 Września 2024
24 Września 2024
13 Września 2024
12 Września 2024
10 Września 2024
7 Września 2024
4 Września 2024
4 Września 2024
Instrukcje kamera
Najnowsze instrukcje dla kamera
9 Kwietnia 2025
9 Kwietnia 2025
3 Kwietnia 2025
2 Kwietnia 2025
1 Kwietnia 2025
29 Marca 2025
29 Marca 2025
27 Marca 2025
27 Marca 2025
27 Marca 2025