Instrukcja obsługi Eberle FITnp 3R
Przeczytaj poniżej 📖 instrukcję obsługi w języku polskim dla Eberle FITnp 3R (2 stron) w kategorii termostat. Ta instrukcja była pomocna dla 25 osób i została oceniona przez 9 użytkowników na średnio 4.3 gwiazdek
Strona 1/2
User and
installation guide
Room Temperature Controller
FITnp 3R
468931003758-3
1 Principle of operation
The temperature controller FITnp 3R makes it very easy to
change over between comfort- and set-back temperature (one
key press). In addition, via an external timer the temperature
can be set automatically to an ECO-Temperature (e.g. for night
set-back).
After installation the room will be controlled to the comfort-tem-
perature T+. The room temperature will be controlled according
to the temperature measured by the internal or remote sensor.
The Heater will be switched on when the temperature drops
below the current set-point.
2 Installation
Caution!
This device must be installed by a qualified electrician, accor-
ding to the wiring diagram on the device and in compliance
with all applicable safety regulations. Appropriate installation
measures must be taken to achieve the requirements of pro-
tection class II. This device, is used to control the temperature
only in dry rooms, under normal environmental conditions.
This electronic device conforms to EN 60730, It is an “inde-
pendently mounted control” and
3 Use
The electronic Room Temperature Controller FITnp 3R can be
used to control the room temperature in conjunction with:
• Thermal actuators for e.g. water based floor heating or
convector heaters
• Oil or Gas heaters
• Circulation pumps
• Heatpumps
• Electric convector heaters, ceiling and storage heating
• Cooling equipment
4 Features
• One line text display for simplified operation
• Back light
• very easy change over between 2 temperatures e.g. Comfort
and Set-Back
• ECO-Input to activate a freely adjustable temperature e.g. night
set-back
• Time limit for manually changed temperature
• Arm chair programming (with display unit removed)
• OFF-Function, Key V to be pressed for 10 sec
• Timer (Party) specific temperature for configurable duration
• Energy consumption display (heating on time * cost) for last 2
days, -week, -month, -year
• Energy cost per hour configurable
• Frost protection
• Range limits for adjusting max and min temperature
• Access protection
• Operating language can be selected
• Control mode PWM or ON/OFF
• Minimum output on/off time and hysteresis configurable for
ON/OFF control
• Valve protection
• Heating or Cooling can be selected.
• Adaptation to valves normally open or normally closed
• Measures the room temperature with the internal sensor or a
remote sensor
Electric connection
Caution: disconnect electric circuit from supply
Connecting according to Wiring Diagram
For flexible or solid wires 1 - 2,5mm
2
Remote sensor F 190 021 (as accessory)
8. ECO-Input
2
Via the ECO-Input the room temperature can be controlled to
an energy saving temperature (e.g. via an external timer). The
temperature can be changed by using + – keys (display then T*).
This mode will be indicated on the screen as „ECO“.
The used temperature can be pre-set in menu H7.
Via key T+/T- a change over between the temperatures T+, T-,
ECO
will be possible.
If ECO input becomes in-active, T+ will be activated.
Note: TIMER will not be cancelled, ECO will be delayed accor-
dingly.
Notes for adjustment
• Activated settings terminate automatically 3 Min after the last
key press, without saving. They return to the mode which was
active before entering the settings, e.g. T+, T-, T*, ECO
• Entering a Code: change value with + – key then press OK
• When going through User- or Installer settings the item
number used in the manual will be displayed, e.g. G1 for „T+
Setting“ or H2 for „Control Mode“.
• There may be gaps in the sequence of menu numbers.
Troubleshooting
1. The controller does not accept any changes
Is access protection switched on? see G6
2. The range of temperature setting is limited.
Are temperature limits set? See G7
3. Temperature display doesn‘t change.
Is display of set-temperature activated? See G10
Connecting the remote sensor
F 193 720 or F190 021 (optional)
In order to measure the room temperature, instead of the internal
sensor an external one can be used.
Remote or internal sensor selection can be made via menu item
H1.
Lay sensor inside a protective tube (simplifies replacement). The
sensor lead can be extended up to 50 m by using a cable and con-
nections suitable for 230 V. Avoid laying sensor cable alongside
power cables, for example inside a conduit.
Caution!
The sensor is at mains voltage.
6 Technical Data
Order TypeFITnp 3R
Supply voltage230 V AC 50 HZ (195…253 V)
Temperature setting range5 °C ... 30 °C; in 0,5 °C steps
Temperature resolution 0,1 °C steps
OutputRelay NO contact
Switching current10mA .10(4)A AC; 230 V~
Output signal PWM (Pulse Width modula-
tion) or ON/OFF
PWM cycle timeadjustable
Hysteresis adjustable (ON/OFF only)
ECO-Inpute.g. for night set-back via
external clock (230V Input),
can be extended up to 50 m.
Power consumption ~ 1,2 W
Remote sensor (optional)F 193 720, length 4 m,
F 190 021.
Both can be
extended up to 50 m.
Ambient temperature
Operating
Storage
without condensation
0 °C … 40 °C
–20 °C … 70 °C
Rated impulse voltage4 kV
Ball pressure test temperature75 ± 2°C
Voltage and Current for the
purposes of Interference mea-
surements
230 V, 0,1A
Degree of protectionIP 30
Protection class of housingII (see Caution)
Pollution degree2
Software classA
Weight~ 100 g
Energy classIV = 2%
(acc. EU 811/2013, 812/2013, 813/2013, 814/2013)
7 Wiring Diagram / Dimensions
ECO
Sensor
ECO
LNN
230V~ 50Hz
L
N
Last /
Load
Remote sensor F 193 720 (as accessory)
20
Ø7,8
Caution!
Maximum length
of removed cable
insulation 8 mm.
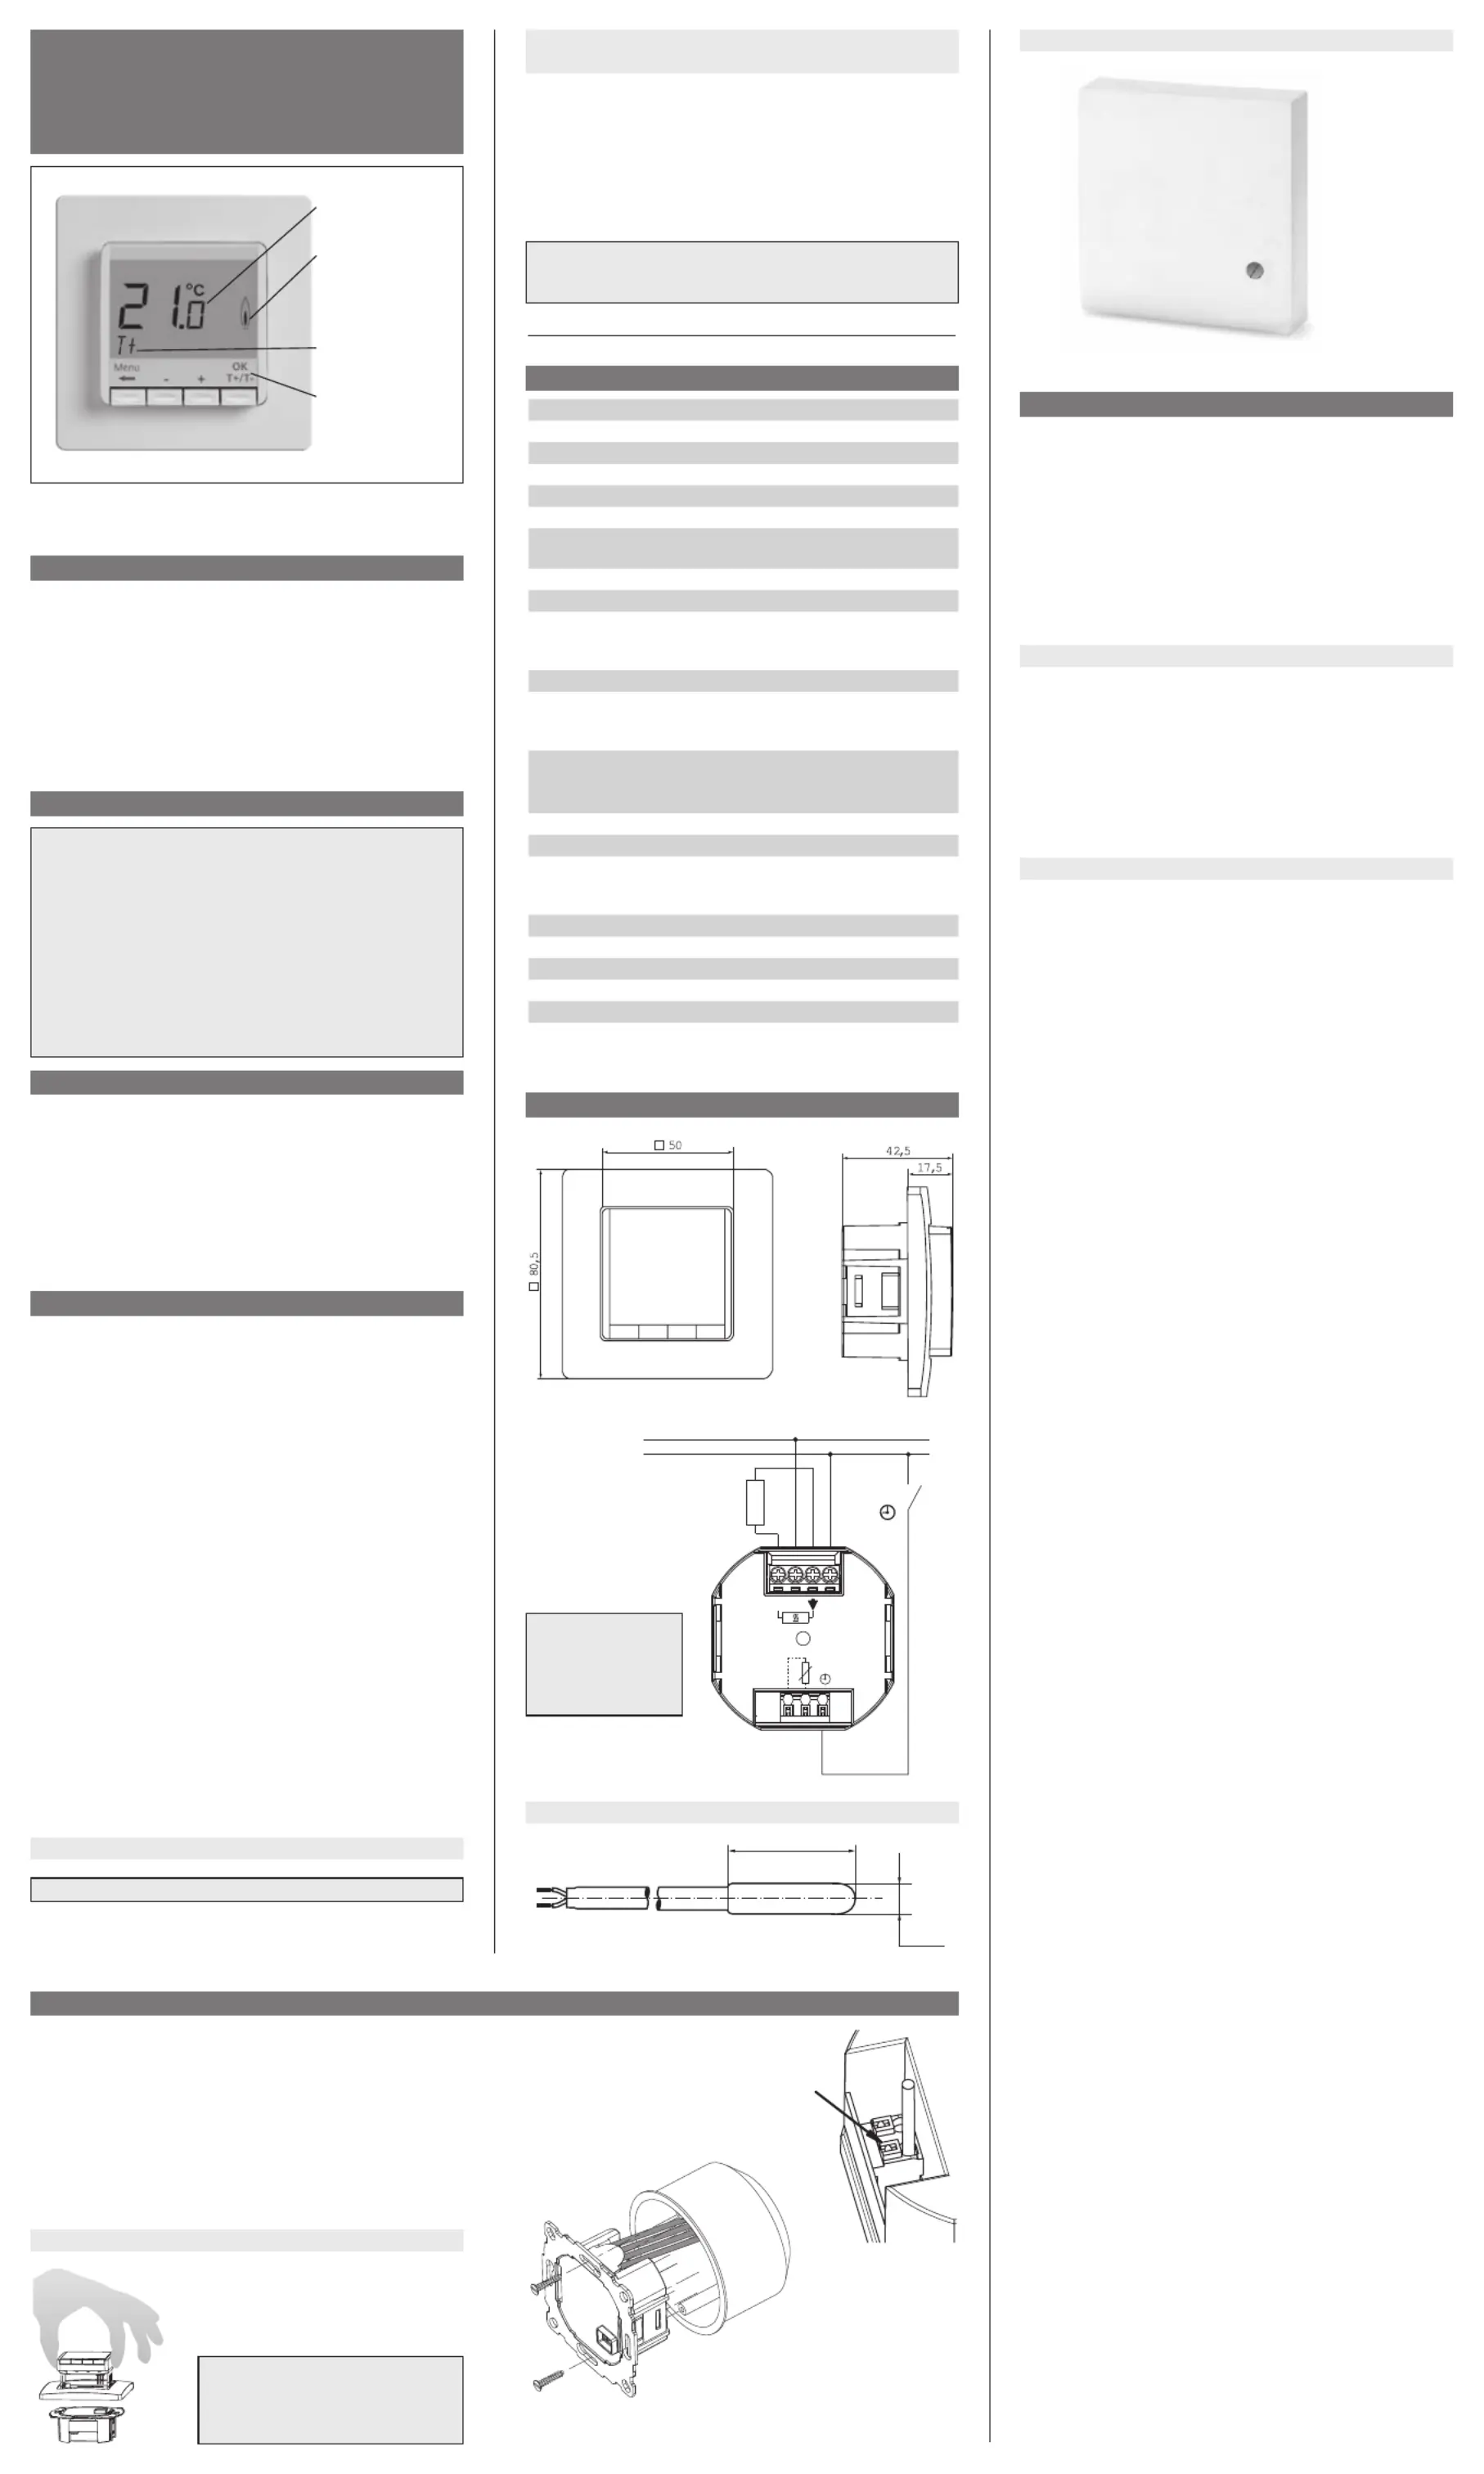
Actual Room
Temperature
Calling for Heat
(Blinks if detached
from power module
or there is no mains
power)
Mode T+ = Comfort-
Temperature
T+ = Comfort-Temp.
T - = Set-Back-Temp.
OK = Accept
The controller should be mounted at a location in the room
which:
• can be easily accessed
• is free of curtains, cabinets, shelves, etc.
• allows free air circulation
• is not exposed to direct sunlight
• is not draughty (when doors or windows are opened)
• is not directly influenced by the source of heat/cooling
• is not located on an outer wall
• is approx. 1.5 m above the floor.
Fitting
in a conduit box Ø 60 mm
• remove the display unit
• remove the frame
• Mount it following the reverse
procedure
Caution!
Mounting in plastic wall boxes
only
To insert or remove a flexible
wire press pin.
The plastic tab must be in place to provide insulation between
the terminals/wires and the mounting screw.
5. Mounting
Specyfikacje produktu
| Marka: | Eberle |
| Kategoria: | termostat |
| Model: | FITnp 3R |
Potrzebujesz pomocy?
Jeśli potrzebujesz pomocy z Eberle FITnp 3R, zadaj pytanie poniżej, a inni użytkownicy Ci odpowiedzą
Instrukcje termostat Eberle

5 Kwietnia 2025
4 Kwietnia 2025
31 Marca 2025
31 Marca 2025
31 Marca 2025
11 Marca 2025
9 Marca 2025
5 Marca 2025
31 Stycznia 2025
11 Stycznia 2025
Instrukcje termostat
Najnowsze instrukcje dla termostat
9 Kwietnia 2025
9 Kwietnia 2025
8 Kwietnia 2025
8 Kwietnia 2025
7 Kwietnia 2025
7 Kwietnia 2025
6 Kwietnia 2025
6 Kwietnia 2025
5 Kwietnia 2025
5 Kwietnia 2025