Instrukcja obsługi Focal Hip Evo stand
Przeczytaj poniżej 📖 instrukcję obsługi w języku polskim dla Focal Hip Evo stand (3 stron) w kategorii głośnik. Ta instrukcja była pomocna dla 9 osób i została oceniona przez 5 użytkowników na średnio 4.3 gwiazdek
Strona 1/3

Hip EVO
Notice Pied Hip Evo, User guide Pied Hip Evo, Gebrauchsanleitung Hip Evo Standfuß,
Istruzioni Piede Hip Evo, Instrucciones Pie Hip Evo, Instruções do Suporte Hip Evo, Gebruiksaanwijzing voetsteun Hip Evo,
Инструкция к подставке Hip Evo, Hip Evo , Hip Evo , Hip Evo , Hip Evo 底座说明书 법적고지 スタンド取扱説明書 عليمات حول أرجل
4
3
1
3
2
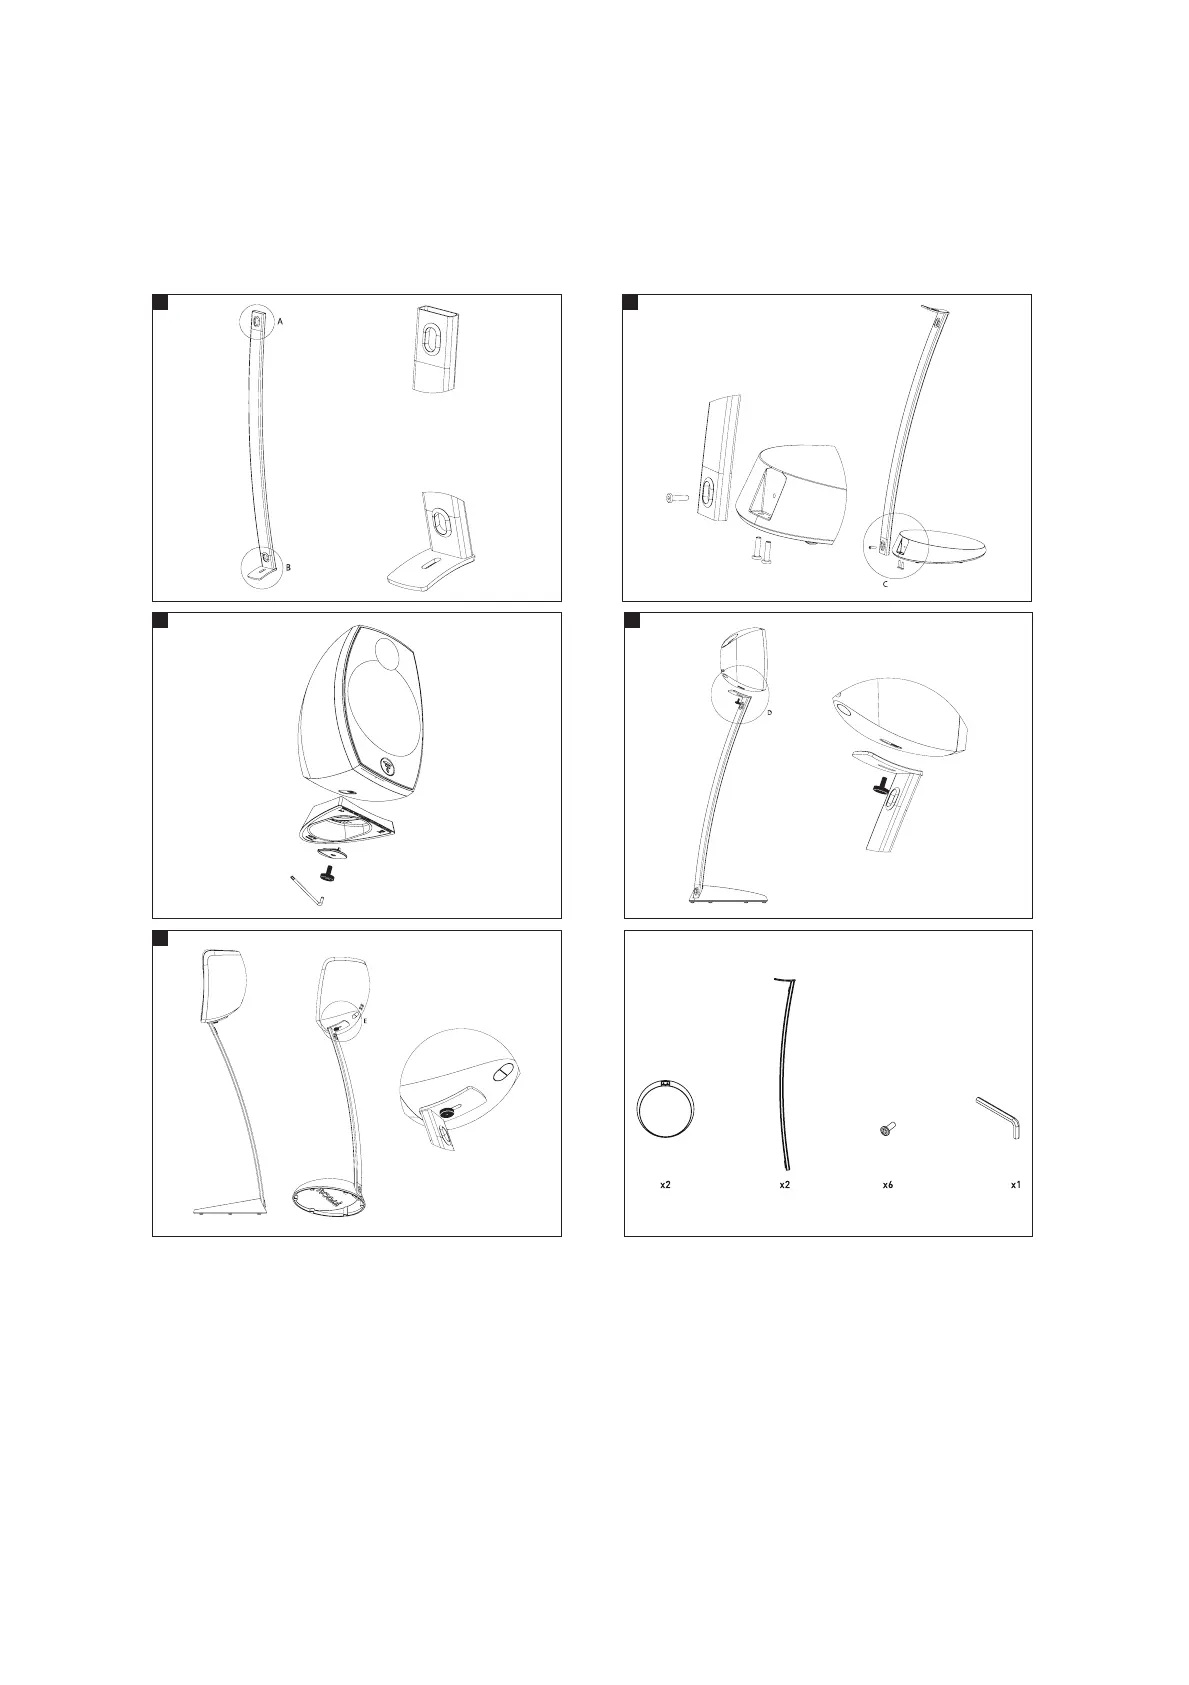
Accessoires / Accessories
FR 1 Passez le câble dans le tube du point A au point B et gardez une longueur susante de fil pour connecter l’enceinte.
Pour fixer le tube sur la base, visser d’abord les 2 vis dessous, puis la vis devant le tube. Serrez ensuite les 3 vis.2
3 Pour positionner l’enceinte Sib Evo sur le pied Hip, dévissez la vis située sous la base, puis placez l’enceinte sur le pied et revissez l’ensemble.
4 La position certifiée par Dolby pour placer l’enceinte Dolby Atmos est spécifiée sur la figure E. L’angle de l’enceinte
peut être modifié selon votre position d’écoute pour améliorer les eets sonores.
GB 1 Route the cable through the tubing from point A to point B, while keeping enough cable to connect the loudspeaker.
2 To fix the tube to the base, first insert the two bottom screws, then insert the screw on the front of the tube.
Then, tighten all three screws.
3 Position your Sib Evo loudspeaker on the Hip stand, unscrew the screw situated underneath the base, place the
loudspeaker on the stand, then tighten the screw to secure in place.
4 The position certified by Dolby for placing the Dolby Atmos loudspeaker is specified in figure E. The angle of the
loudspeaker can be adjusted to improve the sound eects depending on your listening point.
DE 1 Ziehen Sie das Kabel von Punkt A nach Punkt B durch das Rohr und achten Sie darauf, dass es lange genug ist, um
den Lautsprecher anzuschließen.
2 Fixieren Sie das Rohr am Sockel, indem Sie erst die beiden Schrauben an der Unterseite einschrauben und
anschließend die Schraube an der Vorderseite des Rohrs hineindrehen. Nun alle 3 Schrauben festziehen.
3 Um den Sib Evo Lautsprecher auf dem Hip Standfuß zu befestigen, lösen Sie erst die Schraube an der Unterseite
seiner Basis, stellen den Lautsprecher auf den Standfuß und schrauben die Teile anschließend zusammen.
4 Die von Dolby zertifizierte Position zur Aufstellung des Dolby Atmos ist in Abbildung E angegeben. Der
Lautsprecherwinkel kann entsprechend Ihrer Hörposition verändert werden, um das Klangbild zu optimieren.

Focal-JMlab® - BP 374 - 108, rue de l'Avenir - 42353 La Talaudière cedex - France - www.focal.com
Tel. (+33) 04 77 43 57 00 - Fax (+33) 04 77 43 57 04 - SCAB-170214/2 - CODO1513
Hip EVO
Due to constant technological advances, Focal-JMlab
® reserves its right to modify specifications without notice.Images may not conform exactly to specific product.
Dans un but d’évolution, Focal-JMlab® se réserve le droit de modifier les spécifications techniques; Photos non contractuelles.
AR B A
2
E Dolby 4
Hip 3
iT 1 Passare il cavo nel tubo dal punto A al punto B e mantenere una lunghezza di filo suciente per collegare l’altoparlante.
2 Per fissare il tubo sulla base, prima di tutto avvitare le 2 viti sotto, poi la vite davanti al tubo. Quindi stringere le 3 viti.
3 Per posizionare l’altoparlante Sib Evo sul piede Hip, svitare la vite situata sotto la base, quindi posizionare l’altoparlante
sul piede e avvitare il tutto.
4 La posizione certificata da Dolby per posizionare l’altoparlante Dolby Atmos è specificata nella figura E. L’angolo
dell’altoparlante può essere modificato a seconda della vostra posizione di ascolto, per migliorare gli eetti sonori.
ES 1 Pase el cable por dentro del tubo, desde el punto A hasta el punto B, dejando suficiente longitud de cable para
conectar el bafle.
2 Para fijar el tubo a la base, atornille antes los 2 pernos inferiores y después, el tornillo delante del tubo. A continuación,
apriete los 3 tornillos.
3 Para situar el bafle Sib Evo sobre el pie Hip, desatornille el perno situado bajo la base y a continuación coloque el
bafle sobre el pie y vuelva a atornillar el conjunto.
4 La posición certificada por Dolby para situar el bafle Dolby Atmos se especifica en la figura E. El ángulo del bafle
puede modificarse según su posición de escucha, para mejorar el efecto sonoro.
pT 1 Passe o cabo por dentro do tubo desde o ponto A até o ponto B e mantenha um comprimento suficiente de fio para
conectar a coluna de som.
2 Para fixar o tubo sobre a base, primeiro aperte os 2 parafusos em baixo e em seguida o parafuso na frente do tubo.
Em seguida aperte os 3 parafusos.
3 Para posicionar a coluna Sib Evo sobre o pé Hip, desaperte o parafuso situado sob a base, em seguida coloque a
coluna sobre o pé e aparafuse de novo o conjunto.
4 A posição certificada pela Dolby para colocar a coluna de som Dolby Atmos é especificada na Figura E. O ângulo
da coluna pode ser modificado consoante sua posição de escuta para melhorar os efeitos sonoros.
NL 1 Steek de kabel in de buis van punt A naar punt B. Houd een voldoende lange draad over om de luidsprekerbox aan te sluiten.
2 Om de buis vast te zetten op de basis schroeft u eerst de 2 schroeven onderaan erin en vervolgens de schroef voor
de buis. Draai vervolgens de 3 schroeven vast.
3 Om de Sib Evo luidsprekerbox op de Hip-voet te plaatsen, draait u de schroef onder de basis los, vervolgens plaatst
u de luidsprekerbox en draait u het geheel opnieuw vast.
4 De door Dolby gecertificeerde plaats om de Dolby Atmos luidsprekerbox te installeren, wordt gespecificeerd in
figuur E. Voor betere geluidseecten kan de hoek van de luidsprekerbox gewijzigd worden naargelang de positie
van waaruit u luistert.
RU 1 Пропустите кабель через трубку из точки A в точку B и оставьте достаточный запас длины для подключения колонки.
2 Чтобы прикрепить трубку к основанию, сначала закрутите 2винта снизу, затем винт перед трубкой. После
этого зажмите все 3винта.
3 Чтобы разместить колонку Sib Evo на подставке Hip, открутите винт под основанием, затем поместите колонку
на подставку и закрутите конструкцию обратно.
4 Позиция, сертифицированная Dolby для размещения колонки Dolby Atmos, представлена на изображенииE. Угол
наклона колонки можно изменять в зависимости от места прослушивания для улучшения звуковых эффектов.
CH 1 将电缆从管子的A点穿入至B点,导线必须预留足够的长度以便连接音箱。
2 将管子固定在底座上时,请先拧紧下面的2个螺钉后再拧紧管子前的螺钉。然后拧紧3个螺钉。
3 将Sib Evo音箱放置在Hip底座上时,请先拧下底座下的螺钉,然后将音箱放在底座上,最后再拧紧全部的螺钉。
4 图E说明Dolby认证的Dolby Atmos摆设位置。音箱的角度可以根据您的听音位置改变,以便获得更好的音效。
KO 1
2
3
4
Jp 1 スピーカを接続するのに十分な長さを残した上で、チューブのA点からB点にケーブルを通します。
2まず下部のネジ2本、次にチューブ前面のネジ1本でチューブを土台に固定します。
3 Sib Evo スピーカーを Hip スタンドに設置するには、土台の下部にあるネジ1本を外してからスピーカーをスタンドに載せ、全体を再
びネジで固定します。
4 Dolby の認定する Dolby Atmos スピーカーの設置ポジションは図Eに示す通りです。音響効果を向上させるために、リスニングポ
ジションによりスピーカーの角度を変えてもかまいません。
Specyfikacje produktu
Marka: | Focal |
Kategoria: | głośnik |
Model: | Hip Evo stand |
Potrzebujesz pomocy?
Jeśli potrzebujesz pomocy z Focal Hip Evo stand, zadaj pytanie poniżej, a inni użytkownicy Ci odpowiedzą
Instrukcje głośnik Focal
5 Kwietnia 2025
28 Grudnia 2024
7 Października 2024
7 Października 2024
4 Października 2024
3 Października 2024
3 Października 2024
3 Października 2024
29 Września 2024
29 Września 2024
Instrukcje głośnik
- głośnik GMB Audio
- głośnik Cygnett
- głośnik Edifier
- głośnik TV Ears
- głośnik Monster
- głośnik Cabasse
- głośnik SunBriteTV
- głośnik Bearware
- głośnik Bush
- głośnik Easypix
- głośnik Xiron
- głośnik Logik
- głośnik Potter
- głośnik Tascam
- głośnik Silvergear
Najnowsze instrukcje dla głośnik
8 Kwietnia 2025
8 Kwietnia 2025
8 Kwietnia 2025
7 Kwietnia 2025
7 Kwietnia 2025
7 Kwietnia 2025
3 Kwietnia 2025
3 Kwietnia 2025
3 Kwietnia 2025
3 Kwietnia 2025