Instrukcja obsługi Hooker 5820-75206-84
Przeczytaj poniżej 📖 instrukcję obsługi w języku polskim dla Hooker 5820-75206-84 (3 stron) w kategorii Tabela. Ta instrukcja była pomocna dla 8 osób i została oceniona przez 4.5 użytkowników na średnio 4.5 gwiazdek
Strona 1/3

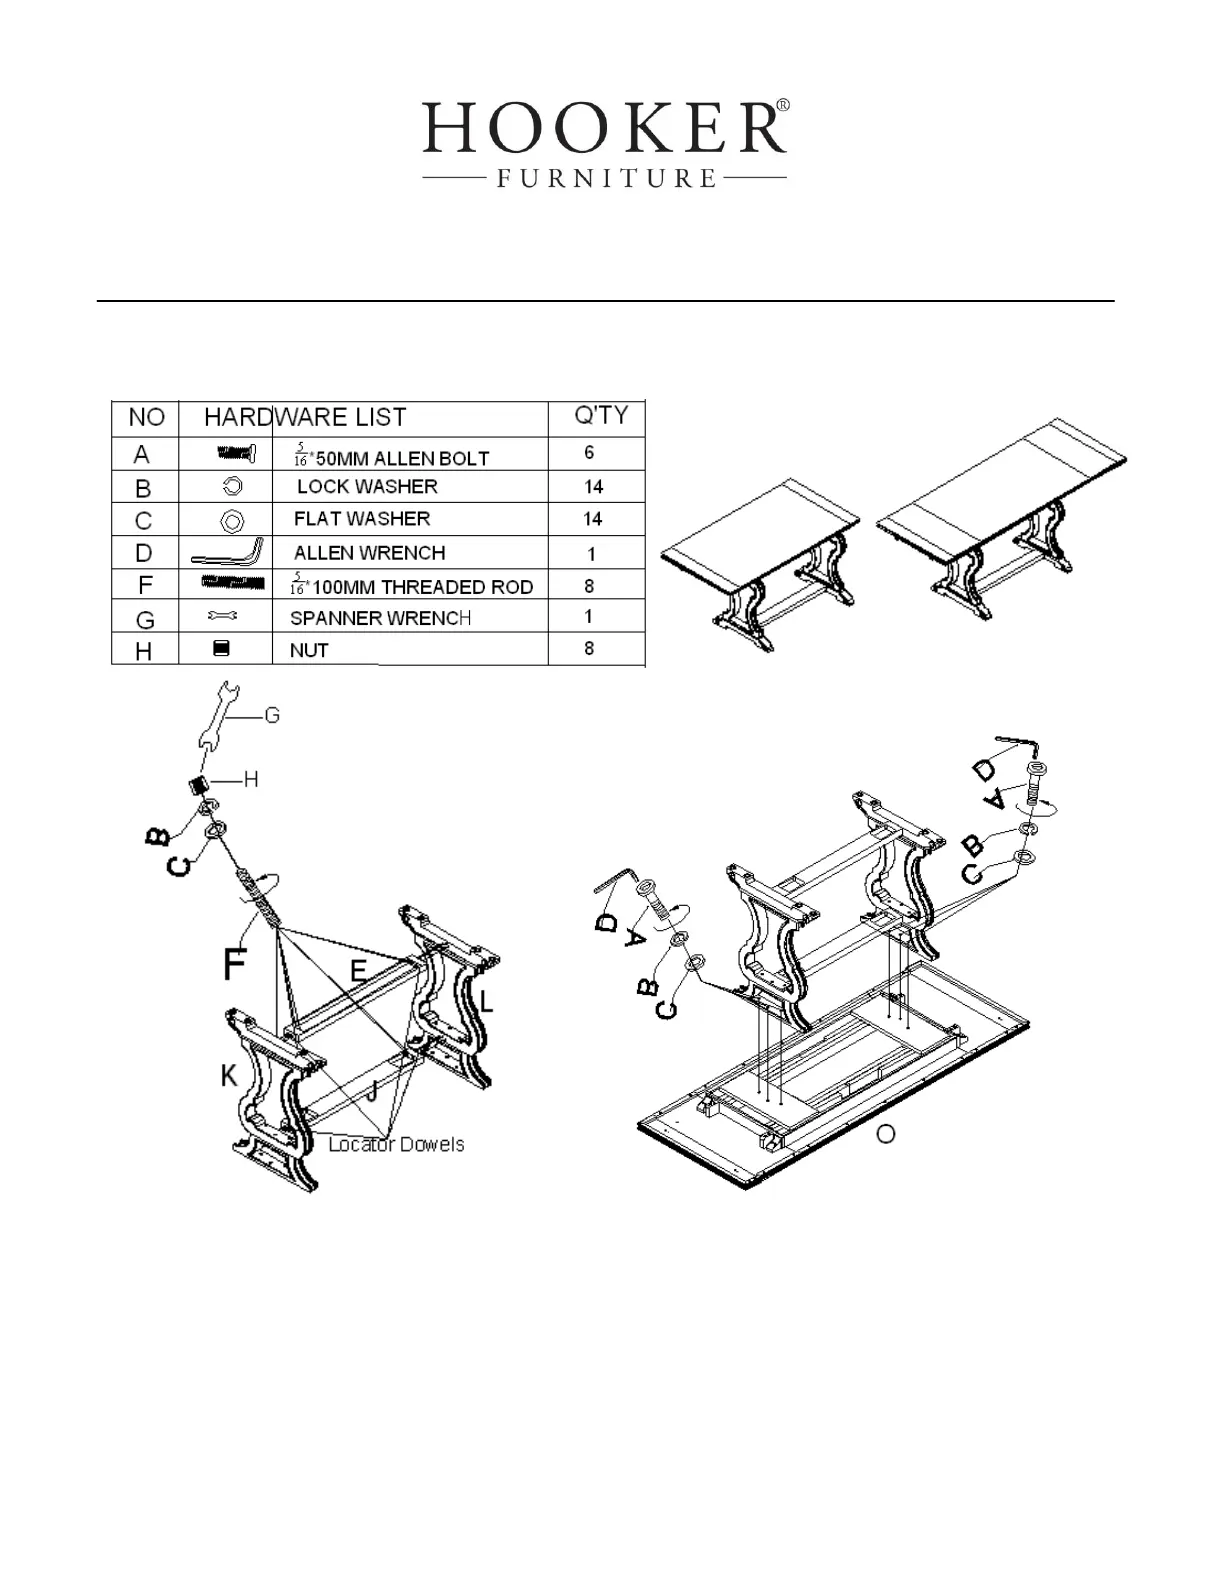
ASSEMBLY INSTRUCTION
Item#:5820- 6- Friendship Table 7520 84
** Please make sure you have all parts indicated below prior to assembly.
This table is heavy and can best be assembled with the help of two or more people.
Diagram 1 Diagram 2
Note:
1. Leaves cannot be switchable. Follow numbers on leaves and top when assemble
2. Height of this table can be adjusted with or without extension block. (30” and 36” heights)
3.Please follow numbers on the side frames and letters on the top & bottom stretcher during
assembly.
1/3

2/3
Assembly steps with extension blocks:
1. Put two side frames & L) upside down on a soft surface to prevent it from being scratched. (K
2. her Place the ends of top stretc (J) bottom stretcher (E) into side frames ( K&L ) make & to
sure all pre-drilled holes are in alignment , first insert bolts (F), flat washers (C) and lock
washers (B), ts (H), tighten bolts by turning with spanner wrench (G) to assemble the top nu
stretcher (J) (See Diagram 1).
3. Then insert bolts (F), flat washers (C) and lock washers (B), nuts (H), tighten bolts by turning
with spanner wrench (G) to assemble the bottom stretcher (E) (See Diagram 1).
4. Place table top (O) upside down on a soft surface to prevent it from being scratched.
Put whole base onto top to make sure all pre-drilled holes are in alignment, well insert
bolts (A), lock washers (B) and flat washers (C), tighten bolts by turning with allen
wrench (D) in clockwise direction (See Diagram 2).
Assembly steps without extension blocks:
Diagram 3 Diagram 4
4.Unscrew bolts (E), lock washers (B) and flat washers (C and remove the extension blocks from )
the side frames ( ) K&L (See Diagram 3).
5.Place table top (O) upside down on a soft surface to prevent it from being scratched. Put
whole base onto top to make sure all pre-drilled holes are in alignment, well insert bolts
(E lock washers (B) and flat washers (C), tighten bolts by turning with allen wrench (D) i), n
clockwise direction (See Diagram 4).
6. Turn table upright.

Instruction for table leaves:
1. There are latches at the bottom of table top, turn o the latches as shown in Diagram 5. ff
2. Pull out table top as the arrow direction shown in Diagram 6.
3. Place table leaves between and push table tops together.
4. Turn on latches. (see Diagram 5)
5.Take opposite actions to remove table leaves.
Diagram 5
Diagram 6
Cleaning Instruction: Clean finished parts with a damp cloth using a mild dishwashing liquid and water solution.
Polish the finish with soft cloth and an industry recognized furniture polish.
3/3
Specyfikacje produktu
Marka: | Hooker |
Kategoria: | Tabela |
Model: | 5820-75206-84 |
Potrzebujesz pomocy?
Jeśli potrzebujesz pomocy z Hooker 5820-75206-84, zadaj pytanie poniżej, a inni użytkownicy Ci odpowiedzą
Instrukcje Tabela Hooker
30 Września 2024
30 Września 2024
30 Września 2024
30 Września 2024
30 Września 2024
30 Września 2024
30 Września 2024
30 Września 2024
30 Września 2024
30 Września 2024
Instrukcje Tabela
- Tabela Interstuhl
- Tabela Talgø
- Tabela BoConcept
- Tabela Allibert
- Tabela MooreCo
- Tabela Florabest
- Tabela Klarfit
- Tabela Melinera
- Tabela Boori
- Tabela Mio
- Tabela Powerfix
- Tabela Livarno Lux
- Tabela Saro
- Tabela Campart Travel
- Tabela Home Trends & Design
Najnowsze instrukcje dla Tabela
9 Kwietnia 2025
3 Kwietnia 2025
3 Kwietnia 2025
1 Kwietnia 2025
1 Kwietnia 2025
1 Kwietnia 2025
1 Kwietnia 2025
31 Marca 2025
13 Marca 2025
13 Marca 2025