Instrukcja obsługi Intermatic DT620
Intermatic przełącznik DT620
Przeczytaj poniżej 📖 instrukcję obsługi w języku polskim dla Intermatic DT620 (4 stron) w kategorii przełącznik. Ta instrukcja była pomocna dla 19 osób i została oceniona przez 6 użytkowników na średnio 4.7 gwiazdek
Strona 1/4
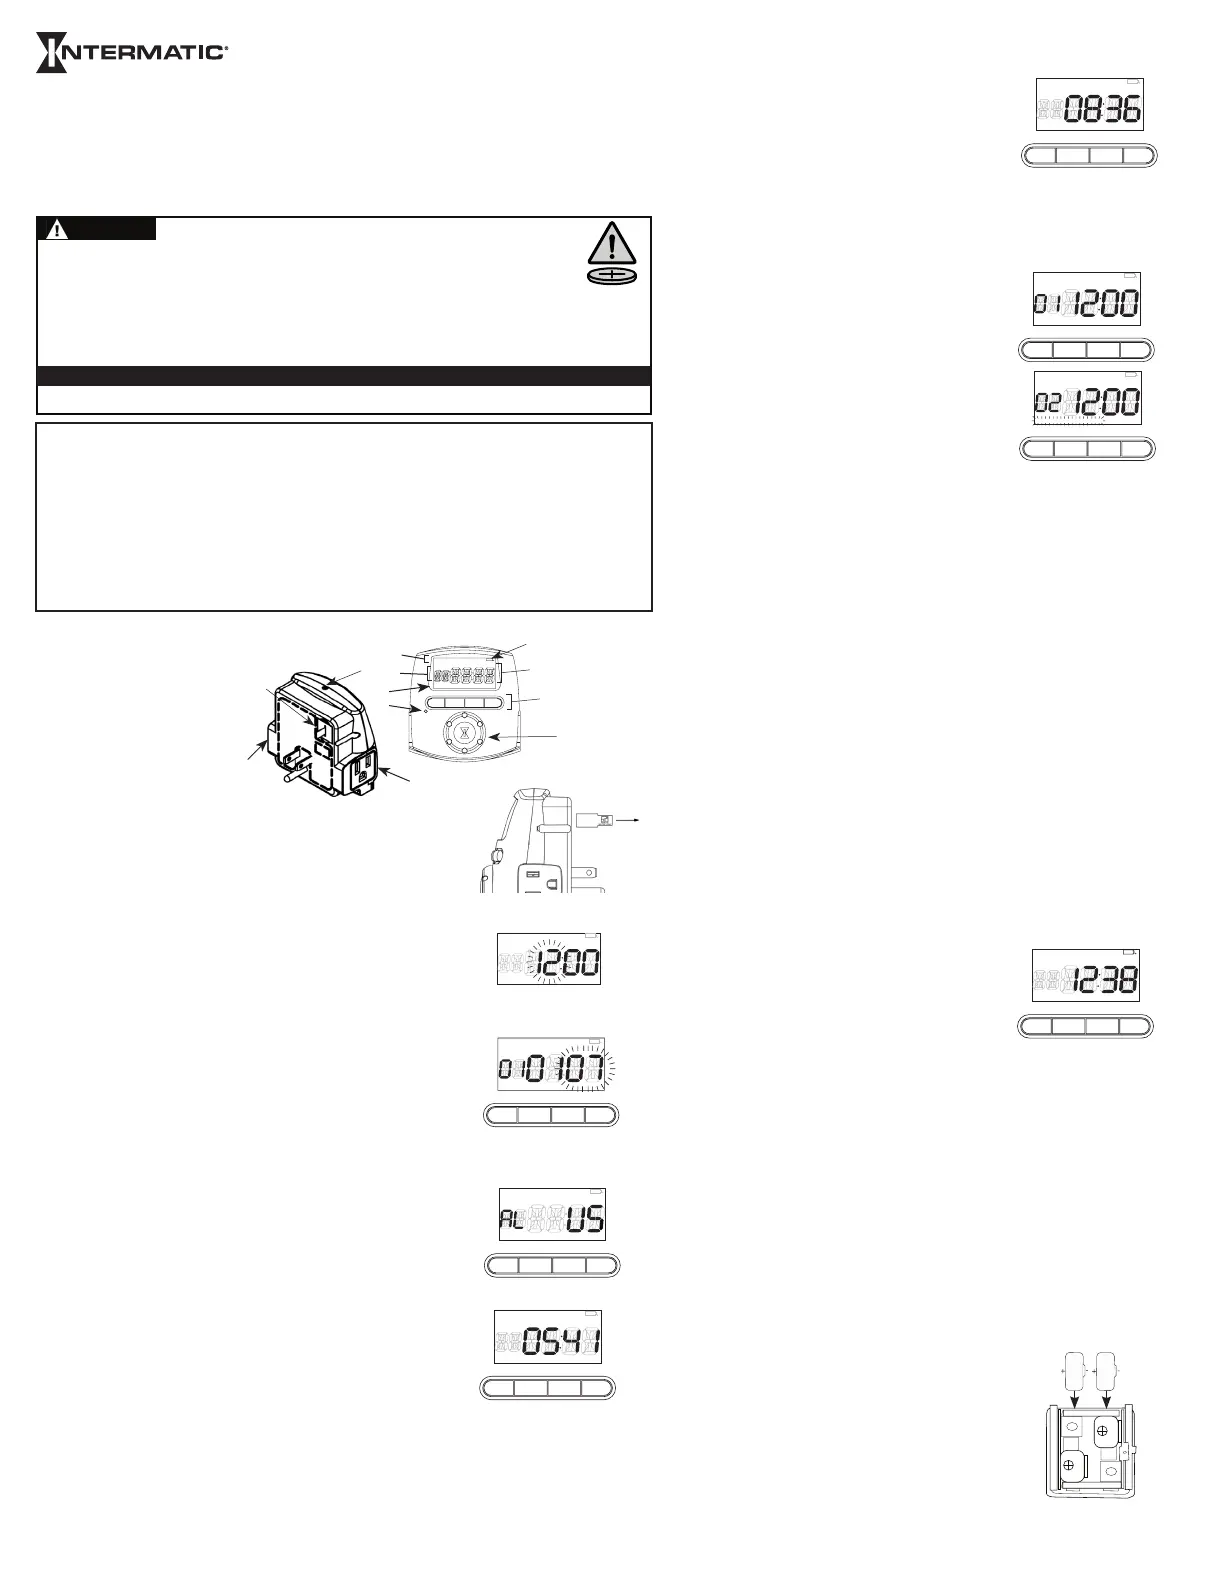
Fig. 1
L
ON
DAYSAVMANAUTORANDCLOCK
YEARDATE
MONTH
SKIP
EVENT
MOTUWETHFRSASUAMPM
OFFLOCDUSKDAWN
OKMODEPROGON/OFF
ON
DAYSAVMANAUTORANDCLOCK
YEARDATE
MONTH
SKIP
EVENT
MOTUWETHFRSASUAMPM
OFFLOCDUSKDAWN
OKMODEPROGON/OFF
ON
DAYSAVMANAUTORANDCLOCK
YEARDATE
MONTH
SKIP
EVENT
MOTUWETHFRSASUAMPM
OFFLOCDUSKDAWN
OKMODEPROGON/OFF
ON
DAYSAVMANAUTORANDCLOCK
YEARDATE
MONTH
SKIP
EVENT
MOTUWETHFRSASUAMPM
OFFLOCDUSKDAWN
OKMODEPROGON/OFF
ON
DAYSAVMANAUTORANDCLOCK
YEARDATE
MONTH
SKIP
EVENT
MOTUWETHFRSASUAMPM
OFFLOCDUSKDAWN
OKMODEPROGON/OFF
11. Turn the knob to change the flashing 11 to the required new month (07-12)
for the autumn adjustment, then press OK.
12. Turn the knob to change the flashing 01 to the required
new week (01-02-03-04-L)
for the autumn adjustment, then press OK. LOC shows
at top of display. (Fig. 3)
13. Turn the knob to select the desired state or province
(if in Canada) or MEX for Mexico and press OK.
14. Turn the knob to select the region of the state or province and press OK.
15. Turn the knob to select the time zone and press OK. The Dawn time
flashes.
16. Turn the knob to adjust the Dawn Time, (Fig. 5) if necessary and
press OK.
17. Turn the knob to adjust the Dusk Time, (Fig. 6) if necessary and
press Ok. Display shows MAN, and Time of Day.
Programming Dusk ON/Dawn OFF
1. From the MAN, AUTO,or RAND screen, press PROG.
The screen displays a flashing 01. (Fig. 7)
2. Press PROG again.
3. Turn the selector knob until a flashing ON and DUSK
appears at the
top of the screen then press PROG.
4. Turn the knob to select the required days of the week
that you want the DUSK ON event to occur. (Fig. 8)
5. Press PROG twice. The screen displays EVENT 02 and
flashing text at top.
6. Turn the knob until a flashing OFF and DAWN appears
on the screen and press PROG.
7. Turn the knob to select the required days of the week for the DAWN OFF to
occur and press PROG.
8. Press OK to save the programming and return to the AUTO screen.
To Set a Dusk ON and Fixed Time OFF Program:
1. From the MAN, AUTO or RAND screen, press PROG. The screen displays a
flashing 01. Press PROG again.
2. Turn selector knob until a flashing ON and DUSK appears. Press PROG.
3. Turn the knob to select the required days for the DUSK ON event and press
PROG. The screen displays a flashing 02. Press PROG.
4. Turn the knob until OFF flashes and 12:00 AM appears then press PROG.
5. Turn the knob to select the desired days of the week for the Fixed Time
OFF event and press PROG.
6. Turn the knob to select the desired OFF hour and press PROG.
7 Turn the knob to select the desired OFF minute and press PROG.
8. Press OK to return to the AUTO screen.
To Set a Fixed Time ON and Fixed Time OFF Program
1. From the MAN, AUTO or RAND screen, press PROG. The screen displays a
flashing 01. Press PROG.
2. Turn the knob until ON flashes and 12:00 AM appears. Press PROG.
3. Turn the knob to select the required days for the fixed time ON and press PROG.
4. Turn the knob to select the desired ON hour and press PROG.
5. Turn the knob to select the desired ON minute and press PROG. The
screen displays a flashing 02. Press PROG again.
6. Turn the knob until OFF flashes and 12:00 AM appears and press PROG.
7. Turn the knob to select the desired days of the week for the fixed time OFF
to occur and press PROG.
8. Turn the knob to select the desired OFF hour and press PROG.
9. Turn the knob to select the desired OFF minute and press PROG.
10. Repeat steps 2-12 for additional (higher numbered) ON/OFF events or
press OK to return to the AUTO screen.
To Review/Revise Calendar Settings
1. Press MODE repeatedly until CLOCK is displayed.
2. Press OK repeatedly to step through all settings until Time of Day and MAN
is displayed.
3. Use selector knob to revise and OK button to save changes.
4. Use MODE button to select MAN, AUTO or RAND operation.
To Review/Revise ON/OFF Settings
1. Press PROG button.
2. Turn selected knob to view all 28 possible settings.
3. Revise per setting procedure.
4. Press OK to return to AUTO mode.
5. Use MODE button to select MAN, AUTO,or RAND operation.
Select Operating Mode
1. PRESS MODE button to select:
a. AUTO (Timer follows your program)
b. RAND (Timer follows your program with daily RANDOM variations in
ON/OFF times.
c. MAN (Timer saves but ignores your program. Use ON/OFF to switch the load).
About the Batteries
The battery voltage is continuously monitored. If a low
voltage is detected, the low battery indicator will be dis-
played. (Fig. 9).
• The timer requires two LR44 batteries to keep time
up to three months without power.
• Replace the batteries as soon possible after the low battery indicator appears.
• Change the batteries within one minute of unplugging in order to keep the time
and date settings. Afterwards, if the display is wrong or flashes “12:00 AM”,
reset the time and date.All other settings (your ON and OFF programming) remain
in memory indefinitely without battery or AC power.
• While the batteries are removed, the timer will turn off the display to conserve
power.
• Dispose of the used batteries promptly according to local
regulations. Keep batteries away from children.
Replacing the Batteries
• Unplug timer before replacing batteries.
To remove the batteries, carefully pry the battery holder up
with a small flat screwdriver. Install the new batteries as
shown in Fig. 10. Firmly place the battery holder into
the switch.
Fig. 2
Fig. 4
Fig. 5
Fig. 6
Digital Timer
Installation and User Instructions
MODEL DT620 Series
• Input: 102-132 VAC 60 Hz, 2.5W max.
• Output: 15 A output, 1800 W resistive and 12 A inductive, 8.3 A, 1000W tungsten, 1/2 HP
Ratings
• Ingestion Warning:This product contains a button cell or coin battery.
• DEATH or serious injury can occur if ingested.
• A swallowed button cell or coin battery can cause Internal Chemical Burns in as little as 2 hours.
• KEEP new and used batteries OUT OF REACH of CHILDREN
• Seek immediate medical attention if a battery is suspected to be swallowed or inserted inside any part of the body.
• Risk of injury or death. Always plug three-prong plug into a properly grounded outlet. Never attempt to defeat this safety feature.
• Do not use timer to control devices that could have dangerous consequences due to inaccurate timing, such as sun lamps, sauna, heaters,
crock pots, etc.
• Unplug timer before replacing batteries.
WARNING
• Follow local electrical codes during use.
• Dispose of used batteries promptly per local regulations.
Risk of Fire or Electrical Shock
NOTICENOTICE
Timer Overview
ON
DAYSAVMANAUTORANDCLOCK
YEARDATE
MONTH
SKIP
EVENT
MOTUWETHFRSASUAMPM
OFFLOCDUSKDAWN
OKMODEPROGON/OFF
B
C
F
G
H
I
J
D
ItemDescription
A Battery Holder
B Low battery indicator
C Time of Day display
D Control buttons (4)
E Grounded outlet (2)
F Selector knob
G Reset button
H Day of Week display
I Event display
J Mode display
K ON/OFF indicator light
L Battery Pull Tab
Fig. 3
ON
DAYSAVMANAUTORANDCLOCK
YEARDATE
MONTH
SKIP
EVENT
MOTUWETHFRSASUAMPM
OFFLOCDUSKDAWN
Enable Battery
1. Remove Pull Tab (L) (Fig. 1) from battery holder if present.
2. Display shows 12:00. If no display see troubleshooting guide.
3. For your convenience timer may be set while unplugged. Display
turns OFF after 1 minute to save battery. Press any button to turn display back ON.
Clear Out Old Settings
1. Press and hold the ON/OFF button.
2. While holding ON/OFF button, press and release the reset button (G)
with a blunt object. Continue holding ON/OFF button for five seconds
until the display shows “CLR”.
3. Release ON/OFF button. The screen displays 12:00 AM,
with 12 flashing. (Fig. 2) Proceed to step 2 below.
Set The Time, Date and Location
1. If necessary, press MODE to display CLOCK in the top right corner
of the screen, then press OK. Hours digits flash.
2. Turn the selector knob to set the current hour (AM/PM) and press OK.
3. Turn the selector knob to set the current minute and press OK.
4. Turn the knob to set the desired year and press OK. (Fig. 3)
5. Turn the knob to set the desired month and press OK.
6. Turn the knob to set the correct date and press OK. The screen displays
DAY SAV and flashing AUTO (Meaning AUTOmatic DAYlight SAVing Time
adjustment is enabled).
7. To accept AUTO Daylight Saving Time adjustment press OK and
proceed to step 8. To disable Daylight Saving Adjustment (For example, in
Arizona or Hawaii) turn knob to display flashing MAN then press OK. LOC
will show on top of display. (Fig. 4) Proceed to step 13.
8. Steps 8-10 allow you to change the Daylight Saving Time (DST)
adjustment dates. The timer is factory-set to the US Daylight
Saving rules effective from the year 2007 forward. The display will
show ON DAY SAV, flashing 03, and WK 02, meaning timer will adjust
forward on 2nd Sunday in March. Proceed to step 9 if you need to change
the factory settings or press OK repeatedly to accept the factory settings until LOC appears on
top of display and proceed to step 13. (Fig. 4)
9. Turn the knob to change the flashing 03 to the required new month (01-06)
for the spring adjustment, then press OK.
10. Turn the knob to change the flashing 02 to the required new week
(01-02-03-04-L) for the spring adjustment, then press OK. (“L” means
Last week of month).
Fig. 7
ON
DAYSAVMANAUTORANDCLOCK
YEARDATE
MONTH
SKIP
EVENT
MOTUWETHFRSASUAMPM
OFFLOCDUSKDAWN
OKMODEPROGON/OFF
Fig. 9
ON
DAYSAVMANAUTORANDCLOCK
YEARDATE
MONTH
SKIP
EVENT
MOTUWETHFRSASUAMPM
OFFLOCDUSKDAWN
OKMODEPROGON/OFF
Fig. 8
Fig. 10
K
A
E
E
• Remove and immediately recycle or dispose of used batteries according to local regulations and keep away from children. Do NOT
dispose of batteries in household trash or incinerate.
• Even used batteries may cause severe injury or death.
• Replace only with LR44 (1.5 V) Batteries.
• Call a local poison control center for treatment information.
• Non-rechargeable batteries are not to be recharged.
• Do not force discharge, recharge, disassemble, heat above (manufacturer’s specified temperature rating) or incinerate. Doing so may
result in injury due to venting, leakage or explosion resulting in chemical burns.
• Ensure the batteries are installed correctly according to polarity (+ and -).”
• Do not mix old and new batteries, different brands or types of batteries, such as alkaline, carbon-zinc, or rechargeable batteries.
• Remove and immediately recycle or dispose of batteries from equipment not used for an extended period of time according to local
regulations.
• Always completely secure the battery compartment. If the battery compartment does not close securely, stop using the product,
remove the batteries, and keep them away from children.
Specyfikacje produktu
| Marka: | Intermatic |
| Kategoria: | przełącznik |
| Model: | DT620 |
Potrzebujesz pomocy?
Jeśli potrzebujesz pomocy z Intermatic DT620, zadaj pytanie poniżej, a inni użytkownicy Ci odpowiedzą
Instrukcje przełącznik Intermatic

20 Marca 2025
12 Grudnia 2024
12 Grudnia 2024
12 Grudnia 2024
12 Grudnia 2024
12 Grudnia 2024
12 Grudnia 2024
12 Grudnia 2024
12 Grudnia 2024
12 Grudnia 2024
Instrukcje przełącznik
Najnowsze instrukcje dla przełącznik
9 Kwietnia 2025
9 Kwietnia 2025
7 Kwietnia 2025
5 Kwietnia 2025
4 Kwietnia 2025
4 Kwietnia 2025
4 Kwietnia 2025
3 Kwietnia 2025
3 Kwietnia 2025
2 Kwietnia 2025