Instrukcja obsługi Kolink Observatory Y
Kolink Komputerowe przejęcie Observatory Y
Przeczytaj poniżej 📖 instrukcję obsługi w języku polskim dla Kolink Observatory Y (2 stron) w kategorii Komputerowe przejęcie. Ta instrukcja była pomocna dla 26 osób i została oceniona przez 3 użytkowników na średnio 5.0 gwiazdek
Strona 1/2
OBSERVATORY Y
ARGB MIDI TOWER CASE
USER MANUAL
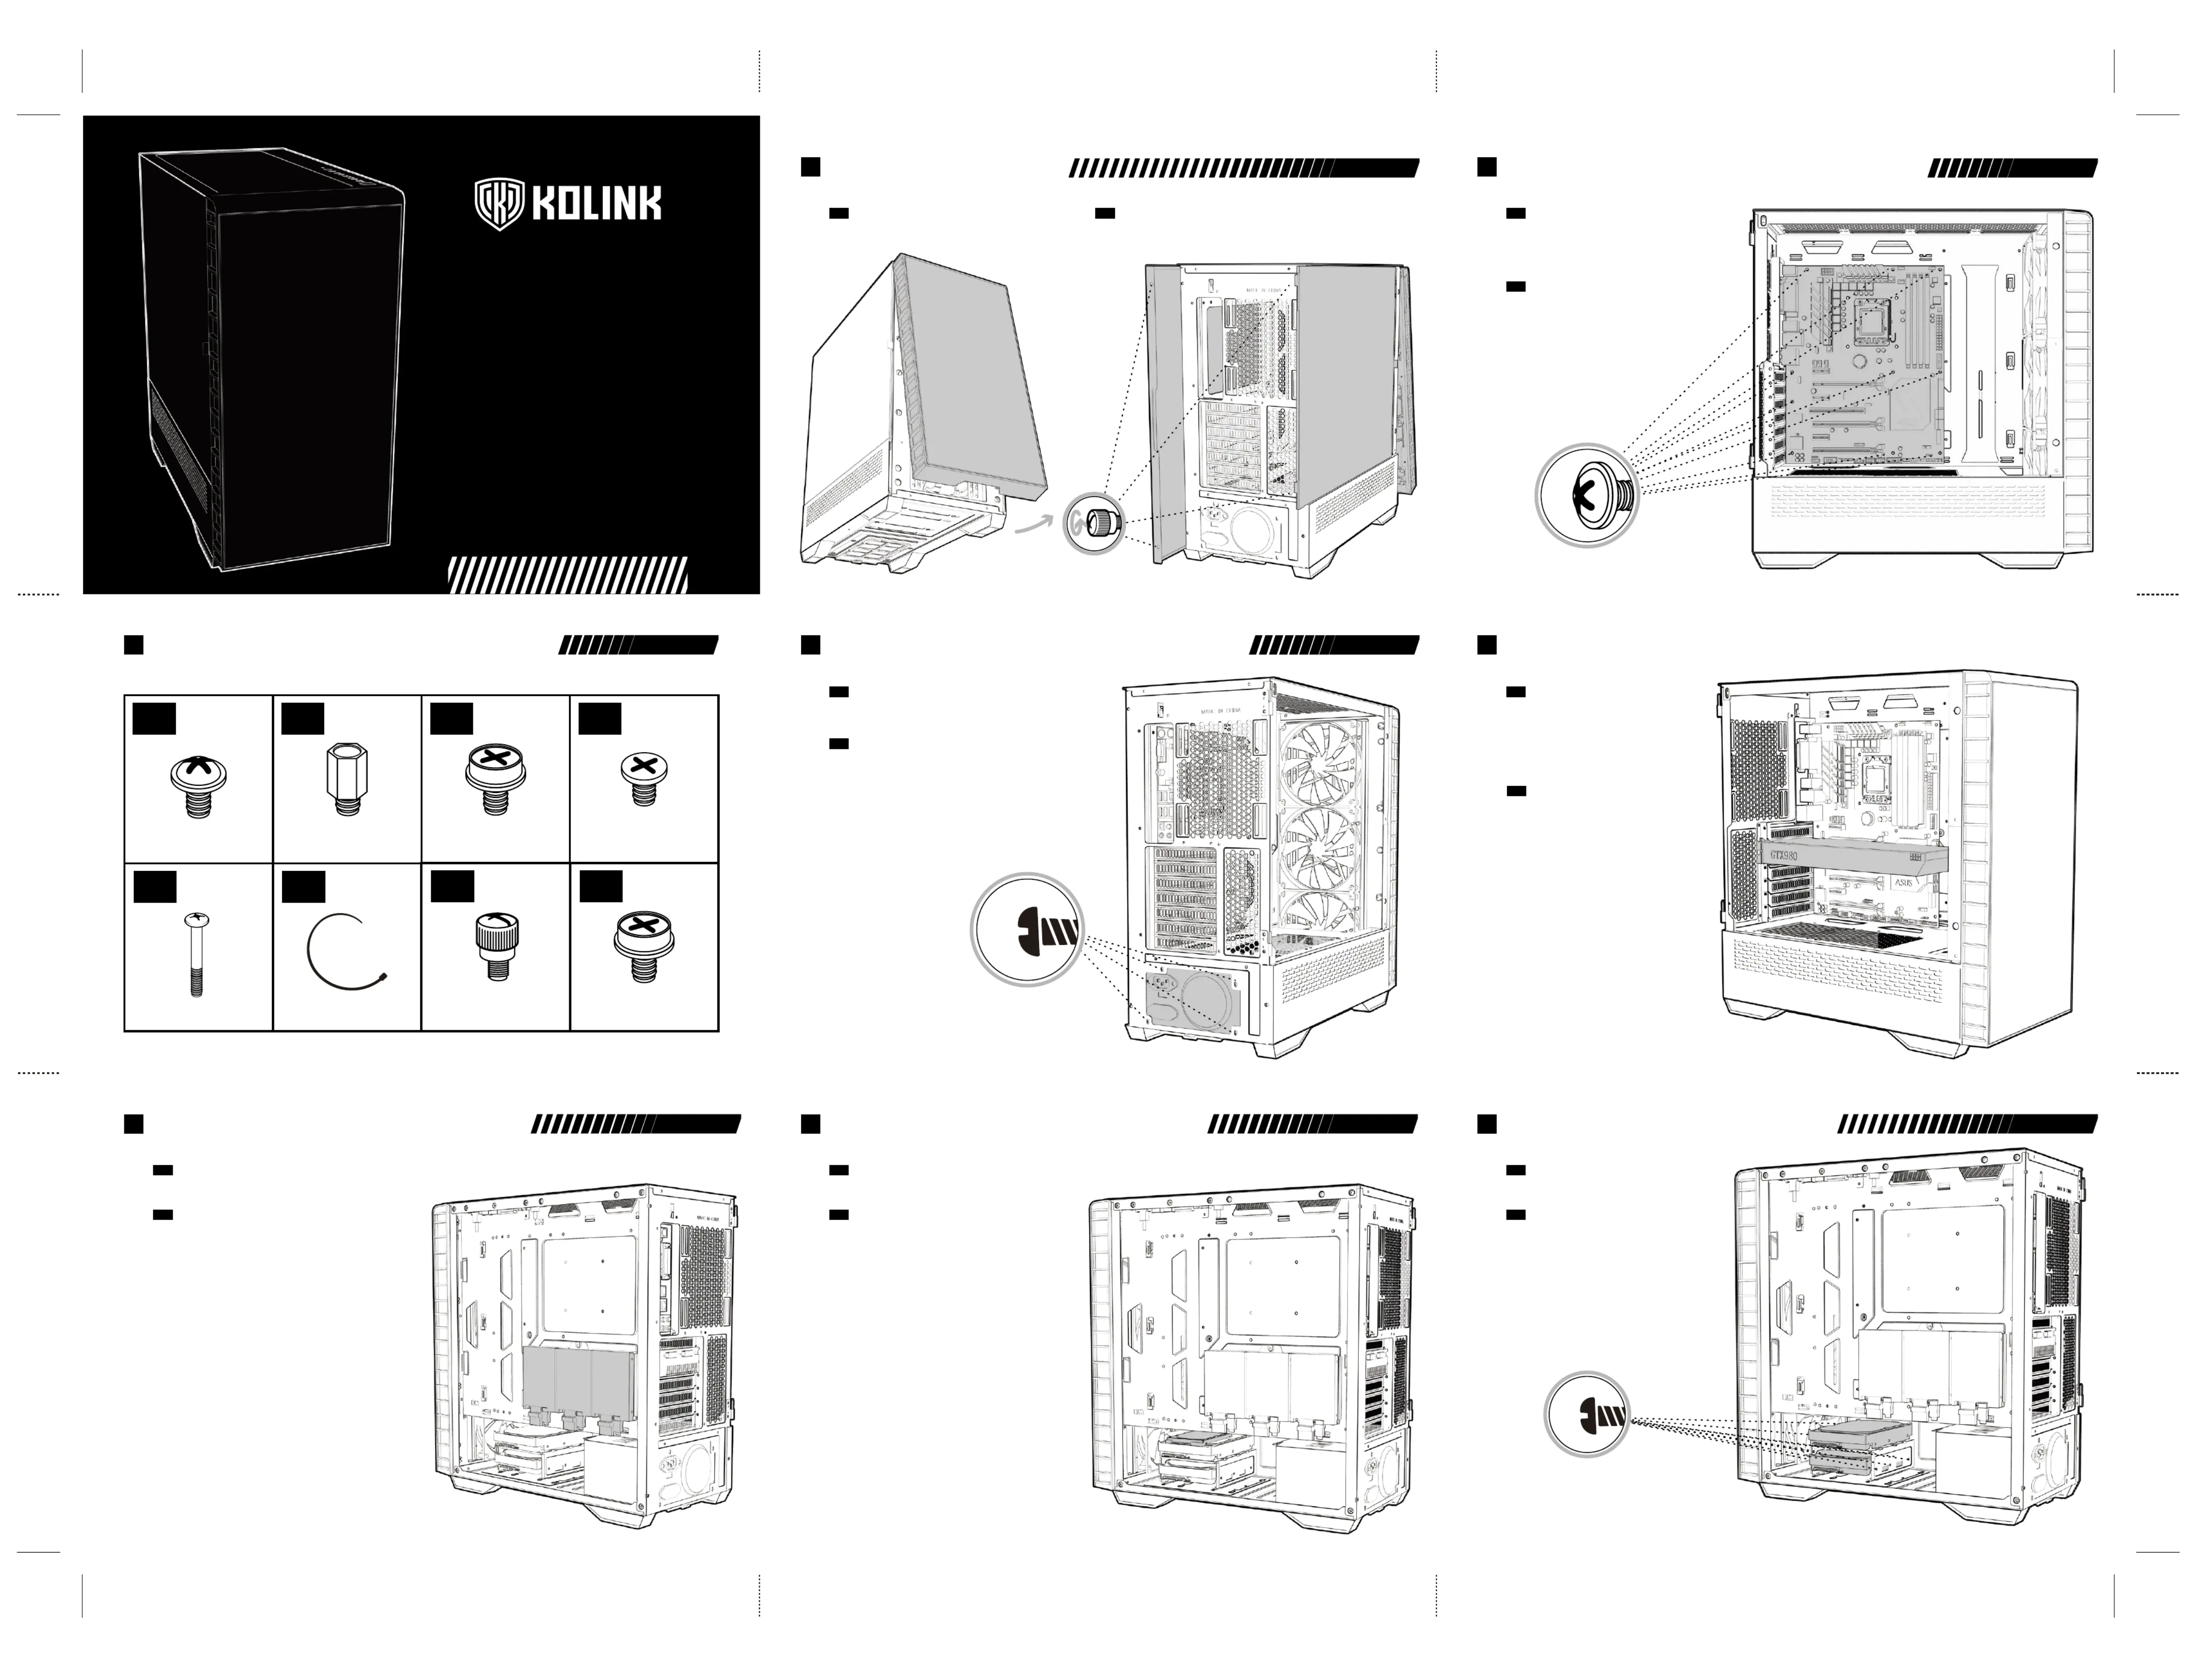
• Left Panel - Pull the tab to open the hinged glass panel and lift off the hinges
• Right Panel - Unscrew the two thumbscrews and slide off.
• Front Panel - Find the bottom cut out, stabilise the chassis with one hand,
and pull from the cutout with a little force until the clips release.
PANEL REMOVAL
EN
• Linkes Paneel: Ziehen Sie an der Lasche, um die Seitentür zu öffnen und
heben Sie sie anschließend aus den Scharnieren.
• Rechtes Paneel: Entfernen Sie die beiden Rändelschrauben und ziehen Sie das Paneel ab.
• Vorderes Paneel: Greifen Sie in die Einbuchtung an der Unterseite des vorderen Paneels
und ziehem Sie es mit ein wenig Kraft nach vorne.
ENTFERNEN DER SEITENTEILE
DE
• Align your motherboard with the chassis to locate where the stand-offs should be installed.
Once done, remove the motherboard and fasten stand-offs accordingly.
• Insert your motherboard I/O plate into the cutout at the rear of the case.
• Place your motherboard into the chassis, making sure the rear ports fit into the I/O plate.
• Use the provided motherboard screws to attach your motherboard to the chassis.
MOTHERBOARD INSTALLATION
EN
• Richten Sie Ihr Mainboard im Gehäuse aus, um festzustellen, wo die
Abstandshalter befestigt werden sollen. Entfernen Sie anschließend das
Mainboard und verschrauben Sie die Abstandshalter an den vermerkten Stellen.
• Befestigen Sie das I/O-Shield ihres Mainboards im Ausschnitt an der
Rückseite des Gehäuses.
• Platzieren Sie Ihr Motherboard im Gehäuse und achten Sie darauf, dass die
hinteren Anschlüsse in das I/O-Shield passen.
• Verwenden Sie die mitgelieferten Schrauben Ihres Mainboards, um es an den
Abstandshaltern im Gehäuse zu befestigen.
MAINBOARD INSTALLATION
DE
• Remove the rear PCI-E slot covers as necessary (depending on
the slot size of your card)
• Carefully position and slide your PCI-E card into place, then secure
with the add-on card screws supplied.
• Graphics card can also be mounted vertically using the Vertical
GPU bracket & riser cable kit (sold separately)
VIDEO CARD/PCI-E
CARD INSTALLATION
EN
• Entfernen Sie an der Rückseite des Gehäuses so viele PCI-Brackets
wie für Ihre Grafikkarte/Erweiterungskarte benötigt.
• Positionieren und schieben Sie die Grafikkarte/Erweiterungskarte
vorsichtig in das Mainboard und befestigen Sie sie am
Gehäuse mit den beiliegenden Schrauben.
• Eine Grafikkarte kann auch vertikal montiert werden. Das dafür
benötigte Bracket sowie die PCI-Riser-Karte sind separat erhältlich.
INSTALLATION DER
GRAFIKKARTE/PCI-E-KARTE
DE
PANEL REMOVAL
2
MOTHERBOARD INSTALLATION
3
GRAPHICS CARD/PCI-E CARD INSTALLATION
5
POWER SUPPLY INSTALLATION
4
• Legen Sie das Netzteil in den unteren hinteren Teil des Gehäuses, unterhalb der
Netzteilabdeckung.
• Richten Sie die Gewinde des Netzteils an den passenden Bohrungen im Gehäuse
aus und sichern Sie es mit entsprechenden Schrauben, die dem Netzteil beiliegen.
INSTALLATION DES NETZTEILS
DE
• Place PSU in the bottom rear of the case, within the PSU shroud.
• Align the holes and secure with screws.
POWER SUPPLY INSTALLATION
EN
• Legen oder schieben Sie das Laufwerk auf oder in den HDD-Schacht und befestigen
Sie gegebenfalls mit den mitgelieferten Schrauben.
3.5" HDD-INSTALLATION
DE
• Place the 3.5" HDD into/on top of the HDD bracket and screw in if required.
3.5" HDD INSTALLATION
EN
3.5" HDD INSTALLATION
8
• Entfernen Sie zunächst die Halterung von der Rückseite des Mainboard-Trays, schrauben Sie daran das
Laufwerk fest und befestigen Sie die Halterung wieder an der Rückseite des Mainboard-Trays.
2.5" SSD-INSTALLATION (RÜCKSEITE)
DE
• Remove the bracket from the rear of the motherboard plate, attach your 2.5" drive and then screw back into place.
2.5" SSD INSTALLATION (REAR)
EN
2.5" SDD INSTALLATION (R)
6
2.5" SDD INSTALLATION (R)
7
• Legen oder schieben Sie das Laufwerk auf oder in den HDD-Schacht und befestigen
Sie gegebenfalls mit den mitgelieferten Schrauben.
2.5" SSD-INSTALLATION (RÜCKSEITE)
DE
• Place the 2.5" HDD/SSD into/on top of the HDD bracket and screw in if required.
2.5" SSD INSTALLATION (REAR)
EN
ACCESSORY PACK CONTENTS
1
x32x6
x8
x4
Motherboard/SSD ScrewsMotherboard Stand-off
3.5” Drive Screw
PSU Screw
x8
Fan Screw
x6
Cable Tie
x2
Thumb Screw
x2
Add-on Card Screw
Specyfikacje produktu
| Marka: | Kolink |
| Kategoria: | Komputerowe przejęcie |
| Model: | Observatory Y |
Potrzebujesz pomocy?
Jeśli potrzebujesz pomocy z Kolink Observatory Y, zadaj pytanie poniżej, a inni użytkownicy Ci odpowiedzą
Instrukcje Komputerowe przejęcie Kolink

30 Marca 2025
12 Lutego 2025
12 Lutego 2025
12 Lutego 2025
12 Lutego 2025
12 Lutego 2025
12 Lutego 2025
12 Lutego 2025
12 Lutego 2025
12 Lutego 2025
Instrukcje Komputerowe przejęcie
Najnowsze instrukcje dla Komputerowe przejęcie
9 Kwietnia 2025
7 Kwietnia 2025
5 Kwietnia 2025
3 Kwietnia 2025
1 Kwietnia 2025
1 Kwietnia 2025
1 Kwietnia 2025
30 Marca 2025
29 Marca 2025
28 Marca 2025