Instrukcja obsługi Meliconi Gumbody Facile 3 web
Meliconi
Zdalne sterowanie
Gumbody Facile 3 web
Przeczytaj poniżej 📖 instrukcję obsługi w języku polskim dla Meliconi Gumbody Facile 3 web (7 stron) w kategorii Zdalne sterowanie. Ta instrukcja była pomocna dla 8 osób i została oceniona przez 4.5 użytkowników na średnio 4.9 gwiazdek
Strona 1/7

8
Keep this booklet for future reference.
Thank you for choosing a Meliconi remote control.
The Facile 3 web remote control is ideal for replacing up to 3 remote controls for TV - SAT (satellite decoder)
- TER (Digital Terrestrial decoder). Moreover, thanks to its AUDIO UPDATE function, the device can also be
connected to a PC via the cable supplied in order to download the information required to confi gure it. And not
only: the Facile 3 web remote control has a LEARN function so it can learn any original remote control signals
not yet inserted in the databank, as well as allowing secondary functions to be acquired and saved on the F1 -
F2 - F3 - F4 function keys or on any other button on the keypad.
The remote control has a non-volatile memory, meaning that it does not lose its settings even if there are no
batteries in it. Its ergonomic shape and soft rubber body make it easy to grip and protect the remote control if it
is knocked or dropped.
IMPORTANT: The remote control must not be exposed to excessive heat sources.
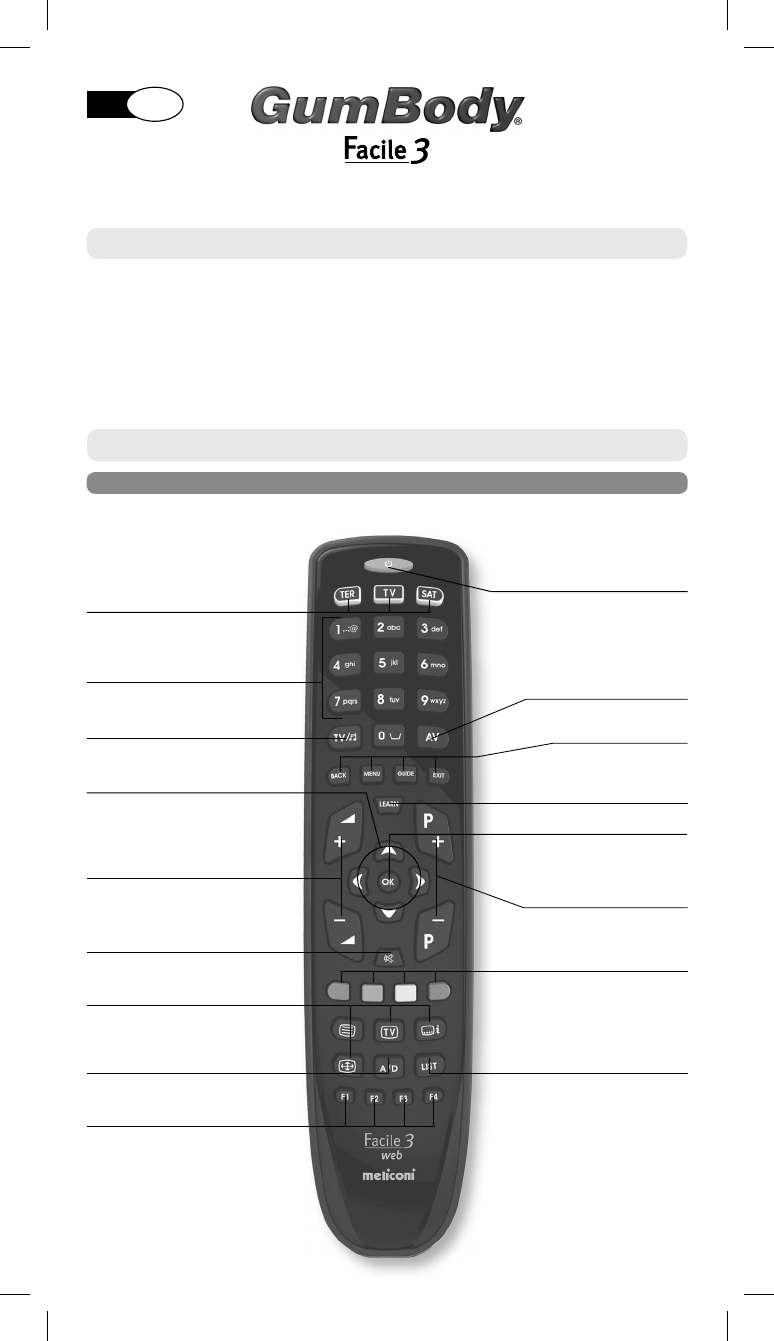
USE OF THE BUTTONS AND FUNCTIONS
The functions of the buttons described below are available only if they are on your original device.
Volume control +/–
TELETEXT buttons
ON/OFF switches the device OFF and
in some cases ON
Numeric keypad
Confi rm selection
MUTE turns sound OFF and ON
For selecting an external
input source
For selecting the next programme
P+ or the previous programme P–
For moving around within the MENU
Buttons for selecting the device to be
controlled.
Fastext functions or for selecting sub-
menus using colours
Specifi c buttons for decoder
Displays the list of programmes
Selects analogue/digital
Selects digital TV and radio
Button for activating the LEARN function.
The button lights up when commands are
being captured or transmitted
User customised buttons that additional
commands can be saved to and accessed
directly from
web
I
EN

INSERTING THE BATTERIES
Before using the remote control, insert the batteries and programme it.
Do not leave fl at batteries inserted, as liquid may leak and damage the remote control
The Facile 3 web remote control is a universal remote, its memory containing data relating to many devices of
different brands available on the market.
Each original device has a specifi c code which must be used to set up the remote control.
Therefore, to use your Facile 3 web you must enter the specifi c code for each device you wish to control.
So use one of the following methods to identify the correct code and set it in your remote control:
A) - INTERNET (recommended)
B) - CELL PHONE (SMS)
C) - MANUAL SEARCH
SETTING CODES
Today, Meliconi gives customers who don’t have internet the chance to receive the codes for programming their
remote control directly on their cell phone.
Simply send an SMS to this number 0039 345 7518893 as follows: 3A, Type, Brand, Model
- Type = indicate the device to be controlled using one of the following abbreviations: TV / SAT / TER (Digital
Terrestrial decoder).
- Brand, Model = to indicate the brand and the model of the device to be controlled.
Example: 3A, TV, PHILIPS, 32PFL3614 (if you don’t know the model, don’t write anything after the brand)
Once you have received the SMS with the list of codes, set the fi rst code in the remote control as described in
the ENTERING THE CODE DIRECTLY section.
Stand in front of the device with the MELICONI remote control. Turn the device on and then press the ON/OFF
button on the remote.
If the device does NOT switch off, try setting the consecutive code in the SMS list in the remote control.
When the device reacts check whether the other buttons are operating correctly too.
If they do, the remote control is ready to use.
If they don’t, you are probably using an incorrect code destined for a very similar device; at this point
ignore the SMS list and consult the SETTING CODES USING A MANUAL CODE section to fi nd a more suitable
code.
The remote control requires 2 new 1.5V alkaline AAA/LR03 batteries.
Insert them as illustrated.
Try pressing a number button and check that the red light remains lit
continuously until you release the button. If the light fl ashes, the batteries
inserted are not charged and are about to go fl at, therefore you must
substitute them.
If you have an Internet connection available, follow the on-line guide on the www.meliconi.com/guide website
to identify the specifi c codes for the devices you wish to command. Then set the codes manually in your
MELICONI remote control as described in the ENTERING THE CODE DIRECTLY procedure.
(the service s fee and the only cost is that of sending the SMS, which naturally depends on the rates of the
service operator in question)
SETTING CODES USING A CELL PHONE
SETTING CODES USING INTERNET
9

10
NOTE: If you don’t receive an SMS on your cell phone or if the message says ERROR / NO CODE, it
means the system has not been able to process the data you have sent. Do not try sending another SMS
use the MANUAL SEARCH instead.
(only to be performed if the specifi c code could not be found)
SETTING CODES USING A MANUAL SEARCH
CHECK
Check that the other buttons correspond to the functions of the original remote control; if not, it is likely
that the code found is incorrect, but is used for a very similar device. In that case, repeat the procedure
from point 2.
If the manual search for the code is successful, obtain the code in use by following the DISPLAY CODE IN
USE procedure and make a note of it inside the battery cover.
NOTE: During the search the indicator stops fl ashing and the remote control exits the programming mode
in the following cases:
• if for 12 seconds the button indicated is not pressed or if another button is pressed
• if the list of codes to fi nd is terminated. If this happens, go to the www.meliconi.com/guide website.
ENTERING THE CODE DIRECTLY
(only to be performed if you know the specifi c code to be set)
1. Switch on the device to be programmed and select a pro-
gram
2. Press and hold down for 6 seconds the device selection
button corresponding to the device you wish to enter the
code for.
3. Release the button. The indicator light will fl ash. Point the
remote control at the device and press the ON/OFF key.
If the device does NOT switch off press the same button
again slowly (it may be necessary to press the button se-
veral times).
4. When the device responds correctly, press OK. Three
long fl ashes indicate that the operation has been carried
out correctly.
6 SEC.
or
1. Press and hold down for 6 seconds the device selection
button corresponding to the device you wish to enter the
code for.
2. Release the button. The indicator light fl ashes. Imme-
diately enter the specifi c code previously found. (e.g.
1306).
3. Three long fl ashes indicate a correct setting.
6 SEC.
or
or or
Specyfikacje produktu
Marka: | Meliconi |
Kategoria: | Zdalne sterowanie |
Model: | Gumbody Facile 3 web |
Potrzebujesz pomocy?
Jeśli potrzebujesz pomocy z Meliconi Gumbody Facile 3 web, zadaj pytanie poniżej, a inni użytkownicy Ci odpowiedzą
Instrukcje Zdalne sterowanie Meliconi
4 Lutego 2025
3 Lutego 2025
1 Lutego 2025
12 Stycznia 2025
30 Września 2024
23 Września 2024
22 Września 2024
22 Września 2024
22 Września 2024
21 Września 2024
Instrukcje Zdalne sterowanie
- Zdalne sterowanie ELV
- Zdalne sterowanie Vello
- Zdalne sterowanie Thomson
- Zdalne sterowanie Pioneer
- Zdalne sterowanie Nexa
- Zdalne sterowanie Steren
- Zdalne sterowanie Maximex
- Zdalne sterowanie Yamaha
- Zdalne sterowanie Russound
- Zdalne sterowanie VDO Dayton
- Zdalne sterowanie Roswell
- Zdalne sterowanie Uni-T
- Zdalne sterowanie Hähnel
- Zdalne sterowanie Iiyama
- Zdalne sterowanie Audiofrog
Najnowsze instrukcje dla Zdalne sterowanie
9 Kwietnia 2025
6 Kwietnia 2025
6 Kwietnia 2025
4 Kwietnia 2025
2 Kwietnia 2025
1 Kwietnia 2025
1 Kwietnia 2025
31 Marca 2025
31 Marca 2025
30 Marca 2025