Instrukcja obsługi StarTech.com EXTEND-HDMI-4K40C6P1
StarTech.com przedłużacz AV EXTEND-HDMI-4K40C6P1
Przeczytaj poniżej 📖 instrukcję obsługi w języku polskim dla StarTech.com EXTEND-HDMI-4K40C6P1 (2 stron) w kategorii przedłużacz AV. Ta instrukcja była pomocna dla 43 osób i została oceniona przez 6 użytkowników na średnio 4.1 gwiazdek
Strona 1/2
Quick-Start Guide
To view manuals, FAQs, videos, drivers, downloads, technical drawings, and more, visit www.startech.com/support.
Manual Revision: October 22, 2021 7:09 PM
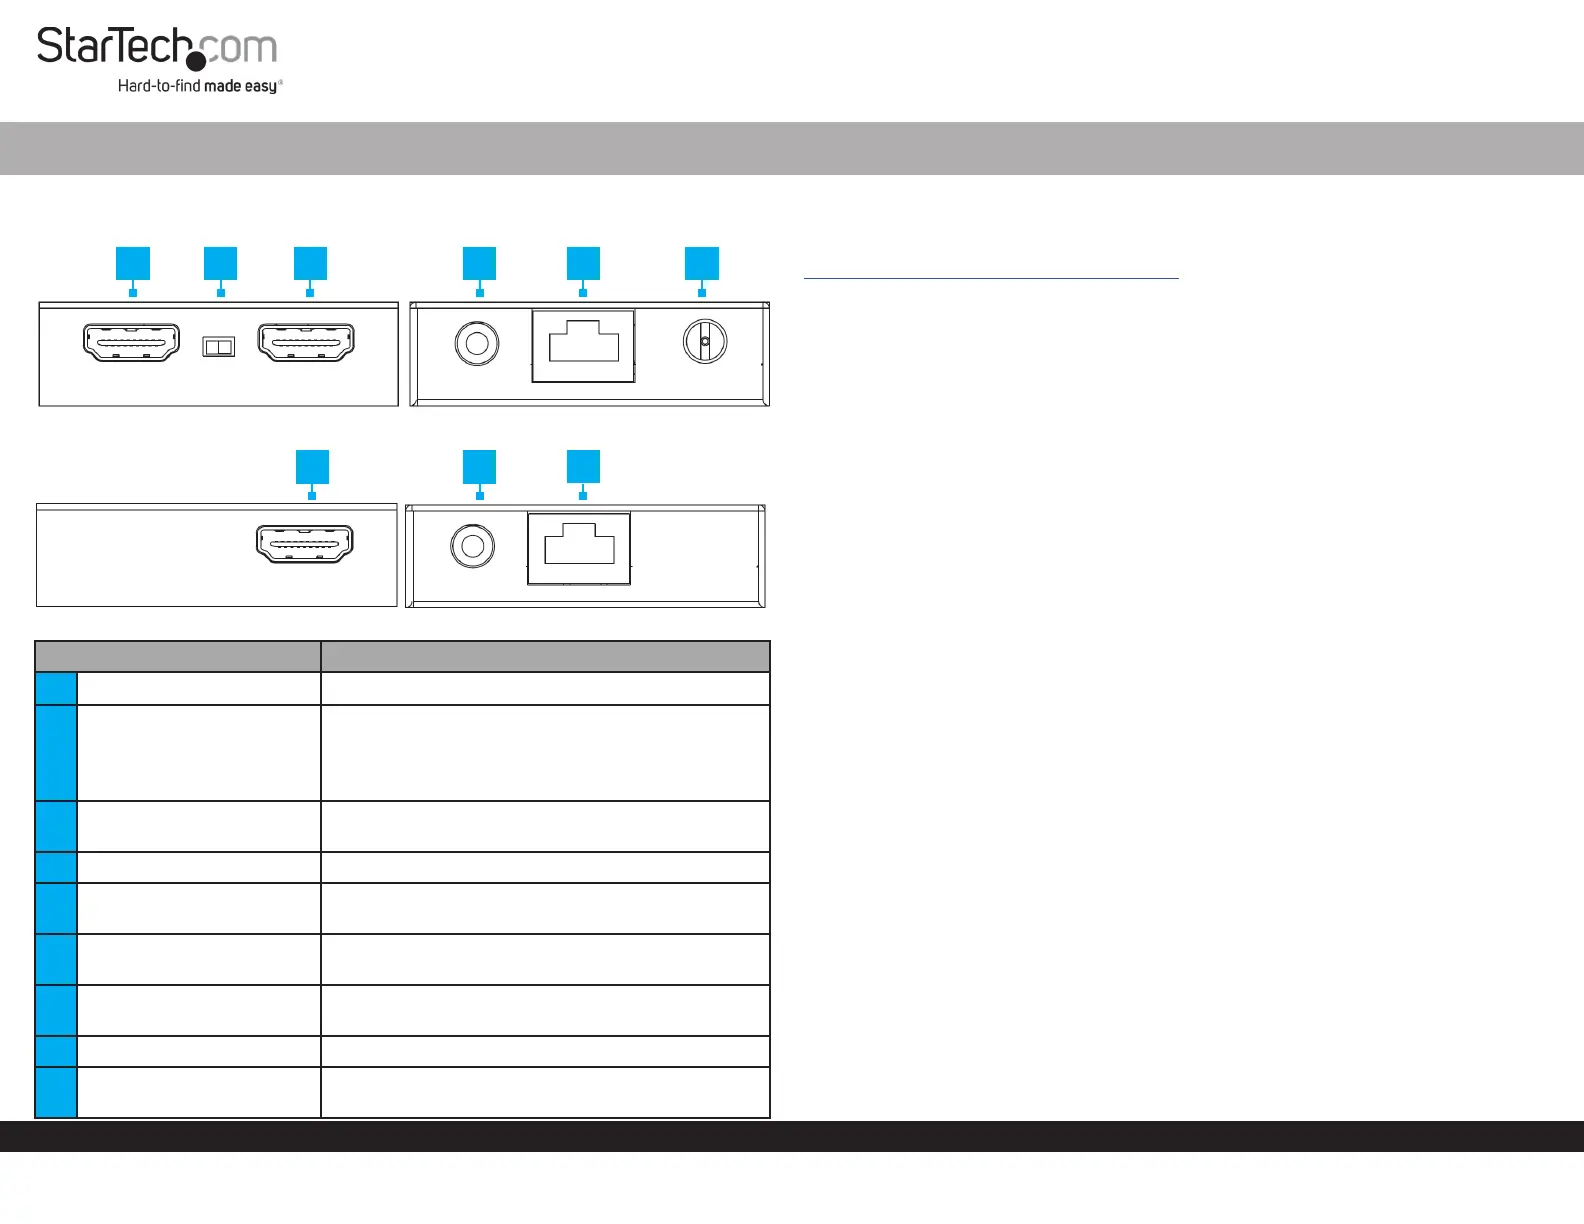
Product Diagram (EXTEND-HDMI-4K40C6P1)
Transmitter
Receiver
PortFunction
1HDMI Input Port• Connect an HDMI Source Device
2EDID Selector Switch
• TX: Copys EDID data from the display connected
to the HDMI Output Port on the Transmitter
• RX: Copys EDID data from the display connected
to the HDMI Output Port on the Receiver
3
HDMI Output Port
(Transmitter)
• Connect an HDMI Display to the Transmitter
4IR Output Port• Connect the IR Blaster to the Transmitter
5
RJ45 Output Port
(Transmitter)
• Connect to the Receiver, using a CAT5e/6
Ethernet Cable (Sold Separately)
6DC 12V Port
• Power the Transmitter using the Power Adapter
(included)
7
HDMI Output Port
(Receiver)
• Connect an HDMI Display to the Receiver
8IR Input Port• Connect the IR Receiver to the Receiver
9RJ45 Port (Receiver)
• Connect to the Transmitter with a CAT5e/6
Ethernet Cable
HDMI over CAT5e/6 Extender - 4K 30Hz - 130ft (40m)
Requirements
For the latest manuals, product information, technical specications, and declarations of
conformance, please visit:
www.startech.com/EXTEND-HDMI-4K40C6P1
Package Contents
• Local HDMI Transmitter Unit
• Remote HDMI Receiver Unit
• IR Blaster
• IR Receiver
• Power Adapter
• Quick-Start Guide
Installation
Installing the HDMI Transmitter and Receiver
1. Position the Transmitter near the HDMI Source Device.
2. Connect an HDMI Cable (not included) to the HDMI Source Device and to the
HDMI Input Port on the Transmitter.
3. (Optional) Connect an HDMI Cable to the Local HDMI Display and to the HDMI
Output Port on the Transmitter.
4. Connect a CAT5e/6 Cable (not included) to the RJ45 Port on the Transmitter and
to the RJ45 Port on the Receiver.
Note: The cabling cannot go through any networking equipment (e.g. router,
switch, etc.).
5. Position the HDMI Receiver near the HDMI Display Device.
6. Connect an HDMI Cable to the HDMI Output Port on the Receiver and to the HDMI
Display Device.
7. Connect the Universal Power Adapter to the DC 12V Port on the Transmitter to an
AC Electrical Outlet.
Installing the IR Blaster and IR Receiver
Control the HDMI Source Device from the Receiver
1. Connect the IR Blaster (Rounded Shape) to the IR Output Port on the Transmitter.
2. Peel the Film o of the Adhesive Pad that is located on the IR Blaster. Position
the IR Blaster so that it is pointing directly at the IR Sensor on the HDMI Source
Device.
Note: Consult the HDMI Source Device’s manual to determine the location of the IR
Sensor.
123456
78
9
Specyfikacje produktu
| Marka: | StarTech.com |
| Kategoria: | przedłużacz AV |
| Model: | EXTEND-HDMI-4K40C6P1 |
Potrzebujesz pomocy?
Jeśli potrzebujesz pomocy z StarTech.com EXTEND-HDMI-4K40C6P1, zadaj pytanie poniżej, a inni użytkownicy Ci odpowiedzą
Instrukcje przedłużacz AV StarTech.com

1 Stycznia 2025
1 Stycznia 2025
1 Stycznia 2025
1 Stycznia 2025
1 Stycznia 2025
1 Stycznia 2025
1 Stycznia 2025
1 Stycznia 2025
1 Stycznia 2025
31 Grudnia 2025
Instrukcje przedłużacz AV
Najnowsze instrukcje dla przedłużacz AV
8 Kwietnia 2025
1 Kwietnia 2025
1 Kwietnia 2025
1 Kwietnia 2025
1 Kwietnia 2025
1 Kwietnia 2025
26 Lutego 2025
20 Lutego 2025
20 Lutego 2025
7 Lutego 2025