Instrukcja obsługi Sunding SD-546C
Sunding komputer rowerowy SD-546C
Przeczytaj poniżej 📖 instrukcję obsługi w języku polskim dla Sunding SD-546C (1 stron) w kategorii komputer rowerowy. Ta instrukcja była pomocna dla 34 osób i została oceniona przez 3 użytkowników na średnio 4.3 gwiazdek
Strona 1/1
Bicyclecomputer
SD-546C(24Functions)
FUNCTIONS
-AUTOWAKEUP(SD-546C1)
MANUALWAKEUP(SD-546C2)
-SPDCURRENTSPEED
-ODOODOMETER0.00(1~99999km/m)
-DSTTRIPDISTANCE
-MXSMAXIMUMSPEED
-AVSAVERAGESPEED
-TMELAPSEDTIME.
-CLKCLOCK12H/24H()
-TMPTEMPERTERATURE(-1070)℃~℃
-MINRPM
-MAXRPM
-SCAN
-“+”“”COMPAPATOR-
-CALCALORIE(099999Kcal)~
-FAT(09999.9kg)~
-SETTINGSPEEDSCALEkm/h,m/h()
-SETTINGTYRECIRCUMFERENCE:0mm(~
9999mm)
-SETTINGTHELASTVALUEOFODOMETER/ODO
-SETTINGRIDER’SWEIGHT
-FREEZEFRAMEMEMORY
-MAINTENANCEALERT
-“”LOWPOWERREMINDING
-BACKLIGHT
-AUTOON/OFF
ComputerBatteryInstallation
Removethebatterycoverfromthebottomofthecomputerby
usingaatbladescrewdriver,installoneCR2032batterywith
thepositive(+)polefacingthebatterycoverandreplacethe
cover.ShouldtheLCDshowirregulargures,takeoutthe
batteryandreinstallit.
SensorTransmitterBatteryInstallation
Removethebatterycoverfromthe
bottomofthecomputerbyusinga
atbladescrewdriver,installone
23A12Vbatterywiththepositive
(+)polefacingthebatterycover
andreplacethecover.Shouldthe
LCDshowirregulargures,take
outthebatteryandre-installit.
SensorTransmitter
Attachthesensortransmittertotheleftforkblade,thedistance
betweencomputerandthesensorcannotexceed60cm,the
closerthebetter.Usingtheshimstoadjustthediameter,and
usingthecableties(showbelow)totieitwiththefork.
Positionthesensortransmitterandmagnetasshows,make
surethatthearcofthemagnetintersectsthealignmentmark
onthesensortransmitterwith1mmclearance.
MountingShoe
Attachthemountingshoewiththecable
tiestothehandlebar,adjustthemounting
shoeonthehandlebarwiththeshimsto
holditsposition.
SensorWiring
Routethesensorwireuptheforkblade,
usingcabletiestosecureitatthebottomandcrowntoavoidit
hinderthemovementofthefrontwheel.
Computer
Attachthecomputertothemountingshoebyslidingtheunit
untilitsnapsrmlyintoitspostion.Toremoveit,pressthe
buttononitintheoppositedirection.
Tocheckforproperspeedfunctionandsensoralignment,spin
thefrontwheelwithcomputerinspeedmode.Adjustthe
positionofsensorandmagnetwhenthereisnoorweak
reaction.
WheelSizeInput
‘2060’appearsonthescreenwhenthebatteryhasbeen
installed,withonegureashing,choosethecorrectwheel
circumferencefromthetablebelow.PressRIGHTbuttonto
advancedigitsasneededandLEFTbuttontoconrmand
advance.(Thecircumferenceranges0mm~9999mm),press
LEFTbuttontoenterKM/Mmode.
TIRESIZETIRESIZECIRCCIRC
700cx38mm218026’’x2.25’’2115
700cx35mm216826’’x2.1’’2095
700cx32mm215526’’x2.0’’2074
700cx30mm214526’’x
1.9’’/1.95’’
2055
700cx28mm213626’’x1.75’’2035
700cx25mm212426’’x1.5’’1985
700cx23mm210526’’x1.25’’1953
700cx20mm207426’’x1.0’’1913
700cTubulari213024’’x
1.9’’/1.95’’
1916
650cx23mm199020’’x1-1/4’’1618
650cx20mm194516’’x2.0’’1253
27’’x1-1/4’’216116’’x1.95’’1257
27’’x1-1/8’’215516’’x1.5’’1206
26’’x2.3’’2135
Setting(km/h/m/h)()
PresstheRIGHTbuttontochoosekm/h
orm/h.PresstheLEFTbuttontoenter
CLOCKmode.
SettingRider’sWeight
Thedefaultweightis65kg,presstheRIGHTbuttontoadjust
theashingweightnumberaccordingtorider’sweight,press
LEFTbuttontoconfirmandadvance.Weightranges:
20~150kg.PresstheLEFTbuttontoenterintoMaintenance
Alertsetting.
SettingMaintenanceAlert
WhilethedefaultMaintenanceAlertdigit
200km/m
isashing,PresstheRIGHTbuttontochoose
200/400/600/800km/m.PresstheLEFTbuttontoconrm(
andenterintoClockmode.(WhentheODO>theMaintenance
Alertdigityouset,thewillappearonthescreento
alerttherider,presstheLEFTbuttontocancelit.)
CLKMode(12H/24H)
InCLOCKMode,presstheLEFTbuttonfor
3secondstoenter12/24Hselection.
Re-presstheLEFTbuttonfor12/24
exchanging.PresstheRIGHTbuttonto
enterHoursettingmode,whenthegure
indicatingHOURstarttoash,presstheLEFTbuttonto
adjustit.
theLEFTbuContinuetopresstheRIGHTbuttontoenter
Minutesettingmode,whenthegureindicatingMINUTE
starttoash,pressttontoadjustitandRIGHTbuttonto
conrm,presstheRIGHTbuttonagainto
ODOmode.
SettingtheLastValueofOdometer
InODOmode,presstheLEFTbuttonfor
2secondstosettheODOvalue,its
initialvalueis0000.0.whenonefigureflashing,press
RIGHTbuttontoadjustitandLEFTbuttontoconfirm
itandstarttosetthenextfigure.(afterre-installthe
battery,latestvaluecanbeinputtedaccordingtothe
valueexistsbeforethebatteryisre-installed).
ResetofMileageParameter
InODOmode,pressandholdbothRIGHTandLEFTbutton
simultaneouslyfor3secondstoclearthetirecircuferenceand
(km/m)setting,Theuserneedtoresetthetirecircumference
and(km/m),theoriginalODOvalueandCLOCKwillremain
unaffected.
Speedometer
Speedisshownallthetimeonthescreen,itsmaximum
readingis99.9km/h(m/h),andit’saccurateto+/-0.1km/h
(m/h).
SpeedComparator
Duringriding,¡øand¨‹willdispalyonthe
screen,¡øindicatesthecurrentspeedishigherthanaverage
speed.¨‹indicatesthecurrentspeedis
lowerthanaveragespeed.
Odometer
InODOmode,thetotaldistanceis
indicatedonthescreen,itsmileagerangeis
0.001~99999km(m).thedisplaywillbebackto0whenvalue
exceedsitsmaximumlimit,presstheRIGHTbuttontoenter
DSTmode..
TripDistance(DST)
InDSTmode,thedistanceforonetripis
indicatedonthebottomline.DSTranges
from0.0019999km(m),whenthevalue~
exceedtherangelimit,itrestartsfrom0
automatically.Boththetimeandthedistancerecordswillbe
clearedwhenthetimeofonetripexceedtherangelimits.
presstheLEFTbuttonfor5secondstocleartherecordsof
DST,MXS,AVSandTM.
PresstheRIGHTbuttontoenterMXSmode.
MaximumSpeed(MXS)
InMXSmode,maximumspeedis
indicatedonthebottomline.Pressthe
LEFTbuttonfor5secondstoclearthe
recordsofMXS,DST,AVSandTM.
PresstheRIGHTbuttontoenterAVSmode.
AverageSpeed
InAVSmode,averagespeedisindicated
onthebottomline.PresstheLEFTbutton
for5secondstocleartherecordsof
AVS,DST,MXSandTM.
PressRIGHTbuttontoenterTMmode.
TripTime
InTMmode,triptimeisindicatedonthe
bottomline.TMranges0:00:00~
99:59:59.Itwillbebackto0when
valueexceedthelimits.
PresstheLEFTbuttonfor5secondstocleartherecordsof
TM,DST,MXSandAVS.
PresstheRIGHTbuttontoenterSCAN
mode.
Temperature(RPM)(MIN)(MAX)
InRPMmode,thecurrentoutdoor
temperatureisindicatedonthescreen.
MinimumTemperature(MINRPM)
MaximumTemperature(MAXRPM)
ahing,presstheRIGHTbuttonto
conrm.RPMranges:-
accurateto+/-
theLEFTbuttonfor5secondstoclearRPMMINMAX,DST,
MXS,AVS.PresstheRIGHTbuttontoenterintoCALmode.
CAL(Calory)
InCALmode,thetotalheatenergytheriderconsumedis
calculatedfromthelastrestorationofthecomputeris
indicatedonthescreen.Itranges:0~99999Kcal.Pressthe
RIGHTbuttontoenterintoFATmode.
FAT
InFATmode,thetotalFATthe
riderconsumediscalculatedfromthelast
restorationofthecomputerisindicated
onthescreen.Itranges:0~9999.9kg.
PresstheRIGHTbuttontoenterinto
Scanmode.
SCAN
InScanmode,DST,MXS,AVSandTM
modeareindicatedinturnevery4
seconds.PresstheRIGHTbuttontoenterCLOCKMode.
MenuHideFunction
InanymodeexceptCLKmode,presstheRIGHTbuttonfor5
seconds,thecomputerisgoingtoMenuhidemode,ithides
MINRPM,MAXRPM,CAL&FAT,whichwillnotbe
indicatedonthescreenbutstillrunningwithouteect.Alsoin
anymodeexceptCLKmode,presstheRIGHTbuttonfor5
secondsagain,thesefunctionsareresumed.
SleepMode
Ifnosignalhasbeeninputtedfor300seconds,computerwill
enterintoSleepMode,andCLKvalueremains.Itwillturn
backtotheformermodewithallthedatacollectedwhenany
signalisinputtedoranybuttonispressed.
FreezeFrameMemory
PresstheLEFTbuttoninanytimewillenterintofreezeframe
memorymode.FlashingTMdatawillappearonthescreen.
PresstheRIGHTbuttontoviewtherecordsofDST,MXS,
AVSandTM.
PresstheLEFTbuttontoendit
BackLight
Thebacklightfunctionisswitchedonorowhenyoupress
anybuttonduringPM:1800800.Itwillnotworkatany:~:
othertime.
LowPowerReminding
Whenthebatteryislowpower,thesymbol“”willbe
shining,whichremindstheridertochangeintoanewbattery.
MalfunctionsandProblems
MalfunctionsProblems
Nospeedometer
Impropermagnet/sensoralignment
Distancebetweencomputerand
sensortransmitterexceed60cm
Lowbatteryvoltageofsensor
transmitterorcomputer.
Shortdistanceof
thetransmitteror
noreceiving
Lowerbatteryvoltage,needtochange
foranewone.
Display
Abnormal
gures
ToomuchElectromagnetic
interferencearound
Inaccuratevalue
isindicated
Improperinput,suchaswheel
circumference.
Slowdisplay
respons
Temperatureexceedsoperating
limits(055).℃~℃
Blackdisplay
Temperaturetoohigh,orputindirect
sunlightfortoolongtime.Needtake
backtoshadowplaceforaperiod.
WeakdisplayPoorbatterycontactordeadbattery
Displayshows
irregulargures
Takeoutbatteryandre-installitafter
10seconds.
Sensorwithout
reaction
Putofftheinsulationlmofthe
sensortransmitter
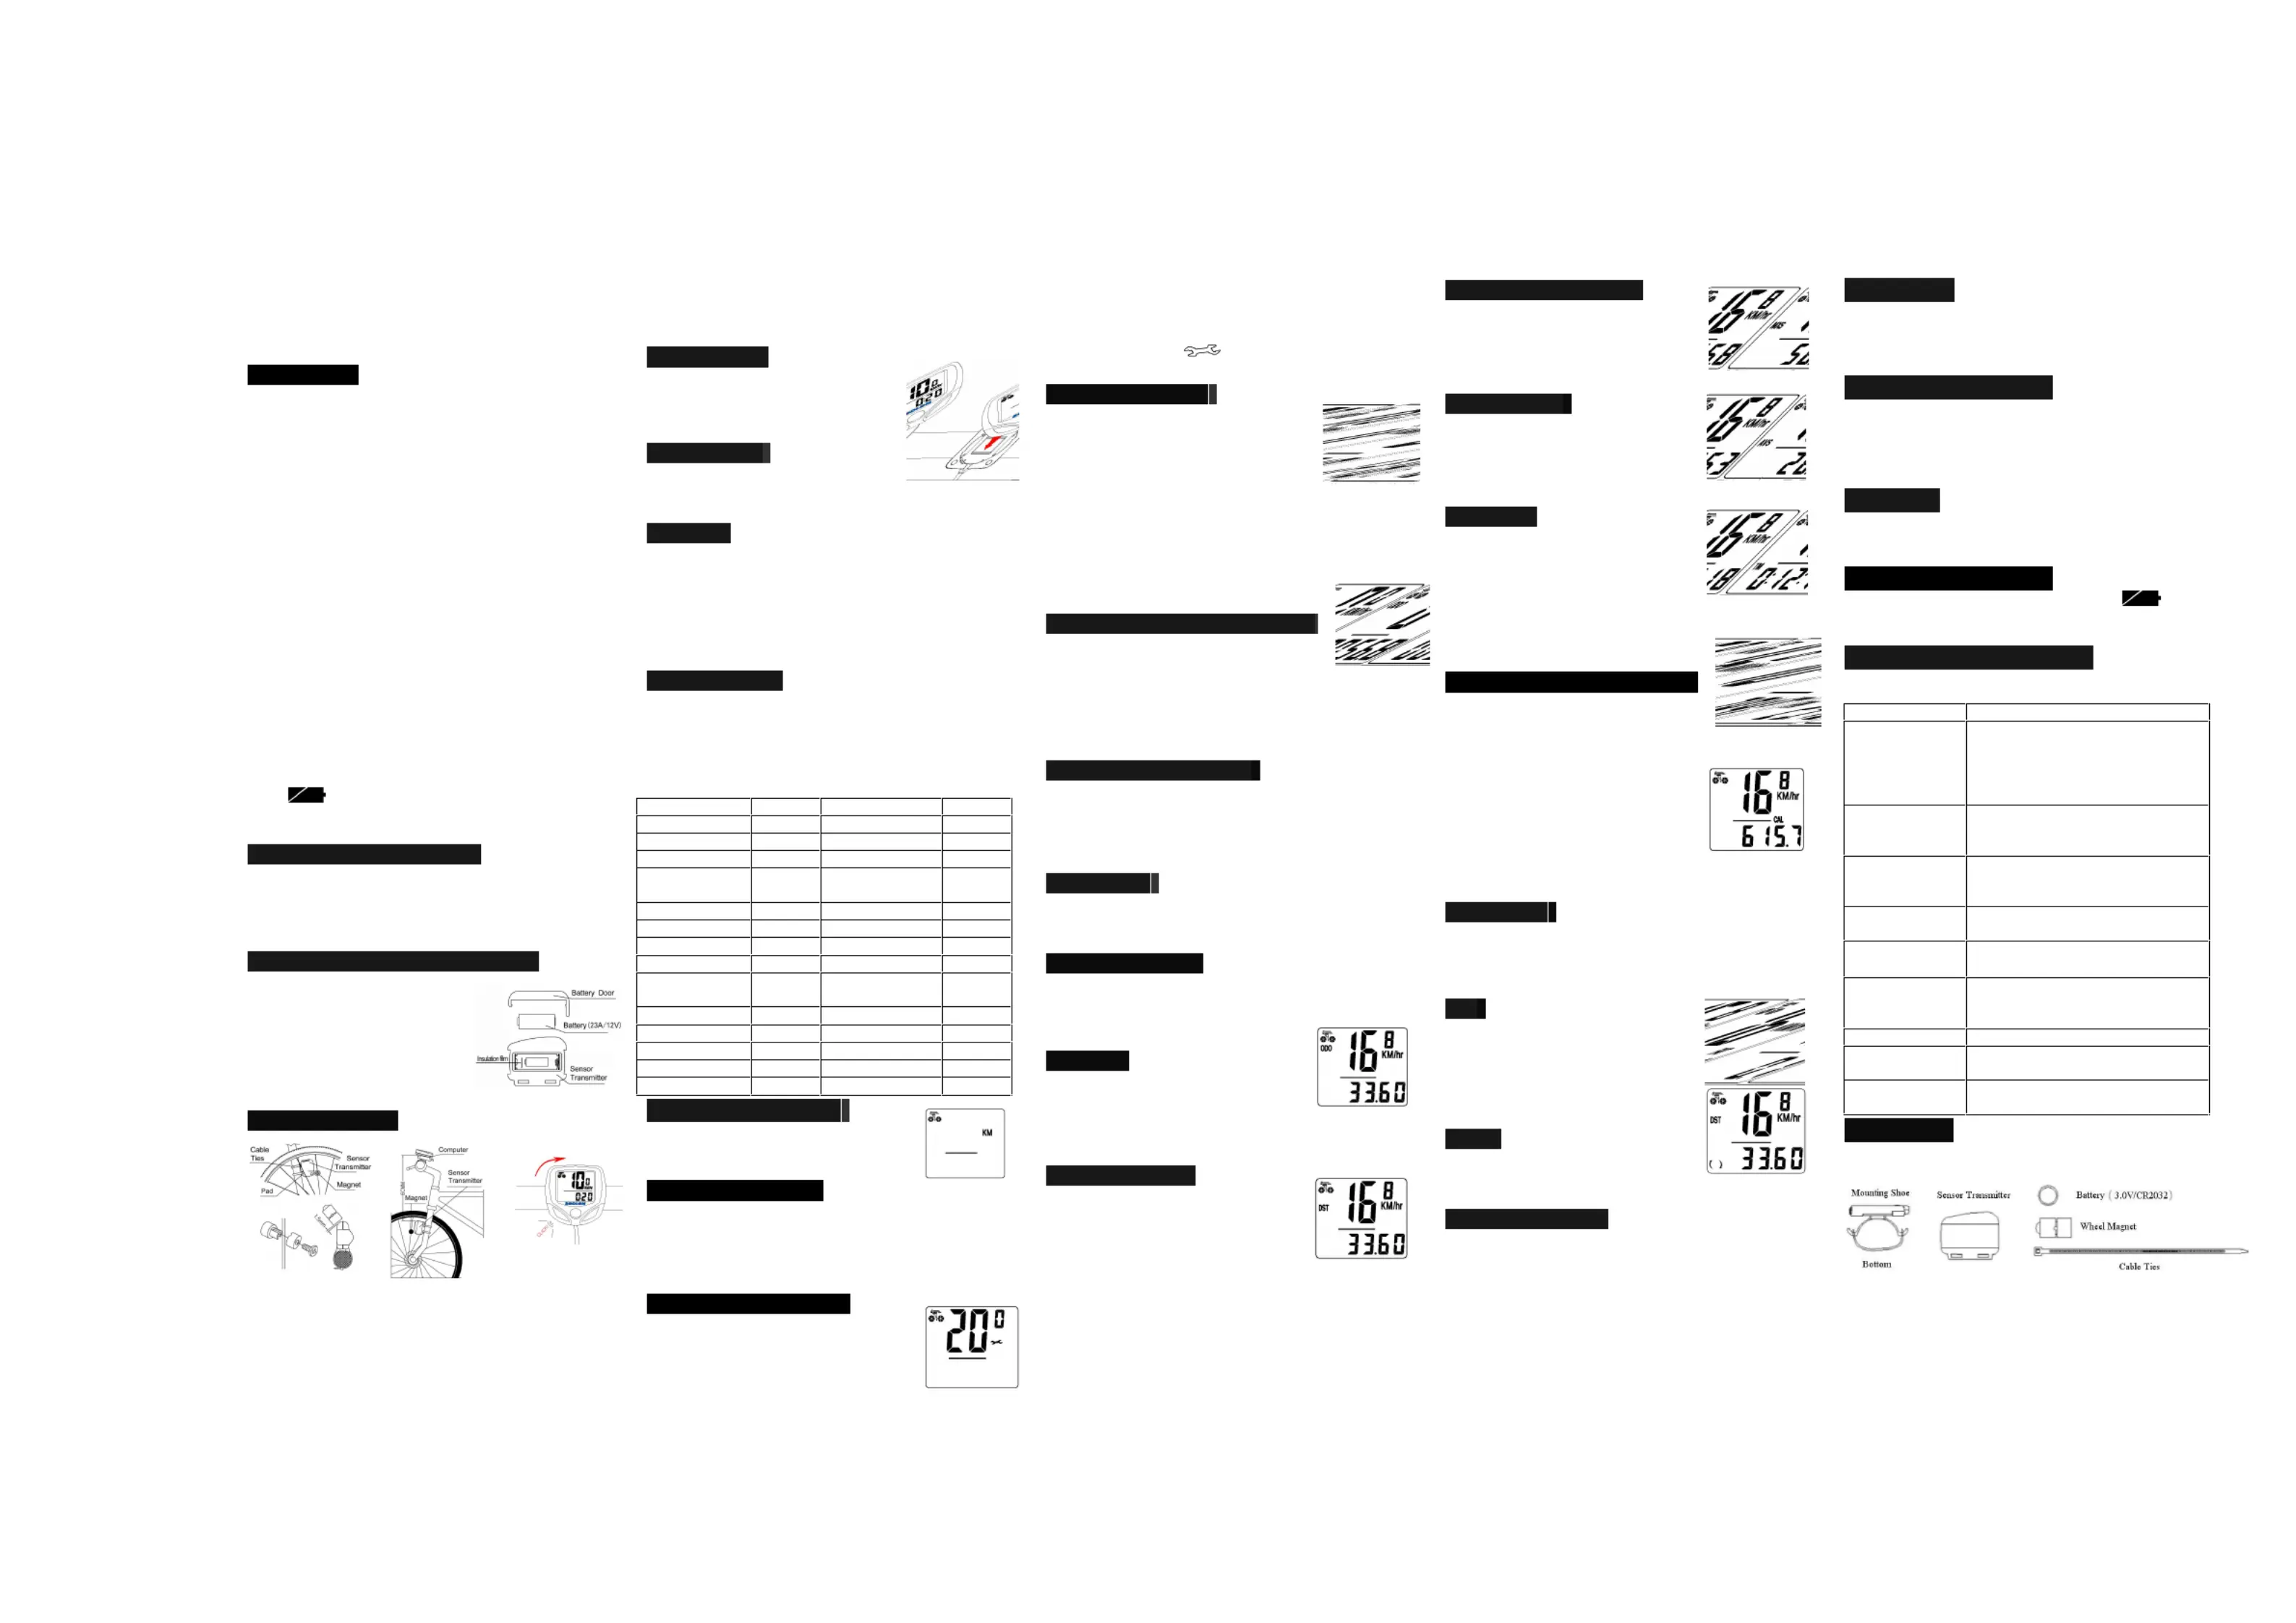
Accessories
Create PDF with GO2PDF for free, if you wish to remove this line, click here to buy Virtual PDF Printer
Specyfikacje produktu
| Marka: | Sunding |
| Kategoria: | komputer rowerowy |
| Model: | SD-546C |
Potrzebujesz pomocy?
Jeśli potrzebujesz pomocy z Sunding SD-546C, zadaj pytanie poniżej, a inni użytkownicy Ci odpowiedzą
Instrukcje komputer rowerowy Sunding

22 Września 2024
22 Września 2024
21 Września 2024
21 Września 2024
20 Września 2024
20 Września 2024
20 Września 2024
20 Września 2024
18 Września 2024
18 Września 2024
Instrukcje komputer rowerowy
Najnowsze instrukcje dla komputer rowerowy
9 Kwietnia 2025
9 Kwietnia 2025
9 Kwietnia 2025
8 Kwietnia 2025
8 Kwietnia 2025
7 Kwietnia 2025
7 Kwietnia 2025
7 Kwietnia 2025
4 Kwietnia 2025
4 Kwietnia 2025