Instrukcja obsługi Techno Line WS 6740
Techno Line Stacja pogodowa WS 6740
Przeczytaj poniżej 📖 instrukcję obsługi w języku polskim dla Techno Line WS 6740 (1 stron) w kategorii Stacja pogodowa. Ta instrukcja była pomocna dla 31 osób i została oceniona przez 4 użytkowników na średnio 4.6 gwiazdek
Strona 1/1
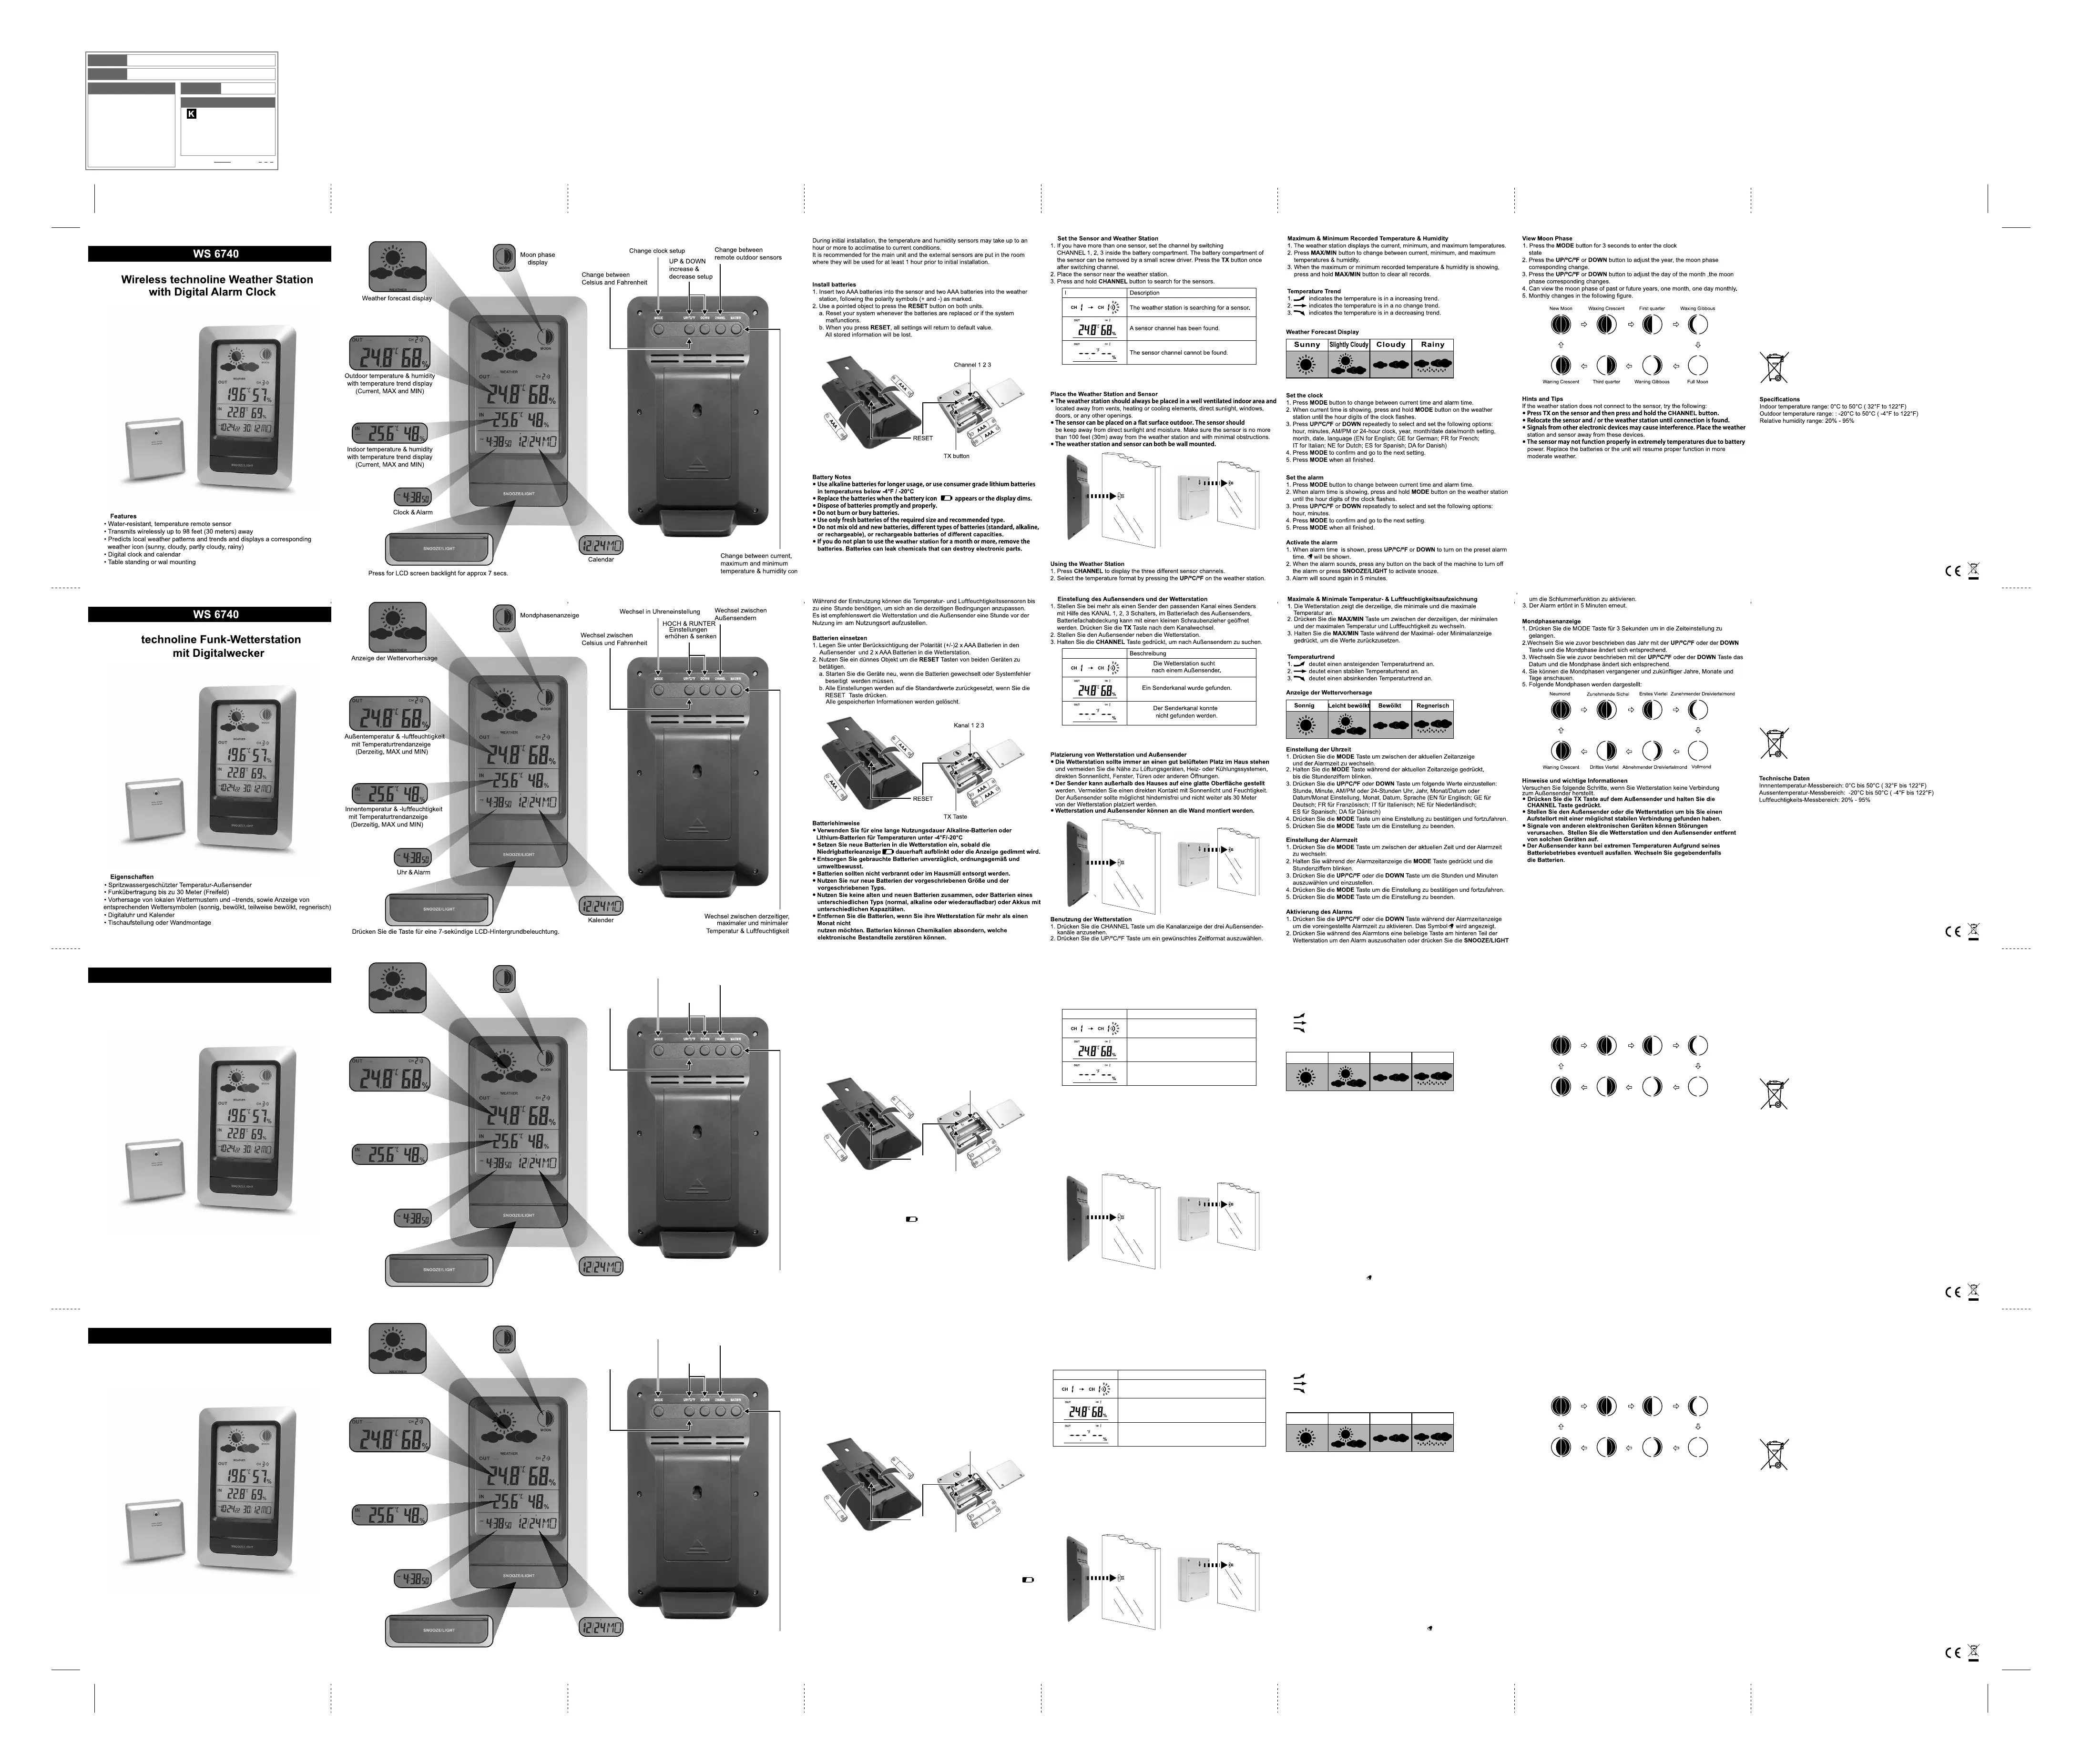
Nastavení senzoru a meteorologické stanice
1. Pokud máte více senzorů, nastavte kanál přepnutím možností CHANNEL 1, 2, 3
uvnitř přihrádky na baterie. Přihrádku na baterie senzoru je možné vyjmout pomocí
malého šroubováku. Po zapnutí kanálu jednou stiskněte tlačítko TX.
2. Umístěte senzor do blízkosti meteorologické stanice.
3. Stisknutím a podržením tlačítka CHANNEL vyhledejte senzory.
Umístění meteorologické stanice a senzoru
• Meteorologická stanice y měla být vždy umístěna v řádně větraném vnitřním
prostředí a umístěna mimo oblast ventilátorů, topných nebo chladicích prvků,
přímého slunečního světla, oken, dveří nebo jiných otvorů.
• Senzor je možné položit na rovný povrch venku. Senzor by měl býtumístěn
mimo přímé sluneční světlo a vlhko. Umístěte senzor do 30 metrů od
meteorologické stanice a dbejte na to, aby v cestě nebyly žádné překážky.
• Meteorologická stanice a senzor by měly být řádně připevněné.
Použití meteorologické stanice
1. Stisknutím tlačítka CHANNEL zobrazte tři různé kanály senzoru.
2. Vyberte formát teploty stisknutím tlačítka UP/ºC/ºF na meteorologické stanici.
Maximální a minimální zaznamenaná teplota a vlhkost
1. Meteorologická stanice zobrazuje aktuální, minimální a maximální teplotu.
2. Stisknutím tlačítka MAX/MIN přepínejte mezi aktuální, minimální a maximální
teplotou a vlhkostí.
3. Po zobrazení maximální nebo minimální nahrané teploty a vlhkosti stisknutím
tlačítka MAX/MIN vymažte všechny záznamy.
Nastavení hodin
1. Pokud chcete přepínat mezi režimem aktuálního času a času buzení, stiskněte
tlačítko MODE.
2. Když se zobrazuje aktuální čas, stiskněte a podržte tlačítko MODE na
meteorologické stanici, dokud nezačnou blikat číslice hodin.
3. Opakovaným stisknutím tlačítka UP/ºC/ºF nebo DOWN vyberte a nastavte
následující možnosti:hodina, minuty, dop./odp. nebo 24hodinový formát, rok, měsíc,
datum/datum/nastavení měsíce, datum, jazyk (EN – angličtina; GE – němčina;
FR – francouzština; IT – italština; NE – němčina; ES – španělština; DA – dánština).
4. Potvrďte stisknutím tlačítka MODE a přejděte na další nastavení.
5. Po dokončení všech nastavení stiskněte tlačítko MODE.
Nastavení budíku
1. Pokud chcete přepínat mezi režimem aktuálního času a času buzení, stiskněte
tlačítko MODE.
2. Když se zobrazuje čas buzení, stiskněte a podržte tlačítko MODE na
meteorologické stanici, dokud nezačnou blikat číslice hodin.
3. Opakovaným stisknutím tlačítka UP/ºC/ºF nebo DOWN vyberte a nastavte
následující možnosti:hodiny, minuty.
4. Potvrďte stisknutím tlačítka MODE a přejděte na další nastavení.
5. Po dokončení všech nastavení stiskněte tlačítko MODE.
Aktivace budíku
1. Po zobrazení času buzení stisknutím tlačítka UP/ºC/ºF nebo DOWN zapněte
přednastavený čas budíku. zobrazí se.
2. Po zaznění signálu stisknutím libovolného tlačítka na zadní straně přístroje budík
vypněte nebo stisknutím tlačítka SNOOZE/LIGHT aktivujte opakované buzení.
3. Budík se opět rozezní za 5 minut.
Zobrazení předpovědi počasí
Tipy a rady
Pokud se meteorologická stanice nepřipojí k senzoru, vyzkoušejte následující:
• Stiskněte tlačítko TX na senzoru a stiskněte a podržte tlačítko CHANNEL.
• Přemístěte senzor nebo meteorologickou stanici, dokud nenajdete připojení.
• Signály z jiných elektronických zařízení mohou způsobit rušení. Umístěte
meteorologickou stanici a senzor dále od těchto zařízení.
• Senzor nemusí správně fungovat v extrémních teplotách kvůli výkonubaterie.
Vyměňte baterie nebo počkejte, až bude mírnější počasí a jednotka obnoví provoz.
Zobrazení fází měsíce
1. Stiskněte tlačítko MODE na 3 sekundy pro vstup do stavuhodin.
2. Stisknutím tlačítka UP/ºC/ºF nebo DOWN upravte rok, změní se odpovídající fáze
měsíce.
3. Stisknutím tlačítka UP/ºC/ºF nebo DOWN upravte den v měsíci, změní se
odpovídající fáze měsíce.
4. Je možné zobrazit fázi měsíce minulých nebo budoucích let, jedem měsíc, jeden
den v měsíci.
5. Měsíce se mění na následujícím obrázku.
Specifikace
Pokojové teplotní rozpětí: 0 °C až 50 °C (32 °F až 122 °F)
Venkovní teplotní rozpětí: -20 °C až 50 °C (-4 °F až 122 °F)
Rozpětí relativní vlhkosti: 20 % – 95 %
Instalace baterií
1. Vložte dvě baterie AAA do senzoru a dvě baterii AAA do meteorologické stanice
správnými symboly polarity (+ a -) podle značení.
2. Špičatým předmětem stiskněte tlačítko RESET na obou jednotkách.
a. Při každé výměně baterií nebo v případě závady systém resetujte.
b. Po stisknutí tlačítka RESET se obnoví výchozí hodnota všech nastavení.
Všechny uložené informace budou ztraceny.
Poznámky k bateriím
•
•
•
•
•
•
•
Použijte alkalické baterie při delším používání nebo běžné lithiové baterie
při teplotách nižších než -4 °F / -20 °C.
Pokud se zobrazí ikona baterie nebo dojde ke ztlumení displeje, vyměňte
baterie.
Staré baterie ihned a správně zlikvidujte.
Baterie nevhazujte do ohně ani nezakopávejte do země.
Používejte pouze nové baterie požadované velikosti a doporučeného typu.
Nekombinujte staré a nové baterie, různé typy baterií (běžné, alkalické nebo
dobíjecí) ani dobíjecí baterie jiné kapacity.
Pokud víte, že meteorologickou stanici nebudete měsíc nebo déle používat,
vyjměte baterie. Baterie mohou uvolňovat chemikálie, které mohou zničit
elektronické díly.
Během počáteční instalace může trvat teplotnímu senzoru a senzoru vlhkosti až
hodinu nebo více než se aklimatizují na aktuální podmínky.
Doporučuje se umístit hlavní jednotku a externí senzory do místnosti, kde budou
používány, nejméně jednu hodinu před počáteční instalací.
Přepínání mezi stupni
CelsiaaFahrenheita
Zvýšení a snížení
tlačítkem se šipkou
nahoru a dolů
Změna nastavení hodin
Změna mezi vzdálenými
venkovními snímači
Změna mezi aktuální,
maximální a minimální
teplotou a vlhkostí
IPopis
Meteorologická stanice vyhledává senzor.
Byla nalezen kanál senzoru.
Kanál senzoru nelze nalézt.
Teplotní tendence
1. indikuje, že teplota má stoupající tendenci.
2. indikuje, že teplota se nemění.
3. indikuje, že teplota má klesající tendenci.
Bezdrátová meteorologická stanice
Technoline s digitálním budíkem
Stiskněte pro podsvícení LCDdispleje napřibližně 7 sekund.
Hodinyabudík
Kalendář
Zobrazení vnitřní teplotya
vlhkosti spolu s teplotním
trendem (aktuální, MAX a MIN)
Zobrazení venkovní teplotya
vlhkosti spolu s teplotním
trendem (aktuální, MAX a MIN)
Zobrazení fází
měsíce
Zobrazení předpovědi počasí
AAA
AAA
AAA
AAA
RESETOVÁNÍ
Kanál 1 23
Tlačítko vysílače (TX)
NovPřibývající půlměsícPrvní čtvrtPřibývající poslední čtvrt
Ubývající půlměsícTřetí čtvrtUbývající čtvrtÚplněk
WS 6740
Funkce
• Vodě odolná se vzdáleným teplotním senzorem
• Bezdrátový přenos až do 30 metrů
• Předpovídá místní vzorce a trendy počasí a zobrazí příslušnou ikonu počasí
(slunečno, oblačno, částečně oblačno, přeháňky)
• Digitální hodiny a kalendář
• Umístění na stůl nebo upevnění na zeď
Slunečno
Mírná oblačnost
OblačnoDeštivo
Configurar el Sensor y la Estación meteorológica
1. Si tiene más de un sensor, ajuste el canal de transmisión en el interruptor
CHANNEL 1, 2, 3 dentro del compartimiento de las pilas. EL compartimiento de
las pilas del sensor se puede quitar usando un destornillador pequeño. Pulse el
botón TX después de seleccionar el canal.
2. Coloque el sensor cerca de la estación meteorológica.
3. Mantenga pulsado el botón CHANNEL para que busque los sensores.
Colocación de la Estación meteorológica y del Sensor
• Debería colocar siempre la estación meteorológica en una área interior bien
ventilada y situada lejos de rejillas de ventilación, calefacción o refrigeración,
de la luz directa del sol y de ventanas, puertas u otras aberturas.
• El sensor lo puede colocar sobre una superficie horizontal en el exterior.
Debería mantener el sensoralejado de la luz directa del sol y de la humedad.
Cerciórese de que el sensor no se encuentra a más de 100 pies (30 m) de la
estación meteorológica y con las mínimas obstrucciones posibles.
• La estación meteorológica y el sensor se pueden montar también sobre una
pared.
Utilizar la Estación meteorológica
1. Pulse el botón CHANNEL para mostrar los diferentes canales de los sensores.
2. Seleccione la unidad de presentación de la temperatura pulsado el botón
UP/ºC/ºF de la estación meteorológica.
Temperatura y Humedad máximas y mínimas registradas
1. La estación meteorológica muestra las temperaturas actual, máxima y mínima.
2. Pulse el botón MAX/MIN para cambiar entre la temperatura y humedad actuales,
máximas y mínimas.
3. Cuando esté viendo la temperatura y humedad actuales, máximas y mínimas,
mantenga pulsado el botón MAX/MIN para borrar todos los registros.
Ajustar la hora del reloj
1. Pulse el botón MODE para cambiar entre la hora actual y la hora de la alarma.
2. Cuando tenga en la pantalla la hora actual, mantenga pulsado el botón MODE en
la estación meteorológica hasta que los dígitos de las horas empiecen a parpadear.
3. Pulse el botón UP/ºC/ºF o DOWN varias veces para seleccionar y ajustar las
opciones siguientes:horas, minutos, AM/PM o 24-h, año, configuración día/mes o
mes/día, mes, día, idioma (EN para inglés; GE para alemán; FR para francés;
IT para italiano; NE para holandés; ES para español; DA para danés).
4. Pulse el botón MODE para confirmar y continuar con el siguiente ajuste.
5. Pulse el botón MODE cuando haya terminado con todos.
Ajustar la alarma
1. Pulse el botón MODE para cambiar entre la hora actual y la hora de la alarma.
2. Cuando tenga en la pantalla la hora de la alarma, mantenga pulsado el botón
MODE en la estación meteorológica hasta que los dígitos de las horas empiecen
a parpadear.
3. Pulse el botón UP/ºC/ºF o DOWN varias veces para seleccionar y ajustar las
opciones siguientes:horas , minutos.
4. Pulse el botón MODE para confirmar y continuar con el siguiente ajuste.
5. Pulse el botón MODE cuando haya terminado con todos.
Activar la alarma
1. Cuando tenga en pantalla la hora de la alarma, pulse UP/ºC/ºF o DOWN para
activar la función alarma a la hora preestablecida. aparecerá en la pantalla.
2. Cuando suene la alarma, pulse cualquier botón de la parte trasera de la unidad
para que deje de sonar, o pulse el botón SNOOZE/LIGHT para activar el retardo
de alarma.
3. La alarma volverá a sonar 5 minutos más tarde.
Presentación de la previsión meteorológica
Trucos y consejos
Si la estación meteorológica no conecta con el sensor, intente lo siguiente:
• Pulse TX en el sensor y mantenga pulsado el botón CHANNEL en la estación.
• Cambie de posición el sensor y/o la estación meteorológica hasta que establezcan
conexión.
• Las señales de otros dispositivos electrónicos pueden causar interferencias. Sitúe
la estación meteorológica y el sensor alejados de estos dispositivos.
• El sensor puede no funcionar correctamente en temperaturas extremas debido al
rendimiento de laspilas. Reemplace las pilas o use la unidad en condiciones de
temperatura más moderadas donde recuperará su funcionamiento correcto.
Ver la fase lunar
1. Pulse el botón MODE durante 3 segundos para entrar en elestado de reloj.
2. Pulse el botón UP/ºC/ºF o DOWN para ajustar el año, y la fase lunar
correspondiente cambia.
3. Pulse el botón UP/ºC/ºF o DOWN para ajustar el día del mes, y la fase lunar
correspondiente cambia.
4. Podrá ver la fase lunar de los años pasados o futuros, un mes, un día del mes.
5. Los cambios de la fase en un mes se muestran en la siguiente imagen.
Especificaciones
Rango de temperatura interior: 0°C hasta 50°C (32°F hasta 122°F)
Rango de temperatura exterior: -20°C hasta 50°C (-4°F hasta 122°F)
Rango de humedad relativa: 20% - 95%
Instalar las pilas
1. Coloque dos pilas AAA dentro del sensor y dos pilas AAA dentro de la estación
meteorológica, de acuerdo con los símbolos de polaridad (+ y -) marcados.
2. Use un objeto puntiagudo para presionar sobre el botón RESET de ambas
unidades.
a. Reinicie su sistema siempre que cambie las pilas o si observa fallos en el
funcionamiento del sistema.
b. Cuando pulse RESET, todos los parámetros de la estación recuperarán sus
valores preestablecidos. Se perderá toda la información de la memoria.
Notas sobre las pilas
•Usepilasalcalinasparaunamayorduración,ousepilasdelitiocomercialesa
temperaturasinferioresa-4°F/-20°C.
•Reemplacelaspilascuandoleaparezcaenpantallaeliconodebateríabaja
osilapresentaciónenlapantallasedebilita.
•Deshágasedelaspilasconprontitudydeunmodoadecuado.
•Noquemenientierrelaspilas.
•Usesolamentepilasnuevasdeltipoytamañorecomendados.
•Nomezclepilasnuevasconpilasusadas,pilasdetiposdiferentes(normales,
alcalinasorecargables),nipilasrecargablesdediferentescapacidades.
•Sitieneplaneadonousarlaestaciónmeteorológicadurantemásdeunmes,
saquelaspilas.Laspilaspuedenliberarfluidosquímicosquepuedendestruirlos
elementoselectrónicos.
Durante la instalación inicial, el sensor de temperatura puede tardar una hora o más
en aclimatarse a las condiciones actuales.
Se recomienda colocar la unidad principal y los sensores exteriores en la habitación
donde se van a conectar al menos 1 hora antes de su instalación inicial.
Cambiar entre grados
Celsius y Fahrenheit
ARRIBA y ABAJO
subir y bajar el
valor ajustado
Ajustar configuración del reloj
Cambiar entre los sensores
remotos exteriores
Cambiar entre las
lecturas de temperatura
y humedad actuales,
máximas y mínimas
IDescripción
La estación meteorológica está buscando un sensor.
Ha encontrado un canal de un sensor.
No puede encontrar el canal del sensor.
Tendencia de Temperaturas
1. indica que la temperatura tiene una tendencia ascendente.
2. indica que la temperatura tiene una tendencia sin cambios.
3. indica que la temperatura tiene una tendencia descendente.
Estación meteorológica inalámbrica
Technoline con despertador digital
Pulsar para iluminación de fondo de la
pantallaLCD durante 7 seg. aprox.
RelojyAlarma
Calendario
Temperatura y humedad interiores
con presentación de la tendencia
de la temperatura
(actual, MAXy MIN)
Temperatura y humedad exteriores
con presentación de la tendencia
de la temperatura
(actual, MAXy MIN)
Presentación de
lafase lunar
Presentación de laprevisión
meteorológica
AAA
AAA
AAA
AAA
REINICIO
Canal 1 2 3
Botón TX
Luna nuevaLuna nueva visibleCuarto crecienteGibosa creciente
Gibosa menguanteCuarto menguanteLuna menguanteLuna llena
WS 6740
Funciones
• Sensor remoto de temperatura, impermeable
• Transmisión inalámbrica hasta 98 pies (30 metros)
• Efectúa el pronóstico del tiempo atmosférico local y de su tendencia,
mostrando el icono correspondiente (soleado, nublado, parcialmente nublado,
lluvioso)
• Reloj digital y calendario
• Soporte sobre mesa o montaje en la pared
Soleado
Parcialmente Nublado
NubladoLluvioso
Colors
Version Date
12 Nov., 2013
14 Nov., 2013
1.)
2.)
3.)
4.)
5.)
Size
Designer
Mic
700 x 534 mm (2-sides)
File Name
KC1174-KL8810-IM-8L_rev2
foldlinediecutline
白底黑字
Front
Precautions
• This main unit is intended to be used only indoors.
• Do not subject the unit to excessive force or shock.
• Do not expose the unit to extreme temperatures, direct sunlight, dust or humidity.
• Do not immerse in water.
• Avoid contact with any corrosive materials.
• Do not dispose this unit in a fire as it may explode.
• Do not open the inner back case or tamper with any components of this unit.
Batteries safety warnings
• Please read all instructions carefully before use.
• Use only alkaline batteries, not rechargeable batteries.
• Install batteries correctly by matching the polarities (+/-).
• Always replace a complete set of batteries.
• Never mix used and new batteries.
• Remove exhausted batteries immediately.
• Remove batteries when not in use.
• Do not recharge and do not dispose of batteries in fire as the batteries may
explode.
• Ensure batteries are stored away from metal objects as contact may cause a
short circuit.
• Avoid exposing batteries to extreme temperature or humidity or direct sunlight.
• Keep all batteries out of reach from children. They are a choking hazard.
Consideration of duty according to the battery law
Old batteries do not belong to domestic waste because they could
cause damages of health and environment. You can return used
batteries free of charge to your dealer and collection points.
As end-user you are committed by law to bring back needed batteries
to distributors and other collecting points!
Vorsichtsmaßnahmen
• Dieses Gerät ist ausschließlich für den Gebrauch in Innenräumen gedacht.
• Setzen Sie das Gerät nicht extremer Gewalteinwirkung oder Stößen aus.
• Setzen Sie das Gerät nicht hohen Temperaturen, direktem Sonnenlicht, Staub
und Feuchtigkeit aus.
• Tauchen Sie das Gerät nicht in Wasser.
• Vermeiden Sie den Kontakt mit ätzenden Materialien.
• Werfen Sie das Gerät nicht ins Feuer. Es könnte explodieren.
• Öffnen Sie nicht das Gehäuse und manipulieren Sie nicht bauliche Bestandteile
des Geräts.
Batterie-Sicherheitshinweise
• Bitte lesen Sie vor der Inbetriebnahme sorgfältig alle Anweisungen.
• Verwenden Sie nur Alkali-Batterien, keine wiederaufladbaren Batterien.
• Legen Sie die Batterien unter Beachtung der Polarität (+/-) richtig ein.
• Ersetzen Sie stets einen vollständigen Batteriesatz.
• Mischen Sie niemals alte und neue Batterien.
• Entfernen Sie erschöpfte Batterien sofort.
• Entfernen Sie die Batterien bei Nichtnutzung.
• Laden Sie die Batterien nicht auf und werfen Sie sie nicht ins Feuer. Sie könnten
explodieren.
• Bewahren Sie die Batterien nicht in der Nähe von Metallobjekten auf, da ein
Kontakt einen Kurzschluss verursachen kann.
• Setzen Sie Batterien keinen hohen Temperaturen, extremer Feuchtigkeit oder
direktem Sonnenlicht aus.
• Bewahren Sie Batterien außerhalb der Reichweite von Kindern auf. Verschlucken
der Batterien kann zum Ersticken führen.
Hinweispflicht nach dem Batteriegesetz
Altbatterien gehören nicht in den Hausmüll. Wenn Batterien in die
Umwelt gelangen, können diese Umwelt- und Gesundheitsschäden
zur Folge haben. Sie können gebrauchte Batterien unentgeltlich bei
ihrem Händler und Sammelstellen zurückgeben. Sie sind als
Verbraucher zur Rückgabe von Altbatterien gesetzlich verpflichtet!
Upozornění
• Tato jednotka je k použití pouze v interiéru.
• Nevystavujte přístroj nadměrné síle nebo nárazu.
• Nevystavujte přístroj extrémním teplotám, přímému slunečnímu záření, prachu
nebo vlhkosti.
• Nikdy neponořujte do vody.
• Vyhněte se kontaktu s korozívními materiály.
• Nevhazujte tento přístroj do ohně, mohl by explodovat.
• Neotevírejte vnitřní pouzdro nebo manipulovat s jakýmikoli součástí této jednotky.
Baterie a bezpečnostní varování
• Před použitím si prosím pečlivě přečtěte všechny pokyny.
• Používat pouze alkalické baterie. Nepoužívejte dobíjecí baterie.
• Baterie vkládejte správně odpovídající polaritou (+/-).
• Vždy vyměňte kompletní sadu baterií.
• Nikdy nemíchejte použité a nové baterie.
• Okamžitě odstraňte vybité baterie.
• Baterie vyjměte, když není zařízení v provozu.
• Nenabíjejte a nevhazujte baterie do ohně, mohly by explodovat.
• Ujistěte se, že jsou baterie uloženy mimo dosah kovových předmětů, neboť
kontakt může způsobit zkrat.
• Nevystavujte baterie extrémním teplotám nebo vlhkosti nebo přímému slunečnímu
záření.
• Ukládejte baterie mimo dosah dětí. Existuje riziko udušení.
Všimněte si požadavky podle baterie-směrnice
Staré baterie nepatří do domovního odpadu, protože by mohly
způsobit škody na zdraví a životní prostředí. Koncový uživatel se
zavazuje zákon přivézt potřebné baterie distributorům a dalších
sběrných míst!
Precauciones
• Esta unidad está diseñada para usarla solamente en interiores.
• No someta unidad a fuerzas o golpes excesivos.
• No exponga la unidad a temperaturas extremas, directa a los rayos del sol,
polvo o humedad.
• No la sumerja en el agua.
• Evite el contacto con cualquier material corrosivo.
• No se deshaga de esta unidad arrojándola al fuego p1-ya que puede explotar.
• No abra la carcasa trasera interior ni manipule ninguno de los componentes de
esta unidad.
Advertencias de seguridad sobre las baterías
• Por favor, lea detenidamente todas las instrucciones antes de usarla.
• Utilizar solamente baterías alcalinas. No utilizar recargables baterías.
• Coloque las baterías correctamente haciendo coincidir la polaridad (+/-).
• Reemplace siempre el juego completo de baterías.
• Nunca mezcle baterías usadas y nuevas.
• Quite las baterías gastadas inmediatamente.
• Saque las baterías cuando no use la unidad.
• No recargue las baterías ni las arroje al fuego p1-ya que pueden reventar.
• Compruebe que guarda las baterías alejadas de objetos metálicos p1-ya que un
contacto con estos puede causar un cortocircuito.
• Evite exponer las baterías a altas temperaturas, humedad o a los rayos directos
del sol.
• Guarde las baterías lejos del alcance de los niños. Pueden atragantarse con ellas.
Obligación en virtud de la ley de baterías
Las baterías usadas no deben ser eliminadas en la basura doméstica.
Si las baterías llegan al medio ambiente, éstas pueden ocasionar
graves efectos para la salud o para el proprio medio ambiente. Puede
devolver las baterías usadas de forma gratuita a su distribuidor o
suministrador. Según la ley, como consumidor uste destá obligado a
devolver las baterías usadas!
Specyfikacje produktu
| Marka: | Techno Line |
| Kategoria: | Stacja pogodowa |
| Model: | WS 6740 |
Potrzebujesz pomocy?
Jeśli potrzebujesz pomocy z Techno Line WS 6740, zadaj pytanie poniżej, a inni użytkownicy Ci odpowiedzą
Instrukcje Stacja pogodowa Techno Line

4 Stycznia 2025
27 Grudnia 2024
27 Grudnia 2024
27 Grudnia 2024
27 Grudnia 2024
27 Grudnia 2024
27 Grudnia 2024
27 Grudnia 2024
27 Grudnia 2024
27 Grudnia 2024
Instrukcje Stacja pogodowa
Najnowsze instrukcje dla Stacja pogodowa
2 Kwietnia 2025
27 Marca 2025
27 Marca 2025
4 Marca 2025
27 Lutego 2025
5 Lutego 2025
27 Stycznia 2025
27 Stycznia 2025
15 Stycznia 2025
14 Stycznia 2025