Instrukcja obsługi Vango Odyssey Hub Large
Przeczytaj poniżej 📖 instrukcję obsługi w języku polskim dla Vango Odyssey Hub Large (2 stron) w kategorii namiot. Ta instrukcja była pomocna dla 25 osób i została oceniona przez 2 użytkowników na średnio 4.3 gwiazdek
Strona 1/2
PITCHING INSTRUCTIONS – ODYSSEY HUB (UK)
FLYSHEET FIRST PITCHING
1.Assemble the poles and lay them on the ground.
2.Open out flysheet and position in required direction.
3.Insert the diagonal poles through the pole sleeves on the outside of the flysheet.
4.Locate one end of each pole on one side of flysheet, into the Ring & Pin system at the base of the tent. Make sure poles
locate into correct pin system (all poles follow corresponding flysheet seams to pin system).
5.Push poles into an arch from opposite ends and locate pole ends into corresponding metal pin to create the dome.
6.The poles MUST be guided into a dome while pitching.
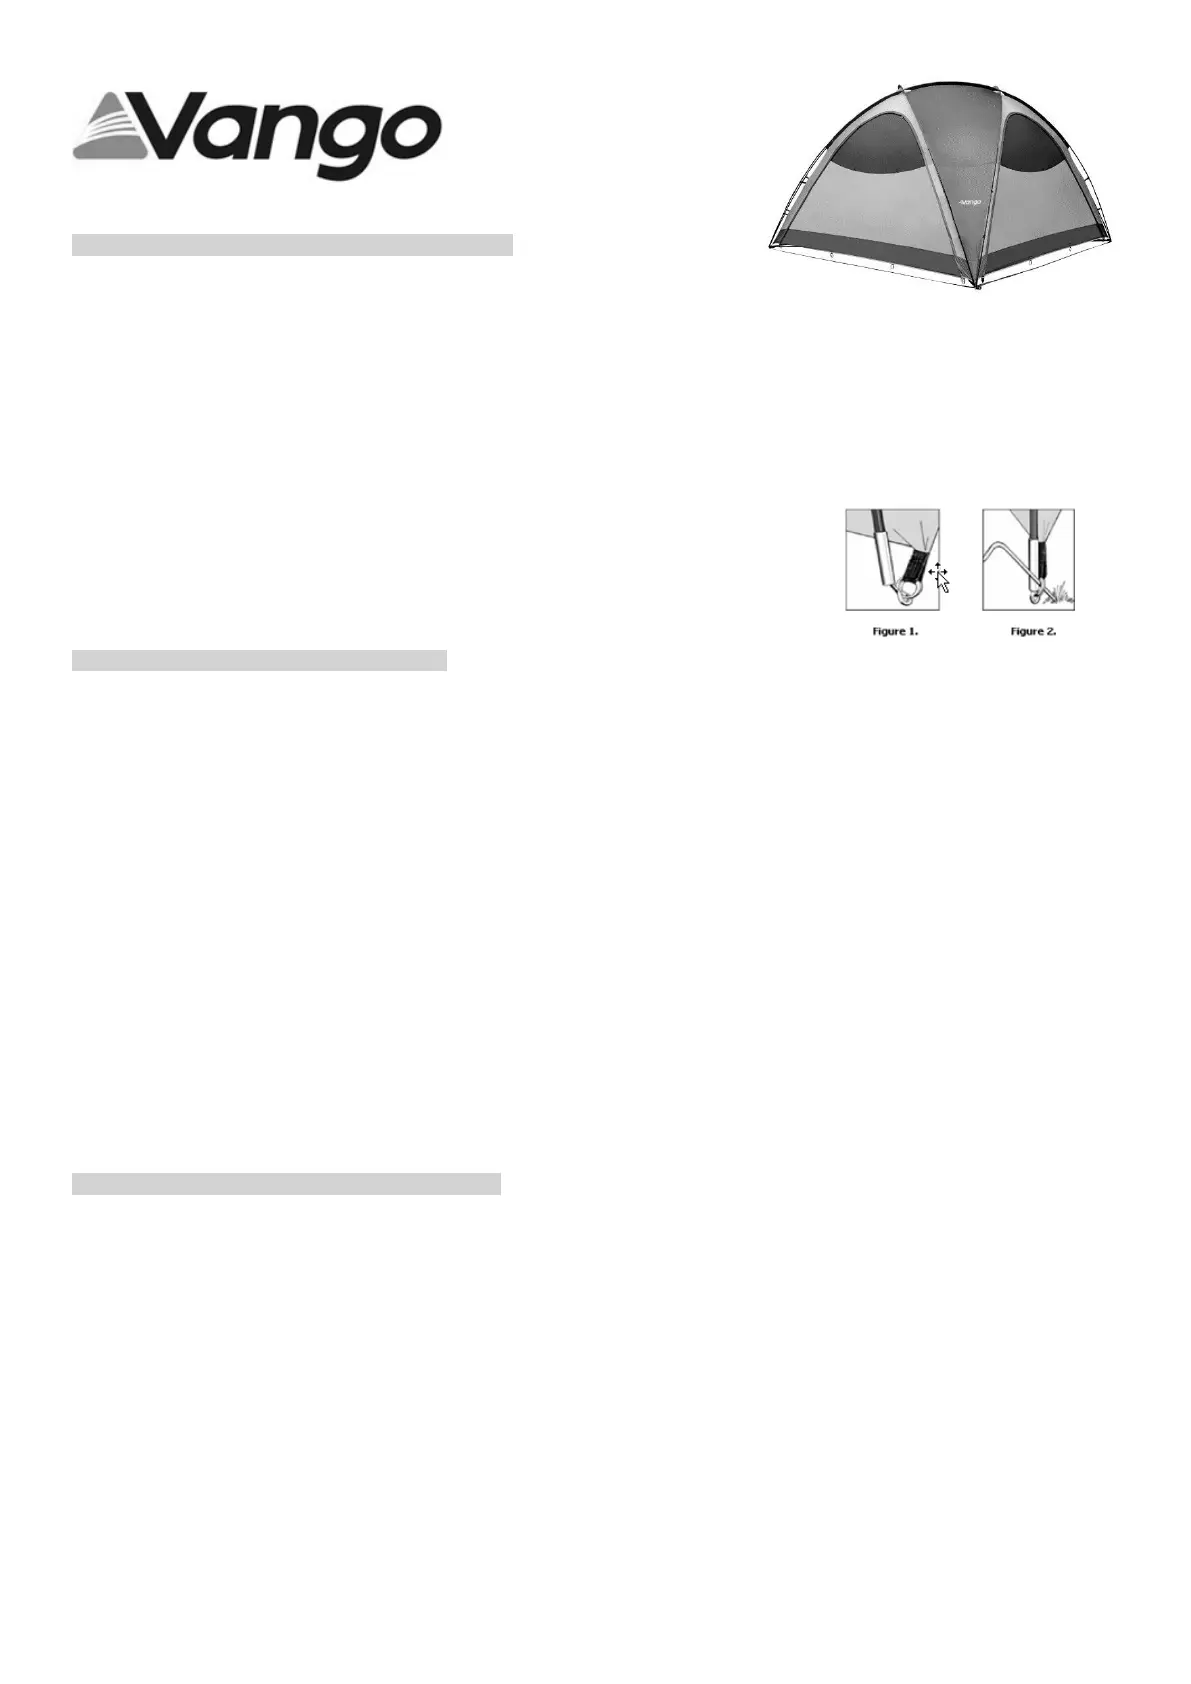
7.Secure the tent using the pin pegs through the Ring & Pin system – see diagram below.
8.Peg out ALL guy lines, ensuring that they are in line with the pole or seam they are attached to.
RING & PIN SYSTEM:
1.Locate one end of pole onto the corresponding metal pin (figure 1)
2.Peg the corners of the tent through the metal rings using pin-pegs (figure 2)
3.Pegs should be positioned at a 45 degree angle to ensure maximum grip
AUFBAUANLEITUNG– ODYSSEY HUB (DE)
MIT AUßENZELTAUFBAU ZUERST
1.Stecken Sie die Stangen zusammen und legen Sie sie auf den Boden
2.Außenzelt auslegen und korrekt ausrichten.
3.Fixieren Sie die Stangenhüllen an der Außenseite des Überdachs und führen Sie die Stangen ein.
4.Befestigen Sie ein Ende jeder Stange auf einer Seite des Zelts in dem an der Bodenplane befestigte Metallstiftsystem.
Achten Sie darauf, dass die Stangen in das korrekte Stift-System eingesteckt werden; alle Stangen verlaufen an den
zugehörigen Außenzeltnähten entlang zum Stift-System.
5.Drücken Sie die anderen Enden dieser Stangen gewölbeförmig hoch und stecken Sie die Spitzen in die passenden Ösen an
den Ecken des Innenzelts, wodurch die Hauptkuppel des Gestänges geformt wird.
6.Das Gestänge muss während des Aufstellens leicht nach oben gedrückt werden, damit es die Kuppelform erreichen kann,
ohne zu brechen.
7.Sichern Sie das Zelt durch das Ring-und-Stift-System mit den Arretierstiften - Diagramm unten.
8.Spannen Sie ALLE Spannschnüre um sicherzustellen, dass sie sich in einer Linie mit der Naht befinden, mit der sie
befestigt sind. Die Spannschnüre der Stangen sollten an einer Ecke der Vorder- und Rückseite des Zelts befestigt werden,
um das Dach zu spannen.
RING-UND-STIFT-SYSTEM:
1.Fixieren Sie ein Ende der Vorbaustange am dazu passenden Metallstift
2.Stecken Sie die Ecken des Zelts durch die Metallringe, indem Sie die Arretierstifte benutzen.
3.Die Heringe sollten in einem Winkel von 45 Grad platziert werden, um maximalen Halt zu erzielen.
CONSIGNES DE MONTAGE– ODYSSEY HUB (FR)
MONTAGE EN COMMENÇANT PAR LE DOUBLE TOIT
1.Rassembler les arceaux et les poser sur le sol
2.Déferler le double toit et orienter dans le sens requis
3.Placer les fourreaux d'arceau à l'extérieur du double toit et y insérer les arceaux.
4.Situer un bout de chaque mât dans l'œillet du tapis de sol sur la longueur d'un côté de la tente. S'assurer que les mâts
joignent à la cheville correspondante, tous les mâts suivent les coutures du double toit.
5.Pousser les autres extrémités de ces arceaux vers le haut, à l'intérieur d'une arche et insérer leurs bouts dans les oeillets
correspondants, sur les coins de la tente intérieure, formant ainsi le dôme principal de la structure d'arceau.
6.Aider les arceaux à créer la forme d’un dôme lors du montage de la tente.
7.Sécuriser la tente, grâce aux piquets utilisés avec le système ring & pin – voir le graphique ci-dessous.
8.Attacher TOUTES les cordes de tension, en s'assurant qu'elles sont alignées avec la couture à laquelle elles sont
attachées. Les cordes de tension de l'arceau devraient être attachées selon un angle dirigé vers l'avant et l'arrière de la
tente, afin de tendre le panneau du toit.
SYSTÈME DE FIXATION RING & PIN:
1.Placer une extrémité de l'arceau de la porche sur la cheville de métal
2.Fixer les coins de la tente aux anneaux de métal, à l'aide de chevilles de fixation
3.Les piquets doivent se planter à un angle de 45 degrés pour le maximum de prise
Specyfikacje produktu
| Marka: | Vango |
| Kategoria: | namiot |
| Model: | Odyssey Hub Large |
Potrzebujesz pomocy?
Jeśli potrzebujesz pomocy z Vango Odyssey Hub Large, zadaj pytanie poniżej, a inni użytkownicy Ci odpowiedzą
Instrukcje namiot Vango

30 Marca 2025
28 Grudnia 2024
3 Października 2024
3 Października 2024
3 Października 2024
3 Października 2024
3 Października 2024
3 Października 2024
1 Października 2024
29 Września 2024
Instrukcje namiot
Najnowsze instrukcje dla namiot
31 Marca 2025
29 Marca 2025
29 Marca 2025
29 Marca 2025
29 Marca 2025
29 Marca 2025
29 Marca 2025
29 Marca 2025
28 Marca 2025
26 Marca 2025