Instrukcja obsługi Whirlpool GMF 7522/IXL
Przeczytaj poniżej 📖 instrukcję obsługi w języku polskim dla Whirlpool GMF 7522/IXL (8 stron) w kategorii piekarnik. Ta instrukcja była pomocna dla 22 osób i została oceniona przez 4 użytkowników na średnio 5.0 gwiazdek
Strona 1/8
PRODUCT DESCRIPTION SHEET
PRODUCT DESCRIPTION SHEET
PRODUCT DESCRIPTION SHEET
PRODUCT DESCRIPTION SHEETPRODUCT DESCRIPTION SHEET
EN
EN
EN
EN EN
5019 300 02568
5019 300 02568
5019 300 02568
5019 300 025685019 300 02568
AU
AU
AU
AUAU
T
T
T
TT
o get full satisfaction from the hob,
o get full satisfaction from the hob,
o get full satisfaction from the hob,
o get full satisfaction from the hob, o get full satisfaction from the hob, please read these instruct
please read these instruct
please read these instruct
please read these instructplease read these instructions carefully and keep them
ions carefully and keep them
ions carefully and keep them
ions carefully and keep themions carefully and keep them for future consultation.
for future consultation.
for future consultation.
for future consultation. for future consultation.
LIGHTING THE BU
LIGHTING THE BU
LIGHTING THE BU
LIGHTING THE BULIGHTING THE BURNERS
RNERS
RNERS
RNERSRNERS
•To ignite one of the burners, turn the relative knob anti-clockwise to the maximum flame setting .
•Press the knob against the control panel to ignite the burner.
•After the burner has ignited, keep the knob pressed for about 5 seconds to allow the thermocouple to warm up.
This burner safety device shuts off the gas supply to the burner if the flame goes out accidentally (because of sudden
draught, an interruption in the gas delivery, boiling over of liquids, etc.).
•
•
•
••The device must not be pressed for more
The device must not be pressed for more
The device must not be pressed for more
The device must not be pressed for more The device must not be pressed for more than 15 sec. If
than 15 sec. If
than 15 sec. If
than 15 sec. Ifthan 15 sec. If, after that tim
, after that tim
, after that tim
, after that tim, after that time has el
e has el
e has el
e has ele has elapsed, the burner d
apsed, the burner d
apsed, the burner d
apsed, the burner dapsed, the burner does not remain lit,
oes not remain lit,
oes not remain lit,
oes not remain lit, oes not remain lit,
wait at least one minute befo
wait at least one minute befo
wait at least one minute befo
wait at least one minute befowait at least one minute before trying to light it again.
re trying to light it again.
re trying to light it again.
re trying to light it again.re trying to light it again.
-The burner might go out when the knob is released. This means that the thermocouple has not warmed up enough.
In this case, repeat the operations described above.
RACTICAL AD
RACTICAL AD
RACTICAL AD
RACTICAL ADRACTICAL ADVICE FOR USING THE BURNERS
VICE FOR USING THE BURNERS
VICE FOR USING THE BURNERS
VICE FOR USING THE BURNERSVICE FOR USING THE BURNERS
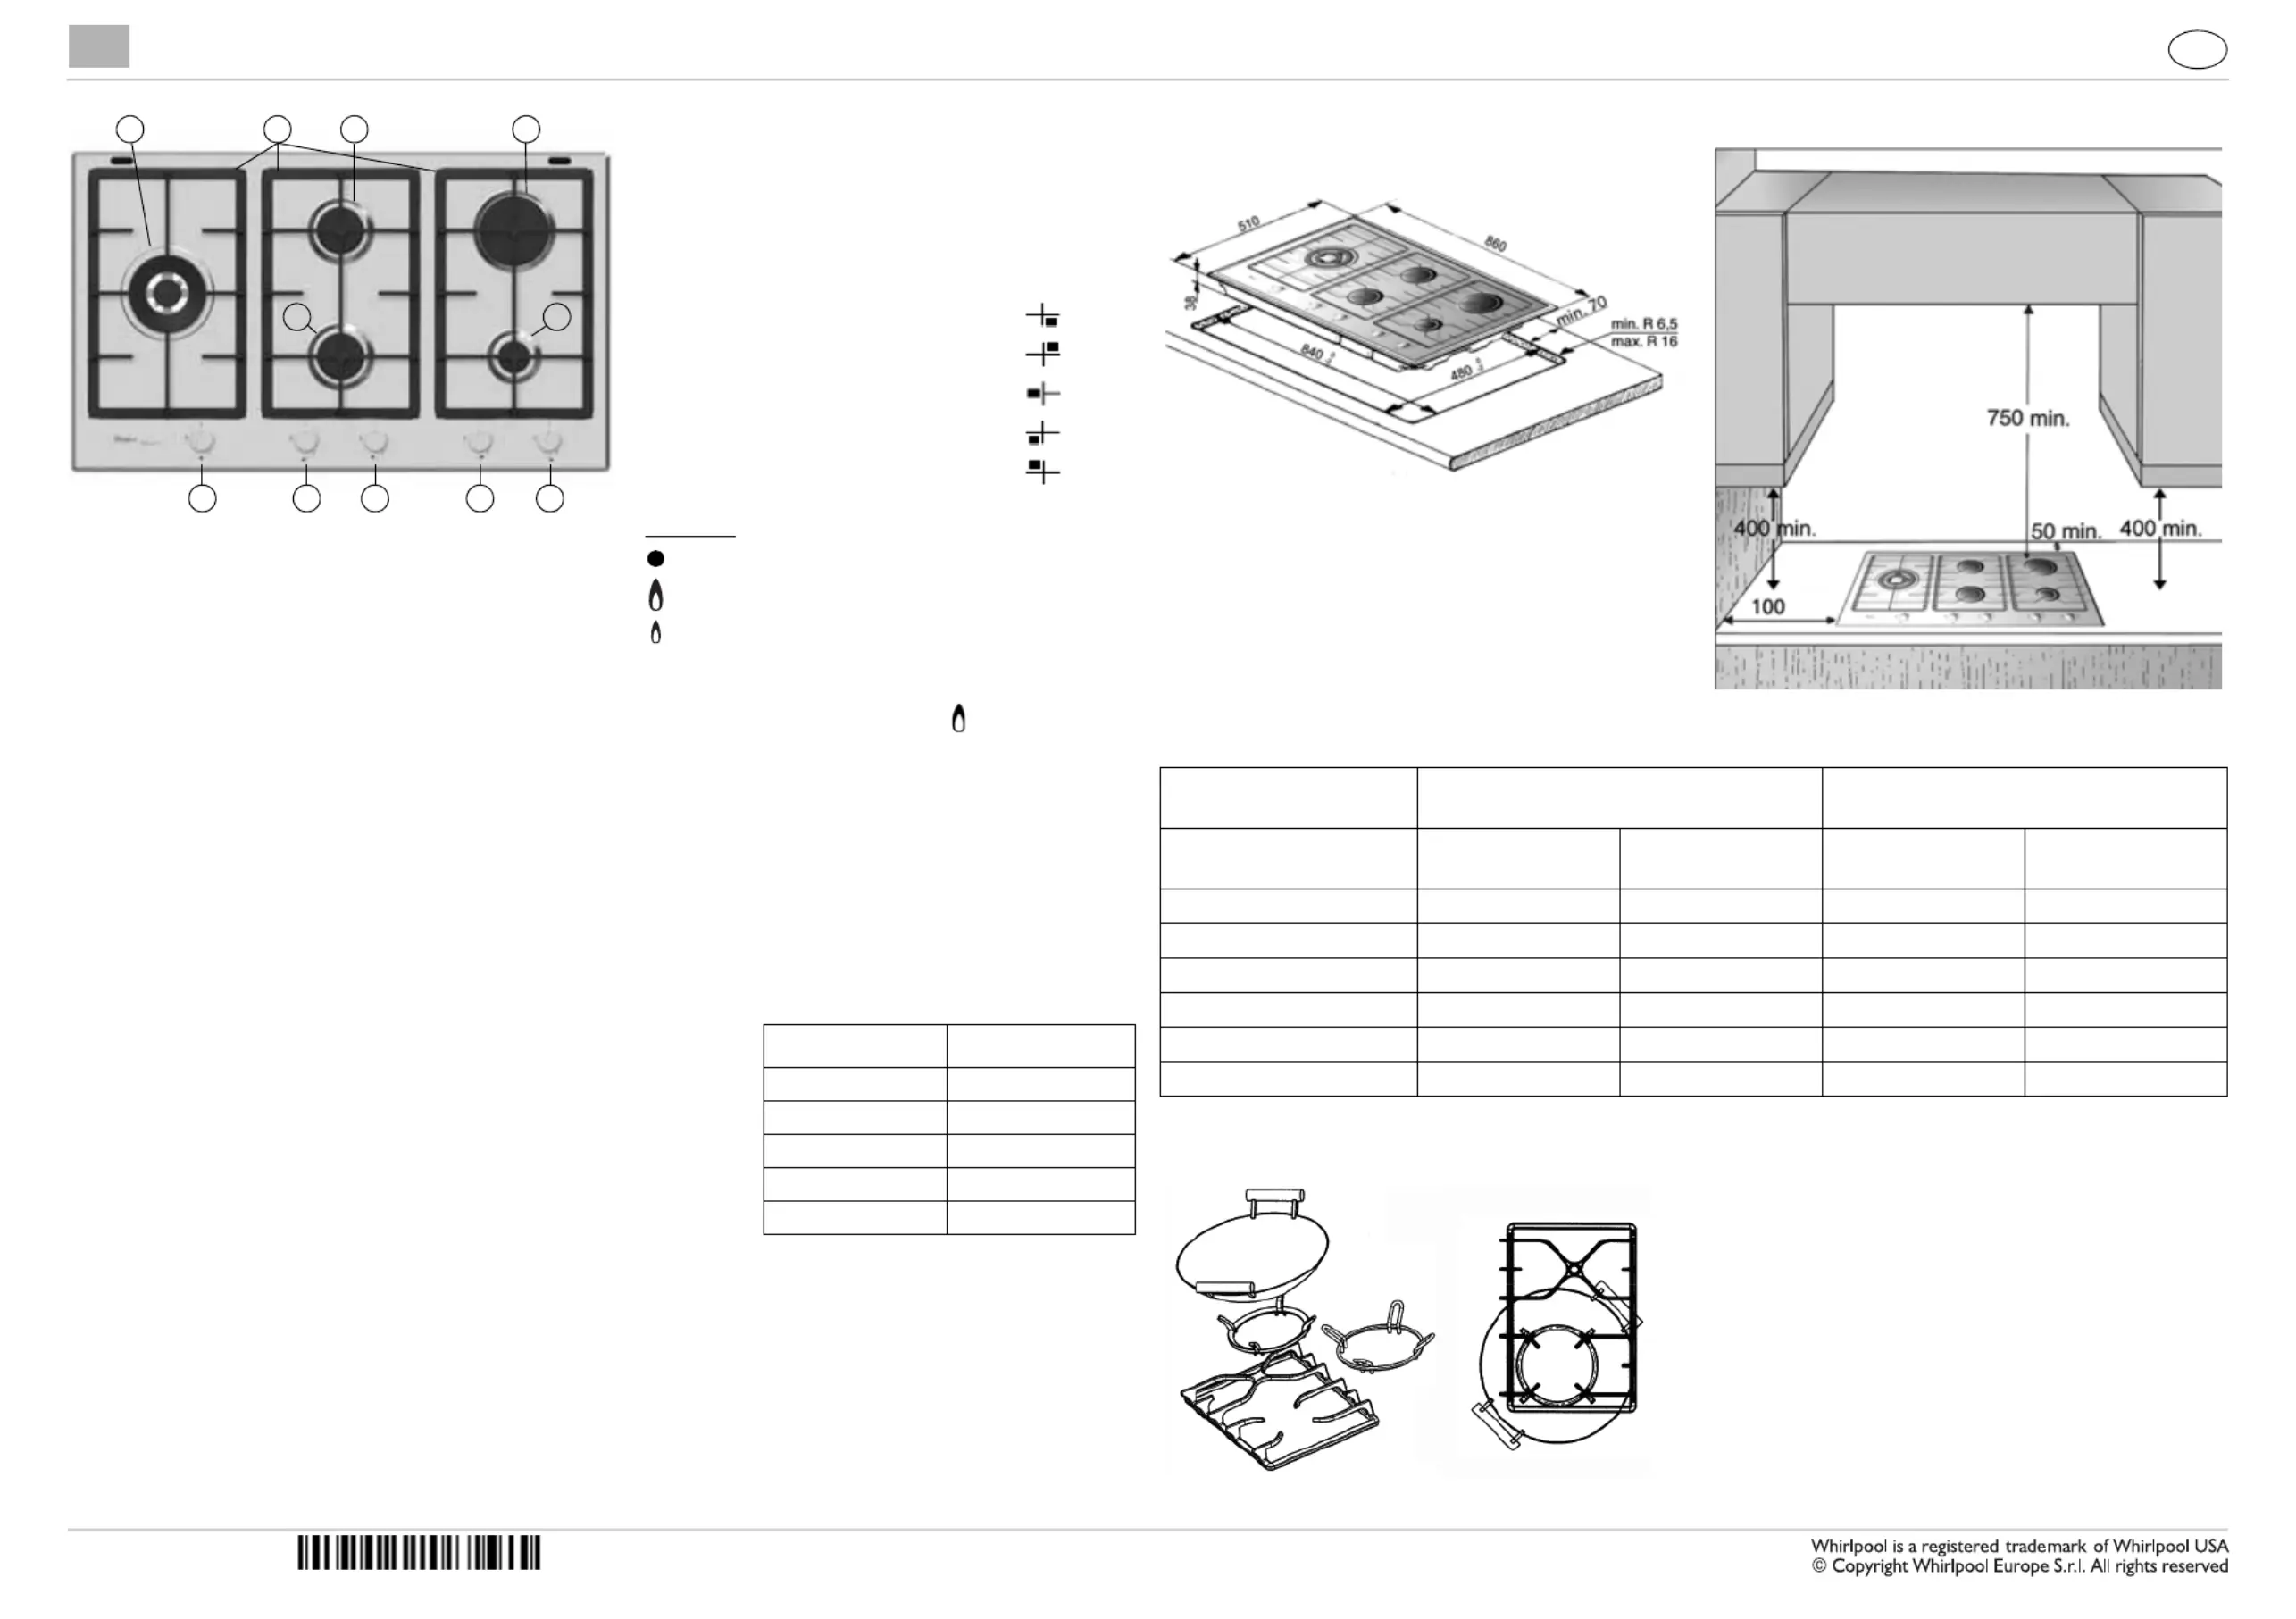
1.Removable panstand grids
2.Semi-rapid burner FC
3.Auxiliary burner
4.Semi-rapid burner BC
5.Rapid burner
6.2 ring burner
7.Auxiliary burner control knob
8.Rapid burner control knob
9.2 ring burner control knob
10.Semi-rapid burner FC control knob
11.Semi-rapid burner BC control knob
Symbols
Tap closed
Maximum flame
Minimum flame
32
78109
6
11
145
This hob has burners of different diameters. For better burner performance,
please stick to the following rules:
-Use pots and pans with bottoms the same width as that of the burners or
slightly larger (see table on the right).
-Only use flat-bottomed pots and pans.
-Use the correct amount of water for cooking foods and keep the pot covered.
-Make sure pots on the grates do not protrude beyond the edge of the hob
-In the case of pans with convex bottoms (WOK), use the support grille
(not included), which should be positioned only on the 2 ring burner.
IMPORTANT: improper use of the grids can result in damage to the hob: do
IMPORTANT: improper use of the grids can result in damage to the hob: do
IMPORTANT: improper use of the grids can result in damage to the hob: do
IMPORTANT: improper use of the grids can result in damage to the hob: do IMPORTANT: improper use of the grids can result in damage to the hob: do
not position the grids upside down o
not position the grids upside down o
not position the grids upside down o
not position the grids upside down onot position the grids upside down or slide them across the hob.
r slide them across the hob.
r slide them across the hob.
r slide them across the hob.r slide them across the hob.
Do not use:
Do not use:
Do not use:
Do not use:Do not use:
-Cast iron griddles, ollar stones, terracotta pots and pans.
-Heat diffusers such as metal mesh, or any other types.
-Two burners simultaneously for one receptacle (e.g. fish kettle).
Burner
Burner
Burner
BurnerBurnerP
P
P
PPot Ø
ot Ø
ot Ø
ot Øot Ø
2 ringFrom 24 to 30 cm
RapidFrom 24 to 26 cm
Semi-rapid BCFrom 16 to 24 cm
Semi-rapid FCFrom 16 to 22 cm
AuxiliaryFrom 8 to 14 cm
BC: means Back
Centre
FC: means Front
Centre
DIMENSIONS AND DIST
DIMENSIONS AND DIST
DIMENSIONS AND DIST
DIMENSIONS AND DISTDIMENSIONS AND DISTANCES
ANCES
ANCES
ANCES ANCES TO BE MAINT
TO BE MAINT
TO BE MAINT
TO BE MAINTTO BE MAINTAINED (mm)
AINED (mm)
AINED (mm)
AINED (mm)AINED (mm)
NOTE:
NOTE:
NOTE:
NOTE: NOTE: In case of installation of a hood
In case of installation of a hood
In case of installation of a hood
In case of installation of a hoodIn case of installation of a hood above the cooktop, please refer to
above the cooktop, please refer to
above the cooktop, please refer to
above the cooktop, please refer to above the cooktop, please refer to the ho
the ho
the ho
the ho the hood instructions for the correct distance.
od instructions for the correct distance.
od instructions for the correct distance.
od instructions for the correct distance.od instructions for the correct distance.
NOTE:
NOTE:
NOTE:
NOTE:NOTE:The indicated clearance dimensions are
The indicated clearance dimensions are
The indicated clearance dimensions are
The indicated clearance dimensions are The indicated clearance dimensions are applicable to al
applicable to al
applicable to al
applicable to alapplicable to all non-
l non-
l non-
l non-l non-combustible materials.
combustible materials.
combustible materials.
combustible materials.combustible materials.
ELECTRIC SUPPL
ELECTRIC SUPPL
ELECTRIC SUPPL
ELECTRIC SUPPLELECTRIC SUPPLY
Y
Y
YY: 220-240 V ~ 50/60 Hz 0.6 V
: 220-240 V ~ 50/60 Hz 0.6 V
: 220-240 V ~ 50/60 Hz 0.6 V
: 220-240 V ~ 50/60 Hz 0.6 V: 220-240 V ~ 50/60 Hz 0.6 VA
A
A
AA
WOK AD
WOK AD
WOK AD
WOK ADWOK ADAPTER
APTER
APTER
APTERAPTER
Gas T
Gas T
Gas T
Gas TGas T
ype
ype
ype
ypeype
Natural @ 1.00 kPa
(test point pressure)
Universal LP @ 2.75 kPa
(inlet pressure)
BURNER
BURNER
BURNER
BURNERBURNER
Nominal Gas
Consumption (MJ/h)
Nominal Injector Size
(mm)
Nominal Gas
Consumption (MJ/h)
Nominal Injector Size
(mm)
FRONT RHS Auxiliary4.10.903.40.52
REAR CHS Semi-Rapid C6.81.175.50.67
FRONT CHS Semi-Rapid C6.81.175.50.67
REAR RHS Rapid9.61.409.50.85
MIDDLE LHS Wok C 17.61.9215.01.08
TOTAL44.9-38.9-
Specyfikacje produktu
| Marka: | Whirlpool |
| Kategoria: | piekarnik |
| Model: | GMF 7522/IXL |
Potrzebujesz pomocy?
Jeśli potrzebujesz pomocy z Whirlpool GMF 7522/IXL, zadaj pytanie poniżej, a inni użytkownicy Ci odpowiedzą
Instrukcje piekarnik Whirlpool

9 Kwietnia 2025
8 Kwietnia 2025
7 Kwietnia 2025
7 Kwietnia 2025
7 Kwietnia 2025
6 Kwietnia 2025
6 Kwietnia 2025
6 Kwietnia 2025
4 Kwietnia 2025
4 Kwietnia 2025
Instrukcje piekarnik
Najnowsze instrukcje dla piekarnik
9 Kwietnia 2025
9 Kwietnia 2025
9 Kwietnia 2025
9 Kwietnia 2025
9 Kwietnia 2025
9 Kwietnia 2025
9 Kwietnia 2025
9 Kwietnia 2025
9 Kwietnia 2025
9 Kwietnia 2025