Instrukcja obsługi Yamaha VXS3FT
Przeczytaj poniżej 📖 instrukcję obsługi w języku polskim dla Yamaha VXS3FT (2 stron) w kategorii głośnik. Ta instrukcja była pomocna dla 47 osób i została oceniona przez 8 użytkowników na średnio 4.5 gwiazdek
Strona 1/2
1
PRECAUTIONS
PLEASE READ CAREFULLY BEFORE
PROCEEDING
Please keep this manual in a safe place for future
reference.
WARNING
Always follow the basic precautions listed below
to avoid the possibility of serious injury or even
death from electrical shock, short-circuiting,
damages, fire or other hazards. These
precautions include, but are not limited to, the
following:
Do not open
•This device contains no user-serviceable parts. Do not
attempt to disassemble the internal parts or modify them
in any way. If it should appear to be malfunctioning,
discontinue use immediately and have it inspected by
qualified Yamaha service personnel.
Water warning
•Do not expose the device to rain, use it near water or in
damp or wet conditions. If any liquid such as water
seeps into the device, turn off the power of the amplifier
immediately. Then have the device inspected by
qualified Yamaha service personnel.
Hearing loss
•When turning on the AC power in your audio system,
always turn on the power amplifier LAST, to avoid
hearing loss and speaker damage. When turning the
power off, the power amplifier should be turned off FIRST
for the same reason.
Fire warning
•Do not place any burning items or open flames near the
device, since they may cause a fire.
If you notice any abnormality
•If any of the following problems occur, immediately turn
off the power of the amplifier.
-Unusual smells or smoke are emitted.
-Some object has been dropped into the device.
-There is a sudden loss of sound during use of the
device.
-Cracks or other visible damage appear on the device.
Then have the device inspected or repaired by qualified
Yamaha service personnel.
CAUTION
Always follow the basic precautions listed below
to avoid the possibility of physical injury to you
or others, or damage to the device or other
property. These precautions include, but are not
limited to, the following:
Location
•Do not place the device in an unstable position where it
might accidentally fall over and cause injuries.
•Do not place the device in a location where it may come
into contact with corrosive gases or salt air. Doing so
may result in malfunction.
•Avoid being near the device during a disaster, such as
an earthquake. Since the device may fall and cause
injury, stay away from the device quickly and move to a
safe place.
•Before moving the device, remove all connected cables.
•Always consult qualified Yamaha service personnel if the
device installation requires construction work, and make
sure to observe the following precautions.
-Choose mounting hardware and an installation location
that can support the weight of the device.
-Avoid locations that are exposed to constant vibration.
-Use the required tools to install the device.
-Inspect the device periodically.
Connections
•Before connecting the device to other devices, turn off
the power for all devices. Also, before turning the power
of all devices on or off, make sure that all volume levels
are set to the minimum. Failing to do so may result in
electric shock, hearing loss, or equipment damage.
•Use only speaker cables for connecting speakers to the
speaker jacks. Use of other types of cables may result in
fire.
Handling caution
•Avoid use excessive force on the connectors to prevent
injuries.
•Do not operate the device if the sound is distorting.
Prolonged use in this condition could cause overheating
and result in fire.
•Avoid pulling the connected cables to prevent injuries.
•When choosing a power amplifier for use with this
device, make sure that the output power of the amplifier
is lower than the power capacity of this device. If the
output power is higher than the power capacity,
malfunction or fire may occur.
•Do not input excessively loud signals that may result in
clipping in the amplifier or cause the following:
-Feedback, when using a microphone
-Continuous and extremely loud sound from a musical
instrument, etc.
-Continuous and excessively loud distorted sound
-Noise caused by plugging/unplugging the cable while
the amplifier is turned on
Even if the output power of the amplifier is lower than the
power capacity of this device (program), damage to the
device, malfunction or fire may occur.
PA_en_7
NOTICE
To avoid the possibility of malfunction/ damage to the
product, damage to data, or damage to other property, fol-
low the notices below.
Handling and maintenance
•Do not expose the device to excessive dust or vibration,
or extreme cold or heat (such as in direct sunlight or near
a heater), in order to prevent the possibility of panel dis-
figuration, unstable operation, or damage to the internal
components.
•When cleaning the device, use a dry and soft cloth. Do
not use paint thinners, solvents, cleaning fluids, or chem-
ical-impregnated wiping cloths.
•Condensation can occur in the device due to rapid,
drastic changes in ambient temperature—when the
device is moved from one location to another, or air con-
ditioning is turned on or off, for example. Using the
device while condensation is present can cause dam-
age. If there is reason to believe that condensation might
have occurred, leave the device for several hours without
turning on the power until the condensation has com-
pletely dried out.
•Be sure to observe the amplifier’s rated load impedance,
particularly when connecting speakers in parallel. Con-
necting an impedance load outside the amplifier's rated
range can damage the amplifier.
•Protection Circuit
This speaker system has an internal protection circuit
that shuts off the speaker unit when an excessive input
signal is applied. If the speaker unit emits no sound,
reduce the volume level of the amplifier immediately. The
sound will return automatically in several seconds.
•Do not place the speaker face down, as deformation of
the grille may result.
Information
About this manual
•The illustrations as shown in this manual are for instruc-
tional purposes only.
•The company names and product names in this manual
are the trademarks or registered trademarks of their
respective companies.
Yamaha cannot be held responsible for damage
caused by improper use or modifications to the device.
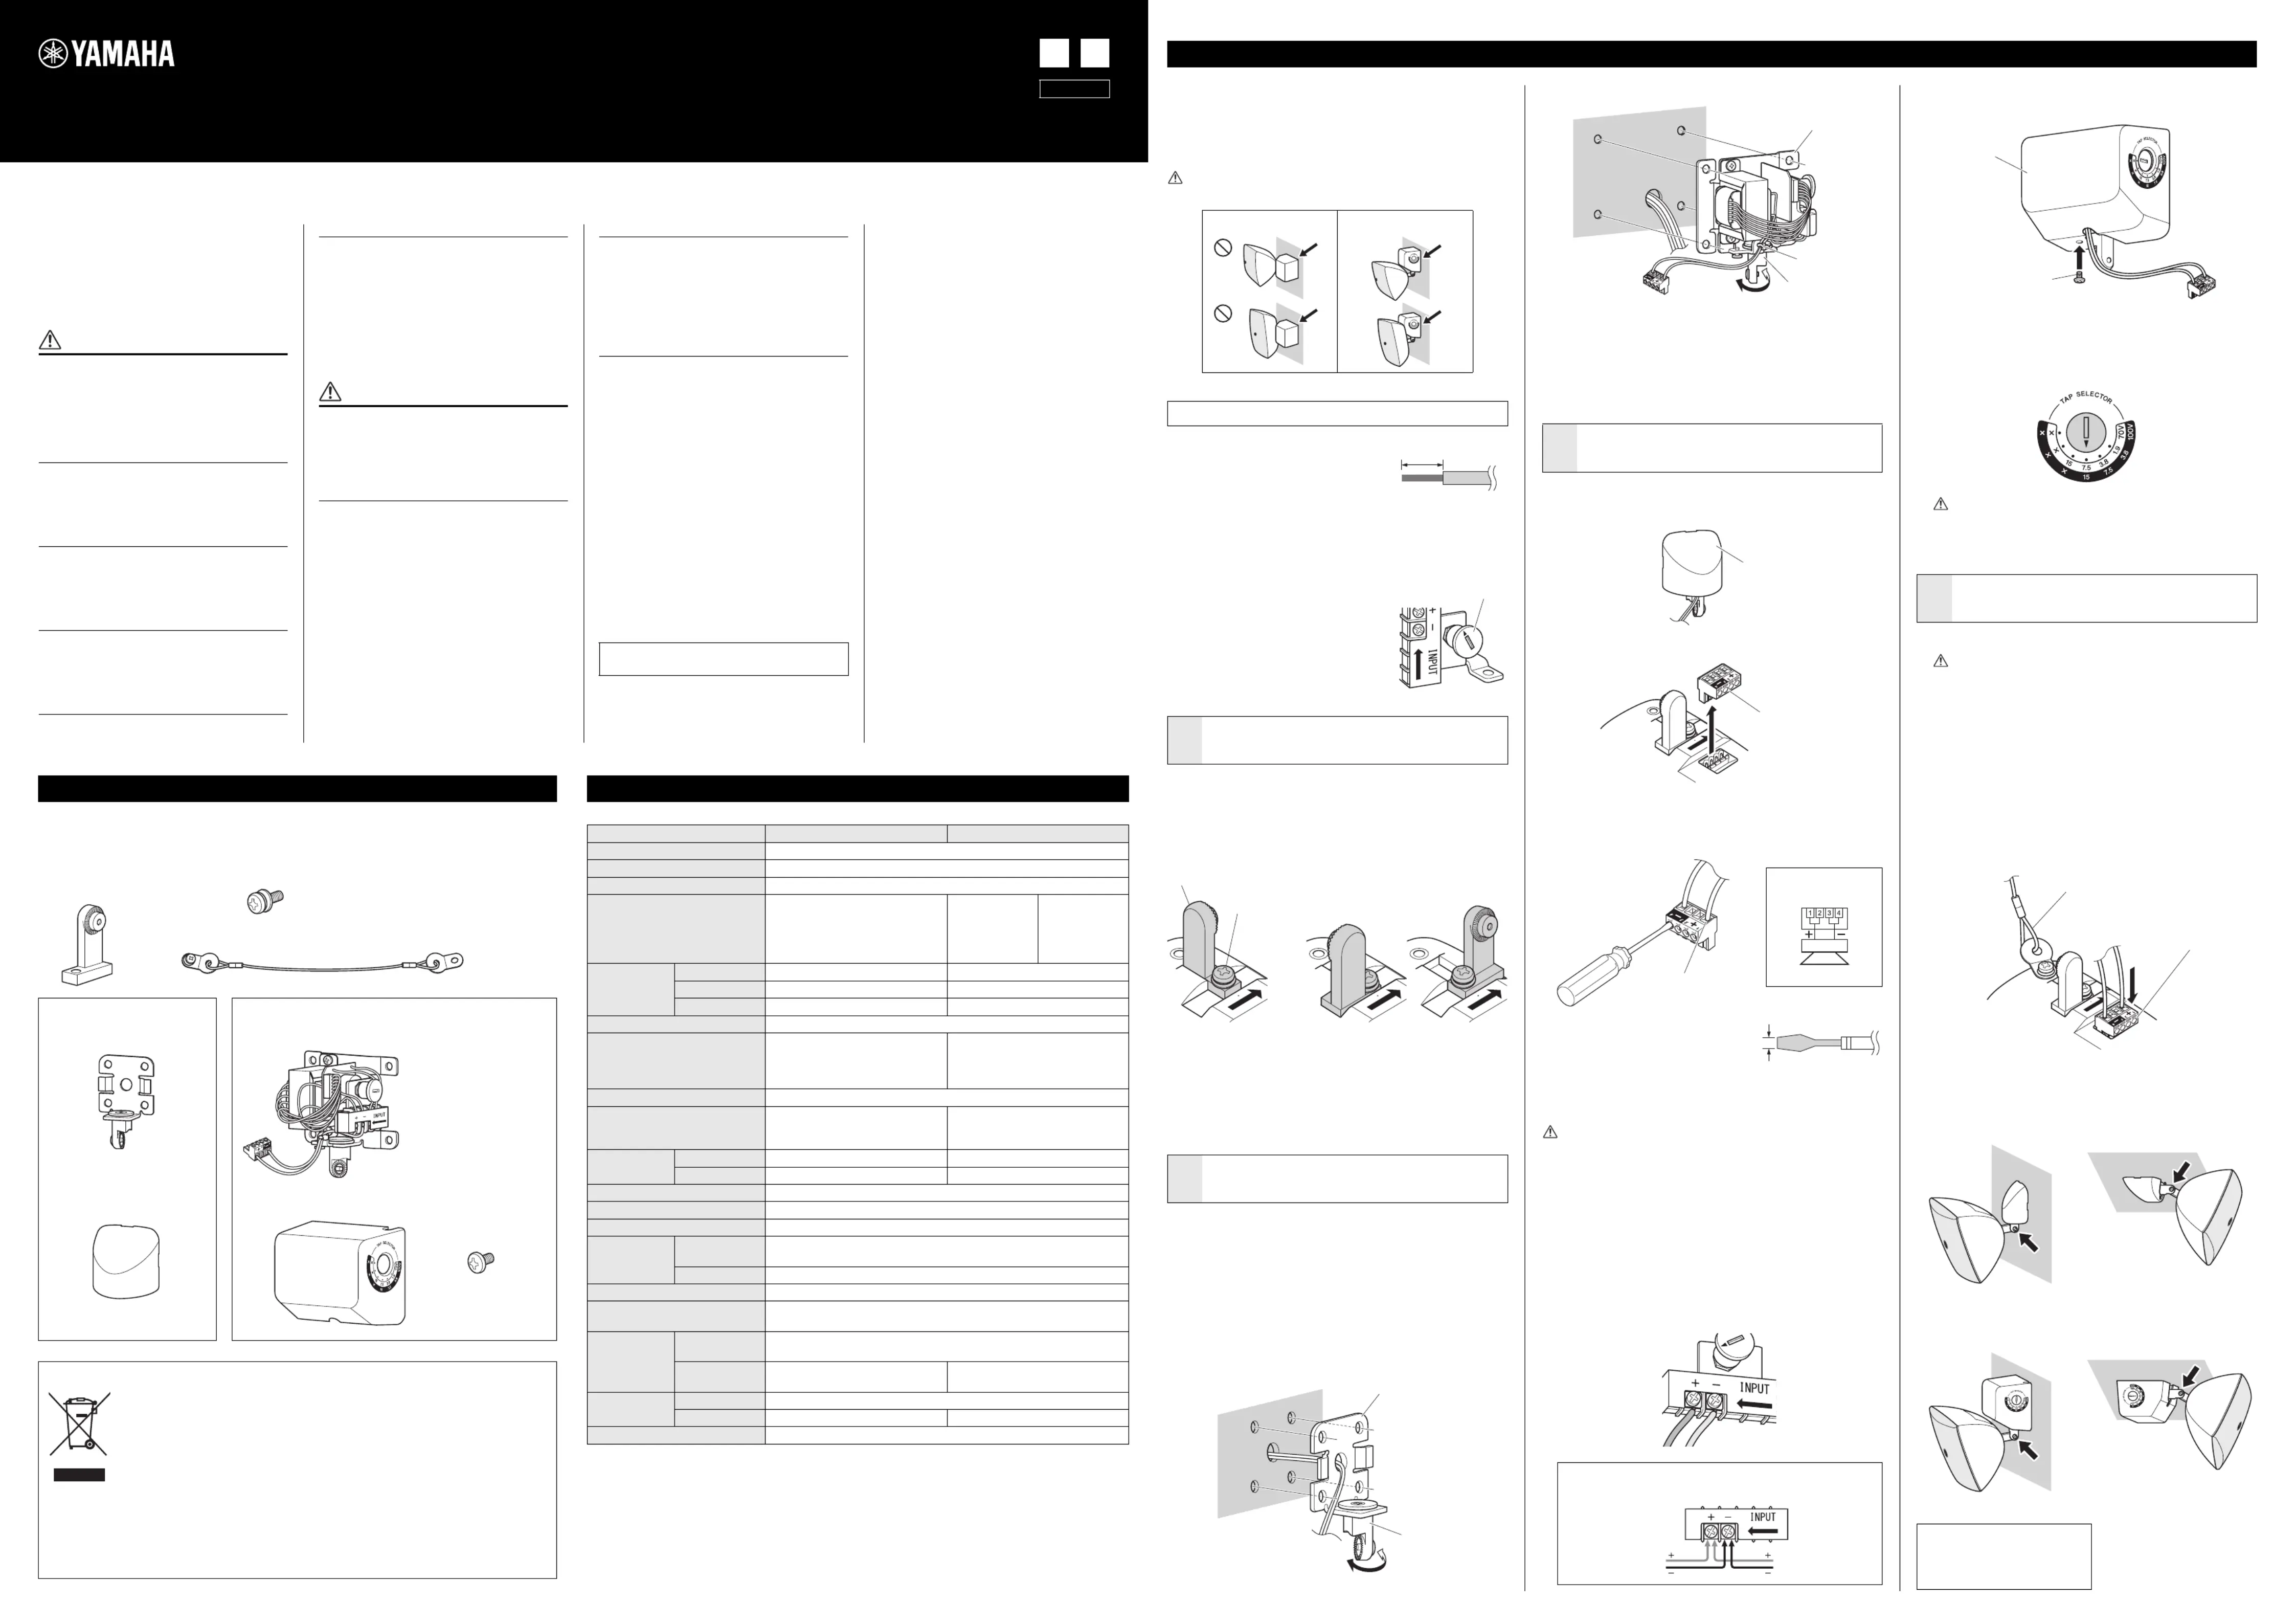
Install the speakers onto wall/ceiling with the supplied brackets.
Ensure that the wall/ceiling is sufficiently strong.
The installation conditions between VXS3F/VXS3FW and VXS3FT/
VXS3FTW differ slightly. For installation instructions, refer to the
VXS3F/VXS3FW/VXS3FT/VXS3FTW Installation Guide.
Cable preparation
Strip the insulation of cables to be used as
shown in the figure and connect them.
Tap selector
(VXS3FT/VXS3FTW only)
Depending on the installation position of
the speaker, it may be impossible to set the
tap selector on the side of the bracket base.
In such a case, set the tap selector before
installing the bracket base.
1.
Install the bracket gear to the speaker.
Use the supplied installation screws to attach the bracket gear.
The method for attaching the bracket gear depends on the orienta-
tion of the speaker (vertical or horizontal).
1.
Make holes through the wall/ceiling for the bolts and cables, as
required, and feed the bolts and cables through them.
2.
Install the bracket base onto the wall/ceiling.
VXS3F/VXS3FW
VXS3FT/VXS3FTW
For VXS3F/VXS3FW
1.
Put the bracket cover on the bracket base.
2.
Remove the Euroblock plug from the speaker system.
3.
After loosening the terminal screws of the Euroblock plug with a
flat-blade screwdriver, insert the cable into each terminal and
tighten the screws. Make sure that the cables are secure and cannot
be pulled out.
For VXS3FT/VXS3FTW
1.
After loosening the input screw on the terminal block with a Phil-
lips screwdriver, insert the cable into the terminal block and
tighten the screw. Make sure that the cables are secure and cannot
be pulled out.
2.
Put the bracket cover on the bracket base and tighten it with
screws to secure the bracket cover.
3.
Select the appropriate power tap by rotating the tap selector on the
side of the bracket base with a flat-blade screwdriver.
Illustration indicates the setting at 15 W for 100 V line and 7.5 W
for 70 V line.
1.
Attach the safety wire to the wall/ceiling.
2.
Attach the safety wire to the speaker.
3.
Plug the Euroblock plug into the socket in the speaker.
4.
Adjust the vertical angle and fix the bracket gear to the bracket
base by tightening with a Phillips screwdriver.
VXS3F/VXS3FW
VXS3FT/VXS3FTW
Installing the Speakers
CAUTION
Do not install brackets horizontally.
IncorrectCorrect
Pre-installation
NOTE
•Use cables with a thickness up to AWG 12.
•Do not tin stranded wires by solder because doing so may cause the
wire to break.
1
Attach the bracket gear
NOTE
•Determine the orientation for attaching the bracket gear by refer-
ring to the VXS3F/VXS3FW/VXS3FT/VXS3FTW Installation
Guide.
•When placing the speaker face down, place it on a soft cloth to
prevent damage to the grille.
2
Install the bracket base onto the wall/
ceiling
NOTE
Determine the position of the holes by putting the bracket base onto
the wall/ceiling or confirming the dimensions.
NOTE
Make a half turn of the junction with the bracket gear as required.
7–8 mm
Tap selector
Bracket gear
M5-16mm
screw
Vertical installationHorizontal installation
Bracket base
Junction with the
bracket gear
NOTE
•If the cable gets in the way when installing, cut the cable tie. When
cutting the cable ties, be very careful not to cut the cables them-
selves by mistake.
•Connect the speaker cables before installing the bracket base, as
required.
3
Connect the speaker cables
NOTE
Use a flat-blade screwdriver with a
blade less than 3 mm (0.1 in.).
CAUTION
When connecting speakers with high impedance, be sure that the
output total of each speaker does not exceed the rated output of
the power amplifier. For details, refer to the explanation of high-
impedance connection at the following URL.
Yamaha Pro Audio site: “Better Sound for Commercial Installations”:
http://www.yamahaproaudio.com/global/en/training_support/
better_sound/
If cables are connected in parallel to the subsequent speaker,
connect two cables to one terminal.
Bracket base
Junction with the
bracket gear
Cable tie
Bracket Cover
Euroblock plug
Power amplifier output (-)
Power amplifier output (+)
Speaker internal
connection
Speaker
Less than 3 mm (0.1 in.)
Power amplifier output (+)Power amplifier output (-)
Next speaker
Power amplifier
output
CAUTION
Make sure the amplifier is switched off before operating the tap
selector switch.
4
Install the speaker onto the bracket
base
CAUTION
•Make sure to take appropriate measures to prevent the
speaker from falling down in the event of an installation fail-
ure.
•When installing the safety wire to the wall, install it higher
than the wire’s attachment point on the speaker, with as little
slack as possible.
•If the safety wire is too short, prepare another wire appropri-
ate for the speaker weight and installation conditions. If the
wire is too long, should the speaker fall, the wire may snap as
a result of excessive strain.
Bracket cover
M4-8mm screw
Safety wire
Euroblock plug
To the wallTo the ceiling
To the wallTo the ceiling
Please check the included accessories.
Included Accessory
•Speaker × 2
•Bracket gear × 2
•M5-16mm screw (for speaker installation;
with washer) × 2
•Owner’s Manual
(this leaflet)
•Installation Guide
(English only)
VXS3F/VXS3FW
•Bracket base × 2
•Bracket cover × 2
VXS3FT/VXS3FTW
•Bracket base × 2
•Bracket cover × 2•M4-8mm screw (for
fixing bracket cover)
× 2
•Safety wire × 2
*1:Full-space (4π)
*2:Pink noise (200 Hz–10 kHz)
*3:Calculated based on power rating and sensitivity, exclusive of power compression
*The contents of this manual apply to the latest specifications as of the printing date. To obtain the latest manual, access the
Yamaha website then download the manual file.
*The dimensions are shown on the reverse side of the Japanese manual.
Specifications
ModelVXS3F/VXS3FWVXS3FT/VXS3FTW
TypeFull-range, acoustic suspension type
Component3.5 (9cm) cone driver
Coverage angle (-6 dB)Horizontal: 150°, Vertical: 160°
Rated impedance8 Ω
100 V line:
670 Ω (15 W),
1.3 kΩ (7.5 W),
2.7 kΩ (3.8 W)
70 V line:
330 Ω (15 W),
670 Ω (7.5 W),
1.3 kΩ (3.8 W),
2.7 kΩ (1.9 W)
Power rating
NOISE20 W—
PGM40 W—
MAX80 W—
Sensitivity
*1
86 dB SPL (1 W, 1 m)
*2
Maximum SPL
*3
105 dB SPL (1 m)
98 dB SPL (15 W, 1 m)
*2
95 dB SPL (7.5 W, 1 m)
*2
92 dB SPL (3.8 W, 1 m)
*2
89 dB SPL (1.9 W, 1 m)
*2
Frequency range (-10 dB)130 Hz – 20 kHz
Connector
Euroblock (4 pin) × 1 (input: +/-,
loop-thru: +/-)
Max. wire size 12AWG (3.3 mm
2
)
Input terminal: screw type (4 × 4 con-
necter) × 1 (input: +/-)
Max. wire size 12AWG (3.3 mm
2
)
Transformer
Taps
70 V—15 W, 7.5 W, 3.8 W, 1.9 W
100 V—15 W, 7.5 W, 3.8 W
Overload protectionFull-range power limiting for protecting network and transducers
Magnetically shieldedNo
Dust and water resistant—
Enclosure
Cabinet
VXS3F/VXS3FT: ABS (UL94-5VB), black
VXS3FW/VXS3FTW: ABS (UL94-5VB), white
BaffleABS (UL94-5VB), black
Metal grillePowder coated perforated SPCC (t=0.8mm), aperture ratio: 55%
Outer color
VXS3F/VXS3FT: Black (approximate value: Munsell N3)
VXS3FW/VXS3FTW: White (approximate value: Munsell N9)
Dimensions
(in horizontal
cabinet setup,
W × H × D)
speaker only
184 × 130 × 95 mm
(7 1/4" × 5 1/8" × 3 47/64")
with bracket, in
0 degree setup
184 × 130 × 134 mm
(7 1/4" × 5 1/8" × 5 9/32")
184 × 178 × 139 mm
(7 1/4" × 7 1/64" × 5 15/32")
Net weight
speaker only1.0 kg (2.2 lbs)
with bracket1.1kg (2.4 lbs)1.7kg (3.7 lbs)
PackagingPackaged in pair
SPEAKER SYSTEM
VXS3F/VXS3FW/VXS3FT/VXS3FTW
Owner’s Manual
DE
ZT08430
Yamaha Pro Audio global website
http://www.yamahaproaudio.com/
Yamaha Downloads
http://download.yamaha.com/
(weee_eu_en_01)
Information for Users on Collection and Disposal of Old Equipment
This symbol on the products, packaging, and/or accompanying documents means that used electri-
cal and electronic products should not be mixed with general household waste.
For proper treatment, recovery and recycling of old products, please take them to applicable collec-
tion points, in accordance with your national legislation and the Directives 2002/96/EC.
By disposing of these products correctly, you will help to save valuable resources and prevent any
potential negative effects on human health and the environment which could otherwise arise from
inappropriate waste handling.
For more information about collection and recycling of old products, please contact your local
municipality, your waste disposal service or the point of sale where you purchased the items.
[For business users in the European Union]
If you wish to discard electrical and electronic equipment, please contact your dealer or supplier for further information.
[Information on Disposal in other Countries outside the European Union]
This symbol is only valid in the European Union. If you wish to discard these items, please contact your local authorities
or dealer and ask for the correct method of disposal.
EN
English
Auf der Rückseite befindet sich die deutsche Version der Bedienungsanleitung.
Specyfikacje produktu
| Marka: | Yamaha |
| Kategoria: | głośnik |
| Model: | VXS3FT |
Potrzebujesz pomocy?
Jeśli potrzebujesz pomocy z Yamaha VXS3FT, zadaj pytanie poniżej, a inni użytkownicy Ci odpowiedzą
Instrukcje głośnik Yamaha

5 Lutego 2025
15 Stycznia 2025
13 Stycznia 2025
13 Stycznia 2025
9 Stycznia 2025
9 Stycznia 2025
9 Stycznia 2025
9 Stycznia 2025
9 Stycznia 2025
9 Stycznia 2025
Instrukcje głośnik
Najnowsze instrukcje dla głośnik
8 Kwietnia 2025
8 Kwietnia 2025
8 Kwietnia 2025
7 Kwietnia 2025
7 Kwietnia 2025
7 Kwietnia 2025
5 Kwietnia 2025
3 Kwietnia 2025
3 Kwietnia 2025
3 Kwietnia 2025