Instrukcja obsługi Abus WA50
Przeczytaj poniżej 📖 instrukcję obsługi w języku polskim dla Abus WA50 (2 stron) w kategorii szczelina. Ta instrukcja była pomocna dla 15 osób i została oceniona przez 6 użytkowników na średnio 4.3 gwiazdek
Strona 1/2
WA 50
Technische Änderungen
vorbehalten.
Für Irrtümer und Druckfehler
keine Haung.
Subjects to technical alterations.
No liability for mistakes and
printing errors.
Nous nous réservons le droit de
toutes modifications techniques.
Nous n’assumons aucune res-
ponsabilité pour des erreurs ou
défauts d’impression éventuels.
Technische wijzigingen voorbe-
houden.
Geen aansprakelijkheid voor ver-
gissingen en drukfouten.
Si riservano modifiche tecniche.
Per errori e refusi di stampa non ci
si assume alcuna responsabilità.
©
ABUS | D 58292 Wetter | Germany
www.abus.com
©
ABUS | D 58292 Wetter | Germany
www.abus.com
©
ABUS | D 58292 Wetter | Germany
www.abus.com
©
ABUS | D 58292 Wetter | Germany
www.abus.com
©
ABUS | D 58292 Wetter | Germany
www.abus.com
Wandanker
Wall anchor
Fixation murale
Wandanker Ancora a muro
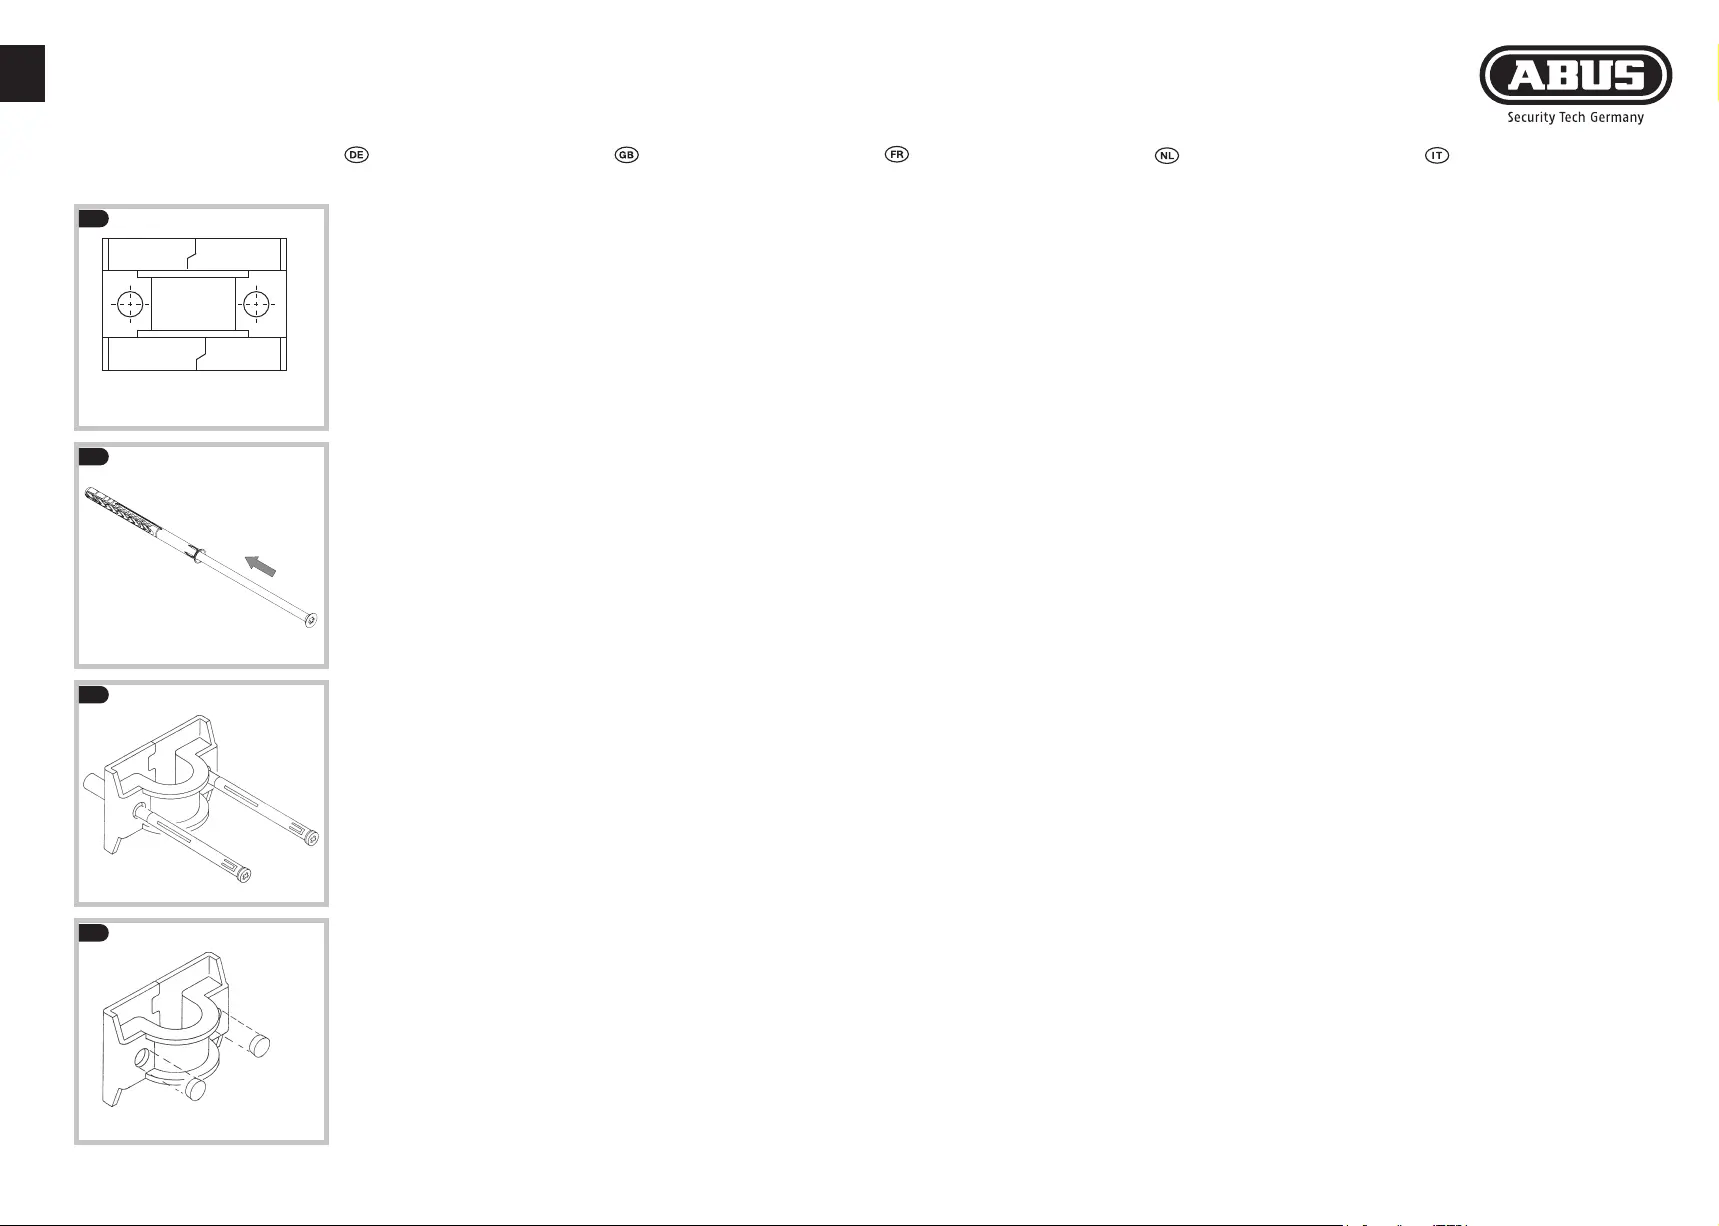
1.
3.
4.
Wichtiger Hinweis:
Die beigefügten Rahmendübel
sind für festes Mauerwerk, z.B.
Vollziegel, Beton oder dergleichen
geeignet.
Für weiches Mauerwerk, z.B. Kalk-
sandlochsteine, Bimssteine oder
dergleichen sollte ein langer
Spreizdübel, z.B. Ø 10 x 120 mm
verwendet werden.
Montage mit Standard-
Rahmendübel:
1. Wandanker zusammenstecken
und komplett mit Hülsen anhal-
ten, Bohrungen Ø 10 mm und
140 mm tief, anschließend Ø 16
mm und 35 mm tief auohren.
2. Schrauben in Rahmendübel
einsetzen.
3. Wandanker ansetzen, Rahmen-
dübel komplett einschlagen
und fest andrehen.
Hinweis:
Die Schrauben müssen bei max.
9–10 Umdrehungen fest werden.
4. Sicherungsstopfen ca. 2 mm tief
bis zum Schraubenkopf
einschlagen und Lochränder
verstemmen.
Conseil important :
Les ancrages de châssis joints sont
adaptés à la maçonnerie solide,
par exemple la brique pleine, le
béton ou similaire.
Pour la maçonnerie tendre,
par exemple les briques silico-
calcaires, les briques ponces ou
autres, il convient d‘utiliser une
cheville à expansion longue, par
exemple de Ø 10 x 120 mm.
Montage avec des chevilles de
cadre standard :
1. Assemblez les ancrages muraux
et les bloquer à l‘aide de
manchons, percez des trous
de Ø 10 mm et de 140 mm de
profondeur, puis percez des
trous de Ø 16 mm et de 35 mm
de profondeur.
2. Insérez les vis dans les chevilles
de cadre.
3. Positionnez l‘ancrage mural,
enfoncez complètement le
cheville de cadre et vissez
fermement.
Remarque :
Les vis doivent être serrées à
9-10 tours maximum.
4. Enfoncez le bouchon de sécurité
d‘environ 2 mm de profondeur
jusqu‘à la tête de la vis et cal-
feutrez les bords du trou.
Important Notice:
The enclosed frame plugs are sui-
table for solid masonry, e.g. solid
brick, concrete or similar
For so masonry, e.g. sand-lime
bricks, pumice bricks or similar, a
long expansion anchor, e.g. Ø 10
x 120 mm should be used.
Mounting with standard frame
anchors:
1. Put the wall anchors together
and stop them completely with
sleeves, drill holes Ø 10 mm
and 140 mm deep, then drill
out Ø 16 mm and 35 mm deep.
2. Insert screws into frame plugs.
3. Position the wall anchor, ham-
mer the frame anchor in all the
way and screw on tightly.
Note:
Tighten expansion bolts, 9 or
10 x full turns should provide a
tight t.
4. Hammer the safety plug in
approx. 2 mm deep up to the
screw head and caulk the
edges of the hole.
Belangrijk:
De meegeleverde framepluggen
zijn geschikt voor massieve wan-
den, bijv. massieve baksteen,
beton of iets soortgelijks.
Voor zachte wanden, bijv.
kalkzandsteen, puimsteen of
iets soortgelijks, moet een lange
spreidplug worden gebruikt, bijv.
Ø 10 x 120 mm.
Montage met standaard frame-
pluggen:
1. Steek de wandankers in elkaar
en positioneer ze compleet
met de hulzen, boorgaten met
Ø 10 mm en 140 mm diep uit-
boren en vervolgens met Ø 16
mm en 35 mm diep uitboren.
2. Plaats de schroeven in de
framepluggen.
3. Muuranker positioneren en
framepluggen volledig inslaan
en stevig aandraaien.
Aanwijzing:
De schroeven moeten max. 9-
10 slagen worden aangedraaid.
4. Borgplug ca. 2 mm diep tot
aan de schroeop inslaan en
randen van het gat afwerken.
Nota importante:
I tasselli in dotazione sono adatti
per muratura solida, ad es. matto-
ni pieni, calcestruzzo o simili.
Per la muratura in cassa vuota,
ad es. mattoni di pietra arenaria
calcarea, pietra pomice o simili,
si deve utilizzare un tassello ad
espansione lungo, ad es. Ø 10 x
120 mm.
Montaggio con tasselli standard:
1. Montare l’ancoraggio a parete e
fermarlo con il suo guscio, pra-
ticare dapprima fori di Ø 10 mm
e 140 mm di profondità, quindi
praticare fori di Ø 16 mm e 35
mm di profondità.
2. Inserire le viti nei tasselli.
.
3. Posizionare l‘ancoraggio a
parete, inserire completamente
l‘ancoraggio del telaio e avvi-
tarlo saldamente.
Nota:
Le viti devono essere serrate con
max. 9-10 giri.
4. Spingere il tappo di sicurezza a
circa 2 mm di profondità fino
alla testa della vite e battere
con un martello per chiudere i
bordi del foro.
2.
Specyfikacje produktu
| Marka: | Abus |
| Kategoria: | szczelina |
| Model: | WA50 |
Potrzebujesz pomocy?
Jeśli potrzebujesz pomocy z Abus WA50, zadaj pytanie poniżej, a inni użytkownicy Ci odpowiedzą
Instrukcje szczelina Abus

29 Marca 2025
29 Marca 2025
29 Marca 2025
29 Marca 2025
29 Marca 2025
27 Marca 2025
30 Stycznia 2025
10 Stycznia 2025
9 Grudnia 2024
8 Października 2024
Instrukcje szczelina
Najnowsze instrukcje dla szczelina
8 Kwietnia 2025
13 Marca 2025
11 Marca 2025
10 Marca 2025
10 Marca 2025
10 Marca 2025
5 Marca 2025
13 Lutego 2025
5 Lutego 2025
5 Lutego 2025