Instrukcja obsługi Alcatel Baby Link 700
Alcatel Elektroniczna niania Baby Link 700
Przeczytaj poniżej 📖 instrukcję obsługi w języku polskim dla Alcatel Baby Link 700 (2 stron) w kategorii Elektroniczna niania. Ta instrukcja była pomocna dla 36 osób i została oceniona przez 4 użytkowników na średnio 4.5 gwiazdek
Strona 1/2
select.
3. Press or choose Low Battery Tone.
4. Press or to choose On or Off, then press to confirm
your selection.
No link alert
You can set whether the parent unit beeps whenever the link
between the parent unit and the baby unit is lost.
To set the no link alert of the parent unit:
1. Press when the parent unit is not in use.
2. Press or to choose ALERT TONE, then press to
select.
3. Press or choose No Link Alert.
4. Press or to choose On or Off, then press to confirm
your selection.
Sound Alert
When the parent unit volume is turned off manually, you may turn
on the sound alert so that the parent unit beeps as soon as the
baby unit detects sounds which light up four sound level indicators
on the parent unit.
To set the sound alert of the baby unit:
1. Press when the parent unit is not in use.
2. Press or to choose ALERT TONE, then press to
select.
3. Press or choose Sound Alert.
4. Press or to choose On or Off, then press to confirm
your selection.
Monitorthetemperature
Minimum temperature
You can set the desired minimum room temperature of the baby
unit. The minimum temperature can be set between 11°C (52°F)
and 20°C (69°F).
To set the minimum temperature of the baby unit:
1. Press when the parent unit is not in use.
2. Press or to choose TEMPERATURE, then press to
select.
3. Press or choose Minimum, then press to select.
4. Press or to choose a desired baby unit or all baby units.
5. Press or to choose the desired temperature, then press
to confirm your selection.
Maximum temperature
You can set the desired maximum room temperature of the baby
unit. The maximum temperature can be set between 21°C (70°F)
and 30°C (86°F).
To set the maximum temperature of the baby unit:
1. Press when the parent unit is not in use.
2. Press or to choose TEMPERATURE, then press to
select.
3. Press or choose Maximum, then press to select.
4. Press or to choose a desired baby unit or all baby units.
5. Press or to choose the desired temperature, then press
to confirm your selection.
Temperature alert
You can set whether the parent unit beeps whenever the
temperature is out of the preset temperature range.
To set the temperature alert of the baby unit:
1. Press when the parent unit is not in use.
2. Press or to choose TEMPERATURE, then press to
select.
3. Press or choose Alert, then press to select.
4. Press or to choose a desired baby unit or all baby units.
5. Press or to choose On or Off, then press to confirm
your selection.
Temperature format
You can set the temperature scale of the baby unit.
To change the temperature scale:
1. Press when the parent unit is not in use.
2. Press or to choose TEMPERATURE, then press to
select.
3. Press or choose Format.
4. Press or to choose ˚F or ˚C, then press to confirm
your selection.
Adjust the sound sensitivity
You can use the parent unit to change the sound sensitivity level of
the baby units from Level 1 to Always On (Maximum) . The higher
the sound sensitivity level is set, the more sensitive the baby unit is
in detecting sounds for transmitting to the parent unit.
Before use
You may test the baby monitor before initial use, and at regular
times thereafter.
To test your baby monitor:
1.Place the parent unit and the baby unit in the same room to test
the product.
2. Press and hold on the parent unit the screen displays Please
Wait...
3. Slide ON/OFF on the baby unit to turn it on.
4. If the parent unit displays an image from the baby unit. Your baby
monitor is now ready for use.
Note:
• Make sure the baby unit is at least 3 feet away from the parent
unit.
• If both units are not connected, the parent unit displays No Link
for a few seconds.
Then it displays Please Wait... and flashes.
Install the battery
You can power up the parent unit by connecting it to AC power or
to the rechargeable battery provided. Even if the parent unit is
connected to AC power, we recommend you also install the
battery. This guarantees continual ope
ration in case of a power
outage.
Install the battery as shown below.
1. With thelabel THIS SIDE UP facing up, insert the small tabs of
thebattery into the slots inside thebattery compartment. Make
sure the metallic contact is correctly oriented as shown below.
Push the battery into the battery compartment until it clicks
securely into place.
2. Align the battery compartment cover flat against the battery
compartment, then slide it towards the center of the parent unit
until it clicks into place.
Replace the battery
To replace the battery, press down on the large tab of the battery
and pull it out of the battery compartment, then follow the steps
above to install the battery.
Note:
• The operating time for using the rechargeable battery is short. If
youwant to monitor your baby for a long time, we recommend you
connect theparent unit to AC power.
• If theparent unit willnot be used for a long time, disconnect and
remove the battery to prevent possibleleakage.
• Use only the battery supplied with this product.
Connect and charge the battery
Note:
• Useonly theparent unit poweradapter andthe baby unit power
adapter supplied with this product.
• The parent unit poweradapter and baby unit power adapter are
intended to be correctly orientedin a
verticalor floormount
position. The prongs arenot designed to hold thepluginplace if it
is plugged into a ceiling, under-the-tableorcabinet outlet.
• Make sure the parent unit, the baby unit and the power adapter
cord are out of reach of children.
Connect the baby unit
Connect the parent unit
Charge the parent unit battery
Once you have installed the parent unit and its battery, press and
hold to turn it on. The battery icon indicates the battery status
(see the Parent unit display icons table).
The standby time varies depending on the sensitivity level you set,
your actual use and the age of the battery.
When the parent unit is operating in battery mode and the battery is
low, you need to charge the parent unit without interruption for at
least 30 minutes to give the parent unit enough charge to use for a
short time. When operating in low battery condition, the parent unit
displays Battery low and . The parent unit plays short beeps to
alert you.
Note:
When you charge the battery initially or it is not used for a long
period of time, charge it for 12 hours continuously. It takes longer to
charge the battery when the parent unit is turned on. To shorten the
charging time, turn the parent unit off while charging.
Positioning the baby monitor
Place the parent unit within the operating range of the baby unit. We
recommend the parent unit is at least 3 feet away from the baby unit
to avoid audio feedback. If you still experience audio feedback,
move the parent unit and the baby unit farther apart.
Note:
For better image quality, do not place the baby unit too far away
from your baby.
Operating range
The operating range of the baby monitor is up to 250m outdoors or
50m indoors. The actual operating range may vary depending on
the environmental conditions and other interferences such as walls,
doors and other obstructions.
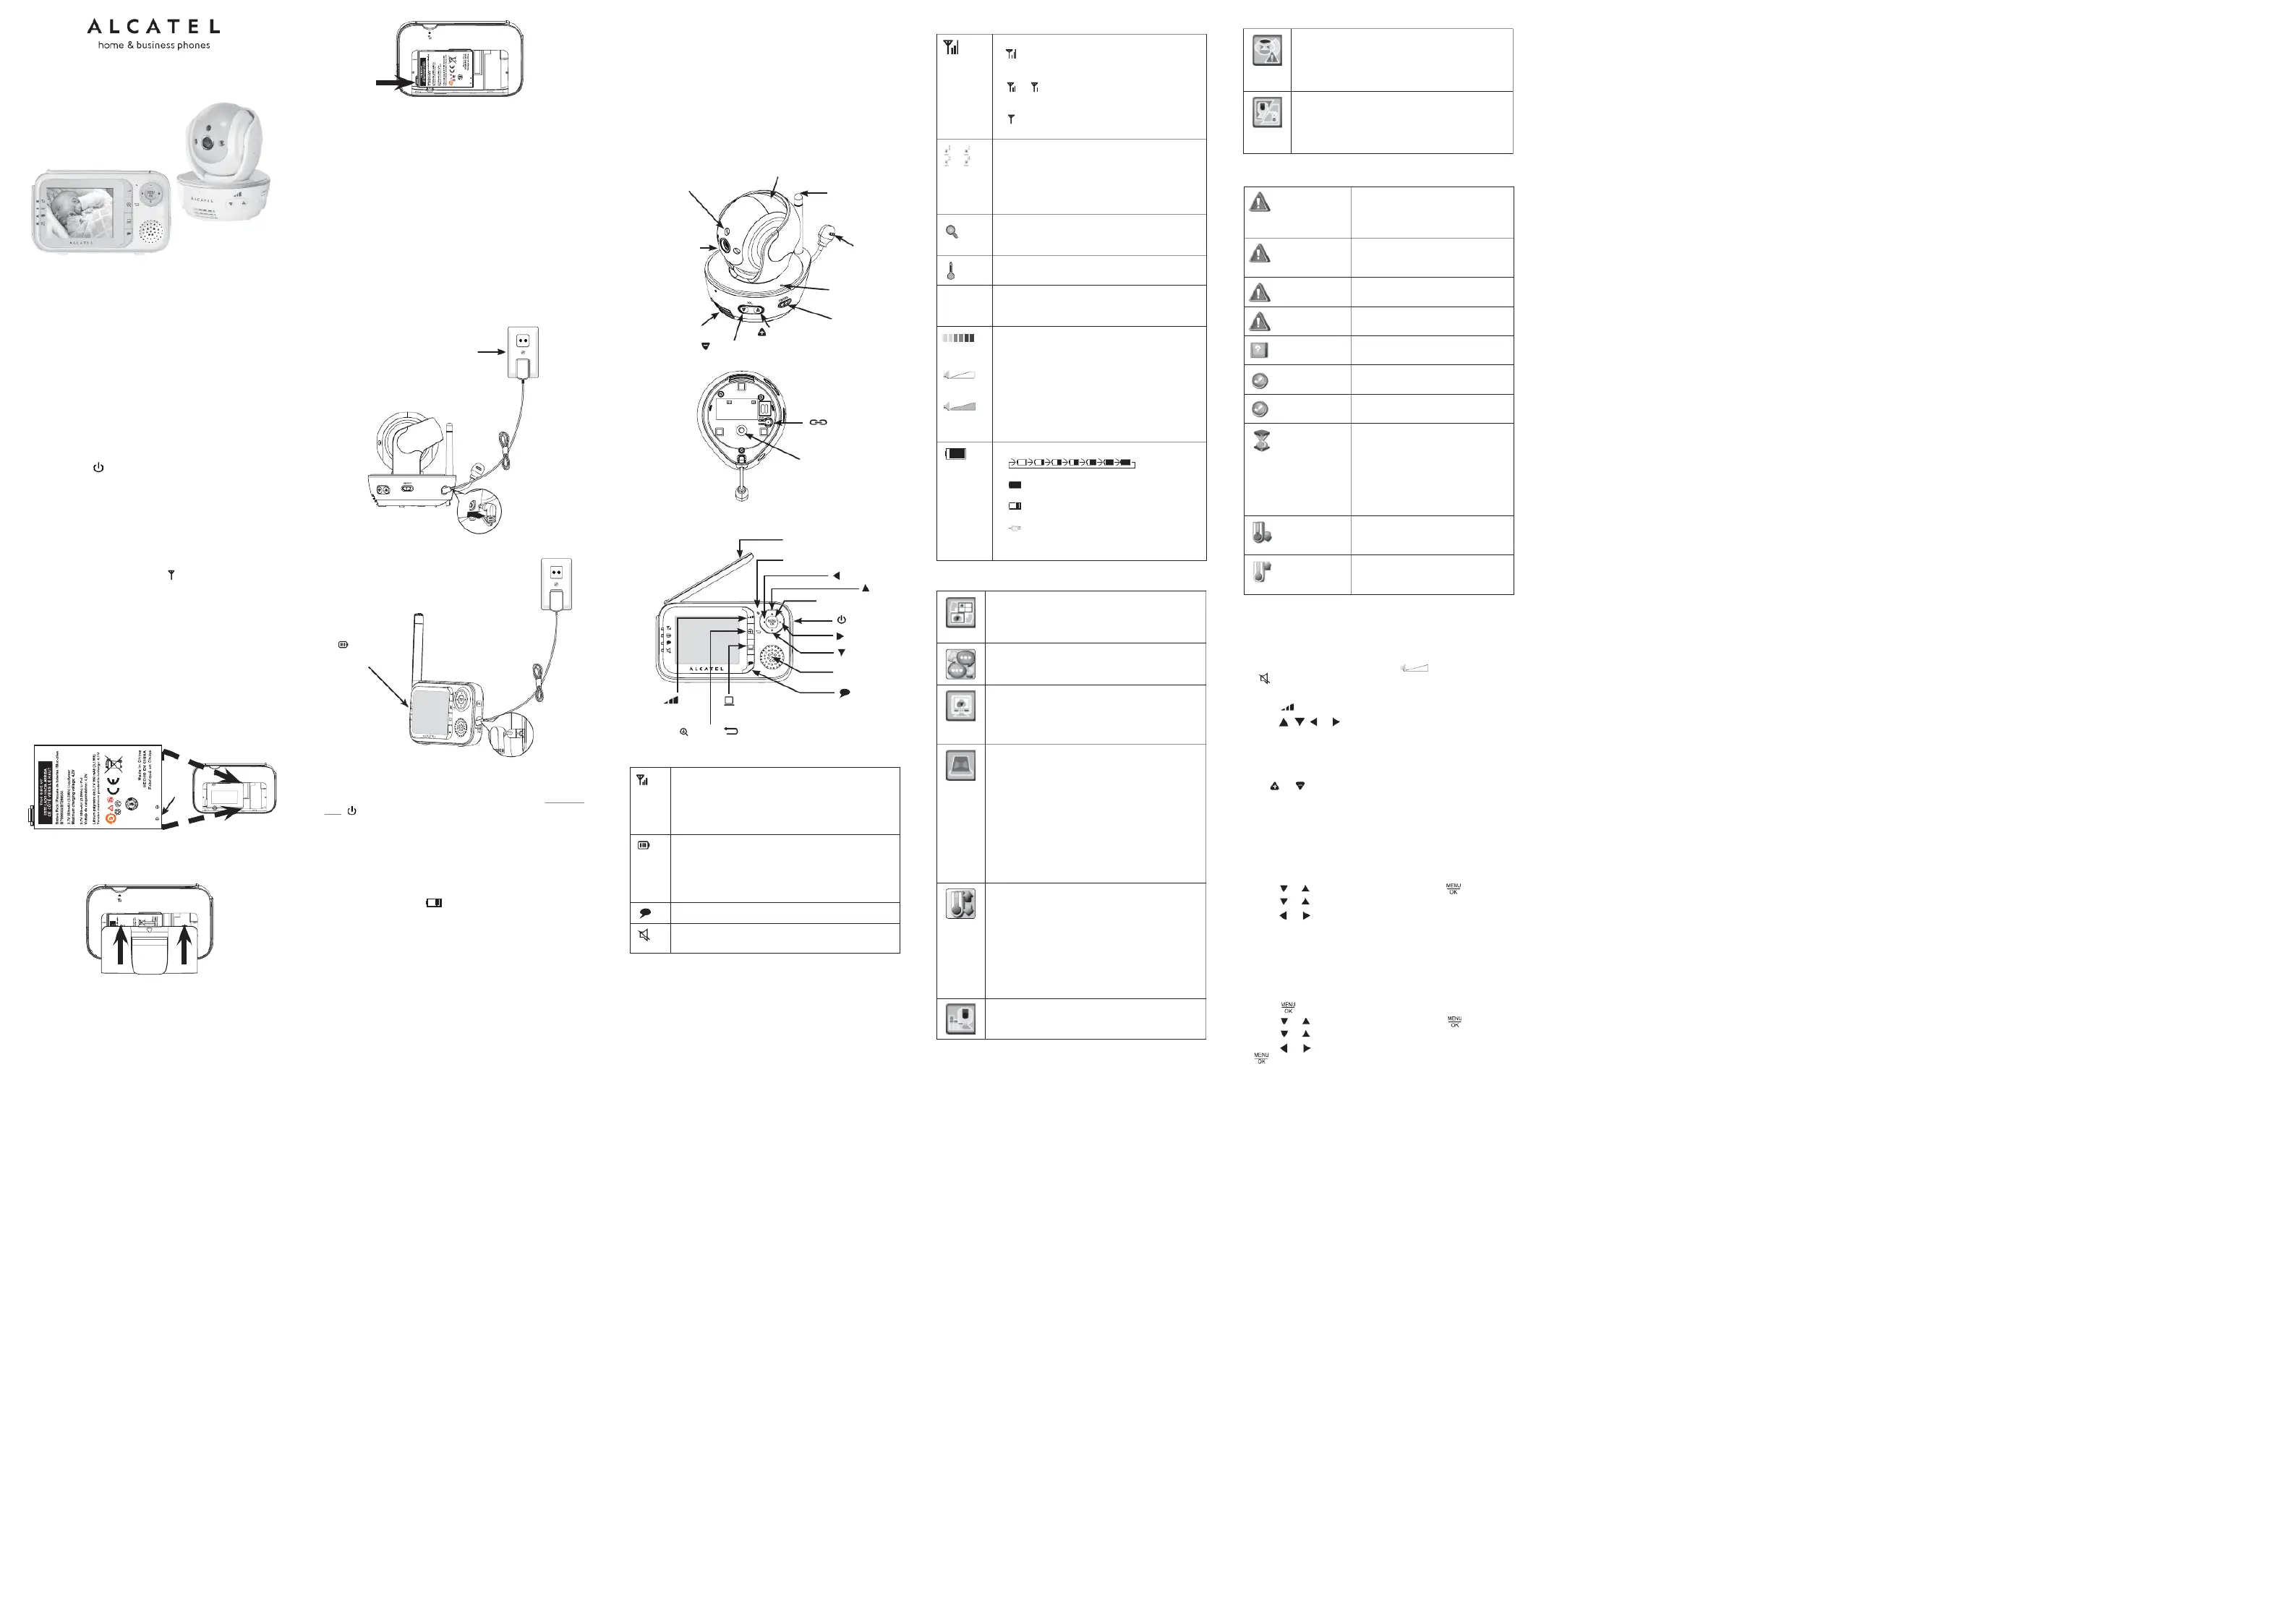
Overview
Baby unit overview
Parent unit overview
Parent unit lights
Parent unit display icons
Parent unit main menu icons
Parent unit display messages
Using the baby monitor
Adjusting speaker volume for parent unit
You can change the speaker volume from Volume 1 to Volume 5,
or turn it off.
When the speaker volume is set to off, appears briefly and
the light turns on.
To adjust the speaker volume:
1.Press when the parent unit is not in use.
2. Press , , or to adjust the speaker volume.
Adjusting speaker volume for baby unit
You can change the speaker volume.
To adjust the speaker volume:
Press or on the baby unit at any time.
Adjusting display
LCDbrightness
You can change the brightness of the parent unit screen from
Level 1
to Level 5.
To set the brightness of the parent unit screen:
1. Press MENU/OK when the parent unit is not in use.
2. Press or to choose DISPLAY, then press to select.
3. Press or to choose Brightness.
4. Press or to choose the desired level of brightness, then
press MENU/OK confirm your selection.
LCD contrast
You can change the contrast of the parent unit screen from Level 1
to Level 5.
To set the contrast of the parent unit screen:
1. Press when the parent unit isnot in use.
2. Press or to choose DISPLAY, then press to select.
3. Press or to choose Contrast.
4. Press or to choose the desired level of contrast, then press
to confirm you selection.
Setting the language
You can select a language to be used in all screen displays.
To change the language:
1. Press when the parent unit is not in use.
2. Press or to choose LANGUE.
3. Press or to choose... desired language.
4. Pressconfirm your selection.
Monitoring mode
You can choose to monitor in Single Baby unit, Split Baby unit or
Patrol Modeif there are more than one baby units in your system.
To change the monitoring mode:
1. Press when the parent unit is not in use.
2. Press or to choose MONITORING MODE, then press
to select.
3. Press or to choose Single Baby unit, Split Baby unit or
Patrol Mode.
• Single Baby unit - Press or to choose a desired baby
unit. The parent unit only displays image of one baby unit. You
may change to view images from different baby units by
pressing in this mode.
• Split Baby unit- The parent unit displays multiple baby unit
images in a maximum of four in one screen.
• Patrol Mode- The parent unit patrols to display images from
different baby units in every 7 seconds. You may change to
view images from different baby units even though the scanning
period is not expired by pressing in this mode.
4. Pressconfirm your selection.
Note:
Monitoring mode is not applicable when there is only one baby unit.
View
You can change the screen to view images from different baby
units, if there are more than one baby units in your system.
To view different baby units while in Single Baby unit:
Press repeatedly to enlarge and switch to the desired baby
unit. The switching is in chronological order: Baby unit 1 to Baby
unit 4.
To view different baby units while in Split Baby unit:
Press repeatedly to enlarge and switch to the desired baby
unit. The switching is in chronological order: Baby unit 1 to Baby
unit 4.
The Split Baby unit mode resumes after a while.
To view different baby units while in Patrol mode:
Press repeatedly to switch to the desired baby unit even if the
scanning period on a particular baby unit is not expired. The
switching is in chronological order: Baby unit1 to Baby unit 4.
Note:
If the switching fails, the screen displays Failed to connect. Try
the switching again.
Zoom
You can zoom in or out while viewing image from baby unit in
Single Baby unit and Patrol mode.
To zoom in or out:
Press to zoom in. Press , , or to move the zoomed
image upward, downward, leftward or rightward correspondingly.
Press again to zoom out.
Note:
In Split Baby unit, is not available.
Talk to the baby unit
You can broadcast messages from the parent unit to any one of the
baby units.
To talk to the baby unit:
Press and hold when the parent unit is in Single Baby unit or
viewing particular baby unit in Patrol Mode. Speak towards the
microphone on the parent unit. The TALK light is on when the
voice connection to the baby unit is made. Your voice is broadcast
to the baby unit. Release the key to stop the broadcast.
Note:
The feature does not work in Split Baby unit.
Night vision
To help you monitor your baby even at night, the baby unit
automatically uses the light from its infrared LEDs for transmitting
images to the parent unit when it is turned on in a dark room.
However, it only transmits black-and-white images.
Set the alert tone
Low battery tone alert
You can set whether the parent unit beeps whenever the parent
unit operates in low battery condition.
To set the low battery tone alert:
1. Press when the parent unit is not in use.
2. Press or to choose ALERT TONE, then press to
If you want the baby unit to be very sensitive in detecting sounds,
you may set the sensitivity level to Always On (Maximum), so that
the baby unit will always detect any sounds including background
noises for transmitting to the parent unit. If you want the baby unit
to be less sensitive level to a lower level (Level 1 to Level 4), so
that the baby unit will transmit sounds to the parent unit only when
your baby is very noisy or crying loudly.
To set the sound sensitivity level of the baby unit:
1. Press when the parent unit is not in use.
2. Press or to choose SENSITIVITY, then press to
select.
3. Press or to choose a desired baby unit or all baby units.
4. Press or to choose the desired sensitivity level, then press
to confirm your selection.
VOX sound activation
When the parent unit screen is turned off manually, you can set the
screen to be turned on automatically whenever there are sounds
detected from the baby units. The parent unit screen will turn off
automatically when no sounds are detected from the baby units
within 50 seconds.
To turn the sound activation on or off:
1. Press when the parent unit is not in use.
2. Press or to choose SOUND ACTIVATION.
3. Press or to choose On or Off, then press to
confirm your selection.
Note:
If
youset thesensitivitylevelto Always On (Maximum), thebaby
unit willbevery sensitiveanddetect anysounds including
backgroundnoises. Thesebackground noises may disrupt the
silenceandprevent the soundactivation featuretowork properly.
Pair and unpair the baby unit
Pair new baby unit
The baby units and parent unit provided are already paired. You
can add or replace baby units (purchased separately) to your baby
monitor system.
You can pair a maximum of four baby units to your parent unit.
Each new baby unit must be paired to the parent unit before use.
Make sure you power on the baby unit and the parent unit before
pairing.
To pair a baby unit:
1. On the idle parent unit, press .
2. Press or to choose PAIR/UNPAIR, then press
to
select.
3. Press or choose Pair Baby unit, then press to
select.
4. Press or to choose a desired baby unit slot, then press
.
5. Make sure the new baby unit is turned on. On the new baby unit,
immediately press and hold when the parent unit screen
displays Press and holdon Baby Unit to start Pairing.
Parent unit screen displays Pairing...Please Wait... and emits
beep sound every two seconds. The LED light on the new baby
unit flashes quickly.
6. When pairing is successful, the screen displays Pairing
completed. You hear a confirmation tone. TheLEDlightonthe
new baby unit turns green. The parent unit returns to the
previous menu.
Note:
• If pairing fails, the screendisplays Pairing failed. Try thepairing
process again.
• Duringregistration, youmay press / to cancelthe
registrationwhenparent unit screendisplays Pairing / ...
PleaseWait...
• Only onebabyunit canbepairedat a time.
Unpair baby unit
Make sure you power on the baby unit and the parent unit before
unpairing the baby unit.
To unpair a baby unit:
1. On the idle parent unit, press .
2. Press or to choose PAIR/UNPAIR, then press to
select.
3. Press or choose Unpair Baby unit, then press to
select.
4.
Press or to choose a desired baby unit or all baby units,
then press .
5. When the screen displays Confirm to unpair?, press .
6. When unpairing is successful, the screen displays Unpairing
completed. The LED light on the selected baby unit flashes
slowly.Then, the parent unit returns to the previous menu.
TECHNICAL DETAILS
* Values may vary according to environment.
** Depending on initial battery charge.
TROUBLESHOOTING
If the connection between the Parents unit and Baby unit is
interrupted:
- Check the power supply of the baby unit is plugged in and on.
- Make sure both units are switched on.
- Check that the batteries are charged and properly installed in the
Parents unit.
- Make sure the Parents unit and Baby unit are within range of
each other.
(under ideal conditions, the range is 250 meters away and 50
meters indoors)
Generally, in case of problems, disconnect the power sector. Wait
about 30 minutes before reconnecting power supplies.
Wipe the parents unit with a damp cloth.
SAFETY
Do not open the device or its AC adapter in order not to constitute a
risk of electric shock.
Your Baby Monitor must be installed in a dry place, away from
heat, moisture and direct sunlight. To avoid radio interference, keep
your baby-monitoring at least 1 meter any electrical appliance.
ENVIRONMENT
This symbol means that your inoperative electronic
appliance must be collected separately and not mixed with
household waste.
To this end, the European Union has implemented a specific
collection and recycling system for which manufacturers are
responsible.
Help us protect the environment in which we live!
CONFORMITY
The logo printed on the unit certifies that it meets the essential
requirements and all relevant directives. You can see this
declaration of conformity on our website: www.alcatel-home.com
Alcatel logo and Alcatel name are trademarks of Alcatel Lucent and
used under license by ATLINKS.
BABY LINK 700
Sound activation
- You can set the screen to be turned on
automatically whenever there are sounds
detected from the baby units when the parent unit
screen is turned off manually.
Pair/unpair
- The baby units and parent unit provided are
already paired. You can add or replace baby units
(purchased separately) to your baby monitor
system.
Monitoring mode
You can choose to monitor in Single Baby unit, Split
Baby unit or Patrol Mode if there are more than one
baby units in your system.
Language
You can select a language to be used in all screen
displays.
Display
- You can change the brightness of the parent unit
screen.
- Youcan change the contrast of the parent unit
screen.
Alert tone
- You can set whether the parent unit beeps
whenever the parent unit operates in low battery
condition.
- You can set whether the parent unit beeps
whenever the link between the parent unit and the
baby unit is lost.
- You may turn on the sound alert so that the
parent unit beeps as soon as the baby unit
detects sounds which light up four sound level
indicators on the parent unit when the parent unit
volume is turned off manually.
Temperature
- You can set the desired minimum room
temperature of the baby unit.
- You can set the desired maximum room
temperature of the baby unit.
- You can set whether the parent unit beeps
whenever the temperature is out of the preset
temperature range.
- You can set the temperature scale of the baby
unit.
Sensitivity
- You can use the parent unit to change the sound
sensitivity level of the baby units.
Battery low
Failed to connect
No Link
Pairing failed
Confirm to unpair?
Pairing completed
Unpairing
completed
When the parent unit is powered by
the rechargeable battery and the
battery level is low, it needs to be
recharged.
The parent unit fails to switch to the
next baby unit in Single Baby unit or
Patrol Mode.
The selected baby unit slot is not
linked to the parent unit.
The selected baby unit cannot be
paired with the parent unit.
You try to unpair the baby unit(s). The
operation needs your confirmation.
The selected baby unit has been
paired with the parent unit.
The selected baby unit(s) has been
unpaired with the parent unit.
Please Wait...
Temperature
too low
Temperature
too high
The link between the parent unit and
the selected baby unit is lost, or the
selected baby unit is out of range, or
the selected baby unit slot is empty.
When you have only one paired baby
unit and the link is lost, or you have
multiple paired baby units and the
links are lost.
The temperature detected from the
selected baby unit is below the set
minimum temperature.
The temperature detected from the
selected baby unit is above the set
maximumtemperature.
270˚ rotatable camera head
Antenna
Temperature
sensor
ON/OFF
Camera
Light sensor
Microphone
(Volume up)
(Volume down)
ON/OFF LED
light
On when strong signal strength is detected between
the parent unit and the selected baby unit.
Flashes when the parent unit cannot link to the
selected baby unit.
Off when the parent unit is turned off.
On when theparent unit battery is being charged.
Flashes when the parent unit battery is low and needs
charging.
Off when the parent unit battery is fully charged, or
when no battery is installed.
On when the parent unit is talking to the baby unit.
On when the speaker volume of the parent unit is
turned off.
Connection status
- displays when strong signal strength is
detected between the baby unit and the parent
unit.
- or displays when moderate signal strength
is detected between the baby unit and the
parent unit.
- displays when the link between the baby unit
and the parent unit is lost.
Current view status
- Displays the number of the baby unit that is
being viewed when in Single Baby unit.
- Displays the highlighted baby unit when in
Patrol Mode, if there are more than one baby
units in your system.
or or
or
25
o
C
or
or
Zoom
- Displays when the camera at the baby unit has
zoomed in.
Temperature alert
- Displays when the temperature alert is set to on.
Real-time temperature
- Displays the real-time temperature of the
selected baby unit.
Sound level indicators
-
Displays the sound level according to the scales
of loudness when there is sound transmitted
from the baby unit.
Speaker volume
- Displays the speaker volume of the parent unit
is turned off.
Speaker volume
- Displays the speakervolumelevel whileadjusting.
Battery status
-
animates when the battery is charging.
- displays solid when the battery is fully
charged.
- displays when the battery is low and needs
charging.
- displays when no battery is installed but
operates using AC power, or the battery has
been installed incorrectly.
ATLINKS, 22 quai Gallieni 92150 Suresnes – France
The Alcatel logo and Alcatel name are trademarks of Alcatel Lucent
and used under license by ATLINKS.
USER'S GUIDE
PLEASE READ THIS USER'S GUIDE BEFORE USING YOUR BABY MONITOR
Connect the AC adapter
to an electrical outlet
230V/50 Hz
The bar keeps
scrolling until charging
is completed
Connect the AC adapter
to an electrical outlet
230V/50 Hz
PAIR
Threaded socket
Antenna
Microphone
(Left)
(Up)
(On/off)
(Right)
(Down)
Speaker
VOL
(Volume)
(Zoom) / BACK
(View)
MENU/SELECT
TALK
Specyfikacje produktu
| Marka: | Alcatel |
| Kategoria: | Elektroniczna niania |
| Model: | Baby Link 700 |
Potrzebujesz pomocy?
Jeśli potrzebujesz pomocy z Alcatel Baby Link 700, zadaj pytanie poniżej, a inni użytkownicy Ci odpowiedzą
Instrukcje Elektroniczna niania Alcatel

11 Stycznia 2025
2 Września 2024
1 Września 2024
18 Sierpnia 2024
17 Sierpnia 2024
7 Sierpnia 2024
Instrukcje Elektroniczna niania
Najnowsze instrukcje dla Elektroniczna niania
28 Stycznia 2025
27 Stycznia 2025
26 Stycznia 2025
25 Stycznia 2025
25 Stycznia 2025
25 Stycznia 2025
25 Stycznia 2025
25 Stycznia 2025
25 Stycznia 2025
25 Stycznia 2025