Instrukcja obsługi ALSEYE Halo AIO H120
ALSEYE Sprzęt komputerowy Halo AIO H120
Przeczytaj poniżej 📖 instrukcję obsługi w języku polskim dla ALSEYE Halo AIO H120 (2 stron) w kategorii Sprzęt komputerowy. Ta instrukcja była pomocna dla 20 osób i została oceniona przez 9 użytkowników na średnio 4.8 gwiazdek
Strona 1/2
Back
plate scr x 4ew
F an
S
cr
ew
H120
:
x4, H240
:
x8, H360
:
x12
R
adia
t
or
S
cr
ew
H120
:
x4, H240
:
x8, H360
:
x12
H240
F an
At daper
C able
x 1
H360
F an
At daper
C able
x 1
P
roduc
t
Specica
tions
W
a
t
er
Block
Dimensions
62x55x44mm
Merialat
Copper/Engineering
P
lastic
P
ump
R
a
t
ed
Voltage
12V
Speed
2600R.P.M.±10%
B
ear
ing
Ceramic
B
ear
ing
R
adia
t
or
Dimensions
H120:
120x157x27mm
H240:
120x275x27mm
H360:
120x393x27mm
Merialat
Aluminum
C
olor
Black
Fa
n
Dimensions
120x120x25mm
Voltage
DC
12V
C
urr
en
t
0.15~0.3A
Fan
Speed
800~2000R.P.M.
Air
F
low
18.3~45.2CFM
S
ta
tic
P
r
essure
0.53~1.8mm/H2O
Noise
Level
13.5~35.2dB(A)
Bring ea
T
ype
Hydraulic
B
ear
ing
C
onnec
t
ors
2510~4Pin
Lead Wire
Length
300mm
LED
R
ainbo
w
16 LEDs
Back
plate x 1 AMD gasket x 1
Int bracket x 2 AMD bracket x 2el
Thermal
grease
x 1
Spring nut x 4
Plastic
gasket x 8
Metal gascket x 4 Hexagonal nut x 4
Double-headed r x 4scew
Specica
tions
I ntel
S
ocket
L
GA775/115X/1366/2011/2066
A MD
S
ocket
F
M1/F
M2/AAM2+/AM3/AM3+/AM2/
M4
I ntel
Platform
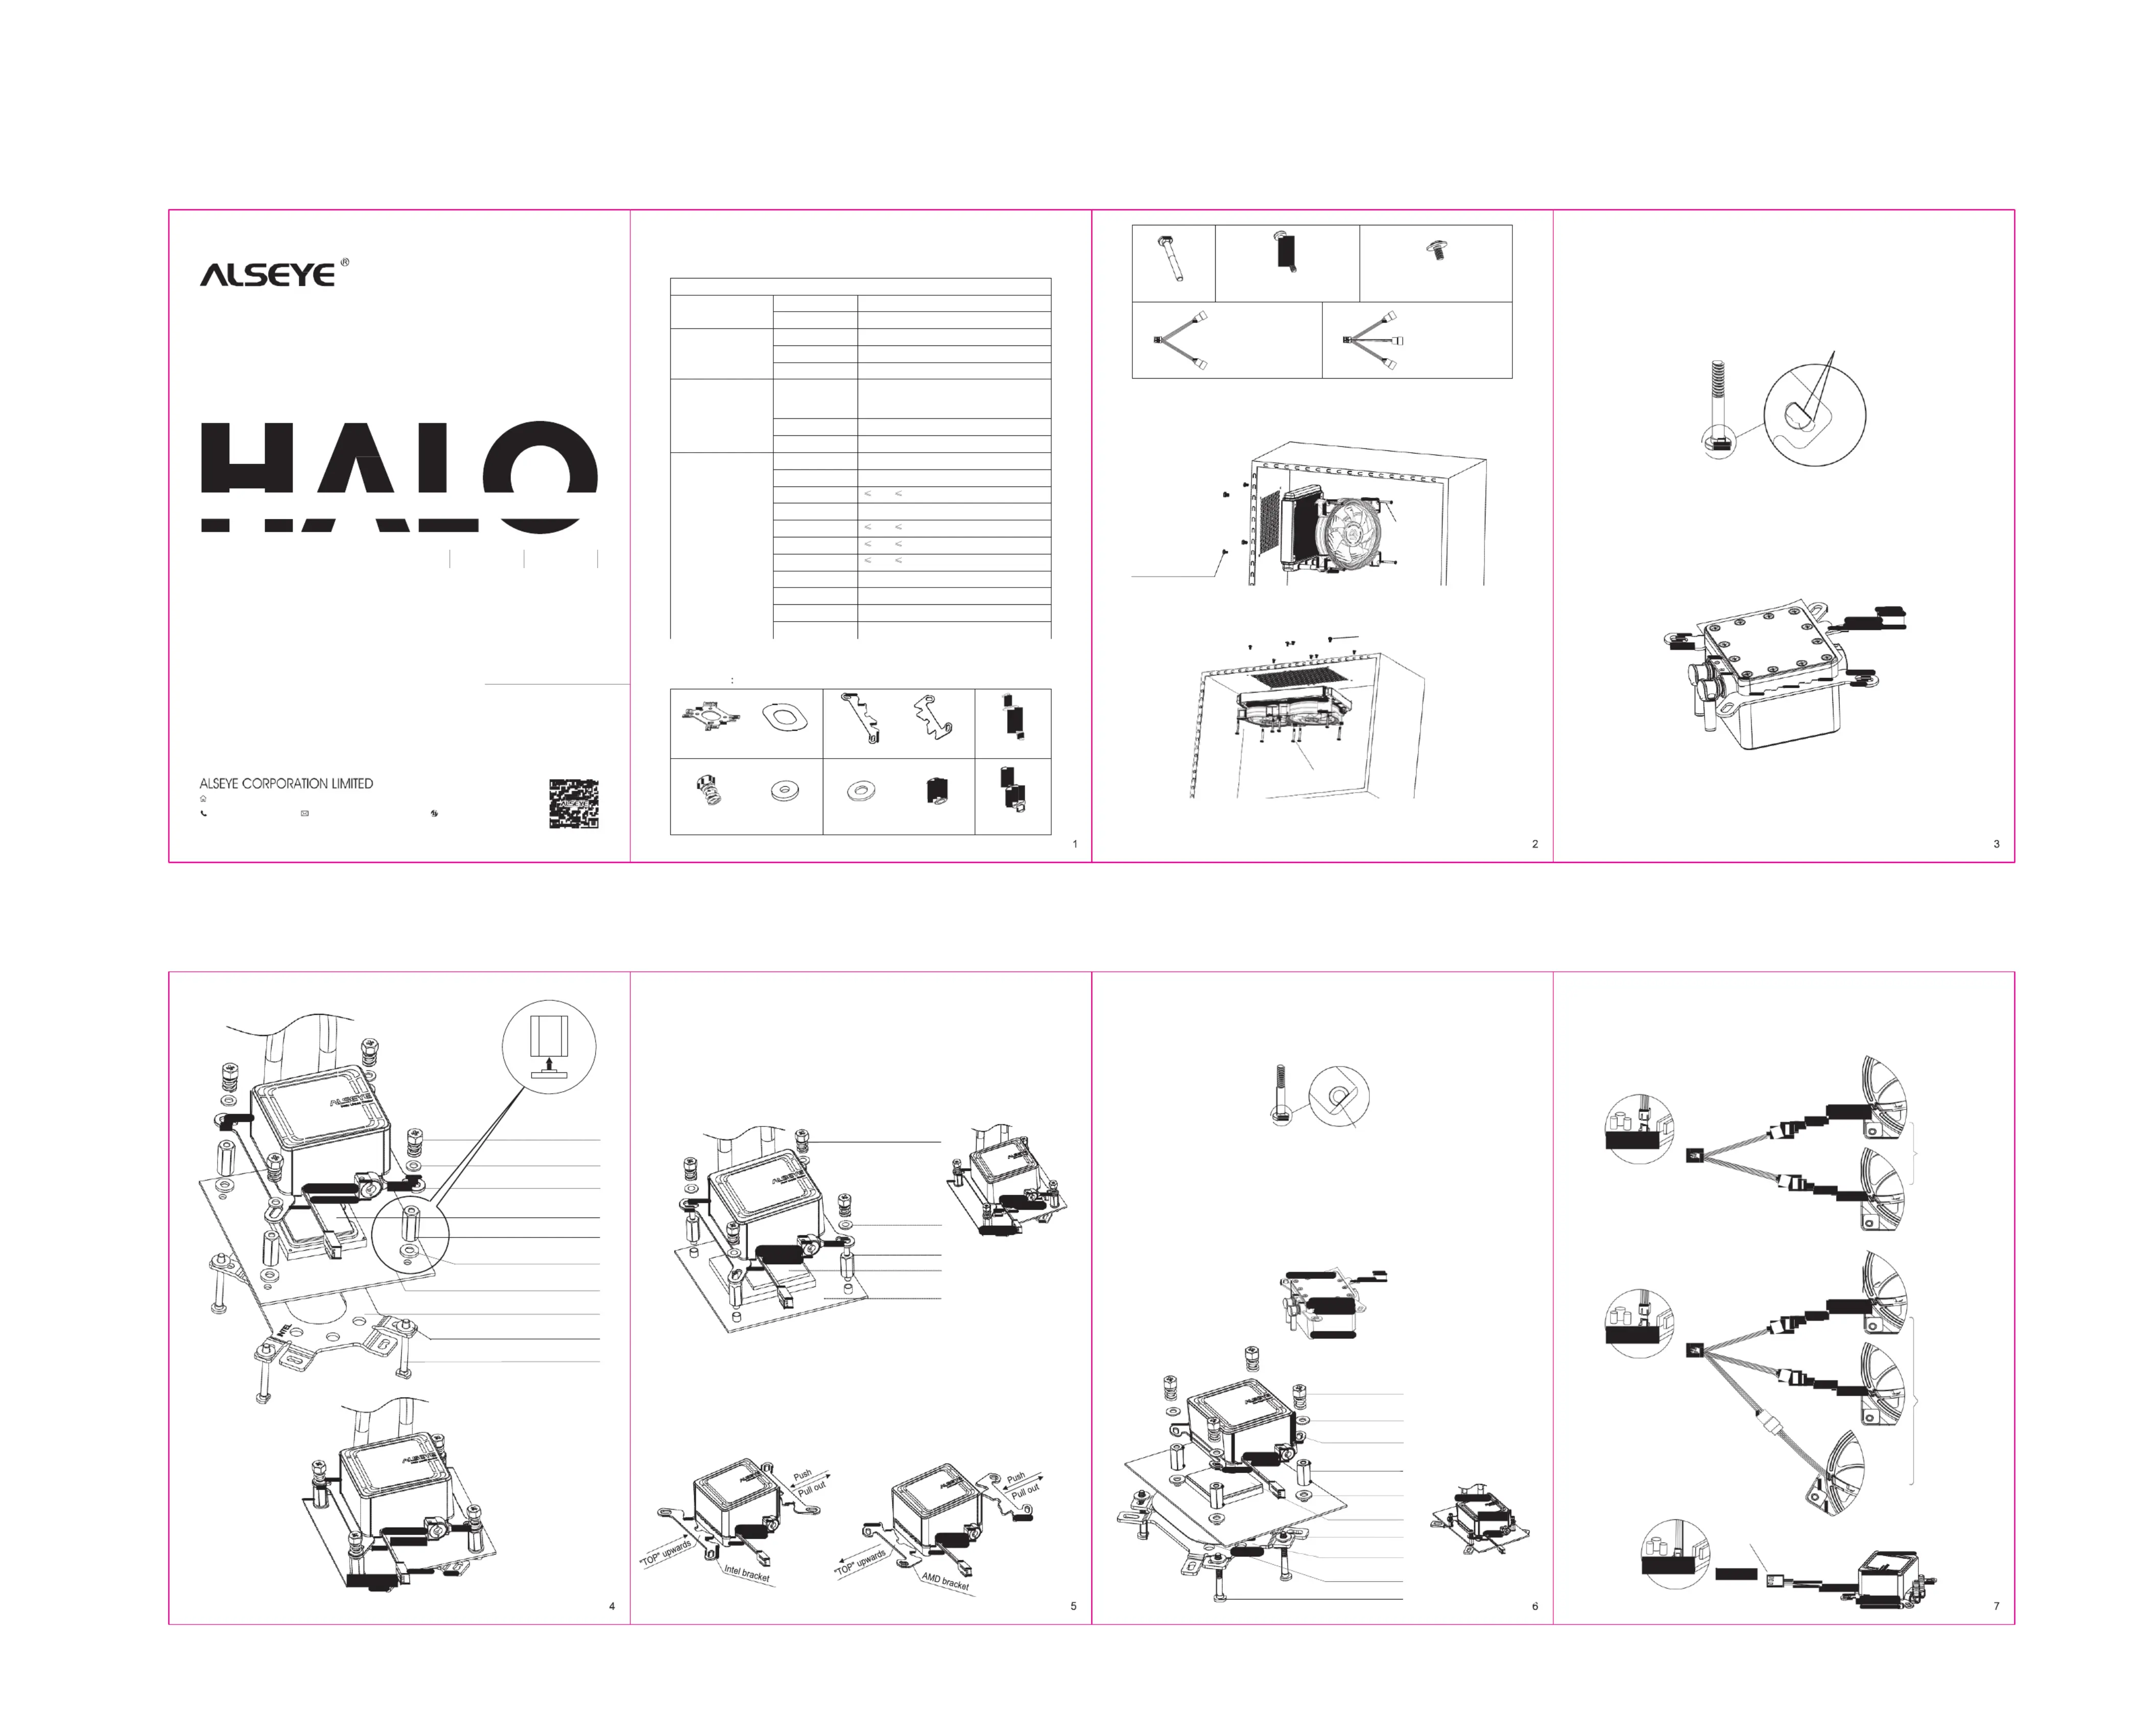
Installation
1. Check
the I metal ntel
back
plate and the motherboard
socket
.
2. Pce la
the
back
plate
scr ew
to the
back
plate with
a plastic gasket
between it and the mother
boar
d
,
then
pass
the
back
plate
scr ew
through the motherboard to its
o sidebverse
.
3. Hexagonal
nut oo the nt
back
plate
scr ew
fr the om
oerse side bv
of the mother
boar
d
.
Plastic
gasket
between the motherboard and
every hexagonal
nut
.
Indicating
P
osition
H120
Installation
Diag
r
am
1. Fix
the
fan
oo the nt
r
adia
t
or
;
2. Fix
the
radiator
with the
fans
oo the nt
case
.
AIO
Liquid
C
ooler
H120 H240 H360
R
adia
t
or
S
crew
H240
Installation Diagram
1. Fix
the
fan
oo the nt
r
adia
t
or
;
2. Fix
the
radiator
with
fan
oo the nt
case
.
Fan
S
crew
R
adia
t
or
S
crew
4.
Apply the thermal
paste
on the
CPU
surcefa
.
5.
I
nser
t
the I ntel
bracket
to the
side
of water block with “”Ielnt
upw
ards
.
6. Tear
o the protecve ti
sticker
fr the copper om
base
of the cold plate and install the cold e platon the
CPU surce fa
and
scr ew
with spring nut (put
a
metal
gasket
between
every
spring nut and the
I
n
t
el
bracket). M ake
the copper botomt
close
to the
CPU surce fa
and lock the ring nut tightly and sp
fla
t
.
User
M
anual
Aessoriescc
Fan
S
crew
HQ: Jinhua Building, Dalang Street, Longhua District, Shenzhen,
China.
860755--23600230 support@alseyecorp.com
www.alseyecorp.com
©2009-2018
ALSEYE CORPORATION LIMITED.
All rights
are
reserved.
*All brand names and logos are trademarks their respecve companies and copyright belongs ofti
to them.
H360
Installation
Ref er
to H240.
I ntel
Platform
LGA 2011/2066
Installation
1. Twist
the
doublheadede- r scew
to
every hole
on the
motherrd boa
by
short readed end th
(as
belo
w).
2.
Apply the
thermal te pas
on the
surce fa
of
CPU
.
3. Tear
othe
protecve sticker ti
fr the om
c base opper
of the cold plate
and install
the cold
plate on the
CPU suscrce and far ew
with
spring
nut (put
a
metal
gasket betw every een
spring
nut
and
the I ntel
bracket). Make
the
copper
bott om
close
to the
CPU surce and lock fa
the
spring
nut tightly
and fla
t
.
A Platform MD
Installation
1.
S
elec
t
the
A MD
metal
back
plate to the
motherrd boa
socket
(F
M1/F
M2/AM2/AM2+/AM3/AM3+/A
M4).
2. Pce la
the
back
plate
scr ew
to the
back
plate with
a plastic gasket between
it
and
the
mother
boar
d
,
then
pass
the
back
plate
scr ew
thr the ough
motherboard
to its
obverse side
.
Cable
C
onnec
tion
1. H120:
cct onne
the
fan
to
“
CPU_F
AN
”
on the mother
boar
d
.
2. H240/360:
connect
the
fans
to
“
CPU_F
AN
”
on the
motherboard via
the
adapert cable
.
Spring
nut
Metal gasket
INTEL
br
acket
CPU
He xagonal
nut
Plastic
gasket
M
other
boar
d
Back
pla
t
e
Plastic
gasket
Back
plate
scr
ew
Iel/A ntMD
Bracket
Installation
Spring
nut
Metal
gasket
Double- headed
scr
ew
CPU
Motherrdboa
F
ool-proong
por
t
3. Hexagonal
nutnt oo the
back
plate
scr ew
fr the motherom
boar
d
’
s
front
side
.
Plastic
gasket
beeentw every hexagonal
nut
and
the mother
boar
d
.
4.
Apply the
thermal te pas
on the
CPU
surcefa
.
5. I
nser
t
the
A bracket MD
to the
side
of
water block
with
“
A
MD
”
upw
ards
.
6. Tear
othe
protecve sticker ti
fr the om
c base opper
of the cold plate
and install
the cold
plate on the
CPU suscrce and far ew
with
spring
nut (put
a
metal
gasket betw every een
spring
nut
and
the I ntel
bracket). Make
the
copper
bott om
close
to the
CPU surce and lock fa
the
spring
nut tightly
and fla
t
.
CPU_F
AN
CPU_F
AN
For
H240
1.
S
elec
t
the
corresponding bracket
to the
motherrd boa
type
(Iel/AMD) nt
with
"TOP"
upw
ards
.
Installation
is as
belo
w
.
2. T bracket can he
be
pushed
io the nt
card
slot dir
ec
tly
.
No rews are sc
needed
.
Spring
nut
Metal
G
asket
A MD
br
acket
For
H360
Hexagonal
nut
Plastic
gasket
CPU
Plastic
gasket
Back
pla
t
e
3-pin cct onneor
of pump
A gasketMD
Back
plate
scr
ew
SYFS_
AN-(3PIN)
Specyfikacje produktu
| Marka: | ALSEYE |
| Kategoria: | Sprzęt komputerowy |
| Model: | Halo AIO H120 |
Potrzebujesz pomocy?
Jeśli potrzebujesz pomocy z ALSEYE Halo AIO H120, zadaj pytanie poniżej, a inni użytkownicy Ci odpowiedzą
Instrukcje Sprzęt komputerowy ALSEYE

2 Października 2024
Instrukcje Sprzęt komputerowy
Najnowsze instrukcje dla Sprzęt komputerowy
9 Kwietnia 2025
9 Kwietnia 2025
9 Kwietnia 2025
8 Kwietnia 2025
8 Kwietnia 2025
8 Kwietnia 2025
8 Kwietnia 2025
8 Kwietnia 2025
8 Kwietnia 2025
8 Kwietnia 2025