Instrukcja obsługi Amer AMRDCP100KIT
Amer
Wsparcie dla płaskich paneli
AMRDCP100KIT
Przeczytaj poniżej 📖 instrukcję obsługi w języku polskim dla Amer AMRDCP100KIT (2 stron) w kategorii Wsparcie dla płaskich paneli. Ta instrukcja była pomocna dla 15 osób i została oceniona przez 8 użytkowników na średnio 4.6 gwiazdek
Strona 1/2

Installation & Assembly: Universal Drop Ceiling Mount
Model Number:
AMR 100KITDCP
IMPORTANT! Read instruction sheet be-
fore you start installation and assembly.
Before you start make sure all parts listed
are included with your product.
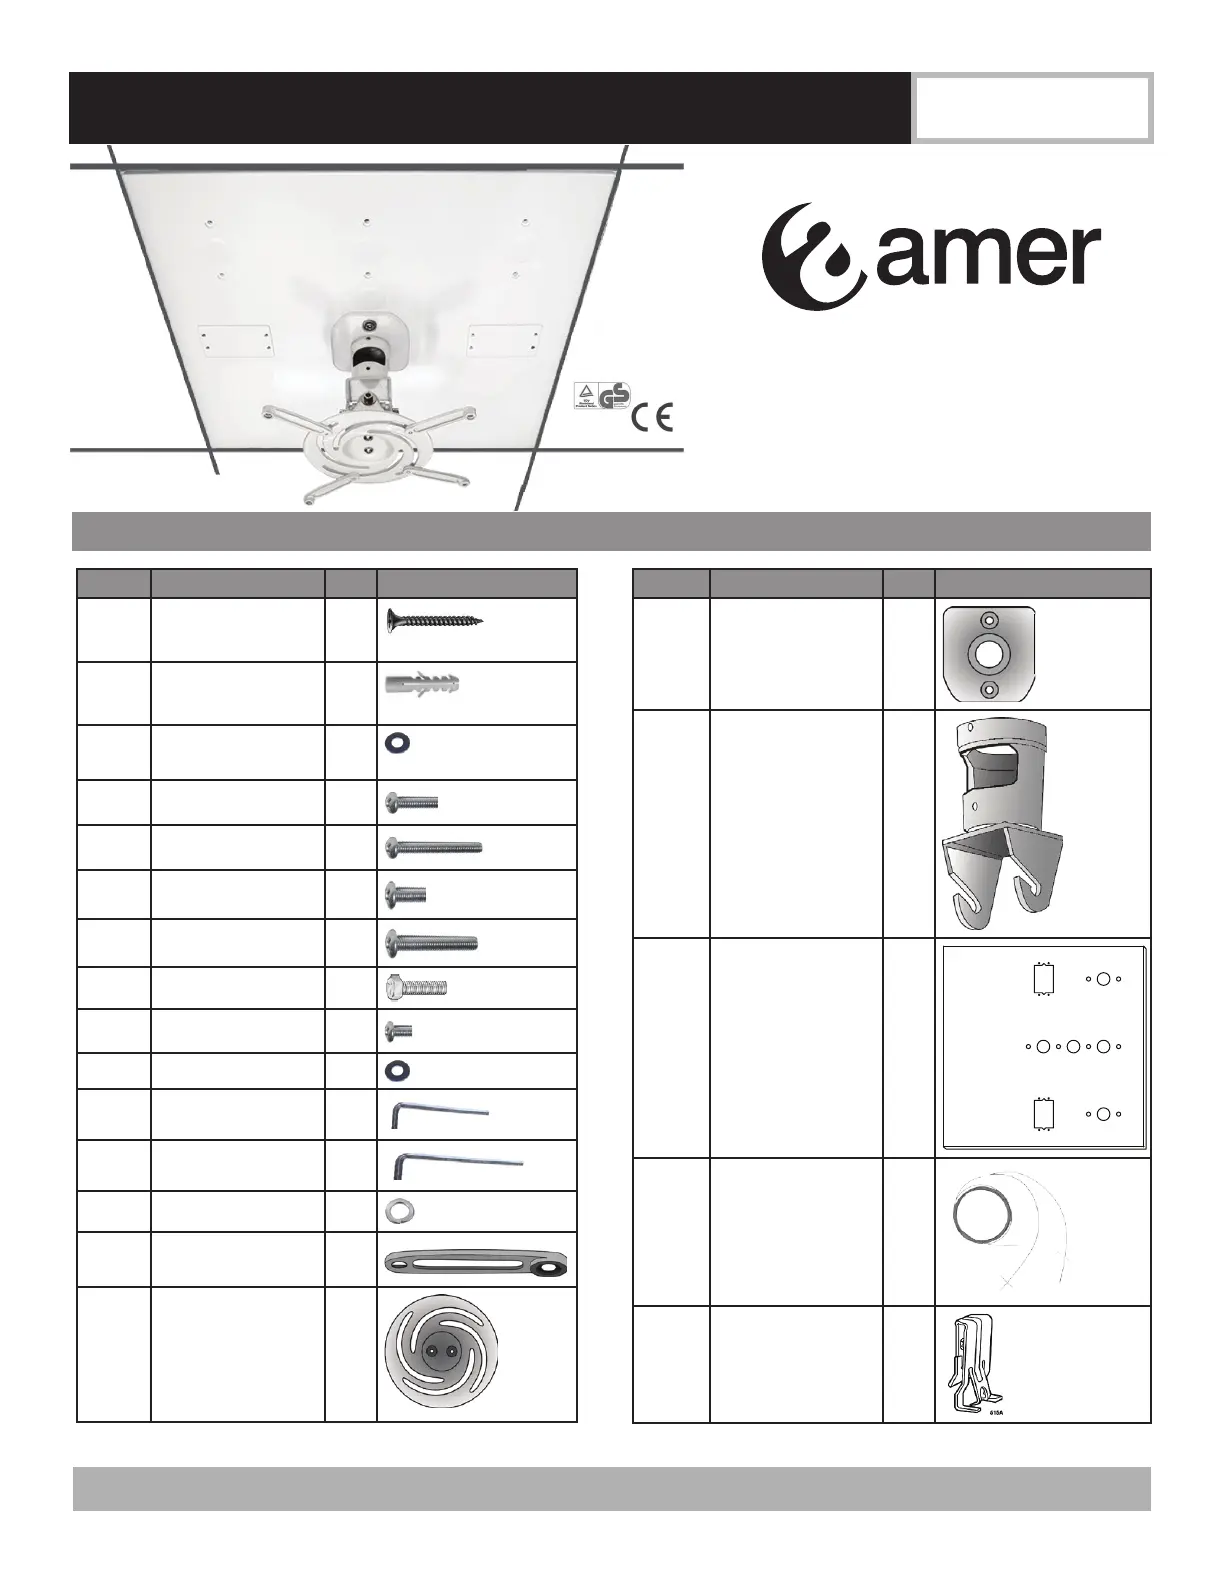
Part # Parts Description Qty. Part Image
A M5x45 Drywall
Screw
2
Not used with 2x2 plate
B Plastic Anchor 2
Not used with 2x2 plate
C M6.5 Washer 2
Not used with 2x2 plate
D M4x16 screw 4
E M4x40 screw 4
F M6x16 screw 4
G M6x40 screw 4
H 8MM hex bolts 2
I M5x16 arm screw 4
J M5 washer 4
K S=3mm Allen
wrench
1
L S=6mm Allen
wrench
1
M M5 washer 4
N Arm 4
O Universal Spider 1
Part # Parts Description Qty. Part Image
P Mount plate 1
Q Middle Piece 1
R Ceiling Plate 1
SCaddy® Speed Link 1
T Hold Down Clips 2
Parts List
www.amer.com For assistance, call 1-800-241-1644

Step 1
Decide where you want to hang your projector in the ceiling.
Remove the existing ceiling tile and place the 2’x2’ plate in the
ceiling using the best orientation for your alignment.
Step 2
Select the location hole to run wires and cables from the ceil-
ing. Plug the four other holes with the provided plugs.
Use two 8mm hex bolts (H) to attach mount plate (P) to ceiling
plate (R).
hex bolt hex bolt
Step 3
Insert two Y-Toggles (S) through two of the sixteen slots on
the back of the ceiling plate (R) and wrap cable over rafter or
ceiling grid as shown:
Step 4
Push Hold Down Clips (T)
down to snap over t-bar as
shown:
Step 5
Attach the three or four arms (M) to the universal spider (N) using
the screws (H) and washers (I) & (L). Do not completely tighten
the screws yet.
Step 6
Attach your projector to the arms (M). Several different screw sizes
sure all screws from step 3 are tightened.
Step 7
Carefully hook the universal spider (N)
with your projector attached to the ceiling.
Installation is now complete.
Adjustment
You can change the tilt of your mount by carefully moving it to the
desired position. You may need to tighten the two tilt adjustment
screws to hold the projector in place.
screws using the allen wrench. Turn the projector to the desired
facing and retighten the screws.
DO NOT CONTINUALLY TURN THE PROJECTOR IN A COUN-
TER-CLOCKWISE DIRECTION! This can cause the mount to
come apart and may cause injury or damage.
swivel screw
tilt screw
swivel screw
tilt screw
www.amer.com For assistance, call 1-800-241-1644
Installation Instructions
Integ ted Cablera
Y-Toggle
Support/Safety
connection slots
(choose 2, depending
on installation)
Specyfikacje produktu
Marka: | Amer |
Kategoria: | Wsparcie dla płaskich paneli |
Model: | AMRDCP100KIT |
Potrzebujesz pomocy?
Jeśli potrzebujesz pomocy z Amer AMRDCP100KIT, zadaj pytanie poniżej, a inni użytkownicy Ci odpowiedzą
Instrukcje Wsparcie dla płaskich paneli Amer
1 Października 2024
Instrukcje Wsparcie dla płaskich paneli
- Wsparcie dla płaskich paneli Ultimate
- Wsparcie dla płaskich paneli StarTech.com
- Wsparcie dla płaskich paneli Atlantic
- Wsparcie dla płaskich paneli Zaor
- Wsparcie dla płaskich paneli SunBriteTV
- Wsparcie dla płaskich paneli SIIG
- Wsparcie dla płaskich paneli Cabstone
- Wsparcie dla płaskich paneli Kogan
- Wsparcie dla płaskich paneli Barkan
- Wsparcie dla płaskich paneli Helder
- Wsparcie dla płaskich paneli Nabo
- Wsparcie dla płaskich paneli Konig & Meyer
- Wsparcie dla płaskich paneli Gabor
- Wsparcie dla płaskich paneli Vogel's
- Wsparcie dla płaskich paneli Sanus
Najnowsze instrukcje dla Wsparcie dla płaskich paneli
29 Stycznia 2025
29 Stycznia 2025
29 Stycznia 2025
29 Stycznia 2025
28 Stycznia 2025
28 Stycznia 2025
16 Stycznia 2025
16 Stycznia 2025
16 Stycznia 2025
16 Stycznia 2025