Instrukcja obsługi AMX TPI-PRO-DVI-4
AMX przełącznik TPI-PRO-DVI-4
Przeczytaj poniżej 📖 instrukcję obsługi w języku polskim dla AMX TPI-PRO-DVI-4 (2 stron) w kategorii przełącznik. Ta instrukcja była pomocna dla 23 osób i została oceniona przez 7 użytkowników na średnio 5.0 gwiazdek
Strona 1/2
Installation Guide
TPI-PRO-DVI-2/4Total Presentation Interface with DVI
Overview
The TPI-PRO-DVI Presentation Interface with DVI displays up to 4 fully-scalable video windows,
each supporting Composite, S-Video, Component, VGA and DVI signals on third party touch
monitors (FIG. 1).
There are two versions of the TPI-PRO-DVI available:
•The TPI-PRO-DVI-2 (FG2275-112) supports up to two DVI inputs.
•The TPI-PRO-DVI-4 (FG2275-114) supports up to four DVI inputs.
Product Specifications
The following table lists the specifications for the TPI-PRO-DVI-2 and TPI-PRO-DVI-4. Note that
the primary difference between the TPI-PRO-DVI-2 and TPI-PRO-DVI-4 is in the number of
inputs. In terms of functionality and specifications, they are otherwise identical.
The specifications listed below apply to both versions, unless specifically noted.
Before You Start
The TPI-PRO-DVI has been factory setup with specific touch panel pages. The first splash
screen that appears indicates the TPI is receiving power, loading firmware, and preparing to
display the default touch panel page.
When the panel is ready, the AMX Splash Screen is replaced by the initial Panel Setup page.
•Verify you are using the latest NetLinx Master firmware.
•Verify you are using the latest TPI-PRO-DVI firmware.
•Verify the NetLinx Studio program you are using is version 2.8 or higher.
•Verify the TPDesign4 program you are using is version 2.11 or higher.
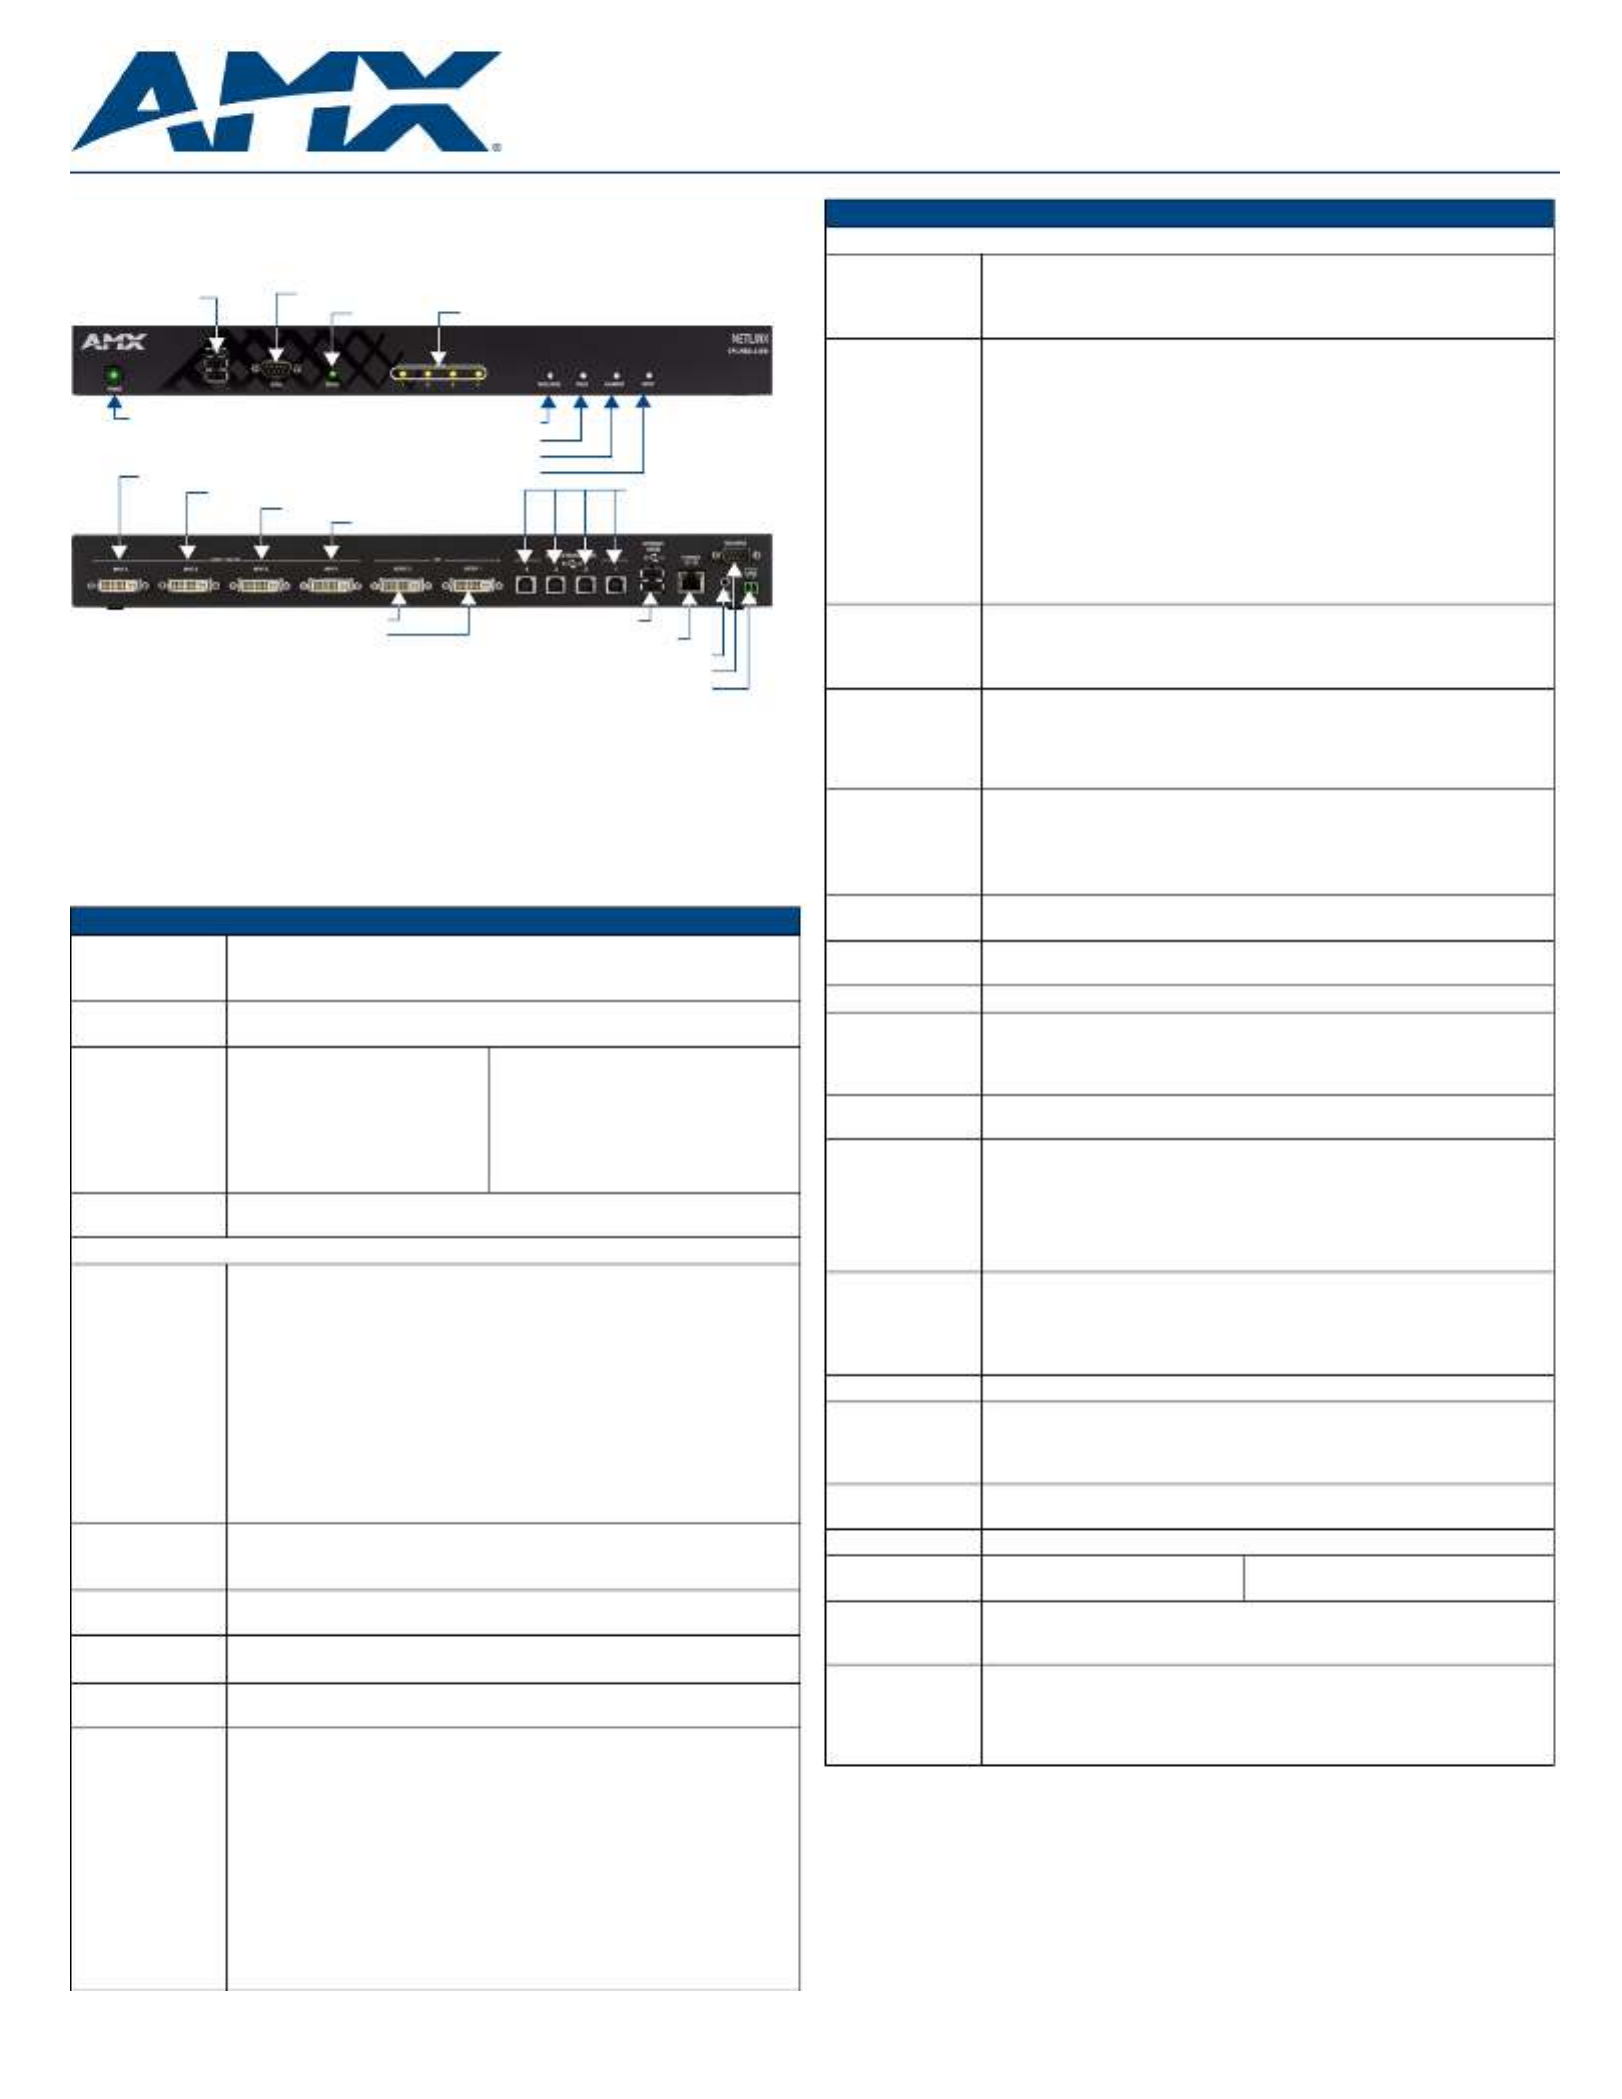
FIG. 1 TPI-PRO-2/4-DVI (TPI-PRO-4-DVI shown)
TPI-PRO-DVI Specifications
•Power
Requirements:
•Constant current draw: 2.6 A @ 12 VDC
•The PSN6.5 Power Supply (FG423-41 - not included) is recommended, to
accommodate all possible configurations and respective power draws.
•Memory:•256 MB SDRAM
•256 MB disk memory
•Supported Video
Resolutions:
Input DVI Video:
•up to 1920 x 1200
•single-link DVI only
Input Component Video:
•NTSC 480i, 480p
•PAL 576i, 576p
•720p, 1080i, 1080p
Input Composite Video and S-Video:
•NTSC M/J
•NTSC 4.43
•PAL B/D/I/G/H
•PAL 60
•PAL M / N / Nc
•SECAM B/D/G/K/L
•Supported Audio
Sample Rates:
48000Hz, 44100Hz, 32000Hz, 24000Hz, 22050Hz, 16000Hz, 12000Hz,
11025Hz, and 8000Hz.
Front Panel Components
•Power
switch/LED:
Toggles the unit off and on.
•Light Off: Power to the unit is either not plugged in, below approximately
10VDC, above approximately 19VDC, or cross-wired.
•Constant Green: Power to the unit is within nominal voltage limits (between
10VDC and 19VDC, approximately), the unit is on, and all internal power
supplies are operating normally.
•Constant Yellow: Power to the unit is within nominal voltage limits (between
10VDC and 19VDC, approximately) and the unit has been turned off by
pressing the power switch for more than two seconds.
•Flashing Yellow: Power to the unit is within nominal voltage limits (between
10VDC and 19VDC, approximately), but one or more of the internal power
supplies are not operating correctly. The unit needs to be serviced. Contact
AMX Technical Support for further instructions.
•USB Type-A
Host ports:
2 USB Type A ports for connecting up to one annotation touch monitor and up
to one keyboard/mouse.
Note: Do not use a USB hub to connect multiple USB devices to the PI.
•Serial port:DB9 connector (male) connects to a DB9 serial port on a PC,for serial
communication.
•Status LED:•Constant ON: No communication with the NetLinx Master
•Blinking: In communication with the NetLinx Master
•Input LEDs:Yellow LEDs indicate a valid input signal on each source input
(1-4 on the TPI-PRO-DVI-4, 1-2 on the TPI-PRO-DVI-2).
•Buttons:Four white buttons provide access to the following configuration options:
•RESOLUTION: Opens a screen used to select the TPI-PRO-DVI output
video signal resolution, ranging from 640 x 480@60Hz to
1920 x 1200@60Hz.
Note: This output resolution setting must not be greater than the resolution
on the connected panel.
•TOUCH: Opens the Panel Information page, where you can select from a
series of serial touch panel drivers, and select the driver that corresponds to
the serial touch panel connected to the TPI-PRO-DVI (via the TOUCH
INPUT connector).
•CALIBRATE: Opens the Calibration page, displaying a series of crosshairs.
These crosshairs are used to calibrate the touch device being used.
•SETUP: Opens the TPI-PRO-DVI firmware setup menu.
Power switch/LED
Status LED
2 USB (Type-A)
Input 1-4 LEDs
Serial (Configuration) port
Input ports
Button - RESOLUTION
Button - TOUCH
Button - CALIBRATE
Button - SETUP
RS-232 Touch Input port
Audio (Stereo) Output
Ethernet (RJ-45) port
Power Connector
VIDEO/VGA/DVI Input 4
VIDEO/VGA/DVI Input 3
VIDEO/VGA/DVI Input 2
VIDEO/VGA/DVI Input 1
DVI Output 2
DVI Output 1
USB (Type-B) Source
Keyboard/Mouse
Ports 1-4
USB (Type-A) Inputs
TPI-PRO-DVI Specifications (Cont.)
Rear Panel Components
•DVI-I Inputs:DVI-I input connectors, one per input source (1-4 on the TPI-PRO-DVI-4,
1-2 on the TPI-PRO-DVI-2).
Each input connector supports DVI, VGA graphics, S-video, composite, and
component video.
•DVI-I Outputs:2 DVI-I (VESA/EIA compatible) output connectors. Both outputs support DVI-D
and analog VGA (RGBHV) outputs.
•Maximum output resolution = 1920 x 1200@60 Hz
•Default output resolution = 1280 x 1024@60 Hz
Note: Refer to the TPI-PRO-DVI Operation/Reference Guide for a listing of
Supported Pixel Display and Refresh Rates.
These connectors display video feeds, G4 graphics and external windowed
video/graphics inputs.
The DVI-I Outputs can be connected to either:
•The touch-panel control display
•The public-view non-touch monitor
Note: The TPI-PRO-DVI does not provide Component (YPbPr) or Interlaced
outputs.
•Source TOUCH,
KEYBOARD/
MOUSE
USB ports:
2 or 4 USB Type-B device ports, one per source computer—for source USB
Touch Monitor, mouse/keyboard control (1-4 on the TPI-PRO-DVI-4, 1-2 on the
TPI-PRO-DVI-2).
Note: Do not use a USB hub to connect multiple USB devices to the TPI.
•Host USB Touch
Monitor
KEYBOARD/
MOUSE
USB ports:
2 USB Type-A ports that can be used for a keyboard, mouse, external storage
unit, or USB-capable touch panel interface.
Note: Do not use a USB hub to connect multiple USB devices to the TPI.
•ETHERNET
10/100 port:
RJ-45 port provides 10/100 Mbps communication with the NetLinx Master (via
ICSP protocol over Ethernet).
•The Ethernet port automatically negotiates the connection speed (10 Mbps or
100 Mbps), and whether to use half duplex or full duplex mode.
• This communication is reflected via the front ICSP LED.
•TOUCH INPUT
port:
RS-232 (DB9) 9-pin serial port provides connectivity to a pointer device (i.e.
touch screen) that requires a serial connection.
•AUDIO OUT
connector:
3.5mm mini-jack provides stereo output - for use with line-level (0.707 VRMS)
non-amplified stereo output only.
•Power connector:2-pin 3.5 mm mini-Phoenix connector.
•Serial Touch
Drivers:
Go to http://www.amx.com//techdocs/TPI-PRO.Supported.Touch.Monitors.xls
to view/download the most recent List of Touch Monitors and USB Touch
Drivers Tested with the TPI-PRO-DVI (including the most current listing of
tested serial touch panel drivers).
•USB Drivers:USB Touch drivers are automatically loaded when the USB Touch Monitor is
detected.
•Button
Assignments:
Button assignments can be modified in TPD4 (not on the TPI-PRO-DVIs.)
•Button channel range: 1 - 4000 button push & feedback (per address port)
•Button variable text range: 1 - 4000 (per address port)
•Button states range: 1 - 256 (General Button; 1 = Off State, 2 = On State)
•Level range: 1 - 600 (Default level value 0-255, can be set up to 1-65535)
•Address port range: 1 - 100
• Communication/
Programming:
Master communication and programming is available via an Ethernet
connection. There are several methods of TPI-PRO-DVI communication and
programming available, including DHCP, Static IP, URL, Listen, Auto, NPD
(UPD) and URL (UPD).
Refer to the TPI-PRO-DVI Operation/Reference Guide for details.
•Enclosure:Metal with black matte finish
• Operating/
Storage
Environment:
•Operating Temperature: 0° C (32° F) to 40° C (104° F)
•Operating Humidity: 5% to 85% RH Non-Condensing
•Storage Temperature: -10° C (14° F) to 70° C (158° F)
•Storage Humidity: 0% to 85% RH Non-Condensing
•Dimensions
(HWD):
•1.72" x 17.00" x 10.54"
(4.37 cm x 43.18 cm x 26.77 cm)
•Weight:8.25 lbs (3.74 kg)
• Certifications:• RoHS
•FCC (Class B)
• CE
• IEC/EN60950
•Included
Accessories:
•2-pin PWR connector (41-5025)
•Assembly Kit - Four screws and washers (KA0001)
•Rack Ear brackets (60-0900-03)
•Other AMX
Equipment:
•PSN6.5: Power Supply with 3.5 mm mini-Phoenix connector (FG423-41)
•CC-DVI-5BNCM: DVI-to-5 BNC Male Adapter Cable (FG10-2170-08)
•CC-DVI-RCA3M: DVI-to-3 RCA Male Adapter Cable (FG10-2170-09)
•CC-DVI-SVID: DVI-to-S-Video Adapter Cable (FG10-2170-10)
•CC-DVIM-VGAF: DVI-to-VGA Adapter Cable (FG10-2170-13)
Specyfikacje produktu
| Marka: | AMX |
| Kategoria: | przełącznik |
| Model: | TPI-PRO-DVI-4 |
Potrzebujesz pomocy?
Jeśli potrzebujesz pomocy z AMX TPI-PRO-DVI-4, zadaj pytanie poniżej, a inni użytkownicy Ci odpowiedzą
Instrukcje przełącznik AMX

21 Czerwca 2024
21 Czerwca 2024
21 Czerwca 2024
Instrukcje przełącznik
Najnowsze instrukcje dla przełącznik
9 Kwietnia 2025
9 Kwietnia 2025
7 Kwietnia 2025
5 Kwietnia 2025
4 Kwietnia 2025
4 Kwietnia 2025
4 Kwietnia 2025
3 Kwietnia 2025
3 Kwietnia 2025
2 Kwietnia 2025