Instrukcja obsługi Analog Way EXT-HDMI20-OPT-TX
Analog Way przedłużacz AV EXT-HDMI20-OPT-TX
Przeczytaj poniżej 📖 instrukcję obsługi w języku polskim dla Analog Way EXT-HDMI20-OPT-TX (2 stron) w kategorii przedłużacz AV. Ta instrukcja była pomocna dla 21 osób i została oceniona przez 7 użytkowników na średnio 4.5 gwiazdek
Strona 1/2
EXT-HDMI20-OPT-TX
EXT-HDMI20-OPT-RX
Further Informaon
www.analogway.com
January 2021
QSG EXT-HDMI20-OPT-TX/RX
Code : 140209
Important Safety Instrucons
Please read the supplied safety
instrucon document before using the
product and keep it available for future
reference.
u
CAUTION- The use of controls or adjustments or any performance of procedures
other than those specied herein may result in hazardous radiaon exposure.
Introducon
Thank you for choosing Analog Way EXT-HDMI20-OPT-TX and RX opcal extenders.
The EXT-HDMI20-OPT-TX and EXT-HDMI20-OPT-RX are HDMI 2.0 compable ber
opcal extenders providing uncompressed signal extension with embedded audio
to a range of 2500 m (8000 .) over a single mulmode ber cable connecon.
Its rugged, solid metal casing provides excellent cooling and maximum reliability.
These ber opcal extenders are also compable with Analog Way’s LivePremier™
HDMI 2.0 over ber output card (ref. ACC-AQL-OUT-HDMI-FBR) and HDMI 2.0 over
ber input card (ref. ACC-AQL-IN-HDMI-FBR).
Box Contents
Transmier / Receiver
module
5V DC adaptor with
interchangeable plugs
Safety and Warranty Info,
Quick Start Guide
1
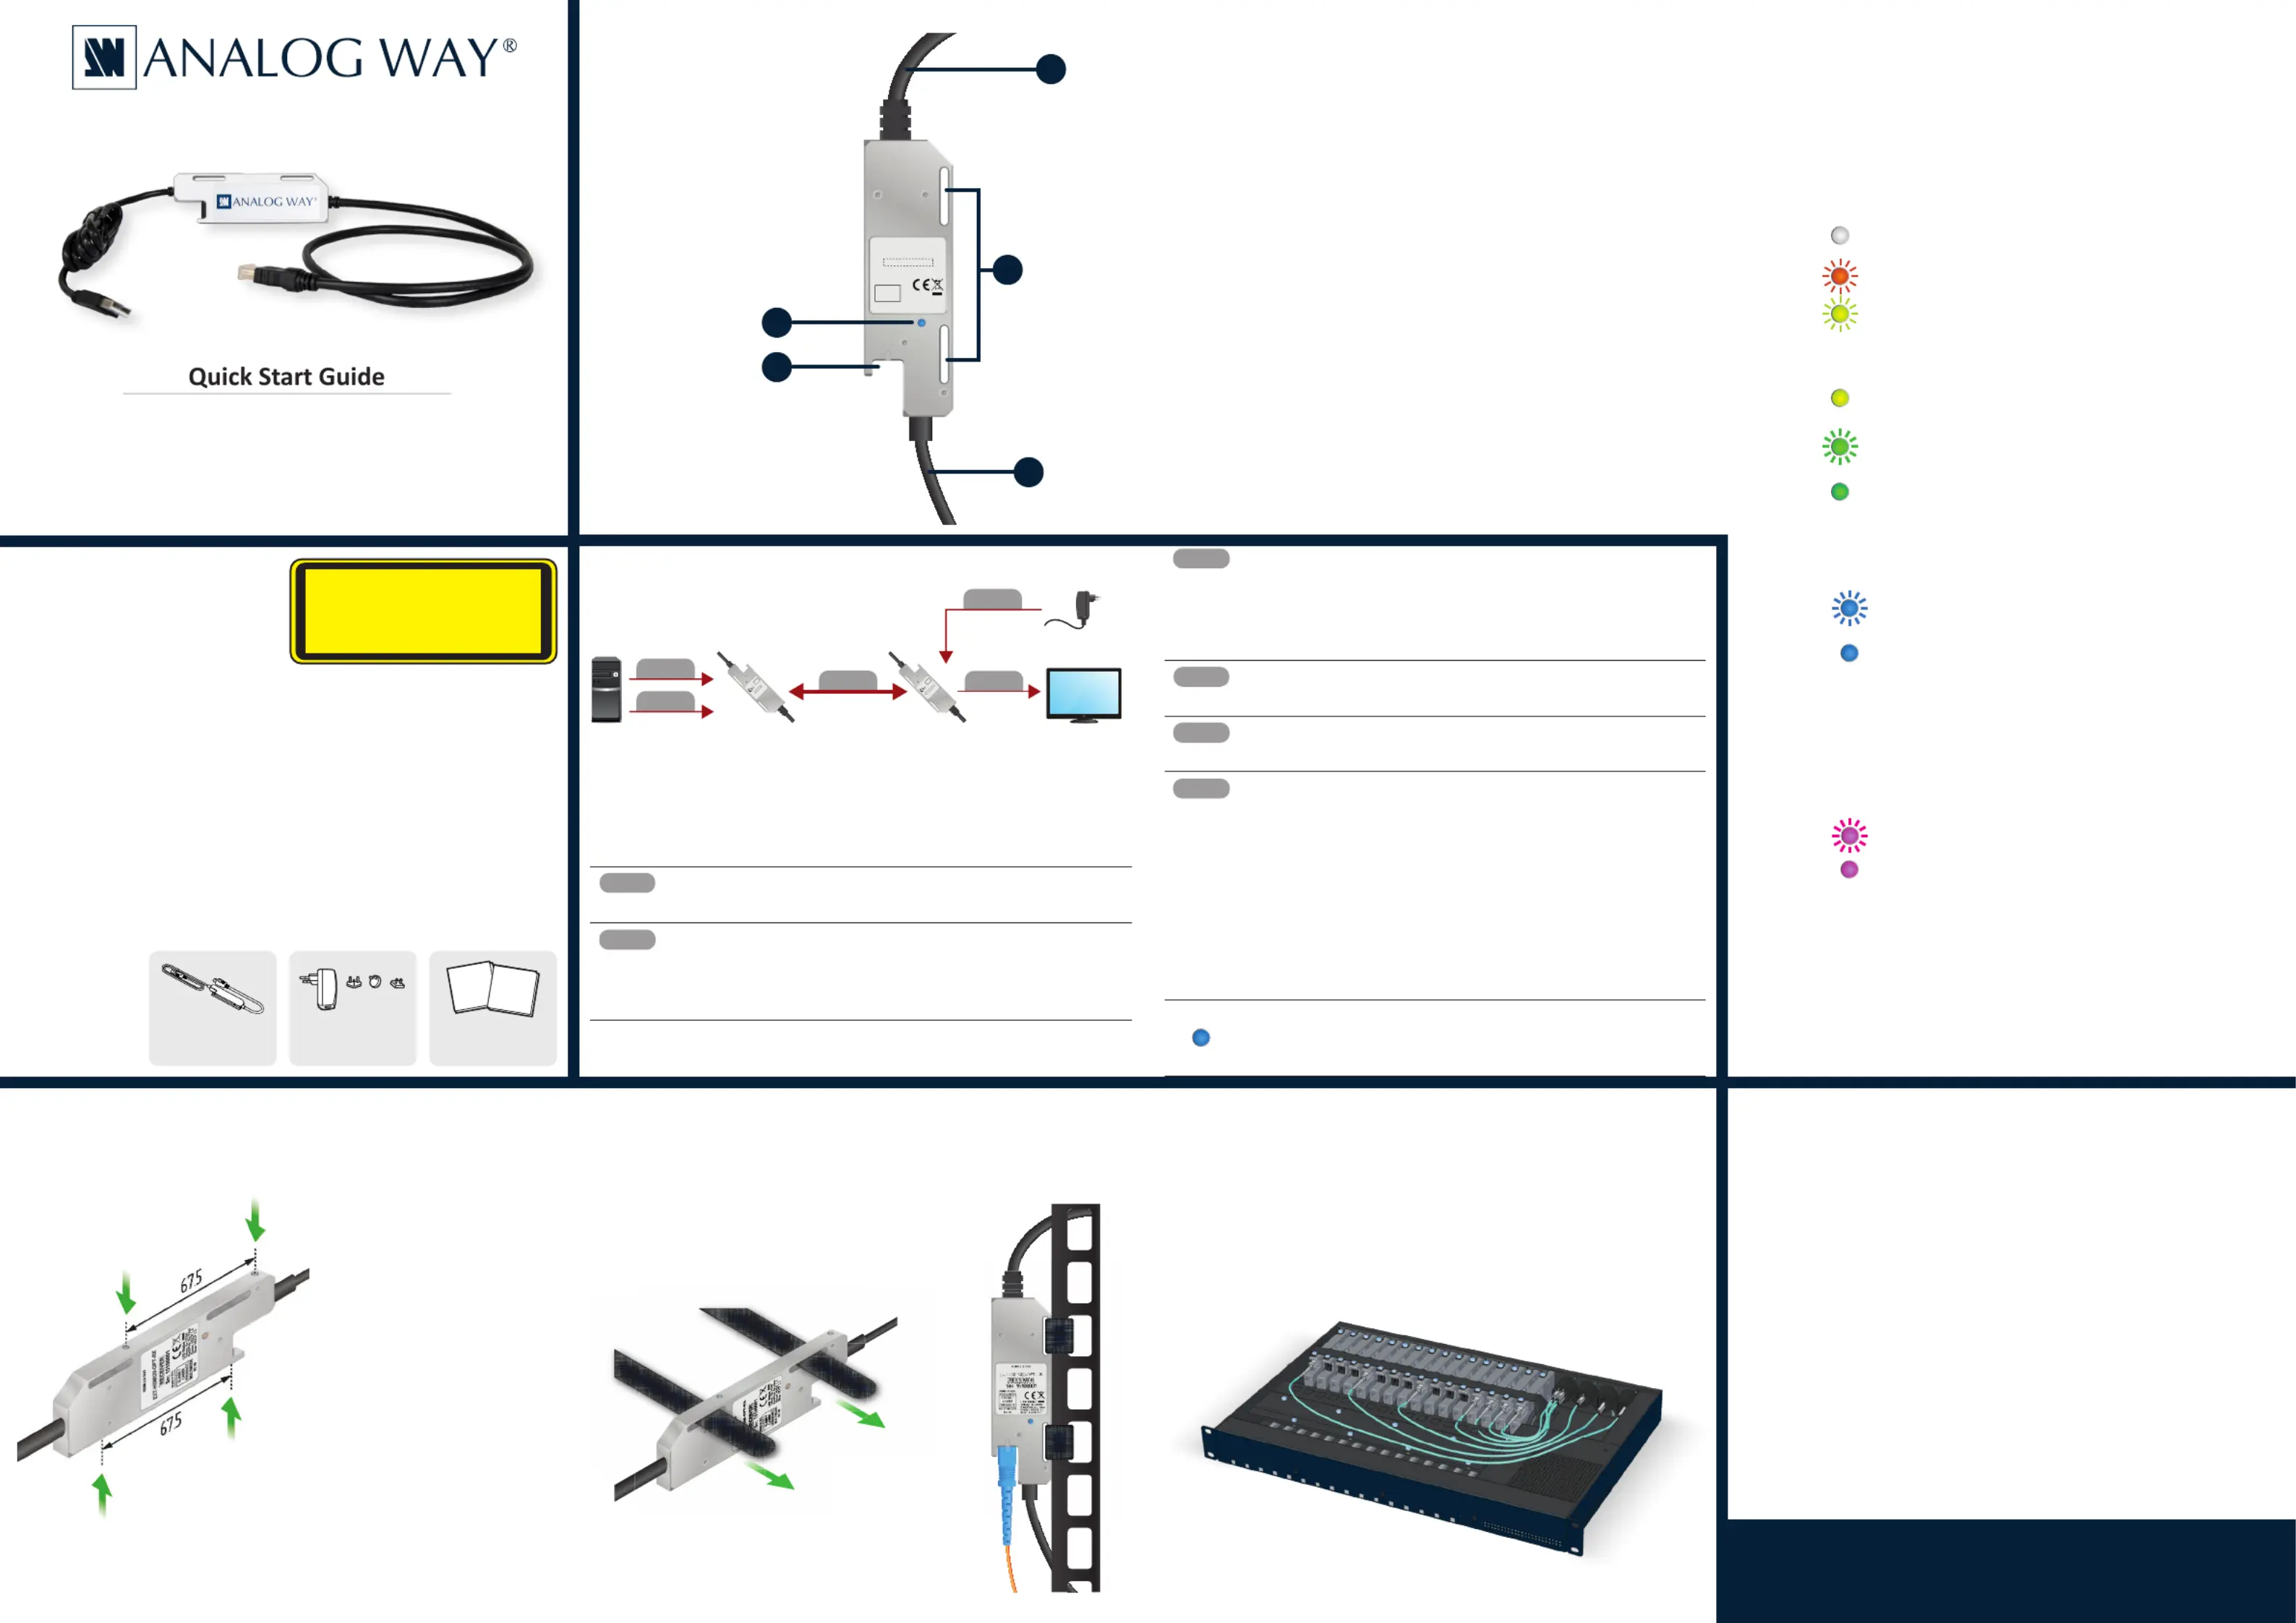
HDMI plugHDMI connector plug for HDMI audio and video signal
transmission. The following protocols and features are
supported:
HDMI 1.x and HDMI 2.0 audio/video - the module
automacally selects between HDMI 2.0 and HDMI 1.x
based on the type of the signal source or sink device.
HDCP 1.4 or HDCP 2.2 encrypon - the module
automacally selects between HDCP 1.4 and HDCP 2.2
based on the type of the signal source or sink device.
EDID, CEC, and HDCP transparent.
2
LoopholesLoopholes for self-fastening belts for mounng. See the
details in the Mounng Opons secon.
3
USB-A plugStandard USB-A plug to USB-compable (1.1 or higher)
host port. The following features are supported:
The receiver and transmier can be fully powered
from the USB port. This capability is available even if
the aached USB host port is “power only”.
For transmier only: USB power is fully compable
with HDMI power. The transmier performance will
not degrade if the HDMI power and USB power are
available simultaneously. Similarly, connecng USB
power and HDMI power simultaneously will not cause
any damage to the aached USB host or HDMI video
source.
Boom View - Transmier / Receiver
4
SC ber
connector
SC ber opcal connector. Connect a mulmode ber
opcal cable between the transmier and the receiver. The
following features are supported:
All communicaon, including audio and video
transmission, and HDCP over one opcal ber.
The connector supports open ber detecon with high
speed laser shutdown.
5
Status LEDIndicates the current status of the transmied or received
opcal and HDMI signals, and the HDCP-encrypon.
OFFModule is not powered.
BLINKING (red)No ber link is detected.
BLINKING (yellow)Fiber link is established, but no
HDMI cable is detected (5V is not
detected on the source or hotplug
is not detected on the sink).
ON (yellow)Fiber link is established, cable is
connected, but no HDMI signal.
BLINKING (green)Fiber link is established, signal is not
HDCP-encrypted.
ON (green)Fiber link is established, signal is
encrypted with HDCP 1.4.
Mounng Opons
The ergonomic enclosure provides two possible methods for mounng the device.
Opon 1 - Mounng the device to a rack shelf
The transmier and the receiver
modules have two mounng holes
each with inner threads on the two
narrow sides. The distance between
the holes is 67,5 mm.
Fasten the device by the screws
packaged with the following,
compable mounng accessories:
Under-desk mounng kit
Under-desk double mounng
kit
1U high rack shelf
The required screw type: PZ at
head (M3x6mm)
To order mounng accessories please contact your sales representaves
Opon 2 - Mounng the device using self-fastener
Use the two e-down loops of the enclosure to thread through self-fastener. The
modules can be mounted to basically any installaon point, for example rack frames.
u
In case of installaon to a truss, always x the module with a safety wire as well.
Opon 3 - Mounng the device to the OPT-POWERTRAY
The OPT-POWERTRAY is a 1RU size housing accessory which can enclose up to 16
pcs EXT-HDMI20-OPT-TX/RX units, also providing power source for every installed
device. Three dierent models are available:
SCmodel: built with 8x SC duplex ber opcal connectors for 16x mulmode
SC ber opcal cables.
NTD model: 4x Neutrik NO2-4FDW-A connectors for 4x Neutrik opcalCON
DUO series cables or 8x LC ber opcal cables.
NTQ model: 4x Neutrik NO4FDW-A connectors for 4x Neutrik opcalCON QUAD
series cables.
BLINKING (blue)Fiber link is established, HDCP 2.2
inializaon is in progress.
ON (blue)Fiber link is established, signal is
encrypted with HDCP 2.2.
Troubleshoong
The following LED status mean incorrect extender modes. It can
happen when the USB-A plug of the extender is connected to a USB
connector where the data transmission is enabled.
Soluon: Use the supplied power adaptors.
BLINKING (pink)The device is in bootloader mode.
ON (pink)The device is in bootloader mode
and bootloader is congured by the
USB host.
Connecng Steps
Follow the installaon steps to connect the extenders between the source and
sink devices:
OPTM
Connect the multimode fiber optical cable to the SC fiber connector
of the receiver.
HDMI
Connect the to the input port of the sink HDMI plug of the receiver
device. The extender reads the EDID from the device (seamless
switcher input, projector, monitor, etc), and outputs the video signal
according to the set resolution.
Power
Power on the receiverby choosing one of the powering options
below:
Connect the USB plug of the receiver to the power adaptor.
Connect the USB plug of the receiver to the USB connector of the
sink device.
OPTM
Connect the multimode fiber optical cable to the SC fiber connector
of the transmitter.
HDMI
Connect the HDMI plug of the transmitterto the output port of the
source device (e.g. PC).
Power
Finally power on the transmitter by choosing one of the powering
options below:
Connect the USB plug of the transmier to the power adaptor.
Connect the USB plug of the transmier to the USB connector of
the source device.
Connect the to the output port HDMI plug of the transmier
of the source device (e.g. PC). If the HDMI source device is able
to provide enough 5V DC current (500mA), there is no need for
external 5V DC power. The extender is powered immediately
when the source device is switched on.
Check the Status LED. When the connection has been made successful,
the LEDs on the transmitter and receiver will appear green or blue
depends on the HDCP-encryption.
EXT-HM
0O-R
L
E
D
S
tatu
s
Ye
l
lo
w:
N
o
H
D
M
I
R
e
d/Pink
: No
F
i
b
e
r
G
reen:
H
D
C
P 1.4
B
lue
:
HDC
P
2.2
H
D
MI 2
.0
OUT
RECEIVER
M
U
LT
IM
OD
E
SC
I
N
CLASS
1
L
A
SE
R
P
RO
D
U
CT
Sn: 15100001
LED Status
Yellow: No HDMI
Red/Pink: No Fiber
Green: HDCP 1.4
Blue: HDCP 2.2
HDMI 2.0 IN
TRANSMITTER
MUL
TIMODE
SC OUT
Sn: 15100001
CLASS 1
LASER
PRODUCT
EXT-HDMI
20-OPT-TX
M
a
de i
n E
U
,
Po
we
r
e
d
b
y L
ig
h
twa
r
e
EXHMI20-OPTXT-T-
transmitter
PCEXHMI20-OPRXT-T-
receiver
4K TV
Power adaptor
OPTM
Power
Power
HDMI
HDMI
Ma
d
e
in
E
U
,
P
ow
ere
d b
y
Li
g
htw
are
EXT-HDMI20-OPT-RX
Safety and
Warranty
Info
Quick
Start
Guide
CLASS 1 LASER PRODUCT
CAUTION - CLASS 3R INVISIBLE LASER
RADIATION WHEN OPEN. AVOID DIRECT
EYE EXPOSURE.
LED Status
Yellow: No HDMI
Red/Pink: No Fiber
Green: HDCP 1.4
Blue: HDCP 2.2
HDMI 2.0 OUT
MUIMODELT
SC IN
CLASS 1
LASER
PRODUCT
Sn: 15100001
Made in EU,
Powered by Lightware
EXT-HDMI20-OPT-TX
TRANSMITTER
1
2
3
4
5
Specyfikacje produktu
| Marka: | Analog Way |
| Kategoria: | przedłużacz AV |
| Model: | EXT-HDMI20-OPT-TX |
Potrzebujesz pomocy?
Jeśli potrzebujesz pomocy z Analog Way EXT-HDMI20-OPT-TX, zadaj pytanie poniżej, a inni użytkownicy Ci odpowiedzą
Instrukcje przedłużacz AV Analog Way

23 Grudnia 2024
23 Grudnia 2024
Instrukcje przedłużacz AV
Najnowsze instrukcje dla przedłużacz AV
8 Kwietnia 2025
1 Kwietnia 2025
1 Kwietnia 2025
1 Kwietnia 2025
1 Kwietnia 2025
1 Kwietnia 2025
26 Lutego 2025
20 Lutego 2025
20 Lutego 2025
7 Lutego 2025