Instrukcja obsługi APC APBK500EI
Przeczytaj poniżej 📖 instrukcję obsługi w języku polskim dla APC APBK500EI (2 stron) w kategorii serwer. Ta instrukcja była pomocna dla 20 osób i została oceniona przez 7 użytkowników na średnio 4.2 gwiazdek
Strona 1/2
USB
RJ-45
Inventory
2Connect Equipment
Note:Allow the Back-UPS to charge for a full eight
hours prior to use.
Press the push-button on the front panel of the Back-
UPS.
Observe that the following events occur after
pressing and releasing the push-button:
•The green On-Line indicator flashes.
•The yellow On Battery indicator lights while the
Self-Test is being performed.
•When Self-Test has successfully completed, only
the green On Line indicator will be lit.
•If the internal battery is not connected, (see Step
1 above) the green On Line indicator and red
Replace Batteryindicator will light. The Back-
UPS will also emit a chirping sound.
ON LINE
ON BATTERY
OVERLOAD
REPLACE BATTERY
5
Connect USB Cable
There are four status indicators (lights) on the front
panel of the Back-UPS (On Line, On Battery,
Overload, and Replace Battery).
On Line (green)- is lit whenever AC
power is powering the Battery Backup
outlets.
On Battery (yellow)- is lit whenever
the battery of the Back-UPS is powering
equipment connected to the Battery
Backup Outlets.
Four Beeps Every 30 Seconds- this
alarm is sounded whenever the Back-UPS
is running On Battery. Consider saving
work in progress.
Continuous Beeping- this alarm is
sounded whenever a low battery condition
is reached. Battery run-time is very low.
Promptly save any work in progress and
exit all open applications. Shutdown the
operating system, computer and the Back-
UPS.
ON LINE
ON BATTERY
OVERLOAD
REPLACE BATTERY
Overload (red)- is lit whenever
power demand has exceeded the capac-
ity of the Back-UPS.
Continuous Tone- this alarm is
sounded whenever the Battery Backup
outlets are overloaded.
Circuit Breaker- the circuit
breaker button located on the rear
panel of the Back-UPS will stick
out if an overload condition forces
the Back-UPS to disconnect itself
from utility power. If the button
sticks out, disconnect non-
essential equipment. Reset the
circuit breaker by pushing the
button inward.
3
Replace Battery (red)- is lit when-
ever the battery is near the end of its use-
ful life, or if the battery is not connected
(see above). A battery that is near the
end of its useful life has insufficient run-
time and should be replaced.
Chirps for 1 Minute Every 5 Hours-
this alarm is sounded whenever the
battery has failed the automatic
diagnostic test.
to the Back-UPS
4
Switch on the
Back-UPS
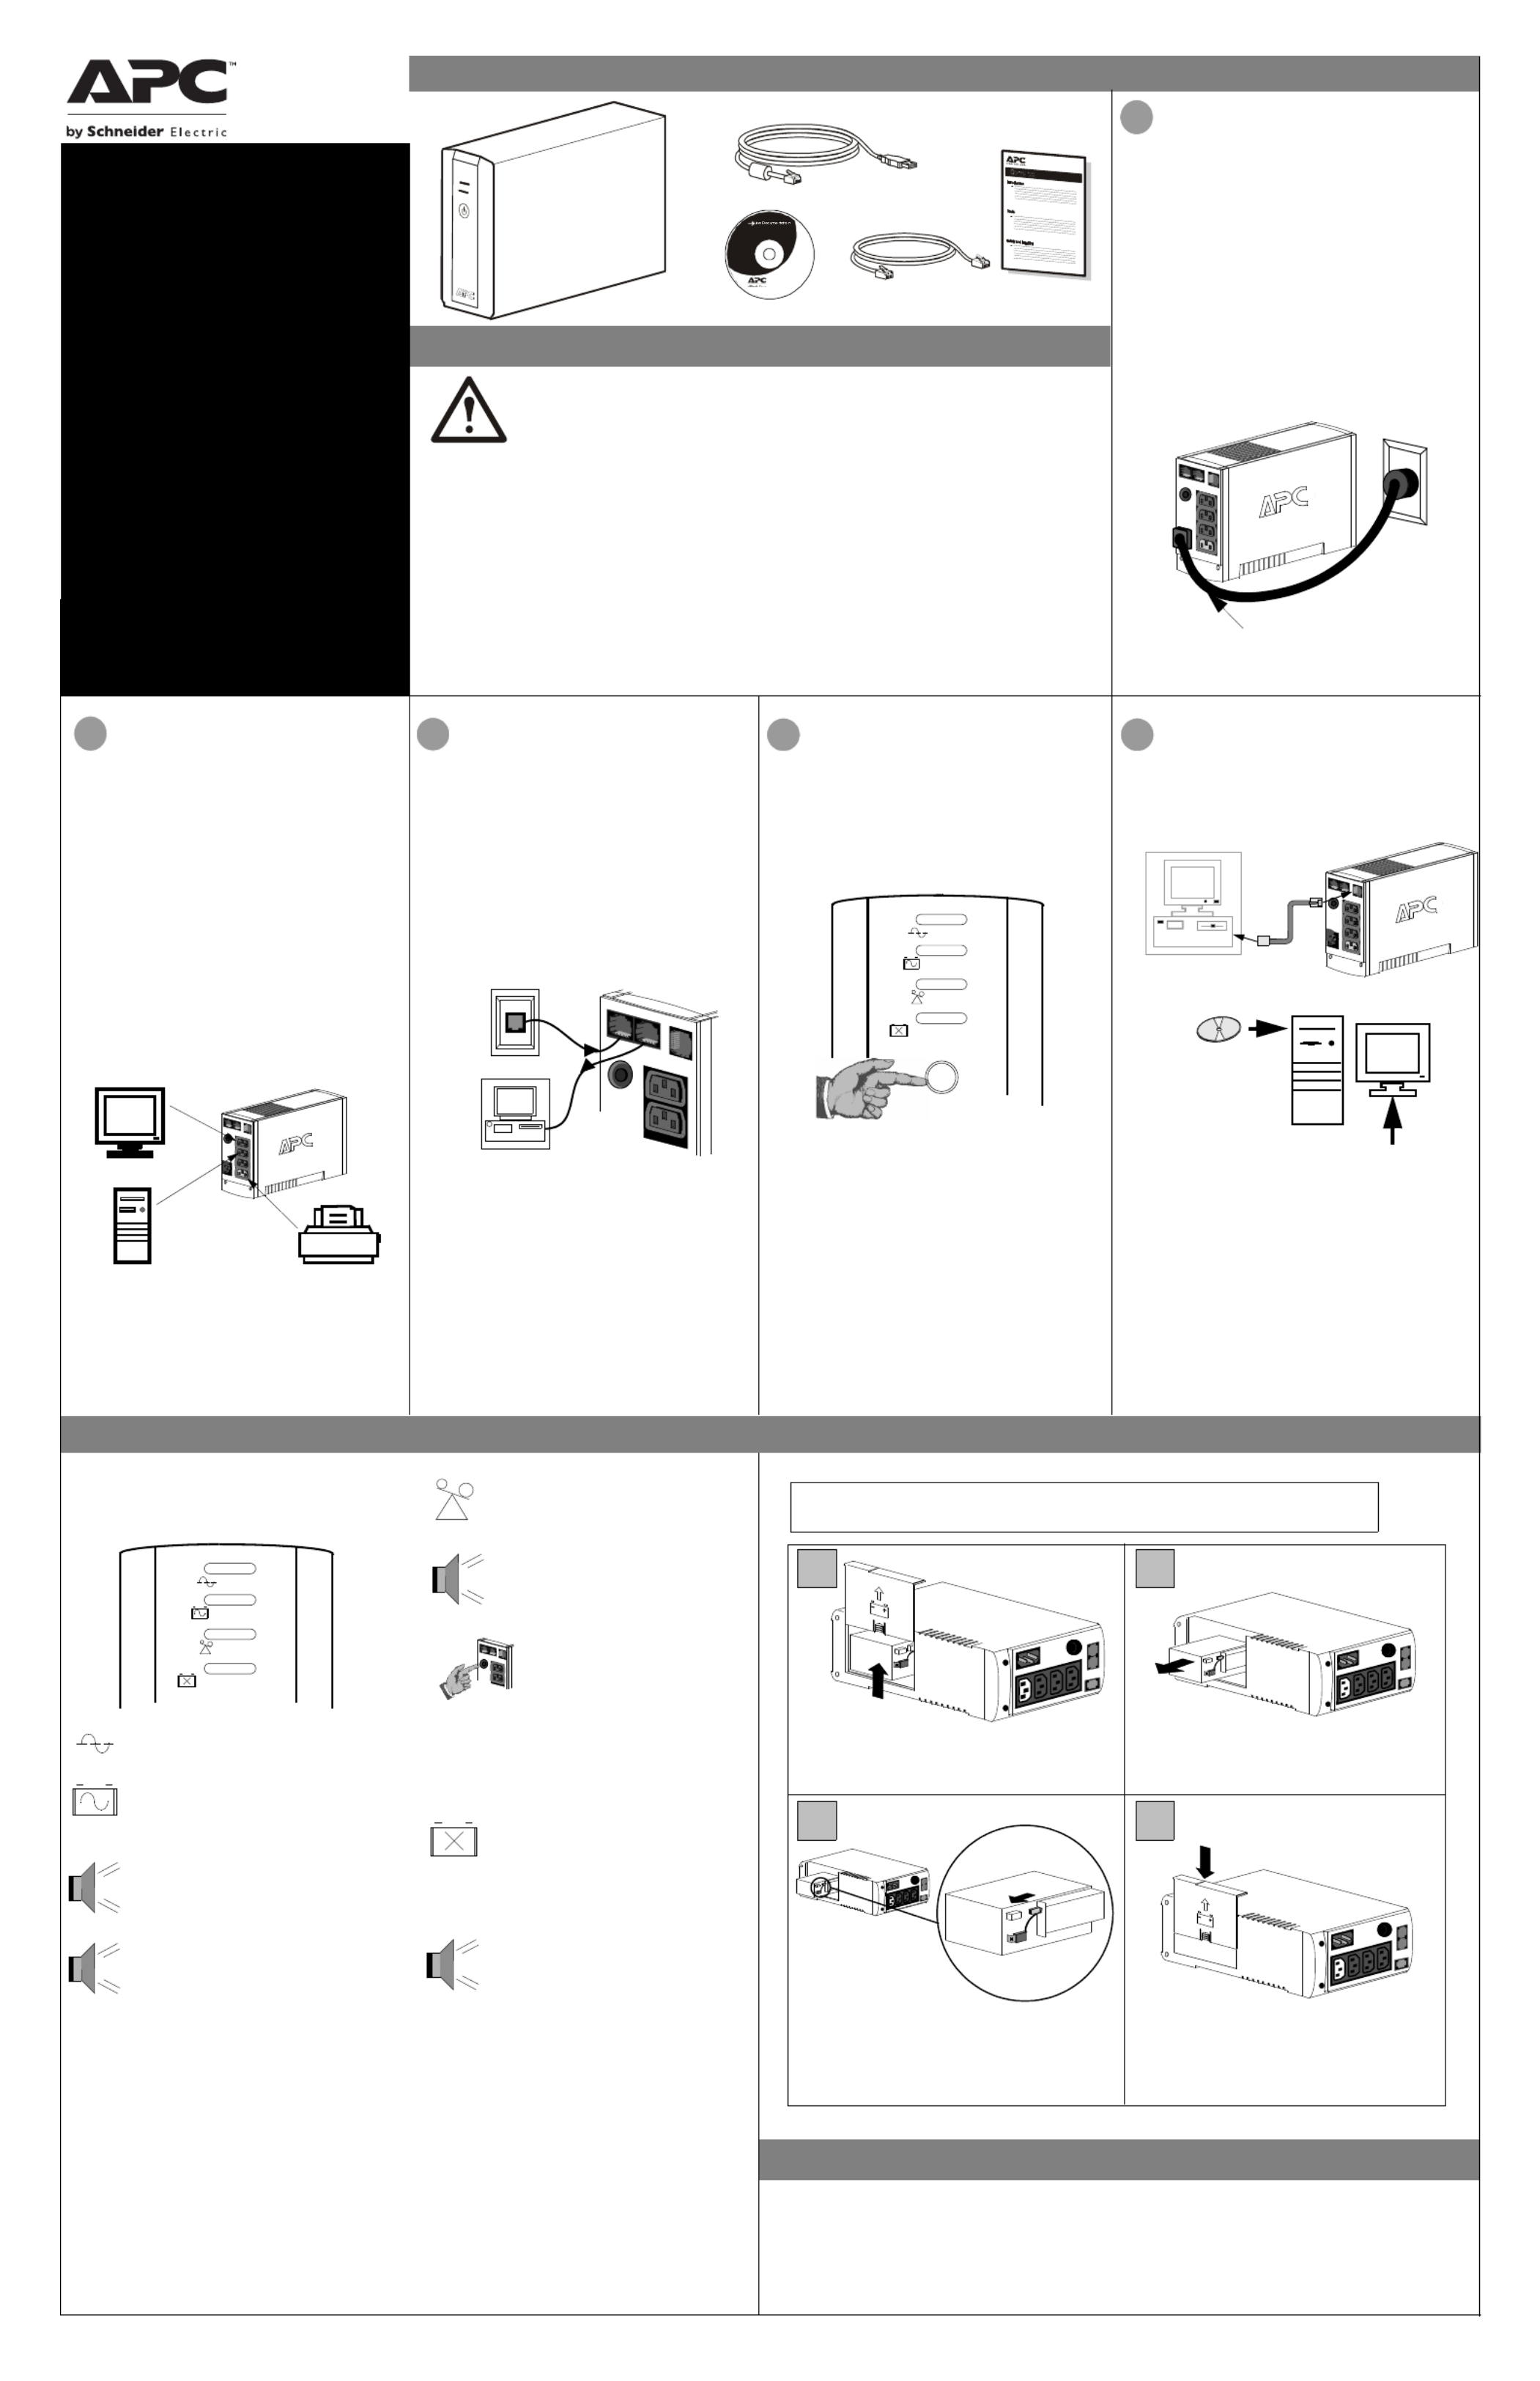
To replace the internal battery, proceed as follows:
Note: Replacing the battery is a safe procedure. However, small sparks may occur
during the process. This is normal.
and Install Software
(optional)
NOTE: Macintosh Users - for full USB
performance, use Mac OS 10.1.5 or higher.
If Autoplay is not enabled on the computer,
proceed as follows:
1.On the computer desktop of the display,
double-click on My Computer.
2.Double-click on the CD-ROM drive icon and
follow the on-screen instructions.
Follow the
on-screen
instructions.
The typical battery lifetime is 3-5 years (depending on the number of discharge cycles and operating
temperature). A replacement battery can be ordered over the phone from Schneider Electric, or the battery
can be ordered on-line from the APC by Schneider Electric web site (http://www.apc.com, a valid credit card
is required).
When ordering, specify Battery Cartridge RBC2 (Back-UPS 350/500) or RBC17 (Back-UPS 650).
Order Replacement Battery
Installation
bu001c
1
Placement / Power
• This UPS is intended for indoor use only.
• Do not operate this UPS in direct sunlight, in
contact with fluids, or where there is excessive
dust or humidity.
• Be sure the air vents on the UPS are not blocked.
Allow adequate space for proper ventilation.
• The battery typically lasts for three to five years.
Environmental factors impact battery life.
Elevated ambient temperatures, poor quality AC
power, and frequent short duration discharges will
shorten battery life.
• Connect the UPS power cable directly to a wall
outlet. Do not use surge protectors or extension
cords.
• Plug the Back-UPS into a wall outlet, as shown.
•The Back-UPS charges the internal battery any
time it is connected to a wall outlet.
Your computer’s power cord.
Place the unit on its side. Slide the battery
compartment cover upward and off of the UPS.
21
3 4
Align the battery compartment cover with the
grooves in the UPS. Slide the cover down
until it locks.
Pull the battery out, exposing the battery
terminals and wires. Disconnect the wires from
the terminals.
Slide the new battery into the battery
compartment. Connect the battery wires to the
terminals as follows:
Black wire to Negative (-) terminal
Red wire to Positive (+) terminal
Connect the Phone
Line to Surge
The telephone ports provide lightning surge
protection for any device connected to the telephone
line (computer, modem, fax or telephone). The
telephone ports are compatible with Home Phoneline
Networking Alliance (HPNA) and Digital Subscriber
Line (DSL) standards, as well as all modem data
rates. Connect as shown.
Wall Outlet
Modem/Phone/Fax
Protection
The rear panel of the Back-UPS consists of the
following elements:
Battery Back Up Outlets (qty. of 3). These outlets
provide battery back-up, surge protection, and
Electro-magnetic Interference (EMI) filtering. In
case of power outage, battery power is automatically
provided to these outlets. Power (utility or battery) is
not supplied to these outlets when the Back-UPS is
switched Off. Connect a computer, monitor, and
external disk or CD-ROM drive to these outlets.
Surge Only Outlet. This outlet is always On (when
utility power is available) and is not controlled by
the On/Off switch. This outlet does not provide
power during a power outage. Connect a printer, fax
machine or scanner to this outlet.
Inspect the package contents upon receipt. Notify the carrier and
dealer if there is any damage.
Read the following reminders before installing the UPS.
• This UPS is intended for indoor use only.
• Connect the UPS power cable directly to a wall outlet. Do not use surge protectors or extension cords.
• When grounding cannot be verified, disconnect the equipment from the AC power outlet before installing
or connecting to other equipment. Reconnect the power cord after all connections are made.
• Servicing of batteries should be performed by Schneider Electric IT (SEIT) Customer Support only.
• When replacing battery the UPS must be OFF, and its AC inlet unplugged.
• Do not dispose of batteries in a fire. The batteries may explode.
• Do not open or mutilate batteries. They contain an electrolyte that is toxic and harmful to the skin and
eyes.
• To avoid harmful injury due to energy hazard, remove wrist watches and jewelry such as rings when
replacing the batteries. Use tools with insulated handles.
• Replace batteries with the same number and type of batteries as originally installed in the equipment.
Safety and General Information
EN 990-9237A 10/2014
Back-UPS
™
350/500/650
User Manual
CS
Replace the Internal Battery
Status Indicators and Alarms
Specyfikacje produktu
| Marka: | APC |
| Kategoria: | serwer |
| Model: | APBK500EI |
Potrzebujesz pomocy?
Jeśli potrzebujesz pomocy z APC APBK500EI, zadaj pytanie poniżej, a inni użytkownicy Ci odpowiedzą
Instrukcje serwer APC

9 Grudnia 2024
7 Grudnia 2024
27 Września 2024
18 Września 2024
12 Września 2024
11 Września 2024
8 Września 2024
7 Września 2024
6 Września 2024
30 Sierpnia 2024
Instrukcje serwer
Najnowsze instrukcje dla serwer
9 Kwietnia 2025
2 Kwietnia 2025
2 Kwietnia 2025
2 Kwietnia 2025
28 Marca 2025
28 Marca 2025
28 Marca 2025
10 Marca 2025
10 Marca 2025
10 Marca 2025