Instrukcja obsługi Areca ARC-1886-6N2I
Przeczytaj poniżej 📖 instrukcję obsługi w języku polskim dla Areca ARC-1886-6N2I (2 stron) w kategorii Kontroler. Ta instrukcja była pomocna dla 30 osób i została oceniona przez 2 użytkowników na średnio 4.2 gwiazdek
Strona 1/2
www.areca.com.tw
M.2 NVMe Tri-Mode
RAID Adapters
ARC-1886-6N2I
Quick Installation Guide
NVMe RAID
Mac Pro
Disk RAID
ARC-1886-6N2I
Automatically backup to Disk RAID when workload does not reach the preset values.
ARC-CD2I
Checklist
Inspect ARC-1886-6N2I RAID adapter from the package. If it
appears damaged, or if any items of the contents listed below
are missing or damaged, please contact your dealer or
distributor.
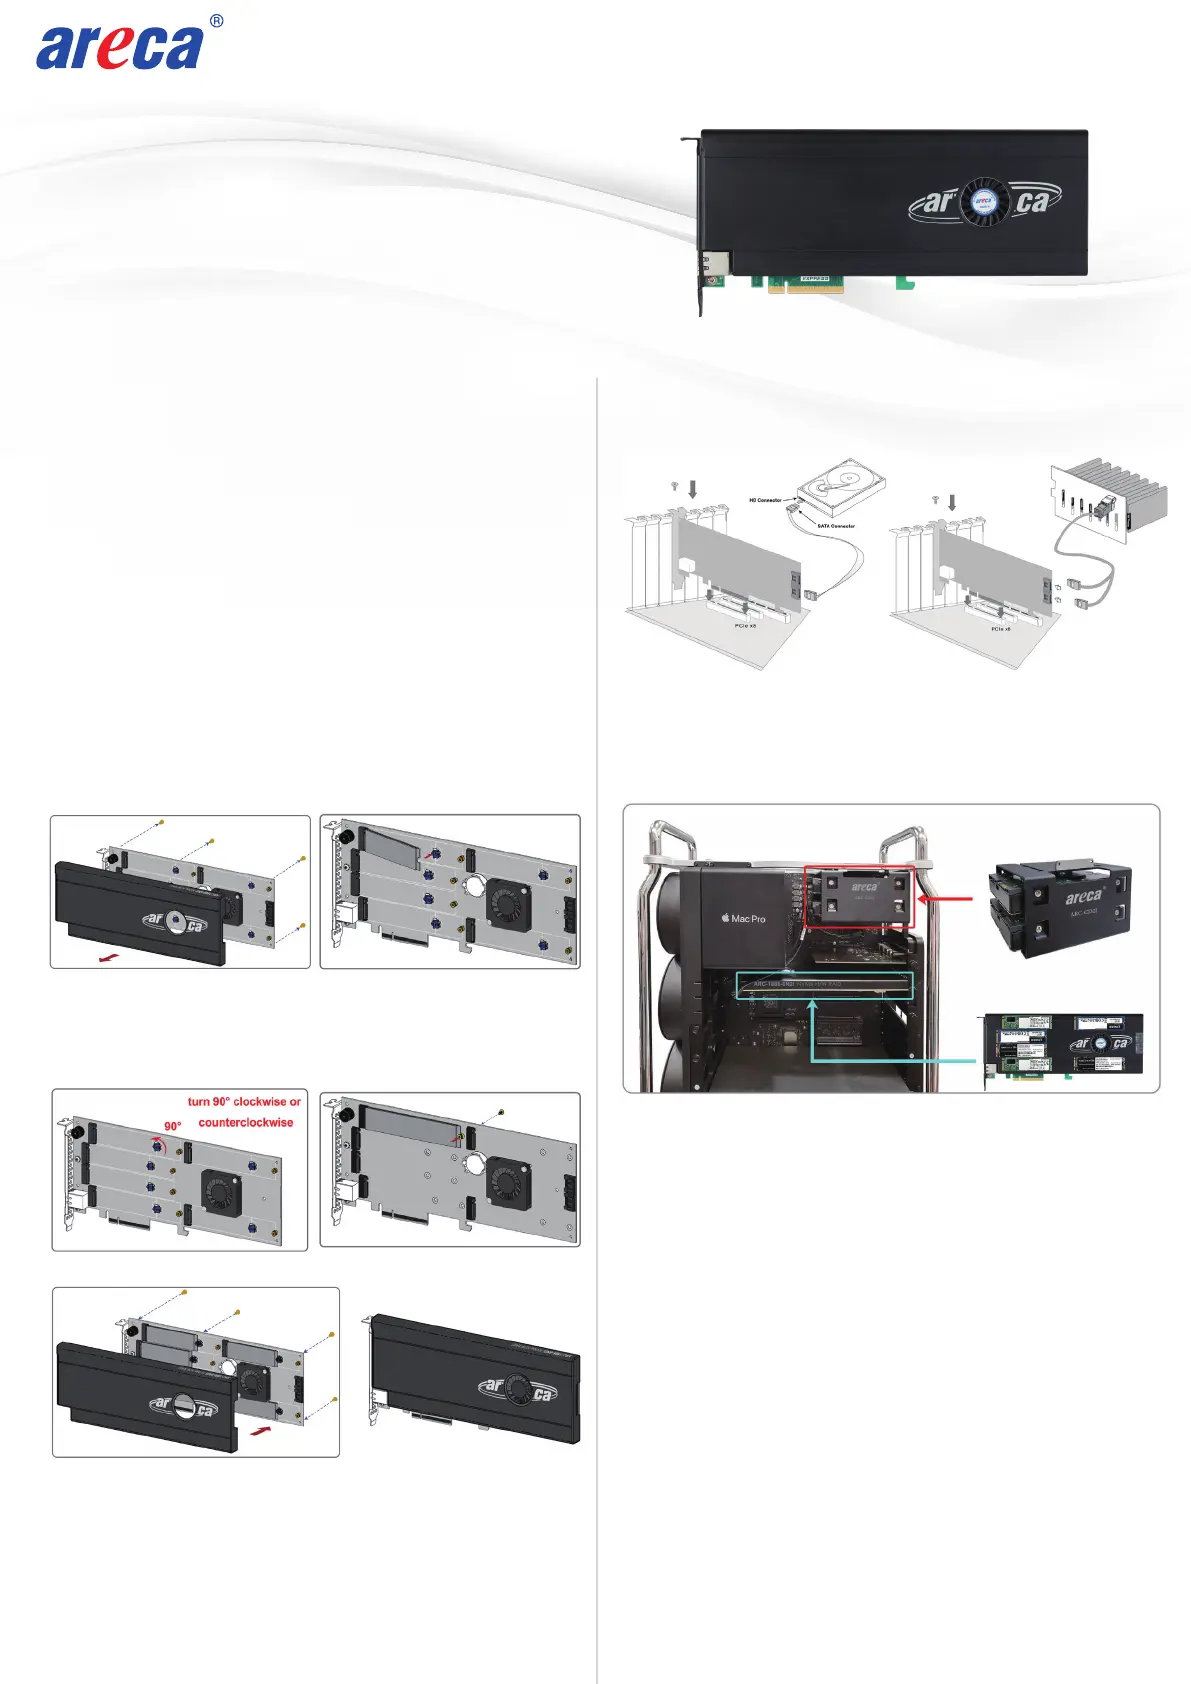
Step 1: Unpack
2 x SATA cable
1 x RAID adapter in an ESD-protective bag
1 x ARC-1886-6N2I quick installation guide
Dual Core RAID-on-Chip (ROC) 1.6GHz processor
PCIe Gen 4.0 p1-x8 lane host interface
8GB on-board DDR4-2666 SDRAM with ECC
Support both 2280 and 22110 form factor M.2 drives
•
•
•
Adapter Architecture
•
•
•
•
Step 3: Power PC/Server Off and Discoennect Power Cable
Remove the mounting screw and existing bracket from the
rear panel behind the selected PCIe 4.0 slot. Align the
gold-fingered edge on the card with the selected PCIe 4.0
slot. Press down gently but firmly to ensure that the card is
properly seated in the slot. Then, screw the bracket into the
computer chassis.
Step 4: Install the RAID Adapters
Step 2: Mount the M.2 NVMe SSD
(1) Remove four screws that secure unit’s front panel
If you use 2280 M.2 NVMe SSD...
(2) Gently insert the SSD into slot and fasten SSD with the
board latch
(3) Repeat steps 2 to install the remaining SSDs
Step 5: Install SAS/SATA Connection Cable (Optional)
The ARC-1886-6N2I utilizes the optional CBM module to
provide below function:
(1). Support Off module (PLP) hold-up power, eliminating the
need for capacitors on the NVMe SSDs which helps reduce
cost.
(2). Support M.2 slot fault LED status and easily be identified
as a failed drive when it is removed from the system PCIe
slot.
(3). Support power to the 8GB cache if it contains data not
yet written to the drives when power is lost.
Please refer to Appendix B of the user manual for installing
the cache backup module (CBM) in your ARC-1886 RAID
adapter.
Step 7: Adding a CBM Backup Module (Optional)
Step 6: Connect Monitor Port - LAN Port
User can remote manage the RAID adapter without adding
any user specific software (platform independent) via
standard web browsers directly connected to the RJ45 LAN
port.
The ARC-1886-6N2I can use two SAS/SATA ports to support
secondary array module.
Below is an example using the space and connections inside
the 2019 Mac Pro next to the PCIe card slots to install and
connect ARC-CD2I up to two SAS/SATA drives in the 2019
Mac Pro.
(4) Refasten four screws to secure unit’s front panel
Connecting to HDD
Connecting to Expander Backplane
If you use 22110 M.2 NVMe SSD...
(※2) Turn the latch 90° clockwise or counterclockwise to
remove it and also remove six screws on the board
(※3) Gently insert the SSD into slot, meawhile put the screw
into the groove and fasten the screw to secure SSD
Specyfikacje produktu
| Marka: | Areca |
| Kategoria: | Kontroler |
| Model: | ARC-1886-6N2I |
Potrzebujesz pomocy?
Jeśli potrzebujesz pomocy z Areca ARC-1886-6N2I, zadaj pytanie poniżej, a inni użytkownicy Ci odpowiedzą
Instrukcje Kontroler Areca

4 Października 2024
29 Września 2024
29 Września 2024
29 Września 2024
29 Września 2024
28 Września 2024
28 Września 2024
Instrukcje Kontroler
Najnowsze instrukcje dla Kontroler
2 Kwietnia 2025
30 Marca 2025
30 Marca 2025
30 Marca 2025
30 Marca 2025
30 Marca 2025
28 Marca 2025
27 Marca 2025
26 Marca 2025
2 Marca 2025