Instrukcja obsługi Berker 24127039
Berker inteligentny dom 24127039
Przeczytaj poniżej 📖 instrukcję obsługi w języku polskim dla Berker 24127039 (2 stron) w kategorii inteligentny dom. Ta instrukcja była pomocna dla 28 osób i została oceniona przez 8 użytkowników na średnio 4.1 gwiazdek
Strona 1/2
6LE008010A
Operating and
assembly instructions
M
2412 XXXX
Berker push-button
Friends of Hue
z
01Berker GmbH & Co. KG - Zum Gunterstal - 66440 Blieskastel/Germany
Safety instructions
Electrical equipment must only be installed and
assembled by a qualified electrician in accord-
ance with the relevant installation standards,
regulations, directives and safety and accident
prevention directives of the country.
Failure to comply with these instructions may
result in damage to the device, fire or other
hazards.
The radio transmission is not suitable for safe-
ty or alarm applications.
These instructions are an integral component
of the product and must be retained by the end
user.
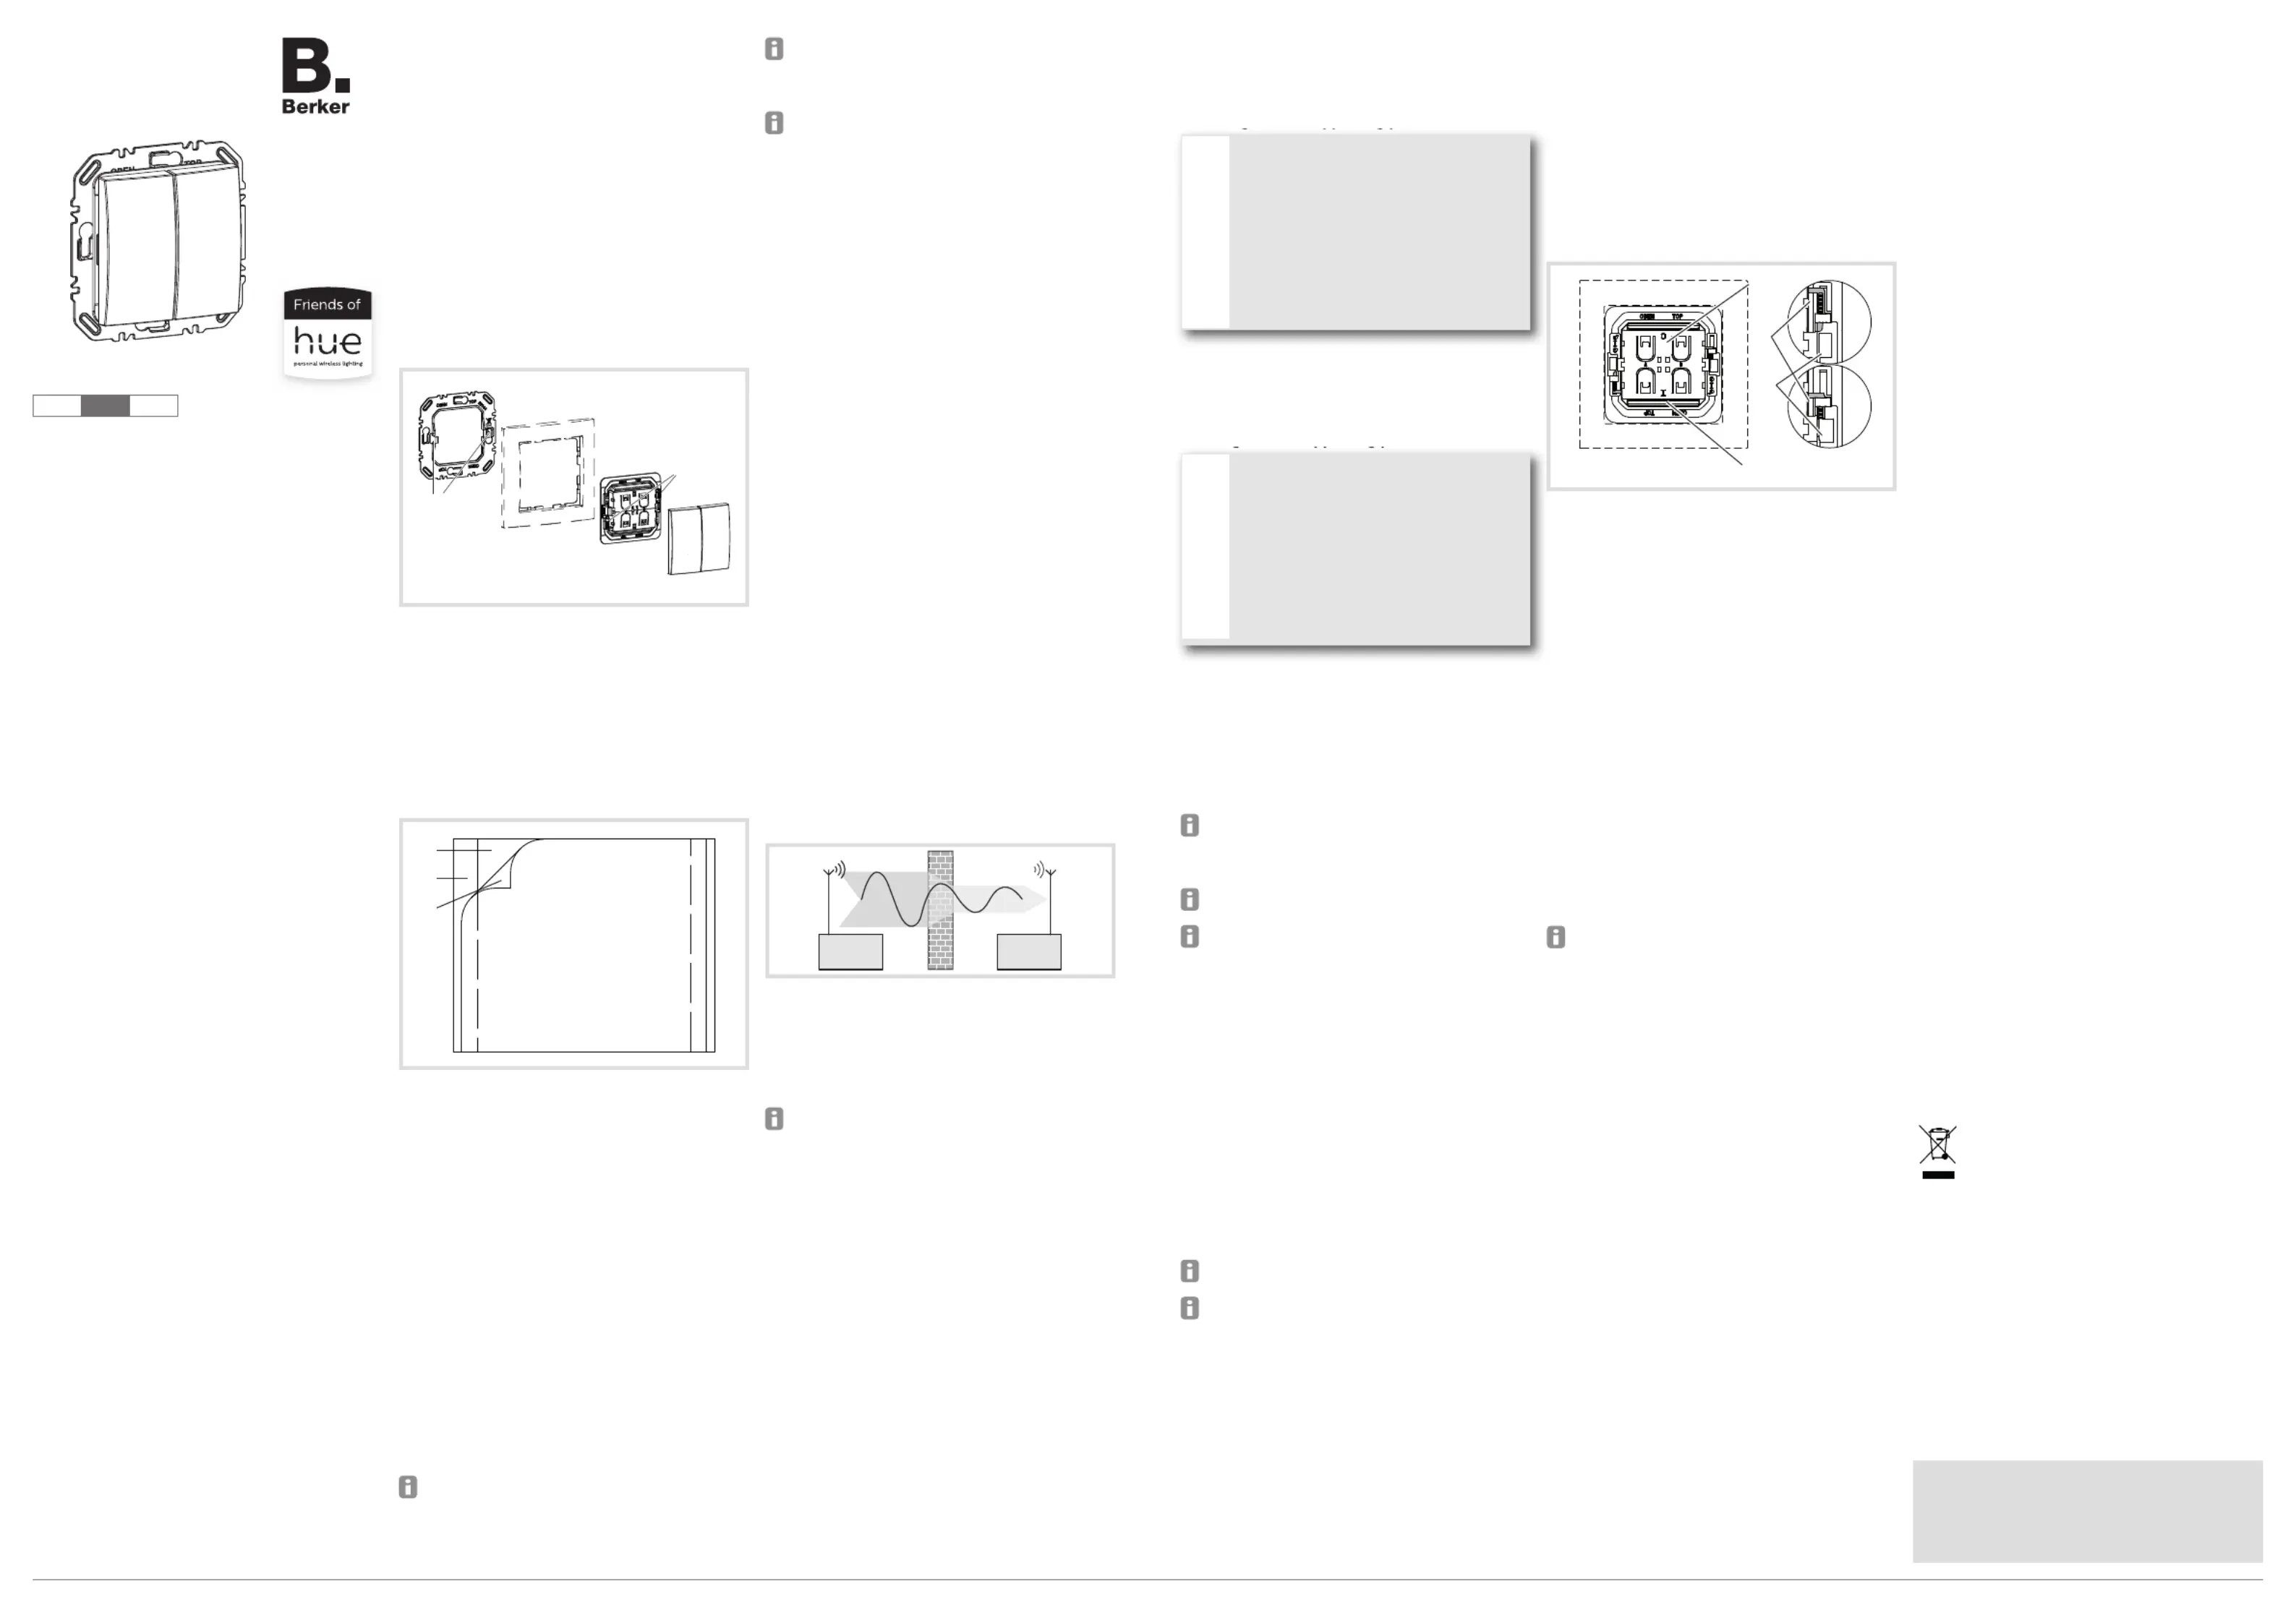
Design and layout of the device
(3)
(4)
(2)
(1)
(6)
(5)
Image 1: Fundamental design and layout of the
device
(1) Locking spigot
(2) Frame (not included)
(3) Berker push-button
(4) Rocker 2gang
(5) Locking pins
(6) Supporting plate
(7)
(9)
(8)
Image 2: Design and layout of the device adhesive
foil
(7) Adhesive foil
(8) Backing film
(9) Protective film
Function
Correct usage
-Smart light switch for wireless control of Philips
Hue lamps.
-For switching, dimming and controlling individu-
al light scenes
-Radio application in acc. with RED 2014/53/EU
with particularly low energy consumption.
-Installation on device box, render or level sur-
faces with screws and adhesive pads.
-Only suitable for use in indoor areas with no
drip and no spray of water.
Berker push-buttons are suitable for residential
use only and require a Philips Hue Bridge (v2)
and Philips Hue App for Android or iOS for initial
commissioning.
Philips Hue lamps can only be controlled by
the Hue system when the light is switched on.
Please ensure that the Philips Hue lamps are
always switched on.
Please be aware that Signify has access to
personal data and user data via the Hue Bridge.
Signify’s privacy policy and terms and condi-
tions of use are available at www.philips-hue.
com. The processing of personal data and user
data is explained there.
Product characteristics
-Batteryless and maintenance-free device with-
out external power supply.
-Encrypted transfer with device-specific code.
-ZigBee Green Power radio standard, compati-
ble with Friends of Hue and Apple HomeKit.
-Automatic extended reach via Philips Hue
lamps.
-Easy commissioning and configuration via
Philips Hue App and Hue Bridge v2 .
-Transmission power is obtained from mechani-
cal energy when the button is pressed (energy
harvesting).
-Berker push-button consists of 4 push-buttons.
Operation
Operating concept
A short and long press can be allocated to func-
tions on each button (switching, dimming, scenes).
Information for electricians
Assembly
Selecting installation location
The transmission reach in buildings is approxi-
mately 15 m without wall penetration. A maximum
of one wall penetration is recommended as other-
wise the radio signal is weakened.
Image 3: Reduction of range through construction
obstacles
The receiver may not be able to properly process
the transmitter signal if it penetrates several walls.
Metals, such as metallic door frames, etc., can also
have a negative impact on transmission.
The reach can be extended with Philips Hue
lamps in each room. werden.
Information for electricians
Installation
Screwing on the supporting plate
DANGER!
Electrical shock when live parts are
touched!
An electric shock can lead to death!
Before mounting the supporting plate
on a wall box, insulate the terminal
leads that are not required against
unintentional contact!
ç
Screw the supporting plate (6) onto a wall box
in the right position and mount them directly on
the wall using the supplied screw/anchor set.
Ensure that the label "TOP/OBEN" is at the top.
Sticking on the supporting plate
CAUTION!
Frame materials such as glass, con-
crete, slate, metal, aluminium are to be
fastened exclusively with a screw
connection!
Device may fall from the wall!
Before using the product by means of
adhesive foil, check whether the
intended use is suitable!
ç
The Berker push-button can be mounted on
smooth, flat surfaces, such as on mobile glass
office walls.
It is recommended to fasten the Berker push-but-
tonh with a screw connection for best hold.
Th optimal processing temperature lies between 15
°C and 25 °C.
After the Berker push-button has been properly
adhered to the surface, it becomes hard to
remove. Therefore select installation location
carefully before installation.
Observe installation sequence for optimal ade-
sion of the supporting plate.
Do not touch adhesive surface.
Clean mounting surface with a suitable,
non-greasing or silicone-containing household
cleaner, e.g. isopropyl.
The mounting surface is clean, free of grease
and offers sufficient support.
Remove the surplus backing film (8).
Align the adhesive film (7) and stick onto
the mounting surface. In so doing, press the
adhesive
film on firmly – if necessary, with a suitable aid
Remove the protective foil (9).
Align the supporting plate (6) and stick to adhe-
sive foil for at least 15 seconds. Align the label
"TOP/OBEN" to the top. Frame and Berker
push-button do not need to be stuck on.
The adhesive pads only reach their final adhe-
sion after approx. 24 hours.
Before installation,
commission the device and test the reach prior
to using the adhesive film.
Mounting the Berker push-button on the
supporting plate
The supporting plate is fastened to the wall.
Place the frame (2) onto the supporting plate
(6).
Place the Berker push-button (3) on the sup-
porting plate via the locking spigot. In doing
so, observe the labelling in the centre of the
module - must be at the top (10) and 0I at the
bottom (11) liegen.
Push the yellow locking pins (5) on the left and
right of the Berkerpush-button upwards/down-
wards under the locking spigots (1) up to the
stop (Figure 4).
The Berker push-button is locked on the sup-
porting plate.
Place the rocker (4) onto the Berker push-but-
ton in the right position and push it on until it
engages.
(10)
(11)
(1)
(5)
Image 4: Locked and unlocked Berker push-button
Dismantling the device
Push the rocker (4) down. On the opposite side,
reach under the rocker and pull it off.
Using a screwdriver, push the yellow locking
pins (5) on the left and right of the Berker
push-button (3) downwards/upwards.
The Berker push-button is unlocked.
Remove Berker push-button and frame. Un-
screw the supporting plate or release from the
adhesive film (7).
Commissioning
Follow the Philips Hue App instructions for com-
missioning and configuration.
Connect Berker push-button to the Philips Hue
Bridge.
The Philips Hue Bridge is ready for operation and
within reach of the radio module.
The system requires a Philips Hue Bridge (v2)
and Philips Hue app for Android or iOS for initial
setup. Learn more on Philips-hue.com.
The Philips Hue App must be connected with the
Philips Hue Bridge.
Select the “Settings” > “Accessories setup” >
“Friends of Hue Switch” menu in the Philips
Hue App.
All compatible Friends of Hue switches are
displayed.
Select Berker push-button.
Operate the buttons (4) of the Berker push-but-
ton as described in the app.
The Berker push-button has received the infor-
mation and has been added as an accessory in
the app.
The Berker push-button can be configured in
the app.
Configuration
The button functions (switching, dimming, scene)
have to be configured in the Philips Hue App.
Configuring Berker push-button in the Philips
Hue app
The Berker push-button is taught-in in the Philips
Hue Bridge.
Philips Hue lamps are ready to use.
Follow the instructions as described in the app
and allocate the Berker push-button to the
lamps and configure it.
Appendix
Technical data
Carrier frequency: 2.4 ... 2.483 GHz
Zigbee Green Power as per IEEE 802.15.4
Transmission range in buildings approx. 15 m
Transmission power: 7 dBm (5 mW)
Degree of protection IP: IP20
Storage temperature: -25 ... +65 °C
Ambient temperature: +5 ... +45 °C
Troubleshooting
Philips Hue receiver does not respond.
Cause 1: The Philips Hue lamp has not been
switched on.
Switch on the Philips Hue bulb with a conven-
tional switch.
Cause 2: Berker push-button is not connected with
the lamp to be switched.
Open the Philips Hue App and check the con-
nection between switch and lamp.
Warranty
We reserve the right to realise technical and formal
changes to the product in the interest of technical
progress.
Our products are under guarantee within the scope
of the statutory provisions.
If you have a warranty claim, please contact the
point of sale.
z
Correct disposal of this product
(Electrical waste).
(Applicable in the European Union and other European coun-
tries with separate collection systems).
This marking shown on the product or its documentation indicates
that it should not be disposed of with other household waste at the
end of its working life. To prevent possible harm to the environment
or human health from uncontrolled waste disposal, please separate
this device from other types of waste. Recycle the device responsi-
bly to promote the sustainable reuse of material resources.
Household users should contact either the retailer where they pur-
chased this product, or their local government offi ce, for details of
where and how they can take this device for environmentally safe
recycling.
Business users should contact their supplier and check the terms
and conditions of the purchase contract. This product should not be
mixed with other commercial waste for disposal.
Hager SA herewith declares that
the Berker push-button
meets Directive 2014/53/EU.
The complete text of the EU declaration of conform-
ity is available at www.hager.com.
Specyfikacje produktu
| Marka: | Berker |
| Kategoria: | inteligentny dom |
| Model: | 24127039 |
Potrzebujesz pomocy?
Jeśli potrzebujesz pomocy z Berker 24127039, zadaj pytanie poniżej, a inni użytkownicy Ci odpowiedzą
Instrukcje inteligentny dom Berker

29 Grudnia 2024
29 Grudnia 2024
29 Grudnia 2024
16 Grudnia 2024
16 Grudnia 2024
Instrukcje inteligentny dom
Najnowsze instrukcje dla inteligentny dom
29 Marca 2025
29 Marca 2025
29 Marca 2025
27 Marca 2025
18 Marca 2025
18 Marca 2025
12 Marca 2025
25 Lutego 2025
19 Lutego 2025
14 Lutego 2025