Instrukcja obsługi Bixolon SRP-380plus
Bixolon Nie skategoryzowane SRP-380plus
Przeczytaj poniżej 📖 instrukcję obsługi w języku polskim dla Bixolon SRP-380plus (4 stron) w kategorii Nie skategoryzowane. Ta instrukcja była pomocna dla 25 osób i została oceniona przez 7 użytkowników na średnio 4.5 gwiazdek
Strona 1/4
◈
Information
Information
Information
Information Information
This installation guide contains quick information required for the product
installation. Please refer to the Software and Documents provided on the
Download section of the BIXOLON Website () for more www.bixolon.com
information on how to setup.
1. Ma, etc. nual: User’s Manual, Code Table, Control Commands
2. Driver: Windows, OPOS, CUPS (Linux, Mac), VCOM (USB, Ethernet)
3. SDK: UPOS SDK (Windows, Android, iOS)
4. Utility: Unified POS Utility, Net Configuration Tool, Android Utility, iOS Utility
We at BIXOLON maintain ongoing efforts to enhance and upgrade the functions
and quality of all our products. In following, product specifications and/or user
manual content may be changed without prior notice.
Please refer to the BIXOLON website for the addresses and phone numbers of
the company's headquarters and branch offices.
◈
Components
Components
Components
Components Components
SRP-380plus82plus /3
DK Gender
Cable Cover
USB A-B Cable
Installation Guide
AC/DC Adaptor
Power Cord
Paper Roll
◈
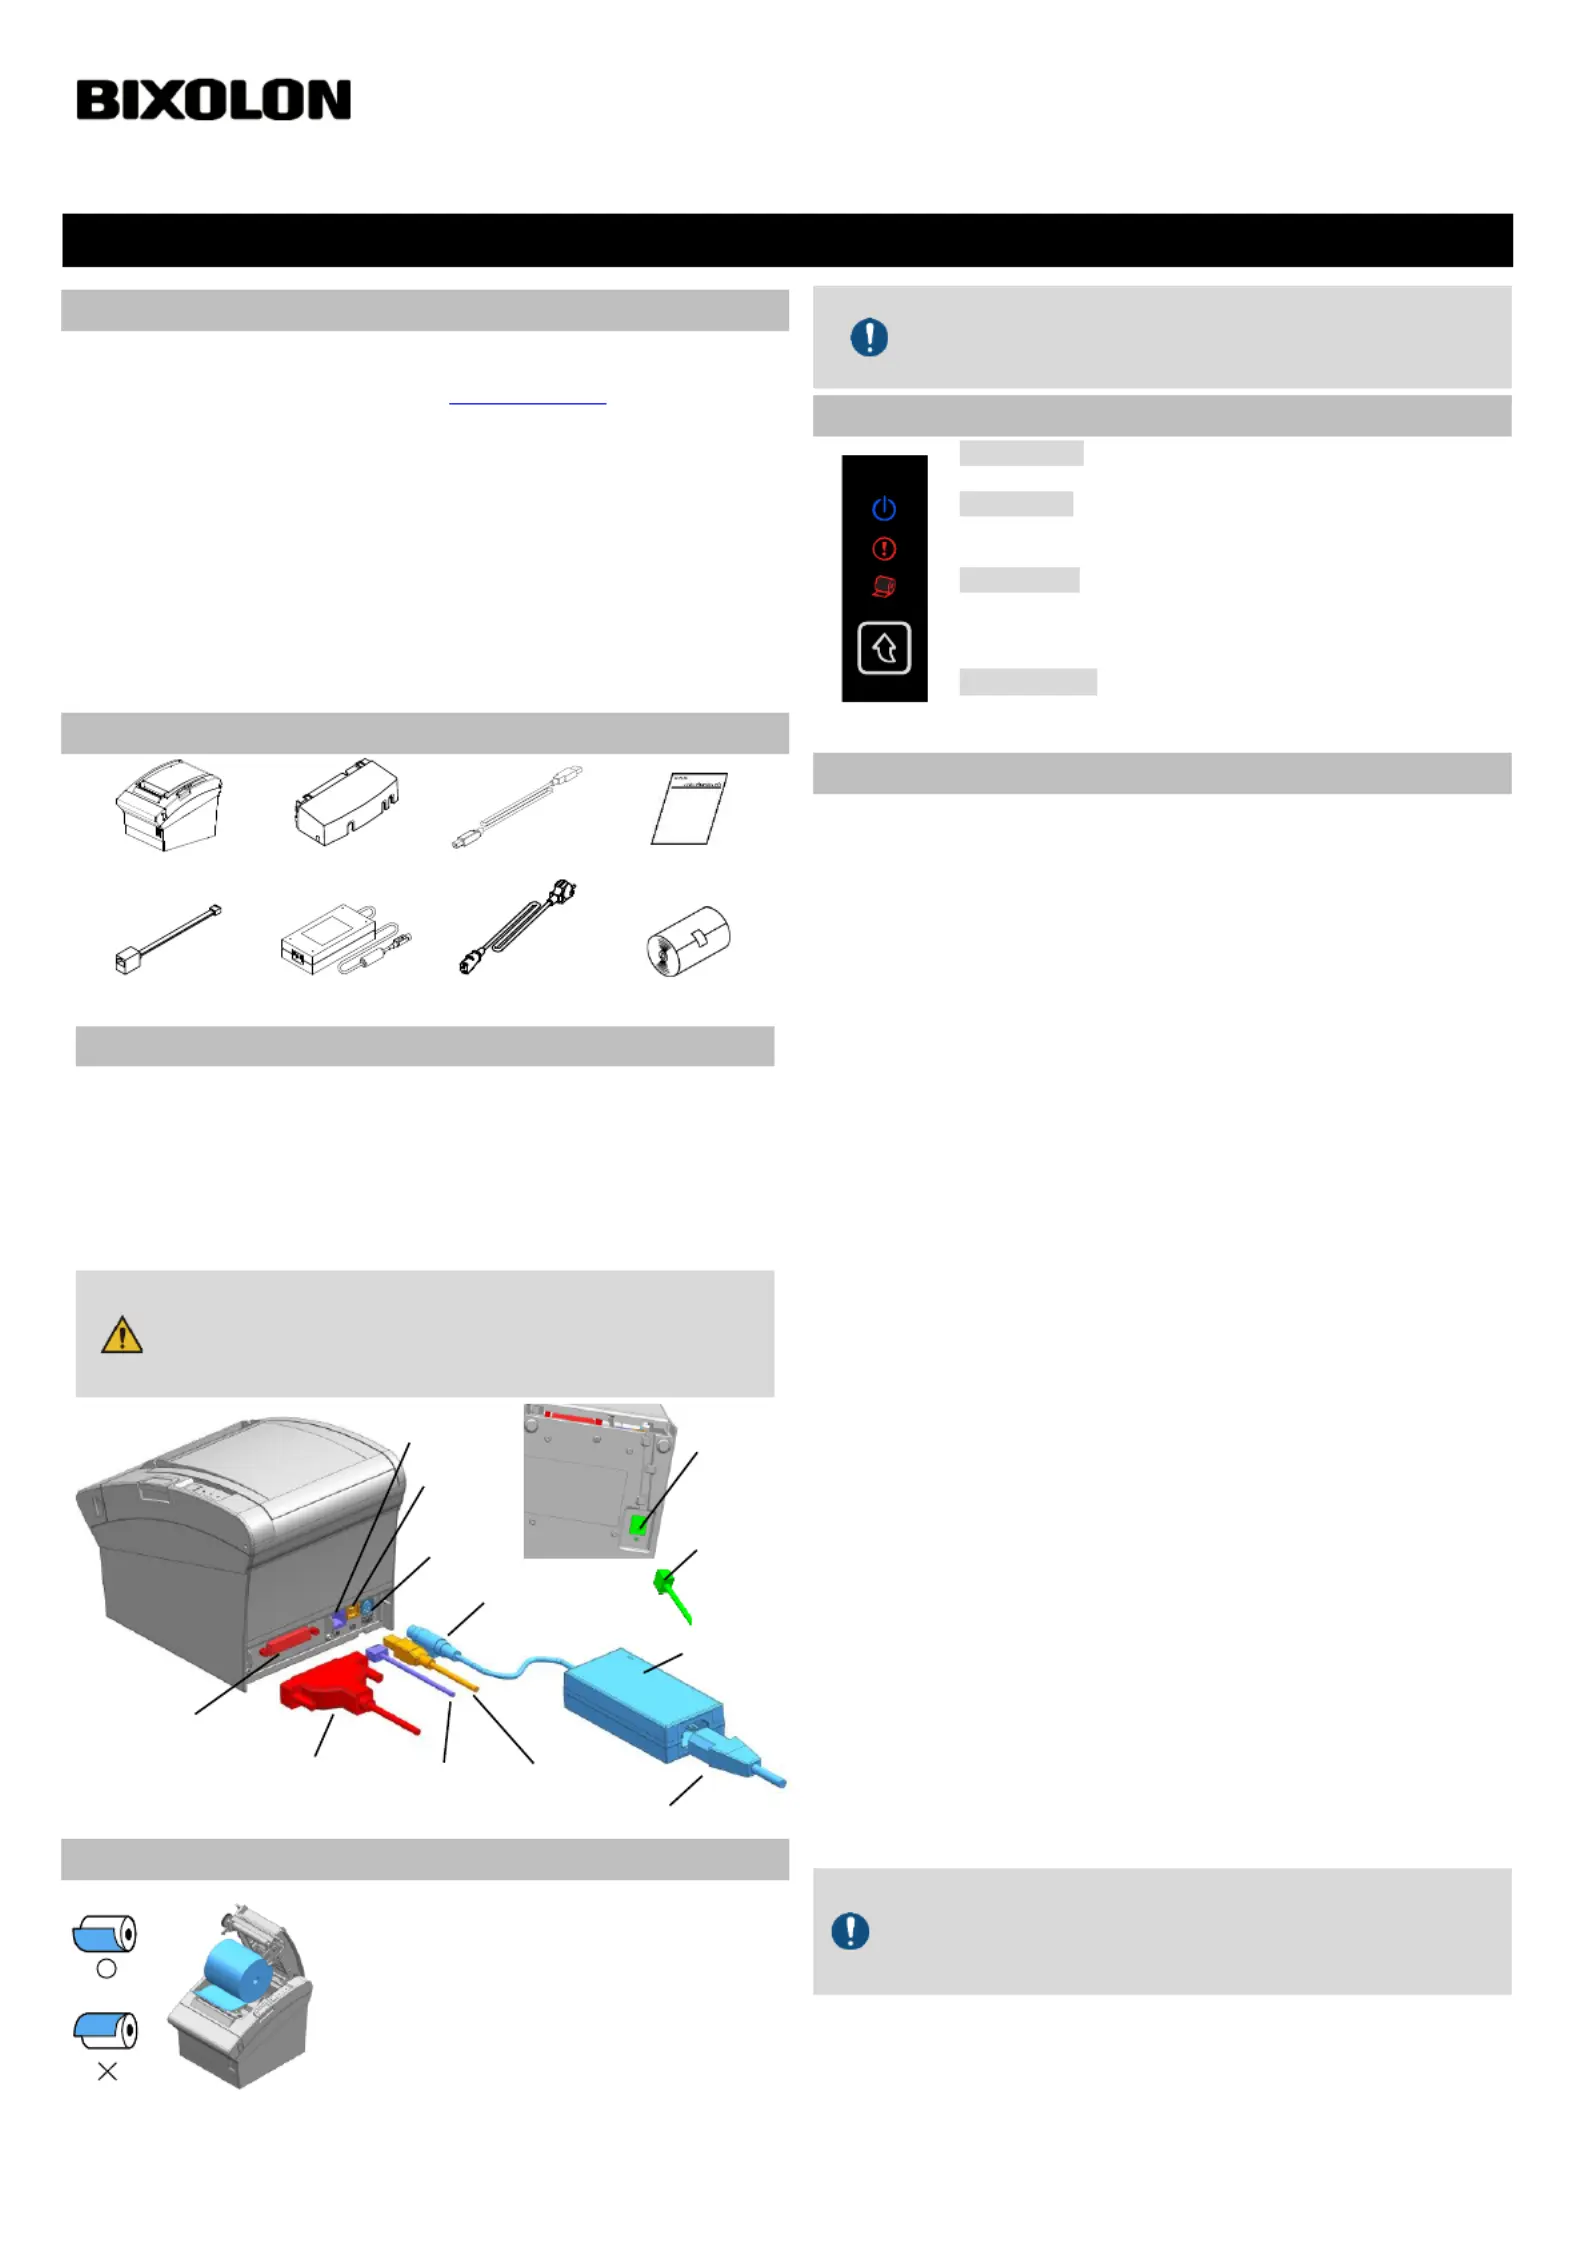
Cable Connection
Cable Connection
Cable Connection
Cable ConnectionCable Connection
1. Turn off the printer and peripheral devices.
2. Connect the power cord to the adapter and connect the adapter to the power
supply connector of the printer.
3. Check the type of the interfaces at the back of the printer (USB, Serial,
Parallel, Ethernet, Powered USB, Wireless LAN, Bluetoothand connect the )
interface cable.
4. Connect the drawer kick-out cable to the drawer kick-out port located on the
underside of the printer.
- Be sure t
- Be sure t
- Be sure t
- Be sure t- Be sure to turn off the
o turn off the
o turn off the
o turn off theo turn off the printer and con
printer and con
printer and con
printer and con printer and connect or disc
nect or disc
nect or disc
nect or discnect or disconnect
onnect
onnect
onnect onnect
the adapte
the adapte
the adapte
the adaptethe adapter jack.
r jack.
r jack.
r jack. r jack.
-
-
-
--Only use a
Only use a
Only use a
Only use aOnly use a power supply pr
power supply pr
power supply pr
power supply pr power supply provided by Bixol
ovided by Bixol
ovided by Bixol
ovided by Bixolovided by Bixolon
on
on
onon
- Pay attentio
- Pay attentio
- Pay attentio
- Pay attentio- Pay attention to the dire
n to the dire
n to the dire
n to the diren to the direction in which you
ction in which you
ction in which you
ction in which youction in which you insert the
insert the
insert the
insert the insert the
adapter ja
adapter ja
adapter ja
adapter ja adapter jack.
ck.
ck.
ck. ck.
◈
Installing Paper Roll
Installing Paper Roll
Installing Paper Roll
Installing Paper Roll Installing Paper Roll
1. Push the Cover Open Button to open the
Printer Cover.
2. Insert new roll paper in the correct
direction.
3. Pull the paper out slightly and close the
Printer Cover.
When closing the cover, press down on the center of the cover
to ensure that the paper is in contact with the roller. Printing
quality may not be optimum if the recommended paper is not
used.
◈
Using Control Panel
Using Control Panel
Using Control Panel
Using Control PanelUsing Control Panel
•
•
•
•• Power (LED)
The Power LED is on whenever the printer is on.
•
•
•
•• Error (LED)
Red light will be on in various error conditions such as out of
paper, cover open, etc.
•
•
•
•• Paper (LED)
Red LED will be lit when the paper roll is running low.
The LED keeps blinking when the printer is in self-test standby
mode or macro execution standby mode.
•
•
•
•• Feed (Button)
Press this button to feed the paper out.
Hold down this button to feed out the paper continuously.
◈
Self-Test
Self-Test
Self-Test
Self-Test Self-Test
You can check whether printer works correctly or not through the self-test.
Printing quality, ROM version, and memory switch settings can be checked
through the self-test function.
1. Check whether paper is mounted correctly.
2. Turn on the power while holding down the Feed button and the self-test
procedure will begin.
3. The printer will print out the current status of printer including the version of
ROM.
4. After printing out the current status of printer, the printer will print following
lines and waits for the next step (paper lamp will keep blinking).
Self-TEST
Self-TEST
Self-TEST
Self-TESTSelf-TEST PRINT COMPL
PRINT COMPL
PRINT COMPL
PRINT COMPL PRINT COMPLETE
ETE
ETE
ETEETE
SELECT M
SELECT M
SELECT M
SELECT MSELECT MODE BY PRESSIN
ODE BY PRESSIN
ODE BY PRESSIN
ODE BY PRESSINODE BY PRESSING THE
G THE
G THE
G THEG THE FEED BUTTON.
FEED BUTTON.
FEED BUTTON.
FEED BUTTON. FEED BUTTON.
End of S
End of S
End of S
End of SEnd of SELF-TEST
ELF-TEST
ELF-TEST
ELF-TEST ELF-TEST : Less than 1 secon
: Less than 1 secon
: Less than 1 secon
: Less than 1 secon: Less than 1 second
d
d
d d
VMSM Selecti
VMSM Selecti
VMSM Selecti
VMSM SelectiVMSM Selection : 1 se
on : 1 se
on : 1 se
on : 1 seon : 1 second or more
cond or more
cond or more
cond or morecond or more
5. Press the Feed button to resume printing or hold down the button for at
least one second to change the VMSM settings.
5-SELF- 1 If “Continuous TEST” is selected
(1) Press the Feed button for less than one second to print the preset page.
(2) The selftest ends automatically as it prints the following line and cuts -
the paper.
*** COMP
*** COMP
*** COMP
*** COMP*** COMPLETED ***
LETED ***
LETED ***
LETED *** LETED ***
(3) The printer goes into normal print mode upon completion of the self
test.
5- 2 If “VMSM Selection” is selected
(1) The following lines will be printed when the VMSM opens.
** VMSM Sele
** VMSM Sele
** VMSM Sele
** VMSM Sele** VMSM Selection **
ction **
ction **
ction **ction **
0 : Exit and reb
0 : Exit and reb
0 : Exit and reb
0 : Exit and reb0 : Exit and reboot printe
oot printe
oot printe
oot printeoot printer
r
r
r r
1 : Print curre
1 : Print curre
1 : Print curre
1 : Print curre1 : Print current settings
nt settings
nt settings
nt settingsnt settings
2 : Set Pri
2 : Set Pri
2 : Set Pri
2 : Set Pri2 : Set Print Density
nt Density
nt Density
nt Density nt Density
3 : Set Pri
3 : Set Pri
3 : Set Pri
3 : Set Pri3 : Set Print Speed
nt Speed
nt Speed
nt Speed nt Speed
4 : Set Cutting
4 : Set Cutting
4 : Set Cutting
4 : Set Cutting4 : Set Cutting mode
mode
mode
mode mode
5 : Set Buz
5 : Set Buz
5 : Set Buz
5 : Set Buz5 : Set Buzzer
zer
zer
zer zer
6
6
6
6 6 Set Near-
Set Near-
Set Near-
Set Near-Set Near-End Sensor
End Sensor
End Sensor
End SensorEnd Sensor
:
:
:
: :
7 : Set Serial
7 : Set Serial
7 : Set Serial
7 : Set Serial 7 : Set Serial Interface
Interface
Interface
Interface Interface
(2) Press the Feed button to run the above function.
▶Step 1(Select Options): press the button a number of times as shown
by each menu.
▶ Step 2(Enter Options): hold down the button for at least one second
to apply each item selected.
If you select any items not listed above, the list of “VMSM
Selection” will be printed again. Setting the mode will be canceled
if no item is selected in Step 1.
If “0: Exit and reboot printer” is not executed, the new settings will
not be saved.
(3) Hold down the Feed button for at least 1 second to save the changes.
The following line will be printed before cutting the paper.
*** COMP
*** COMP
*** COMP
*** COMP*** COMPLETED ***
LETED ***
LETED ***
LETED *** LETED ***
6. The new settings will be automatically applied when printer resets.
Printer Instal
Printer Instal
Printer Instal
Printer InstalPrinter Installation Gu
lation Gu
lation Gu
lation Gulation Guide
ide
ide
ideide & Safety
& Safety
& Safety
& Safety & Safety Guide
Guide
Guide
GuideGuide
KN04-
KN04-
KN04-
KN04-KN04-A (V1
A (V1
A (V1
A (V1A (V1.01)
.01)
.01)
.01) .01)
00237
00237
00237
0023700237
THERMAL RE
THERMAL RE
THERMAL RE
THERMAL RETHERMAL RECEIPT PRINTER
CEIPT PRINTER
CEIPT PRINTER
CEIPT PRINTERCEIPT PRINTERSRP-380/382plus
SRP-380/382plus
SRP-380/382plus
SRP-380/382plus SRP-380/382plus
Power Jack
Ethernet
Cable
Interface Cable
(Serial/Parallel/Powered USB/
Wireless LAN/Bluetooth)
AC/DC Adapter
Adapter Jack
Interface port
USB
Cable
Ethernet Port
USB Port
Power Port
Drawer
Kick-out
Port
Drawer
Kick-out
Cable
Specyfikacje produktu
| Marka: | Bixolon |
| Kategoria: | Nie skategoryzowane |
| Model: | SRP-380plus |
Potrzebujesz pomocy?
Jeśli potrzebujesz pomocy z Bixolon SRP-380plus, zadaj pytanie poniżej, a inni użytkownicy Ci odpowiedzą
Instrukcje Nie skategoryzowane Bixolon

7 Lutego 2025
7 Lutego 2025
Instrukcje Nie skategoryzowane
Najnowsze instrukcje dla Nie skategoryzowane
9 Kwietnia 2025
9 Kwietnia 2025
9 Kwietnia 2025
9 Kwietnia 2025
9 Kwietnia 2025
9 Kwietnia 2025
9 Kwietnia 2025
9 Kwietnia 2025
9 Kwietnia 2025
9 Kwietnia 2025