Instrukcja obsługi COLBOR CL100X
Przeczytaj poniżej 📖 instrukcję obsługi w języku polskim dla COLBOR CL100X (2 stron) w kategorii Ulga. Ta instrukcja była pomocna dla 28 osób i została oceniona przez 4 użytkowników na średnio 4.3 gwiazdek
Strona 1/2
Thank you for choosing COLBOR product. Please read this manual
carefully before use and follow all instructions mentioned herein.
CL100X
Video LightUser Manual
Safety Instructions
Please read and fully understand this manual before using the product.
Please remove the COB protective lm to avoid damage by overheat before
rst use.
Please remove the COB protective cover to avoid damage by overheat
before every use.
Do not use the product under moist environment or with wet hands. Do not
allow the product to be splashed or soaked in water.
Keep the product away from corrosive chemicals and liquid to avoid
damage.
Keep the product out of children’s reach during use. Do not leave the
product unattended.
When the product is working, the COB and heat sink will produce high
temperature. Do not block, turn upside down and touch with hands.
To ensure the service life, the cooling system still runs for a while after
shutdown until the COB is below 45℃.
Please disconnect the power supply and put away the power cord when it is
not in use.
During use, arrange the power cord in order to avoid tripping and cutting o
the power or damaging the product.
Let the product cool completely before storage. Remove the power cable
from the product and put it in the corresponding position of carrying bag
after cooling down.
Do not disassemble the product by yourself, otherwise the warranty will be
invalid. If any fault occurs, please refer it to an authorized technician for
inspection or maintenance.
Recommend to use the original parts of COLBOR. If the product is damaged
due to the use of the non-original parts, it is not included in the warranty of
our products.
Drop or external impact may cause product failure. Articial damage is not
covered by warranty.
COLBOR reserves the right of nal interpretation of the products. The
product design and specications are subject to change without notice.
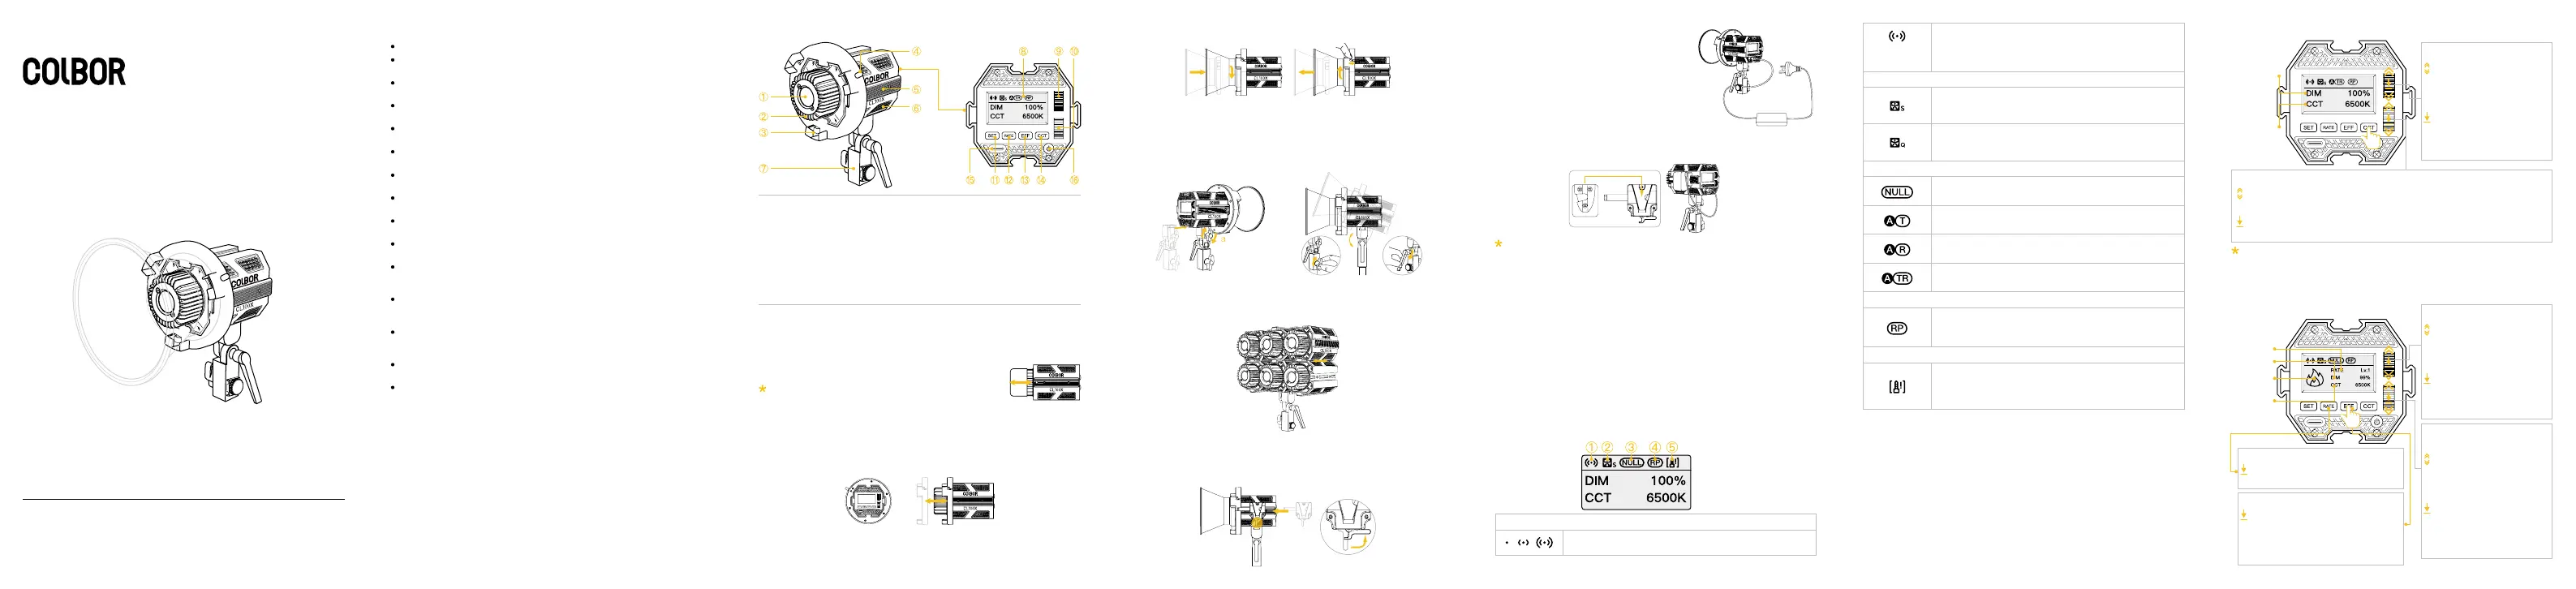
Product Instructions
① COB Bead
② Bead Radiator (Air Outlet)
③ Bowen Mount Adaptor (BAR1)
④ Ejector Pin
⑤ Rail
⑥ Air Vent (Air Intake)
⑦ Quick-mount Holder (EC Stand)
⑧ LCD Display Screen
⑨ Brightness Control Wheel
⑩ Color Temperature Control Wheel
⑪ Setting (SET) Button
⑫ Light Eect Frequency (RATE) Button
⑬ Light Eect Mode (EFF) Button
⑭ Color Temperature Mode (CCT) Button
⑮ Type-C Power Input
⑯ Switch Button
Installation & Disassembly
Hold the COB protective cover and pull it out as the
arrow shows.
Note: Make sure remove the cover before every use
to avoid heat damage.
Power adapter (PA120) and V-port battery power cable (VC50) are only
for powering CL100X and CL100XM, not for other electronic devices. If any
damage caused by the wrong use, it is not within our warranty.
①Align the inner frame of adapter ring with the outer frame of light, and
push the adapter ring into the light from the head. Fasten two marbles on the
adapter ring to the chute.
When disassembling, push the adapter ring towards the head of the light.
①Slide the quick-mount holder into the chute under the light and rotate the
knob a tightly.
②Install tripod into the quick-mount holder and rotate the knob b tightly.
③Adjust the light to the desired angle and rotate the knob c tightly.
Slide the rail of one light into the chute of the other until the pins inlay.
When disconnecting, slide the light out of the chute.
Slide VM2 into the chute of light, determine the xed position and adjust the
lever to lock.
When removing, adjust the level to unlock and slide out of the light.
(1) Fixing power cables
Screw the power cable xing clip, put the
cable into the groove, and then align the
bracket with the tightening screw.
(2)DC power supply
Connect power adapter with Type-C power
input and turn on.
(3) Battery power supply
Turn on power after installing V-mount and battery.
Operation Instructions
1. Remove COB protective cover
2. Install adapter and reector
3. Fixing of the video light
4. Multi-light connection & disassembly
5. Install VM2
6. Power supply
1. Before using the product for the rst time, please be sure to tear o the
protective lm in front of the COB bead.
2. Power On: connect the power cord with the power adapter, plug the
connector of adapter into the xture’s power input, then attach to an
electricity supply.
3. Function: long press the power button, then the power button lights up. The
product enters operation interface.
(Factory default mode: CCT)
4. Power O: press the power button.
After selecting wireless connection in Settings menu, the
icon will be displayed dynamically.
The icon is always on to indicate successful pairing with
mobile APP.
The icon disappears to indicate mobile APP pairing
failure, or the product is unpaired.
Smart Mode. The product will adjust the fan speed
according to the internal detected temperature to ensure
that it is in optimal working condition.
Quiet Mode. The fan keeps running at low speed for
minimum noise, and the brightness should be kept below
80% in case of overheating protection.
Status Icon Description
① APP Connection Status Icon
② Fan Status Icon
None grouping status. The product defaults to the factory
status, and will not be aected by other groups.
If the icon is always on, it means that Repeater function
is turned on, and if the icon disappears, it means the
function is turned o.
If the icon ashes, it means that the internal temperature
of the product is too high, and cooling measures need
to be taken. If the icon disappears, it means that the
operation is normal.
③ Group Status Icon
④ Repeater Status Icon
⑤ Product Overheated Alarm Icon
A stands for Group A. There are 15 groups (A~O). T
stands for Tx.
A stands for Group A. There are 15 groups (A~O). R
stands for Rx.
A stands for Group A. There are 15 groups (A~O). TR
stands for TxRx.
Brightness
Color
Temperature
Roll the wheel upwards
or downwards to adjust
brightness within
0%~100%
Press down the wheel to
quickly switch the preset
brightness, 0%, 25%, 50%,
75%, and 100%
Roll the wheel upwards or downwards to adjust color temperature within
2700K~6500K
Press down the wheel to quickly switch the preset color temperature,
2700K, 3200K, 4000K, 5600K, and 6500K
CCT Mode (Short press CCT Mode Button to enter)
Brightness Control Wheel
Color Temperature Control Wheel
Rolling the wheel will enlarge the current setting parameter value, and
it will automatically return to the main screen after 1.5 seconds of no
operation
Brightness
Rate
Special
Eect
Color
Temperature
Roll the wheel upwards
or downwards to adjust
brightness within
0%~100%
Press down the wheel to
quickly switch the preset
brightness, 0%, 25%, 50%,
75%, and 100%
Roll the wheel upwards
or downwards to adjust
color temperature within
2700K~6500K
Press down the wheel to
quickly switch the preset
color temperature, 2700K,
3200K, 4000K, 5600K, and
6500K
Short press to switch the eect,
Lv.1~Lv.5, and Lv.5 for the fast.
Press to switch light eect:
Fire→CCT Chase→Pulsing
→TV→Explosion→Faulty Bulb
→Welding→Strobe→Lightning
→SOS
EFF Mode (Short press EFF Mode Button to enter)
Brightness Control Wheel
Color Temperature Control
Wheel
Light Eect Frequency (RATE) Button
Light Eect Mode (EFF) Button
②Align the reector with the adapter ring and insert it. The ejector pin is
pinched by reector. Rotate the reector tightly clockwise and the ejector pin
springs back.
When disassembling, push the ejector pin and rotate the reector
anticlockwise.
Specyfikacje produktu
| Marka: | COLBOR |
| Kategoria: | Ulga |
| Model: | CL100X |
Potrzebujesz pomocy?
Jeśli potrzebujesz pomocy z COLBOR CL100X, zadaj pytanie poniżej, a inni użytkownicy Ci odpowiedzą
Instrukcje Ulga COLBOR

16 Grudnia 2024
16 Grudnia 2024
16 Grudnia 2024
16 Grudnia 2024
16 Grudnia 2024
16 Grudnia 2024
16 Grudnia 2024
16 Grudnia 2024
16 Grudnia 2024
16 Grudnia 2024
Instrukcje Ulga
Najnowsze instrukcje dla Ulga
9 Kwietnia 2025
8 Kwietnia 2025
8 Kwietnia 2025
8 Kwietnia 2025
8 Kwietnia 2025
7 Kwietnia 2025
5 Kwietnia 2025
5 Kwietnia 2025
5 Kwietnia 2025
5 Kwietnia 2025