Instrukcja obsługi Cudy M1200
Cudy antena Wi-Fi M1200
Przeczytaj poniżej 📖 instrukcję obsługi w języku polskim dla Cudy M1200 (2 stron) w kategorii antena Wi-Fi. Ta instrukcja była pomocna dla 24 osób i została oceniona przez 6 użytkowników na średnio 5.0 gwiazdek
Strona 1/2
Do you already have a Cudy Mesh router working
as Main Mesh in your network?
YES:
1. Please follow the instructions ofAdd More Mesh
Unitsto add the Cudy mesh unit to the network.
NO:
1. Please follow the instructions of Setup The Main
Mesh to install the main mesh unit to create your
Cudy network.
2. Then please follow the instructions of Add More
Mesh Units to add the rest of the Cudy mesh unit.
Quick Installation Guide
EnglishDeutsch
Español
Italiano
Français
Email:
support@cudy.com
Driver & Manual:
www.cudy.com/download
Before You Begin
Haben Sie bereits einen Cudy Mesh-Router, der als
Main Mesh in Ihrem Netzwerk arbeitet?
JA:
1. Bitte befolgen Sie die Anweisungen unter Weitere
Mesh-Einheiten Hinzufügen , um die Cudy-Mesh-Ein-
heit zum Netzwerk hinzuzufügen.
NEIN:
1. Bitte befolgen Sie die Anweisungen unter Setup
The Main Mesh , um die Main Mesh-Einheit zu
installieren und Ihr Cudy-Netzwerk zu erstellen.
2. Folgen Sie dann bitte den Anweisungen unter
Weitere Mesh-Einheiten Hinzufügen , um den Rest
der Cudy-Mesh-Einheit hinzuzufügen.
Hai già un router Cudy Mesh che funziona come
Main Mesh nella tua rete?
SÌ:
1. Segui le istruzioni di Aggiungi Più Unità Mesh per
aggiungere l'unità mesh Cudy alla rete.
NO:
1. Segui le istruzioni di Installazione Della Rete
Principale per installare l'unità principale della rete
per creare la tua rete Cudy.
2. Quindi segui le istruzioni di Aggiungi Più Unità
Mesh per aggiungere il resto dell'unità mesh Cudy.
Bevor Sie beginnen (Deutsch)Prima di iniziare (Italiano)
¿Ya tienes un router Cudy Mesh funcionando como
Main Mesh en tu red?
SÍ:
1. Siga las instrucciones de Agregar Más Unidades
de Malla] para agregar la unidad de malla Cudy a la
red.
NO:
1. Siga las instrucciones de Configurar la Malla
Principal para instalar la unidad de malla principal
para crear su red Cudy.
2. Luego, siga las instrucciones de Agregar Más
Unidades de Malla para agregar el resto de la unidad
de malla Cudy.
Antes de que empieces (Español)
Avez-vous déjà un routeur Cudy Mesh fonction-
nant comme Main Mesh dans votre réseau?
OUI:
1. Veuillez suivre les instructions de Ajouter Plus
d'unités de Maillage pour ajouter l'unité de
maillage Cudy au réseau.
NON:
1. Veuillez suivre les instructions de Configura-
tion du Maillage Principal pour installer l'unité
de maillage principal afin de créer votre réseau
Cudy.
2. Veuillez ensuite suivre les instructions de
Ajouter Plus d'unités de Maillage pour ajouter
le reste de l'unité de maillage Cudy.
Avant que tu commences (Français)
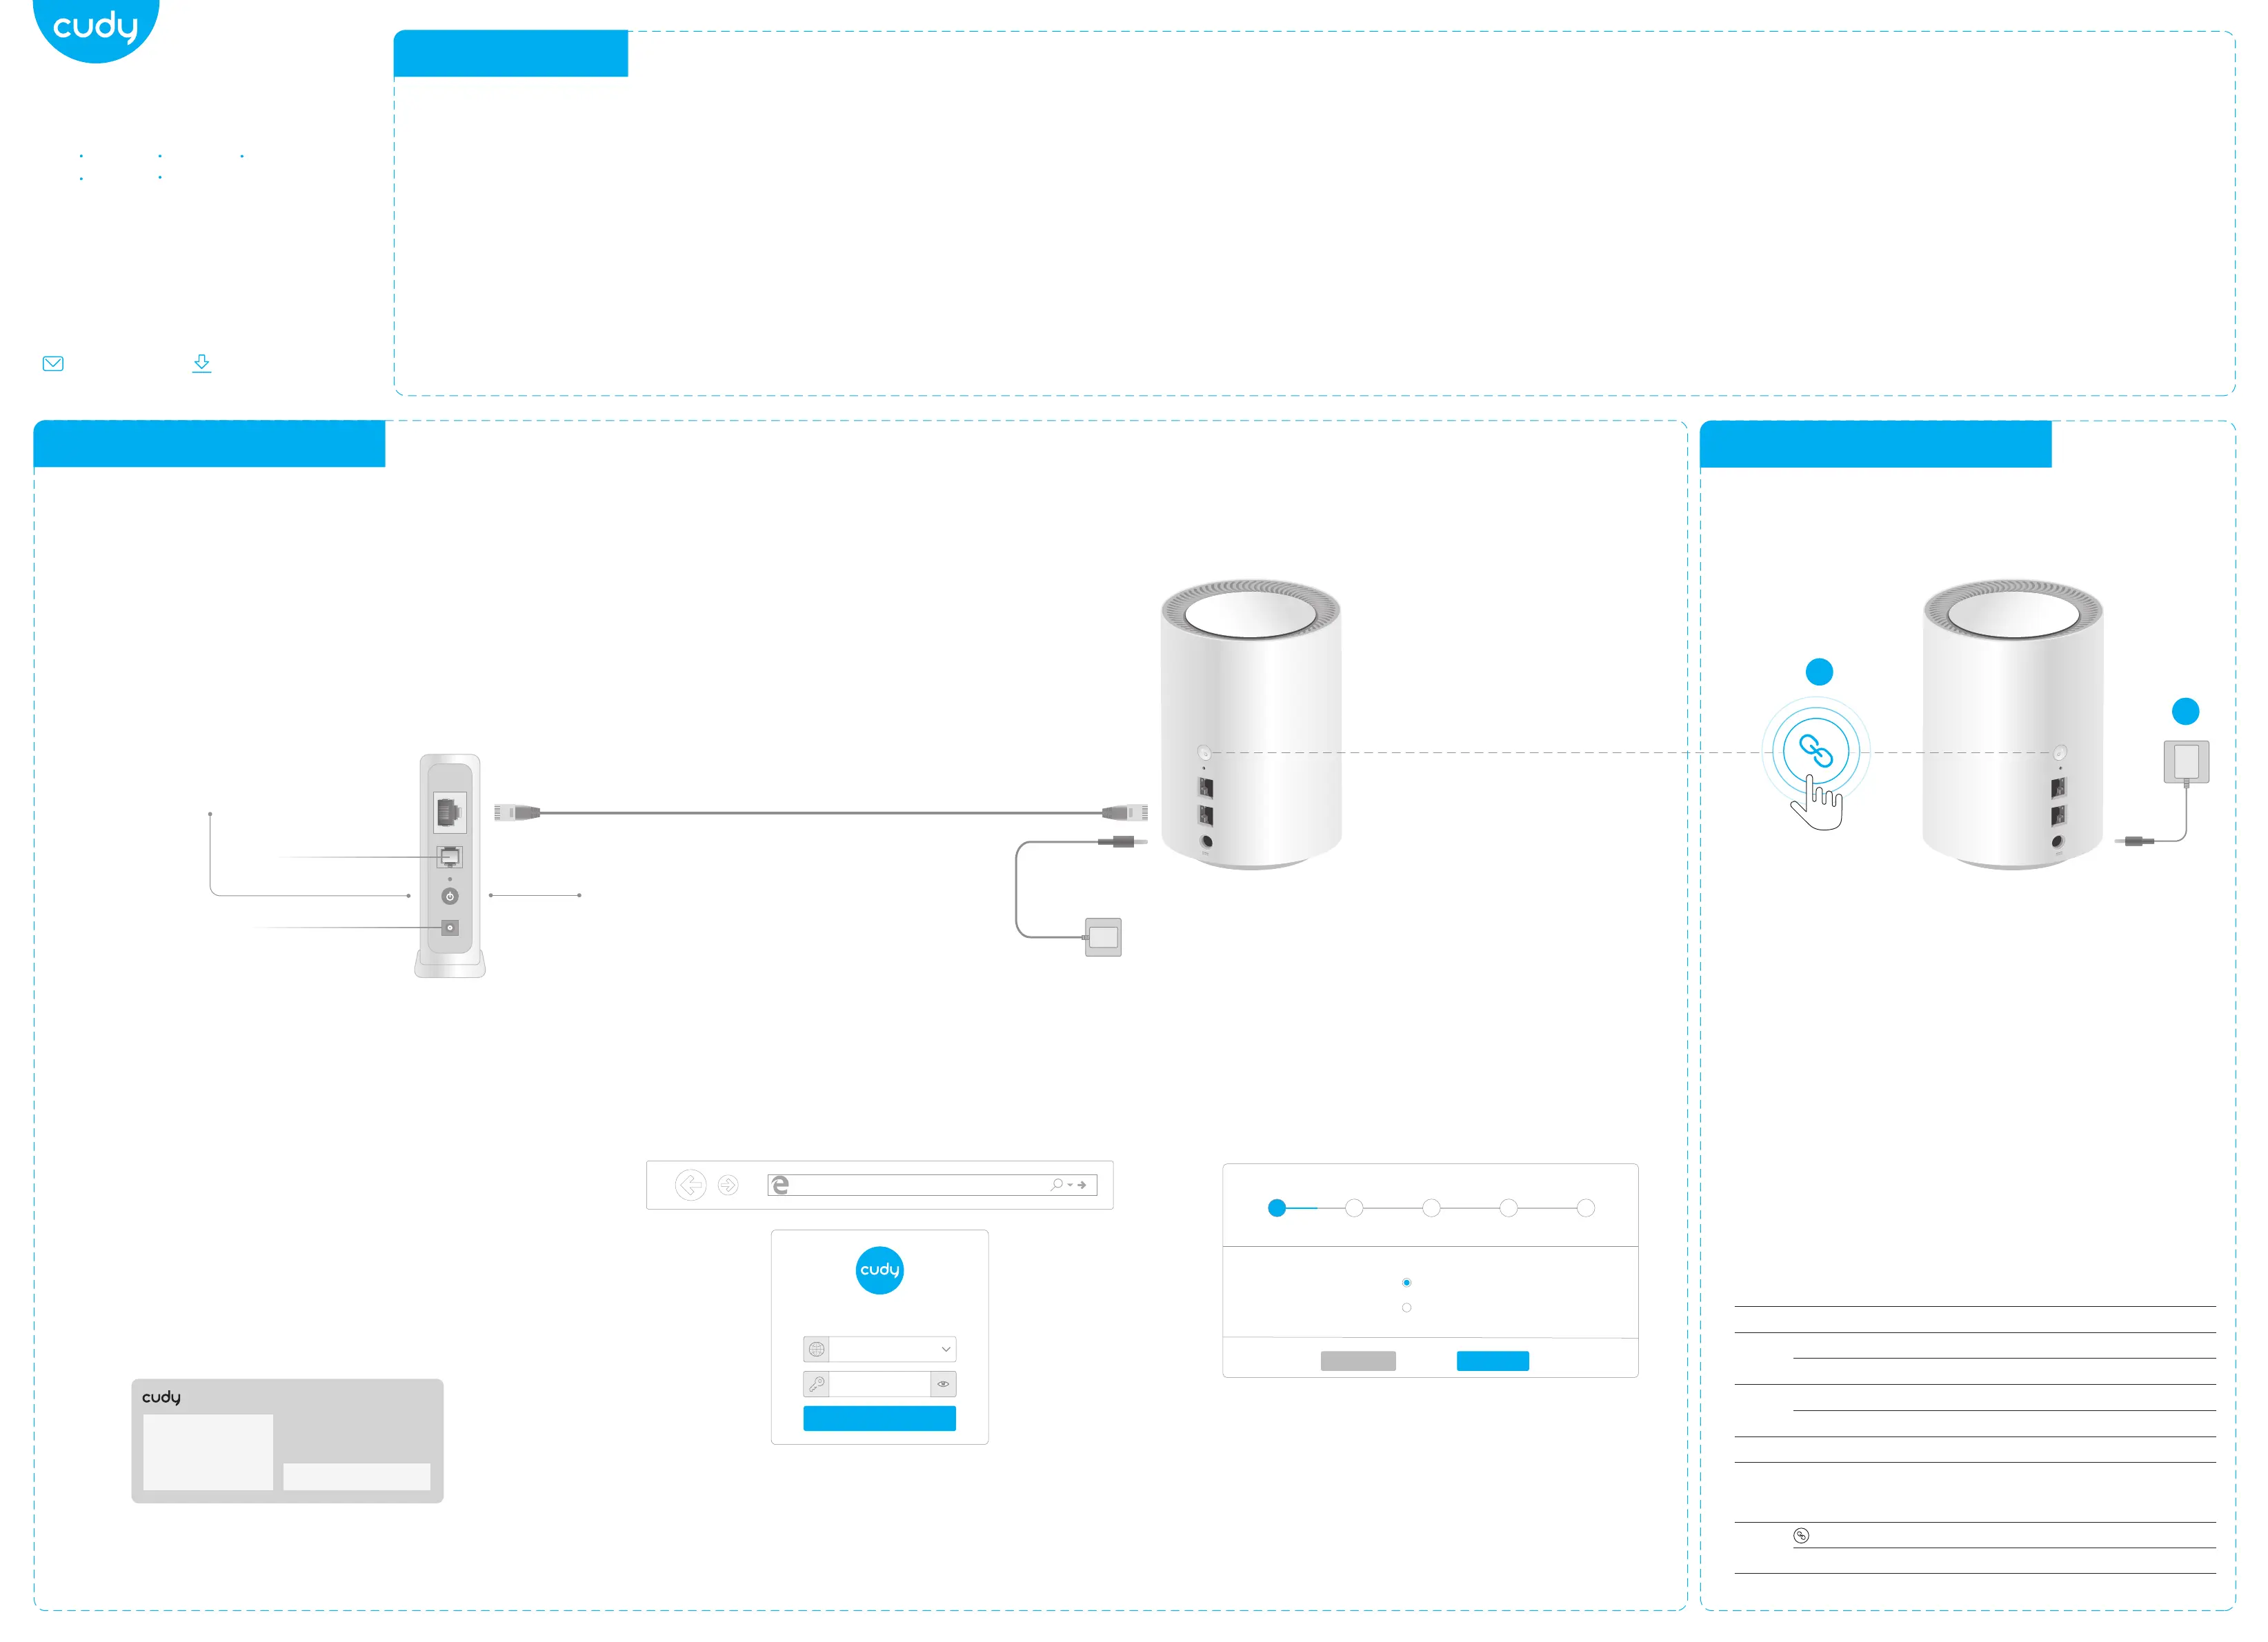
If your internet source is through an Ethernet cable coming from the wall instead of through a DSL/-
Cable/Satellite modem, connect the Ethernet cable to the router’s Port #1, and skip steps 1, 2 ,3.
Internet
Power Socket
Power off your modem.
1
Connect Port #1 of Cudy to your modem’s
LAN port.
2
Power on Cudy and wait about 1 minute
until the system LED is solid on(red or white).
4
Modem
Add More Mesh Units
1. Power on the add-on mesh unit, and waiting its
system LED becomes solid on.
2. Within 2 minutes, press the Pair button on both
of the add-on mesh unit and the main mesh(the
one you already configured).
3. When the system LED on the add-on unit be-
comes solid white, it means the configuration is
succeed.
Note: For other LED status, please check the LED explanation.
Or you can contact our support team support@cudy.com
Power on the modem and wait
about 2 minutes for it to restart.
3
RESET
2
1
RESET
2
1
Main Mesh
Add on Mesh
Press 1 second
5
Connect your computer to the router (Wired
or Wireless)
6
Launch a web browser, and enter
http://cudy.net/ in the address bar. The login
password is admin.
Note: If the login window does not appear, please refer to
FAQ > Q1.
Log In
English
admin
http://cudy.net/
7
Then the pop-up window below will appear,
please follow step by step instructions to set up
the internet connections.
When all the configurations are completed, the router will
restart. Wait the LED turn to solid white, which means the
Main Mesh has configured successfully and connects to the
internet.
Note: If the pop-up window does not appear, please click
Quick Setup on the status page.
Quick Setup(1/5)
Mode Timezone WAN Wireless Summary
Exit
Next
Operation ModeMesh Wi-Fi Router
Mesh Access Point
54
3
21
5GHz Wi-Fi:Cudy-XXXX-5G
2.4GHz Wi-Fi:Cudy-XXXX
Password:XXXXXXXX
Wired
Turn off the Wi-Fi on your computer and connect it to router’s
Port #2 via an Ethernet cable.
Wireless
Connect your computer to the router’s Wi-Fi using the SSID
(network name) and Password printed on the bottom of the
router.
1
2
Setup The Main Mesh
LED Explanation
Button Explanation
LED Status Main Mesh Add on Mesh
Flash
Solid
Flash
Solid
Red
White
Red White Red
Starting upStarting up
System ready, not connected to main mesh
Connected to main mesh, signal not good
Connected to main mesh, signal good
PairingN/A
System ready, no internet
Connected to internet
Pairing
Reset
Button
Press and hold 6 seconds to reset the router to its factory default settings.
Press and hold 1 second to start pairing.
Need help?
Specyfikacje produktu
| Marka: | Cudy |
| Kategoria: | antena Wi-Fi |
| Model: | M1200 |
Potrzebujesz pomocy?
Jeśli potrzebujesz pomocy z Cudy M1200, zadaj pytanie poniżej, a inni użytkownicy Ci odpowiedzą
Instrukcje antena Wi-Fi Cudy

8 Października 2024
8 Października 2024
18 Września 2024
Instrukcje antena Wi-Fi
Najnowsze instrukcje dla antena Wi-Fi
26 Lutego 2025
25 Lutego 2025
7 Stycznia 2025
5 Stycznia 2025
5 Stycznia 2025
5 Stycznia 2025
29 Grudnia 2024
9 Października 2024
7 Października 2024
4 Października 2024