Instrukcja obsługi Daikin EKBRP2A81
Daikin Wentylator EKBRP2A81
Przeczytaj poniżej 📖 instrukcję obsługi w języku polskim dla Daikin EKBRP2A81 (2 stron) w kategorii Wentylator. Ta instrukcja była pomocna dla 25 osób i została oceniona przez 7 użytkowników na średnio 4.4 gwiazdek
Strona 1/2
EK
EK
EK
EKEKBR
BR
BR
BRBRP2
P2
P2
P2P2A8
A8
A8
A8A81
1
1
1 1 :
:
:
:: A
A
A
A ABC
BC
BC
BCBC I
I
I
I I/P
/P
/P
/P/P
PR
PR
PR
PRPRIN
IN
IN
ININTE
TE
TE
TETED
D
D
D D C
C
C
CCIR
IR
IR
IRIRCU
CU
CU
CUCUIT
IT
IT
ITIT B
B
B
B BOA
OA
OA
OAOAR
R
R
RRD
D
D
D D KI
KI
KI
KIKIT
T
T
TT
Position the wires so that the cover will not rise when wiring the power supply.
Make sure that the cover is attached securely. If the cover is attached improperly,
electric shocks or fire may result.
●The following two conventions are used to indicate and classify precautions in this manual.
Always read the important safety information provided with them.
●Make sure that the unit operates properly after completing the installation, and explain to the customer
how to operate the unit and keep it maintained.
Also, advise the customer that they should keep this installation manual along with other manual for
future reference.
●At the time of the installation, read the installation manual of the unit along with the electric diagram.
Ask your dealer or qualified personnel to carry out installation work.
Do not attempt to install the air conditioner yourself. Improper installation may result in water leakage,
electric shocks or fire.
0P750596-1
Install the kit in accordance with the instructions in this installation manual.
Improper installation may result in electric shocks or fire.
CAUTION
READ THE INSTRUCTIONS PROVIDED HEREIN CAREFULLY IN ADVANCE AND INSTALL THIS KIT CORRECTLY.
Do not install this kit in the following locations:
1.Where there is a high concentration of mineral oil spray or vapor for example a kitchen.
2.Where corrosive gas, such as sulfurous acid gas, is produced, acid or alkaline steam gathers,
or the air contains a high salt content, such as places by the sea. Parts may be corroded and fall off.
3.Near machinery emitting electromagnetic waves or in places with great voltage fluctuations,
such as factories.
4.Where flammable gas may leak, in places with carbon fiber or ignitable dust suspensions in the air
or with volatile flammables such as paint thinner or gasoline, or in vehicles or vessels.
Fire may result if gas leakage occurs and stays around the kit.
5.Where small animals intrude, fallen leaves gather, or weeds grow.
Small animals making contact with electrical parts can cause malfunctions, smoke or fire.
Turn off the unit before touching electrical parts.
An electric shock may be received if charged parts come in contact with humans.
Failure to observe these instructions properly may result in property damage or
personal injury, which may be serious depending on the circumstances.
Failure to follow these instructions properly may result in personal injury or loss of life
.
WARNING
Be sure to use the specified wires and fix them securely so that no external force resulting from the wires
will be imposed on any terminal connections.
Improper connections or securing of wires may result in abnormal heat build-up or fire.
CAUTION
Make certain that all electrical work is carried out by qualified personnel according to the local laws and
regulations and this installation manual, using a separate circuit.
Insufficient capacity of the power supply circuit or improper electrical construction may lead to electric
shocks or fire.
WARNING
Be sure to use only the specified accessories and parts for the installation work.
Failure to use the specified parts may cause the kit to fail or result in electric shocks or fire.
PLEASE READ THESE "SAFETY PRECAUTIONS" CAREFULLY BEFORE INSTALLING
Accessories
WHITE
1 pc.
Wire harness
assy(2)
ABC I/P printed circuit
board kit
WHITE
Please make sure all the below listed components are
in the package prior to the installation.
Harness clamp
Tie wrap
1 pc.1 pc.
Wire harness
assy(1)
Installation
manual
9
For 1fan type
:Remove the screws on the front panel.
:Slightly lift the panel.
:Pull the panel forward and remove it.
:Remove the screws on the front panel(upper).
:Slightly lift the panel.
:Pull the panel forward and remove it.
:Remove the screws on the Electrical Components Box cover.
:Pull the cover downward till its top shows.
:Pull the cover forward and remove it.
8
7
For 2fan type
5
1
・Remove the front panel and Electrical Components Box cover.
2
3
6
4
Before Installation
Installation Method
For VRV T,U,A type series.
WHITE(12 pins)
WHITE(5 pins)
1 pc.1 pc.1 pc.1 pc.
WHITE
WHITE(4 pins)
Wire harness
assy(3)
・Please make sure that the transmission wiring of the
Cool/Heat selector to the ABC I/P printed circuit board
(X1M(A,B,C)) has at least the specifications mentioned in
the table below.
Transmission Wiring
Voltage220 - 240 V
Wire typeOnly use harmonised wire providing double insulation and suitable for
applicable voltage.
Wire size0.75 - 1.25 mm²
3
2
6
5
8
9
3
2
6
5
8
9
【
【
【
【【In
In
In
In In cas
cas
cas
cascase o
e o
e o
e oe of
f
f
f f X66A
X66A
X66A
X66AX66A co
co
co
co conne
nne
nne
nnennecto
cto
cto
ctoctor w
r w
r w
r wr with
ith
ith
ithith 12
12
12
12 12 pin
pin
pin
pin pins.
s.
s.
s.s.】
】
】
】】
【
【
【
【【In
In
In
InIn ca
ca
ca
ca case
se
se
se se of
of
of
of of X66A
X66A
X66A
X66AX66A co
co
co
co conn
nn
nn
nnnnect
ect
ect
ectector
or
or
or or with
with
with
withwith 5
5
5
5 5 pin
pin
pin
pinpins.
s.
s.
s.s.】
】
】
】】
【
【
【
【【In
In
In
In In cas
cas
cas
cascase o
e o
e o
e oe of
f
f
f f X66A
X66A
X66A
X66AX66A co
co
co
co conne
nne
nne
nnennecto
cto
cto
ctoctor w
r w
r w
r wr with
ith
ith
ithith 4
4
4
4 4 pins
pins
pins
pinspins.
.
.
..】
】
】
】】
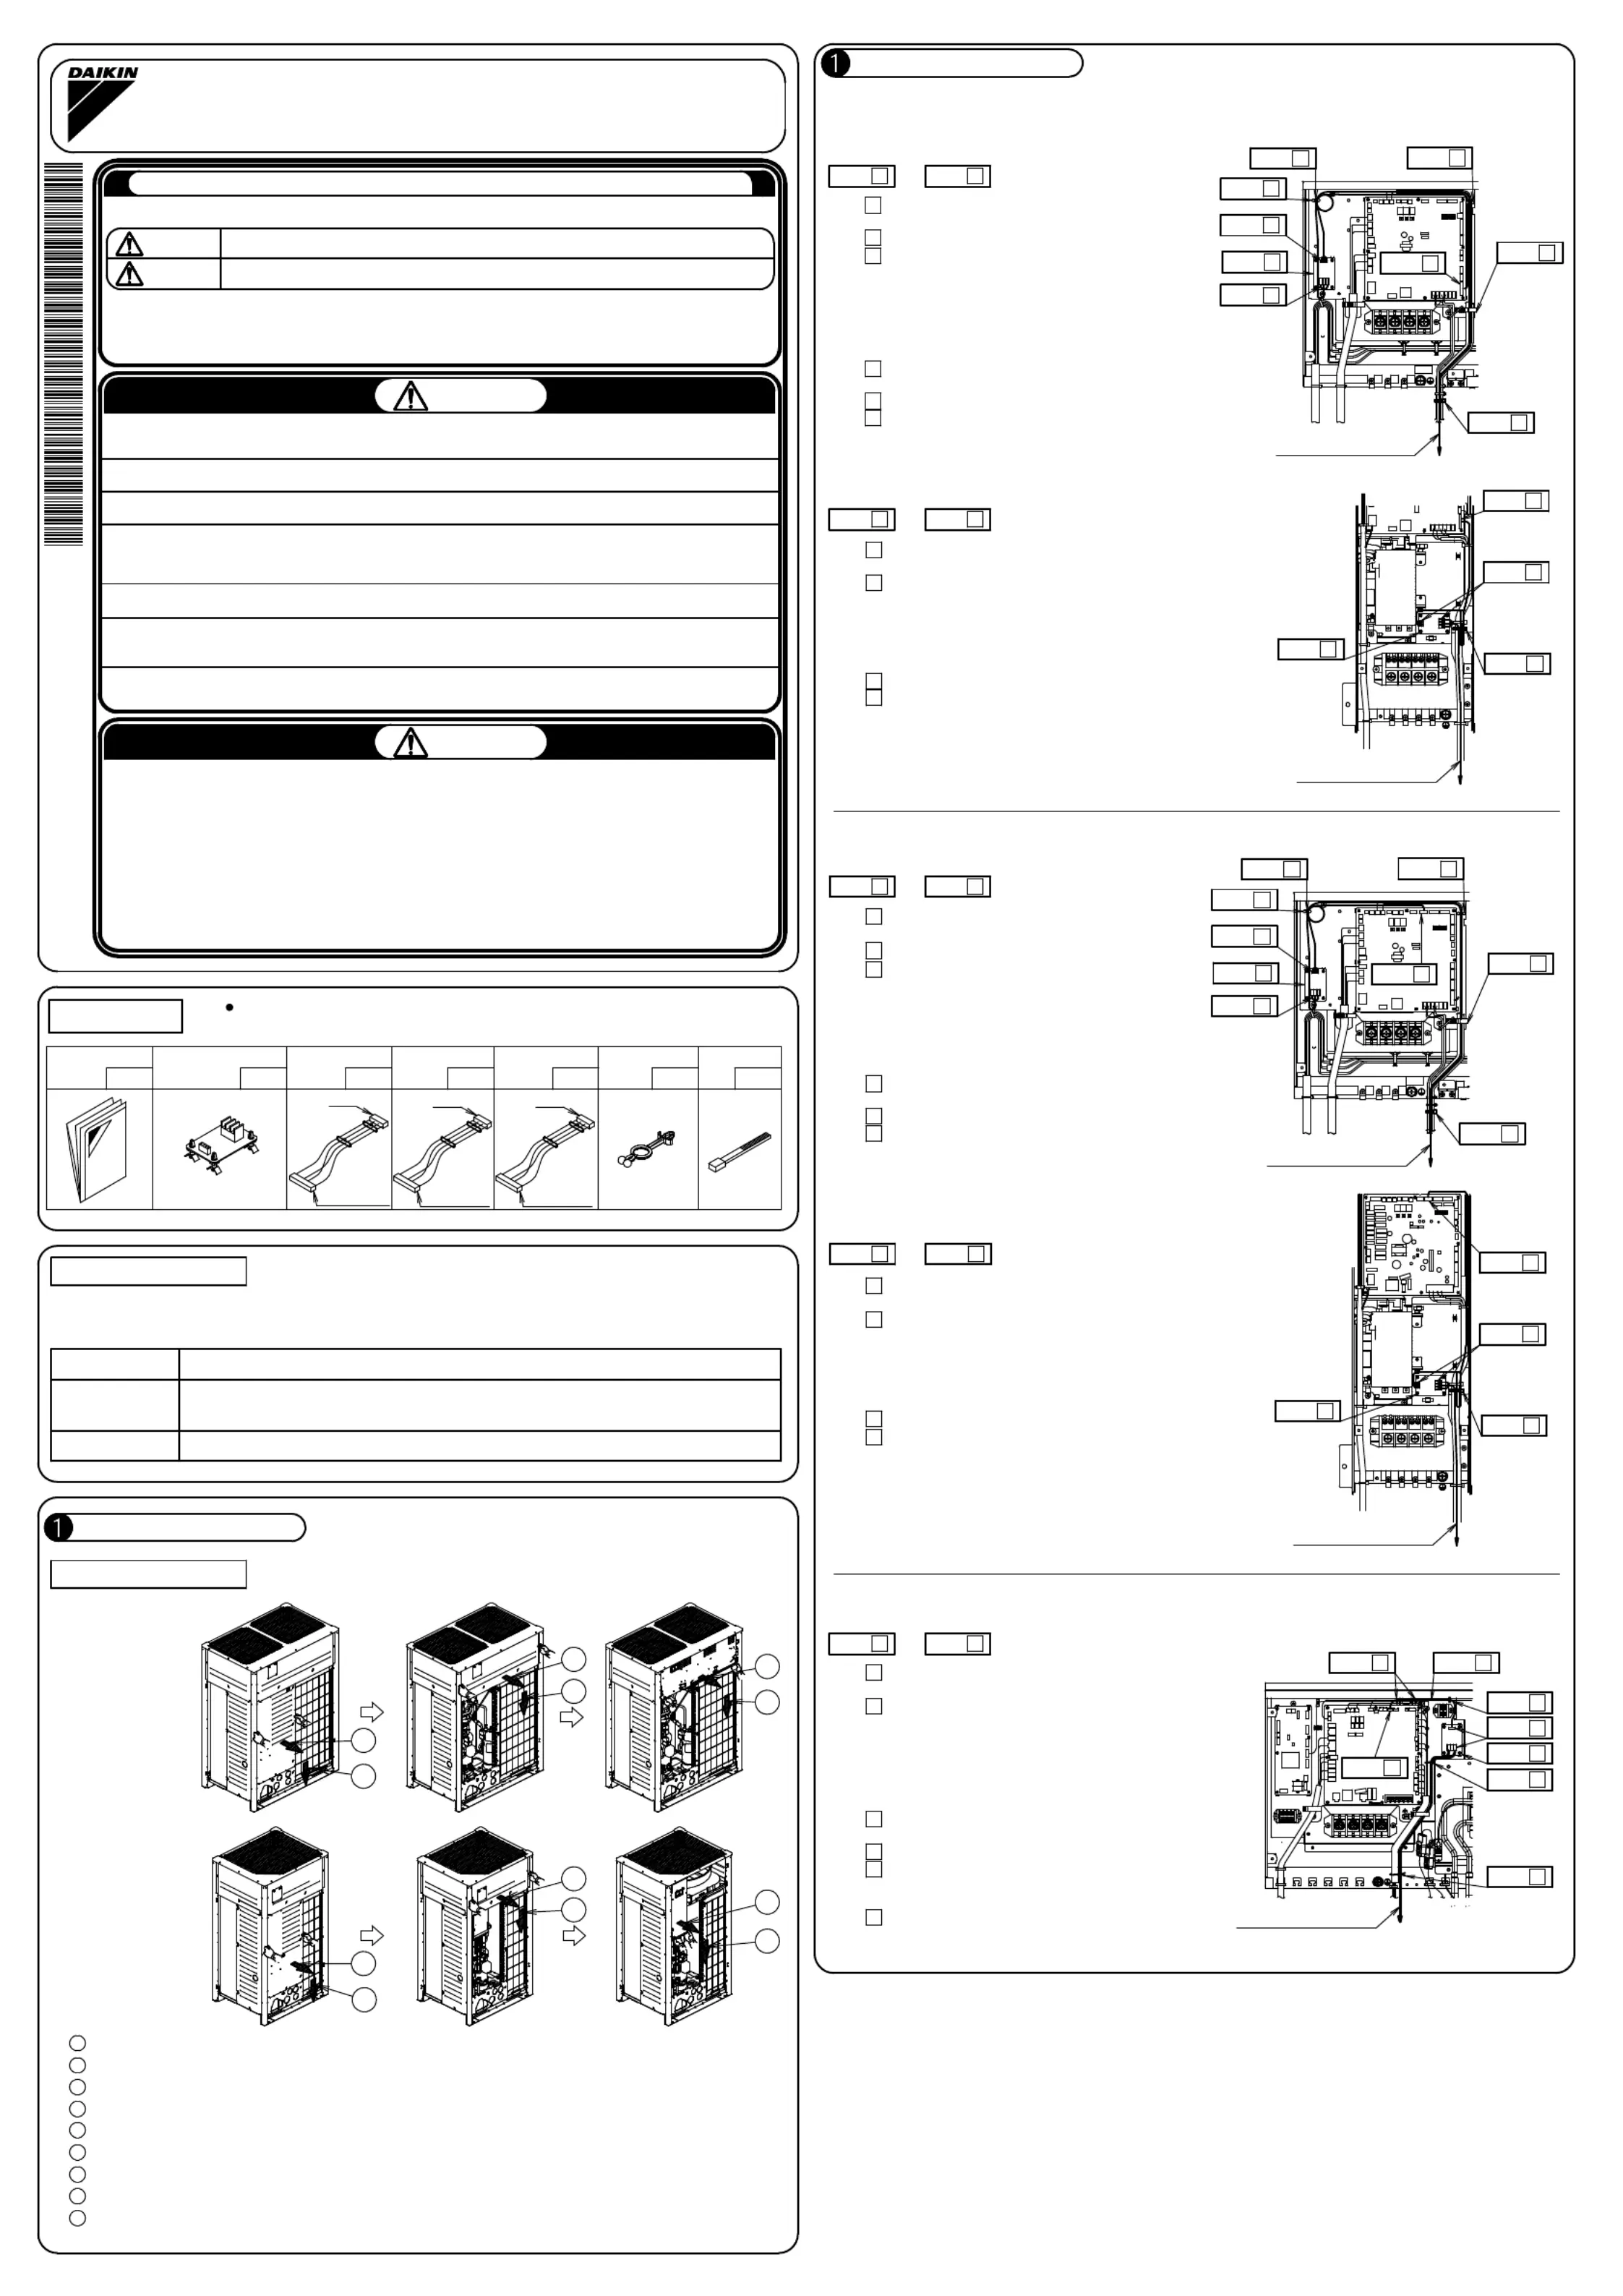
:Set the ABC I/P printed
circuit
board
as shown in the right figure.
:Connect the wire harness assy to the ABC I/P
printed circuit board(X1A).
Use only wire harness assy
(3):4 pins
.
And connect the transmission wiring of the
Cool/Heat selector to the ABC I/P printed circuit
board(X1M(A,B,C)).The tightening torque of
X1M screw is 0.53~0.63N・m(0.39~0.46ft・lbf)
:Proceed wiring of the wire harness assy(3) and
transmission wire, as shown in the right figure.
:Connect the wire harness assy(3) to the A1P(X66A).
:Bundle wiring of the wire harness assy(3) at
location shown in the right figure and fasten it
to other wires using tie wrap (field supply)
:Fasten the transmission wire with other wires
using tie wrap.
:Set the ABC I/P printedcircuitboard
as shown in the right figure.
:Mount harness clamp.
:Connect the wire harness assy(1) to the
ABC I/P printed circuit board(X1A).
Use only wire harness assy(1):12 pins.
And connect the transmission wiring of the
Cool/Heat selector to the ABC I/P printed circuit
board(X1M(A,B,C)).The tightening torque of
X1M screw is 0.53~0.63N・m(0.39~0.46ft・lbf)
:Proceed wiring of the wire harness assy(1) and
transmission wire, as shown in the right figure.
:Connect the wire harness assy(1) to the A1P(X66A).
:Fasten the transmission wire with other wires
using tie wrap.
Step
1
2
Step
3
Step
Step
4
5
Step
Step
6
~
16
Step
For 2fan type
Step
X1M
Step
Step
Step
Step
A1P
4
X1A
3
2
Step
Step
6
Step
Step
4
5
Transmission wire
(To Cool/Heat selector)
3
1
4
X66A
Step
4
For 1fan type
StepStep
1
~
:Set the ABC I/P printed
circuit
board
as shown in the right figure.
:Connect the wire harness assy
(1):12 pins
to the
ABC I/P printed circuit board(X1A).
And connect the transmission wiring of the
Cool/Heat selector to the ABC I/P printed circuit
board(X1M(A,B,C)).The tightening torque of
X1M screw is 0.53~0.63N・m(0.39~0.46ft・lbf)
:Connect the wire harness assy(1) to the A1P(X66A).
:Fasten the transmission wire with other wires
using tie wrap.
Step
1
2
Step
3
Step
Step
4
Step
Step
A1P
4
1
3
Transmission wire
(To Cool/Heat selector)
2
X66A
X1A
Step
Step
Step
For 2fan type
Step
61
~
Step
Step
:Set the ABC I/P printed
circuit
board
as shown in the right figure.
:Mount harness clamp.
:Connect the wire harness assy to the ABC I/P
printed circuit board(X1A).
Use only wire harness assy
(2):5 pins
.
And connect the transmission wiring of the
Cool/Heat selector to the ABC I/P printed circuit
board(X1M(A,B,C)).The tightening torque of
X1M screw is 0.53~0.63N・m(0.39~0.46ft・lbf)
:Proceed wiring of the wire harness assy(2) and
transmission wire, as shown in the right figure.
:Connect the wire harness assy(2) to the A1P(X66A).
:Fasten the transmission wire with other wires
using tie wrap.
Step
1
2
6
4
5
Step
3
Step
StepStep
X66A
4
1
3
Transmission wire
(To Cool/Heat selector)
5
4
Step
Step
6
Step
Step
2
3
X1A
4
A1P
Step
Step
Step
Step
X1M
1
StepStep
For 1fan type
4
~
Step
:Set the ABC I/P printed
circuit
board
as shown in the right figure.
:Connect the wire harness assy
(2):5 pins
to the
ABC I/P printed circuit board(X1A).
And connect the transmission wiring of the
Cool/Heat selector to the ABC I/P printed circuit
board(X1M(A,B,C)).The tightening torque of
X1M screw is 0.53~0.63N・m(0.39~0.46ft・lbf)
:Connect the wire harness assy(2) to the A1P(X66A).
:Fasten the transmission wire with other wires
using tie wrap.
Step
4
Step
3
1
2
Step
Transmission wire
(To Cool/Heat selector)
Step
Step
A1P
4
1
3
2
X66A
X1A
Step
Step
Step
For 2fan type
Step
61
~
1
Step
Step
2
3
Step
4
Step
5
Step
6
Step
X66A
A1P
X1M
X1A
Transmission wire
(To Cool/Heat selector)
1
Step
2
Step
Step
3
Step
3
Step
3
4
Step
5
Step
Step
6
Installation Method
(Continued from the left)
Specyfikacje produktu
| Marka: | Daikin |
| Kategoria: | Wentylator |
| Model: | EKBRP2A81 |
Potrzebujesz pomocy?
Jeśli potrzebujesz pomocy z Daikin EKBRP2A81, zadaj pytanie poniżej, a inni użytkownicy Ci odpowiedzą
Instrukcje Wentylator Daikin

8 Stycznia 2025
8 Stycznia 2025
8 Stycznia 2025
Instrukcje Wentylator
Najnowsze instrukcje dla Wentylator
8 Kwietnia 2025
8 Kwietnia 2025
8 Kwietnia 2025
3 Kwietnia 2025
2 Kwietnia 2025
1 Kwietnia 2025
1 Kwietnia 2025
1 Kwietnia 2025
1 Kwietnia 2025
1 Kwietnia 2025