Instrukcja obsługi Denon Urban Raver AH-D320
Denon zestaw słuchawkowy Urban Raver AH-D320
Przeczytaj poniżej 📖 instrukcję obsługi w języku polskim dla Denon Urban Raver AH-D320 (3 stron) w kategorii zestaw słuchawkowy. Ta instrukcja była pomocna dla 40 osób i została oceniona przez 3 użytkowników na średnio 4.8 gwiazdek
Strona 1/3
ITALIANOFRANCAIS
Getting started
Thank you for purchasing your Denon Urban Raver™ headphones.
Read this manual and attached “Precautions on the use of
headphones” documentation carefully beforehand to use the
headphones properly.
Accessories
qOwner’s manual (this document)................................................1
wPrecautions on the use of headphones1 ......................................
eAudio cable (length: approx. 1.3 m)............................................1
rAdapter plug................................................................................1
tCarrying Case ..............................................................................1
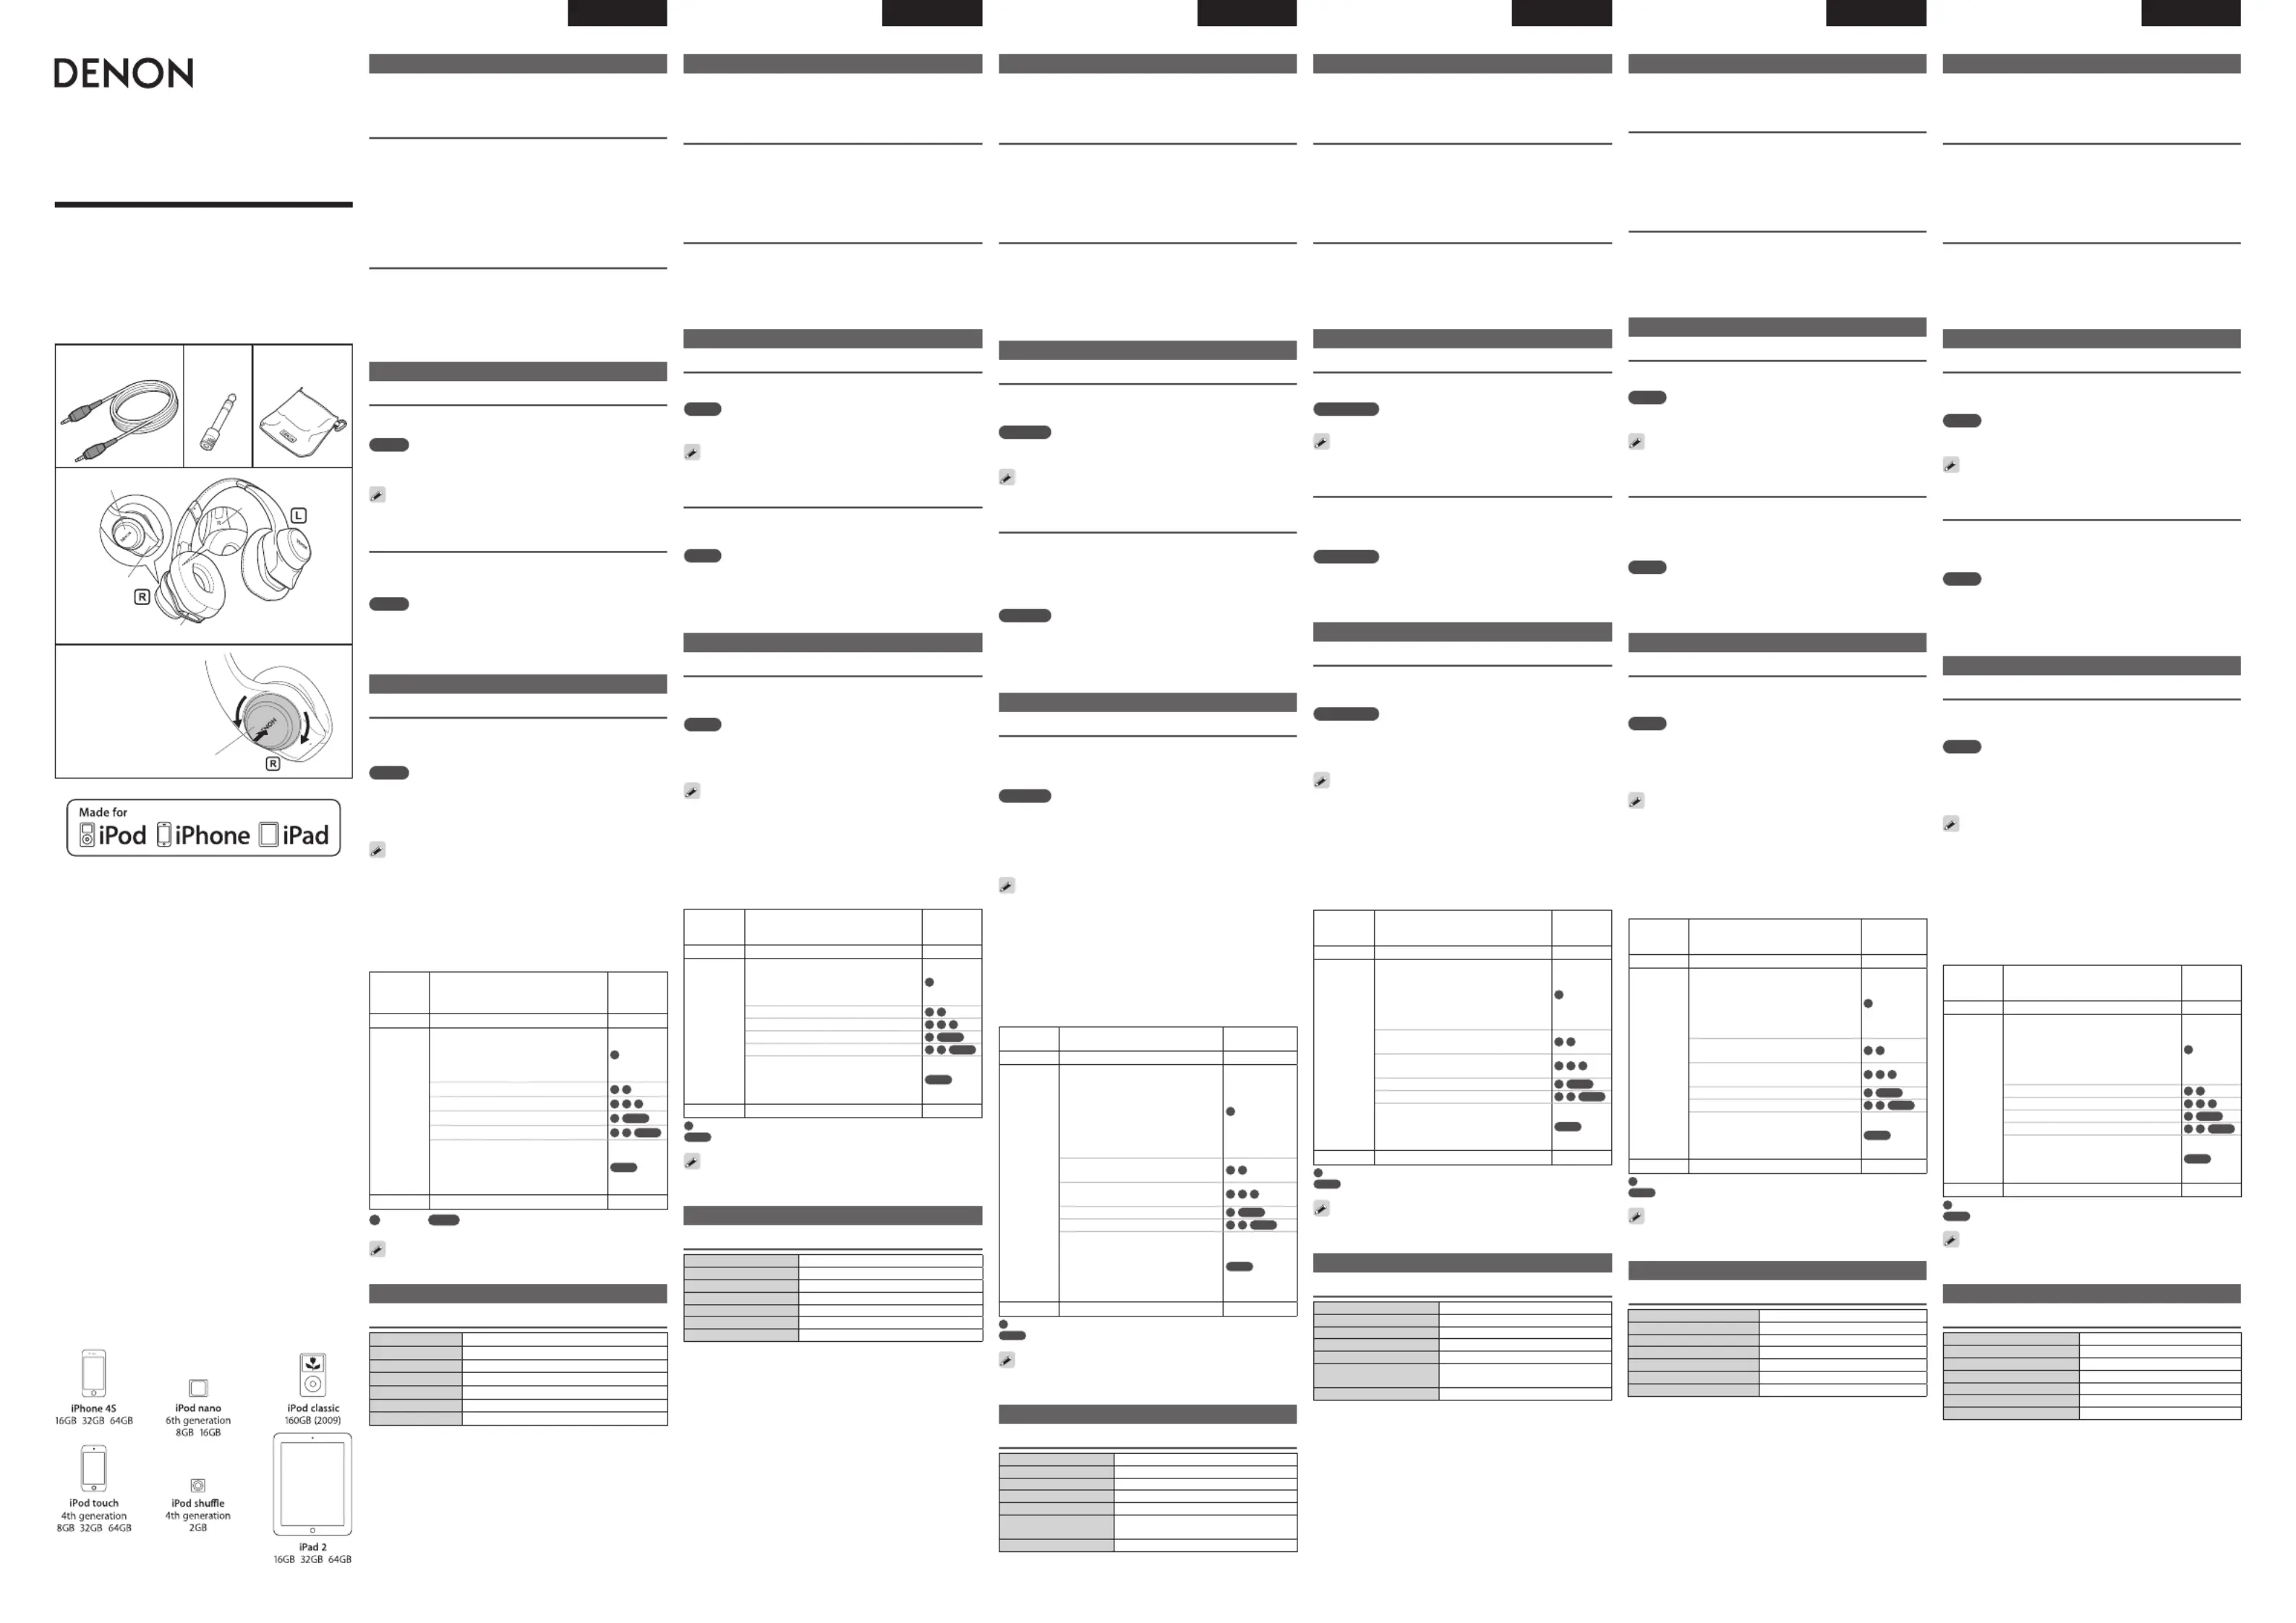
Functions (A)v
qControl wheel
Controls Apple products with remote control support.
wCall microphone
eStereo mini jack
Connector for the included audio cable.
rL/R indication
Preparing the Headphones
Connecting the headphones with your audio device
Use the included audio cable to connect the stereo mini jack on the
headphones and the headphone port on your audio device.
NOTE
First connect the included audio cable to the stereo mini jack on the
headphones.
Use the 1/4” gold-plated adapter jack (included), if the headphone
port on your audio device requires that size.
Adjusting the t of the headphones
Check the hanger marks and t “L” to the left ear and “R” to the
right ear.
Adjust the slider length to t your head when wearing the headphones.
NOTE
•Please read the attached “Precautions on the use of headphones”
documentation.
•Avoid getting your ngers or other body parts caught in the
product’s moving portions.
•Do not pull forcefully on the sliders.
Using the Headphones
Operating Apple
®
products
When the headphones are connected to your Apple product with
the included audio cable, you can use the control wheel on the right
headphone to perform playback operations and adjust the volume.
NOTE
•The headphones cannot operate devices other than Apple products.
•The included audio cable is a cable that is compatible with Apple
product control. Apple product control may not be available when
a different cable is used.
•Use the latest Apple software.
•All operations comply with the Apple genuine remote control.
•You can use the remote control and microphone of the headphones
for iPod nano (the fourth generation or later), iPod classic (120/160
GB), iPod touch (the second generation or later), iPhone 3GS and
later, and iPad.
•You can also use the remote control of the headphones for iPod
shufe (the third generation or later).
•Audio playback is available for all iPod models.
Control
wheel
()vB
Function
Button
operation
q
Increase VolumeTurn
w
Play or pause a song or video
Answer or end a call
Switch to an incoming or on-hold call
and put the current call on hold
Skip to the next song or chapter
Go to the previous song or chapter
Fast forward
Fast reverse
Voice Over
Decline an incoming call
Switch to an incoming or on-hold call
and end the current call
e
Decrease VolumeTurn
Short-press of the button
Long-press of the button (2 sec or longer)
Turn the control wheel to adjust the volume level of the other party’s
voice.
Additional Information
Product specications
Driver typeDynamic type
Driver sizeØ 40 mm
Sensitivity108 dB/mW
Input impedance16 Ω
Playback frequency6 to 37,000 Hz
Maximum input1,300 mW
Weight250 g
ENGLISH
日本語
AH-D320
URBAN
RAVER
TM
On-Ear Headphones
取扱説明書 / Owner’s Manual /
Bedienungsanleitung
/
Manuel de l’Utilisateur
/
Manuale delle istruzioni / Manual del usuario/
Gebruiksaanwijzing / Bruksanvisning /
Инструкция по эксплуатации /
Instrukcja obsługi / / 操作说明书操作說明書
DEUTSCHESPAÑOL
Erste Schritte
Danke, dass Sie sich für den Denon Urban Raver™-Kopfhörer entschieden
haben. Lesen Sie sich zunächst sorgfältig die im Produktumfang
bendliche Schnelleinführung und die Sicherheitshinweise zur
Benutzung des Kopfhörers durch, damit Sie ihn richtig verwenden.
Zubehör
qBedienungsanleitung (dieses Dokument)1 ...................................
wVorsichtsmaßnahmen bei Verwendung des Kopfhörers............1
eAudiokabel (Länge ca. 1,3 m)......................................................1
rAdapterstecker ............................................................................1
tTransportetui ...............................................................................1
Funktionen (A)v
qSteuerrad
Damit können Apple-Produkte gesteuert werden, die Fernbedienung
unterstützen.
wMikrofon für Anrufe
eMiniklinkenstecker (Stereo)
Stecker für das mitgelieferte Audiokabel.
rL/R-Markierung
Vorbereiten der Kopfhörer
Anschließen der Kopfhörer an Ihr Audiogerät
Verwenden Sie das im Produktumfang bendliche Audiokabel, um den
Stereo-Miniklinkenstecker des Kopfhörers an den Kopfhöreranschluss
Ihres Audiogeräts anzuschließen.
HINWEIS
Schließen Sie zuerst das beigefügte Audiokabel an den Stereo-
Miniklinkenstecker am Kopfhörer an.
Verwenden Sie den mitgelieferten 6,35-mm-Adapter, falls der
Kopfhöreranschluss auf Ihrem Gerät nur diese Größe bietet.
Einstellen der Passform der Kopfhörer
Überprüfen Sie die Kennzeichnung der Kopfhörermuscheln und
achten Sie darauf, dass sich die mit “L“ gekennzeichnete Seite auf
Ihrem linken und die mit “R“ gekennzeichnete Seite auf Ihrem rechten
Ohr bendet.
Stellen Sie den Schieber auf Ihren Kopf ein, wenn Sie den Kopfhörer
tragen.
HINWEIS
•Bitte lesen Sie sich die angefügten Sicherheitshinweise zur
Benutzung des Kopfhörers durch.
•Achten Sie darauf, dass Sie Ihre Finger oder andere Körperteile
nicht zwischen die beweglichen Teile des Produkts klemmen.
•Ziehen Sie niemals fest an den Schiebern.
Verwenden der Kopfhörer
Bedienen von Apple
®
-Produkten
Wenn Sie den Kopfhörer mithilfe des mitgelieferten Audiokabels an
Ihr Apple-Produkt anschließen, können Sie das Steuerrad auf der
rechten Muschel dazu verwenden, die Wiedergabe zu steuern und
die Lautstärke zu regulieren.
HINWEIS
•Der Kopfhörer kann nicht zur Steuerung anderer Produkte als
derjenigen von Apple verwendet werden.
•Das im Produktumfang bendliche Audiokabel ist mit der Apple-
Produktsteuerung kompatibel. Die Apple-Produktsteuerung steht
bei Verwendung eines anderen Kabels möglicherweise nicht zur
Verfügung.
•Verwenden Sie die aktuelle Apple-Software.
•Alle Steuerungsvorgänge entsprechen den authentischen Apple-
Fernsteuerungsfunktionen.
•Sie können die Fernbedienung und das Mikrofon des Kopfhörers
für die folgenden Geräte einsetzen: iPod nano (4. Generation oder
neuer), iPod classic (120/160 GB), iPod touch (2. Generation oder
neuer), iPhone 3GS und höher, und iPad.
•Sie haben die Möglichkeit, die Fernsteuerung des Kopfhörers mit
dem folgenden Gerät zu verwenden: iPod shufe (3. Generation
oder neuer).
•Die Audiowiedergabe steht für alle iPod-Modelle zur Verfügung.
Steuerrad
()vB
Funktion
Tastenbetätigung
q
Erhöhen der LautstärkeDrehen
w
Abspielen oder Stoppen eines
Musiktitels oder Videos
Annehmen oder Beenden eines
Anrufs
Wechseln zu einem eingehenden
oder wartenden Anruf und Stellen
des aktuellen Anrufs in die
Warteliste
Springen zum nächsten Titel oder
Kapitel
Zurückkehren zum vorherigen Titel
oder Kapitel
Schnellvorlauf
Schnellrücklauf
Voice Over
Ablehnen eines eingehenden
Anrufs
Wechseln zu einem eingehenden
oder wartenden Anruf und Beenden
des aktuellen Telefonats
e
Verringern der LautstärkeDrehen
Kurzer Tastendruck
Langer Tastendruck (2 s oder länger)
Drehen Sie das Steuerrad, um die Lautstärke der Stimmwiedergabe
anzupassen.
Weitere Informationen
Technische Daten
WandlerprinzipDynamisch
MembrangrößeØ 40 mm
Empndlichkeit108 dB/mW
Eingangsimpedanz16 Ω
Wiedergabefrequenz6 bis 37 000 Hz
Maximale
Leistungsaufnahme
1300 mW
Gewicht250 g
“Made for iPod,” “Made for iPhone,” and “Made for iPad”
mean that an electronic accessory has been designed to
connect specically to iPod, iPhone, or iPad, respectively,
and has been certied by the developer to meet Apple
performance standards. Apple is not responsible for the
operation of this device or its compliance with safety and
regulatory standards. Please note that the use of this
accessory with iPod, iPhone, or iPad may affect wireless
performance.
Apple is a registered trademark of Apple Inc., registered in
the US and other countries.
iPad, iPhone, iPod, iPod classic, iPod nano, iPod shufe,
and iPod touch are trademarks of Apple Inc., registered in
the U.S. and other countries.
The remote and mic are supported only by iPod nano (4th
generation and later), iPod classic (120/160GB), iPod touch
(2nd generation and later), iPhone 3GS and later, and iPad.
The remote is supported by iPod shufe (3rd generation
and later). Audio is supported by all iPod models.
nリモコン対応Apple製品 /
Apple products with remote control support /
Apple Produkte mit Fernbedienungsmöglichkeit /
Produits Apple avec prise en charge de la
télécommande /
Prodotti Apple con telecomando compatibile con
dispositivi esterni /
Productos Apple compatibles con el uso de mando
a distancia /
Apple-producten met ondersteuning voor
afstandsbediening /
Apple-produkter med stöd för fjärrkontroll /
Продукция компании Apple с поддержкой
функции дистанционного управления /
Produkty Apple ze zdalnym sterowaniem /
Apple产品支持遥控功能 /
受遙控器支援的Apple產品/
ご使用になる前に
本製品をお買い上げいただき、ありがとうございます。使用前に別紙
「ヘッドホンの取り扱い上のご注意と保証について」をお読みくださ
い。
付属品を確認する
q取扱説明書(本紙)........................................................................1
wヘッドホンの取り扱い上のご注意と保証について......................1
eオーディオケーブル(約1.3m)....................................................1
r変換プラグ........................................................................................1
tキャリングポーチ............................................................................1
y保証書................................................................................................1
u製品のご相談と修理・サービス窓口のご案内..............................1
各部の名前(A)v
q
コントロールホイール
リモコン対応Apple製品を操作します。
w通話用マイク
eステレオミニジャック
付属のオーディオケーブルの差し込み口です。
rL/R表示
準備する
接続する
付属のオーディオケーブルで、ヘッドホンのステレオミニジャックとオ
ーディオ機器のヘッドホン端子を接続します。
ご注意
付属のオーディオケーブルを、最初にヘッドホンのステレオミニジ
ャックへ接続してください。
オーディオ機器のヘッドホン端子が標準プラグタイプの場合は、付
属の変換プラグをお使いください。
ヘッドホンを装着する
ハンガーの刻印を確認して、“L”を左耳に、“R”を右耳に装着し
てください。
スライダーをお好みの長さに調節して装着します。
ご注意
•別紙「ヘッドホンの取り扱い上のご注意と保証について」をお読
みください。
•可動部で指などを挟まないようご注意ください。
•スライダーを無理に引っ張らないでください。
操作する
Apple
®
製品を操作する
ヘッドホンを付属のオーディオケーブルでApple製品に接続すると、
右側のヘッドホンのコントロールホイールで再生の操作や音量の調節
ができます。
ご注意
•このヘッドホンでApple製品以外を操作することはできません。
•付属のオーディオケーブルはApple製品のコントロール対応ケーブ
ルです。それ以外のケーブルを使うとApple製品のコントロールは
できません。
•最新のAppleソフトウェアをご使用ください。
•すべての動作はApple純正リモコンに準じます。
•本機のリモコンとマイクをお使いいただけるのは、
iPodnano(第4世代以上)、iPodclassic(120/160GB)、
iPodtouch(第2世代以上)、iPhone3GS以降、iPadです。
•本機のリモコンはiPodshue(第3世代以上)でもお使いいただ
けます。
•すべてのiPodモデルでオーディオ再生ができます。
コントロー
ルホイール
(
v
B
)
機能操作
q
音量を上げる回す
w
曲またはビデオを再生/一時停止する
電話に出る/電話を切る
かかってきた電話または保留中の電話に切り替
え、現在の通話を保留にする
次の曲またはチャプターに移動する
前の曲またはチャプターに移動する
早送り
巻き戻し
VoiceOver
かかってきた電話を拒否する
かかってきた電話または保留中の電話に切り替
え、現在の通話を切る
e
音量を下げる回す
1回押す
1回長押し(2秒以上)
コントロールホイールを回すと、通話相手の声の音量を調節できます。
情報
主な仕様
ドライバー形式ダイナミック型
ドライバーサイズφ40mm
感度108dB/mW
インピーダンス16Ω
再生周波数6~37,000Hz
最大入力1300mW
質量250g
Introduction
Nous vous remercions d’avoir acheté un casque Denon Urban
Raver™. Veuillez lire attentivement ce manuel ainsi que les annexes
“Guide de référence rapide” et “Précautions d’utilisation” avant
d’utiliser votre casque.
Accessoires
qManuel de l’Utilisateur (ce document)1 ........................................
wPrécautions à prendre pour l’utilisation du casque audio1 ..........
eCâble audio (longueur : 1,3 m environ)1 .......................................
rPrise adaptateur ..........................................................................1
tBoîtier de rangement1 ..................................................................
Fonctions (A)v
qMolette
Commande les produits Apple prenant en charge la télécommande.
wMicro d’appel
eMini-prise stéréo
Connecteur pour le câble audio fourni.
rIndications L/R (gauche/droite)
Préparation du casque
Connexion du casque à votre périphérique audio
Utilisez le câble audio fourni pour brancher la mini-prise stéréo du
casque au port casque de votre appareil audio.
REMARQUE
Branchez d’abord le câble audio inclus à la mini-prise stéréo du casque.
Utilisez l’adaptateur plaqué or ¼ po (fourni) si le port casque de votre
appareil audio le requiert.
Ajustement du casque
Vériez les indications sur chaque écouteur du casque pour les faire
correspondre à votre oreille gauche (“L”) et à votre oreille droite (“R”).
Réglez la longueur de la partie coulissante pour que le casque tienne
bien sur votre tête.
REMARQUE
•Veuillez lire l’annexe “Précautions d’utilisation”.
•Faites attention de ne pas coincer vos doigts ou d’autres parties de
votre corps dans les éléments mobiles du produit.
•Ne forcez pas les parties coulissantes.
Utilisation du casque
Utilisation de produits Apple
®
Lorsque le casque est branché à votre produit Apple à l’aide du câble
audio fourni, vous pouvez utiliser la molette de l’écouteur droit pour
en commander la lecture et régler le volume.
REMARQUE
•Le casque ne peut pas faire fonctionner des produits autres que Apple.
•Le câble audio fourni est compatible avec la commande des produits
Apple. La commande des produits Apple peut ne pas être disponible
lorsqu’un autre câble est utilisé.
•Utilisez le dernier logiciel Apple.
•Toutes les opérations sont conformes à la télécommande authentique
Apple.
•Vous pouvez utiliser la télécommande et le microphone du casque
pour les iPod nano (4e génération ou ultérieure), iPod classic
(120/160 Go), iPod touch (2e génération ou ultérieure), iPhone 3GS
et les versions ultérieures, et iPad.
•Vous pouvez également utiliser la télécommande du casque pour
les iPod shufe (3e génération ou ultérieure).
•La lecture audio est disponible pour tous les modèles iPod.
Molette de
commande
()vB
Fonction
Utilisation
des touches
q
Augmenter le volumeTourner
w
Lire ou interrompre la lecture d’un
morceau ou d’une vidéo
Répondre ou mettre n à un appel
Basculer sur un appel entrant ou en
attente et mettre en attente l’appel
en cours
Passer au morceau ou au chapitre
suivant
Passer au morceau ou au chapitre
précédent
Avance rapide
Retour rapide
Voice Over
Refuser un appel entrant
Basculer sur un appel entrant ou en
attente et mettre n à l’appel en cours
e
Baisser le volumeTourner
Appui bref sur la touche
Appui long sur la touche (au moins 2 secondes)
Tournez la molette pour régler le volume de la voix de votre
correspondant.
Informations supplémentaires
Spécications du produit
Type de circuit d’attaqueType dynamique
Taille de circuit d’attaqueØ 40 mm
Sensibilité108 dB/mW
Impédance en entrée16 Ω
Fréquence de lecture6 à 37 000 Hz
Niveau maximal
d‘entrée maximal
1 300 mW
Poids250 g
Guida introduttiva
Grazie per aver acquistato la cufa Denon Urban Raver™. Per un utilizzo
corretto della cufa, leggere il presente manuale, nonché la “Guida
rapida” e il documento allegato “Precauzioni sull’uso della cufa”.
Accessori
qManuale delle istruzioni (Questo documento)1 ............................
wPrecauzioni sull’uso delle cuf e.................................................1
eCavo audio (lunghezza: circa 1,3 m)1 ...........................................
rSpinotto adattatore .....................................................................1
tSupporto dei ricevitori1 .................................................................
Funzioni (A)v
qRotella di controllo
Consente di controllare i prodotti Apple che supportano il telecomando.
wMicrofono per chiamate
ePresa mini stereo
Connettore per il cavo audio incluso.
rIndicazione L/R
Preparazione della cufa
Collegamento della cufa al dispositivo audio
Utilizzare il cavo audio incluso per collegare la presa mini stereo della
cufa alla porta cufa del dispositivo audio.
NOTA
Collegare innanzitutto il cavo audio incluso alla presa mini stereo della
cufa.
Utilizzare la presa adattatore da 1/4” placcata in oro (inclusa), se
richiesto per la porta cufa del dispositivo audio.
Regolazione della cufa
Vericare le marcature sinistra/destra sulle cufe, quindi sistemare
quella contrassegnata con la lettera “L” sull’orecchio sinistro e quella
contrassegnata con la lettera “R” sull’orecchio destro.
Regolare la lunghezza del cursore di scorrimento per adattarlo alla
testa quando si indossa la cufa.
NOTA
•Leggere il documento allegato “Precauzioni sull’uso della cufa”.
•Prestare attenzione a evitare che le dita o altre parti del corpo
rimangano incastrate nelle parti in movimento del prodotto.
•Non tirare i cursori con forza eccessiva.
Uso della cufa
Uso dei prodotti Apple
®
Quando si collega la cufa al prodotto Apple utilizzando il cavo audio
incluso, è possibile utilizzare la rotella di controllo sulla cufa destra
per eseguire operazioni di riproduzione e regolare il volume.
NOTA
•È possibile utilizzare la cufa per controllare il funzionamento dei
soli prodotti Apple e non di altri dispositivi.
•Il cavo audio incluso è compatibile con la funzione di controllo dei
prodotti Apple. La funzione di controllo dei prodotti Apple potrebbe
non essere disponibile quando si usa un cavo diverso.
•Utilizzare la versione più recente del software Apple.
•Tutte le operazioni sono conformi al telecomando originale Apple.
•È possibile utilizzare il telecomando e il microfono della cufa per iPod
nano (quarta generazione o successiva), iPod classic (120/160 GB),
iPod touch (seconda generazione o successiva), iPhone 3GS e
successiva, e iPad.
•È inoltre possibile utilizzare il telecomando della cufa per iPod
shufe (terza generazione o successiva).
•La riproduzione audio è disponibile per tutti i modelli di iPod.
Rotella di
controllo
()vB
Funzione
Funzionamento
pulsante
q
Aumentare il volumeRuotare
w
Riprodurre o mettere in pausa un
brano
Rispondere o terminare una chiamata
Passare a un’altra chiamata in entrata
o in attesa mettendo quella attuale
in attesa
Passare al brano o al capitolo
successivo
Tornare al brano o al capitolo
precedente
Avanzamento veloce
Riavvolgimento veloce
Voice Over
Riutare una chiamata
Passare a un’altra chiamata in entrata
o in attesa terminando quella attuale
e
Diminuire il volumeRuotare
Premere brevemente il pulsante
Premere a lungo il pulsante (almeno 2 secondi)
Ruotare la rotella di controllo per regolare il livello del volume della
voce dell’interlocutore.
Ulteriori informazioni
Speciche del prodotto
Tipo di driverTipo dinamico
Dimensione driverØ 40 mm
Sensibilità108 dB/mW
Impedenza in ingresso16 Ω
Frequenza di riproduzioneDa 6 a 37 000 Hz
Ingresso massimo1 300 mW
Peso250 g
Primeros pasos
Gracias por adquirir los auriculares Denon Urban Raver™. Lea
atentamente este manual así como la documentación de la “Quick
Guide” y las “Precautions on the use of headphones” adjuntas
primero para utilizar los auriculares adecuadamente.
Accesorios
qManual del usuario (este documento)1 ........................................
wPrecauciones durante el uso de los auriculares1 .........................
eCable de audio (longitud: aprox. 1,3 m)......................................1
rClavija del adaptador1 ...................................................................
tEstuche .......................................................................................1
Funciones (A)v
qRueda de control
Controla los productos Apple con la ayuda del mando a distancia.
wMicrófono de llamada
eMini conector estéreo
Conector para el cable de audio incluido.
rIndicación L/R
Preparación de los auriculares
Conexión de los auriculares al dispositivo de audio
Utilice el cable de audio incluido para conectar el mini conector estéreo
en los auriculares y el puerto de los auriculares en su dispositivo de
audio.
NOTA
Primero conecte el cable de audio incluido en el mini conector estéreo
de los auriculares.
Utilice un conector adaptador chapado en oro de 1/4” (incluido) si el
puerto de los auriculares de su dispositivo de audio precisa ese tamaño.
Ajuste de los auriculares
Compruebe las marcas de posición y coloque “L” en el oído izquierdo
y “R” en el oído derecho.
Ajuste la longitud del deslizador para adaptarlo a su cabeza cuando
lleve puestos los auriculares.
NOTA
•Lea la documentación “Precautions on the use of headphones”
adjunta.
•Evite que sus dedos u otras partes del cuerpo queden atrapados en
las partes móviles del producto.
•No tire con fuerza de los deslizadores.
Uso de los auriculares
Control de productos Apple
®
Con los auriculares conectados a su producto Apple con el cable de
audio incluido, puede utilizar la rueda de control del auricular derecho
para realizar operaciones de reproducción y para ajustar el volumen.
NOTA
•Los auriculares no pueden controlar dispositivos que no sean
productos Apple.
•El cable de audio incluido es un cable compatible con el control del
producto Apple. Es posible que el control del producto Apple no
esté disponible si se utiliza un cable distinto.
•Utilice el software de Apple más reciente.
•Todas las operaciones son compatibles con el mando a distancia
original de Apple.
•Puede utilizar el mando a distancia y el micrófono de los auriculares
para el iPod nano (cuarta generación y posteriores), iPod classic
(120/160 GB), iPod touch (segunda generación y posteriores),
iPhone 3GS y posterior, y iPad.
•También puede utilizar el mando a distancia de los auriculares para
el iPod shufe (tercera generación y posteriores).
•La reproducción de audio está disponible para todos los modelos
de iPod.
Rueda de
control
()vB
Función
Uso del
botón
q
Aumentar el volumenGirar
w
Reproducir o poner en pausa una
canción o vídeo
Responder o nalizar una llamada
Cambiar a una llamada entrante o
en espera y poner la llamada actual
en espera
Saltar a la siguiente canción o capítulo
Ir a la canción o capítulo anterior
Avance rápido
Retroceso rápido
Voice Over
Rechazar una llamada
Cambiar a una llamada entrante o en
espera y nalizar la llamada actual
e
Disminuir el volumenGirar
Pulsación breve del botón
Pulsación larga del botón (2 segundos o más)
Gire la rueda de control para ajustar el nivel del volumen de la voz
del interlocutor.
Información adicional
Especicaciones del producto
Tipo de controladorTipo dinámico
Tamaño del controladorØ 40 mm
Sensibilidad108 dB/mW
Impedancia de entrada16 Ω
Frecuencia de reproducción6 a 37 000 Hz
Entrada máxima1 300 mW
Peso250 g
③④⑤
A
q
r
w
e
q
w
e
コントロールホイール /
Control wheel /
Steuerrad /
Molette de commande /
Rotella di controllo /
Rueda de control
B
Specyfikacje produktu
| Marka: | Denon |
| Kategoria: | zestaw słuchawkowy |
| Model: | Urban Raver AH-D320 |
Potrzebujesz pomocy?
Jeśli potrzebujesz pomocy z Denon Urban Raver AH-D320, zadaj pytanie poniżej, a inni użytkownicy Ci odpowiedzą
Instrukcje zestaw słuchawkowy Denon

29 Grudnia 2024
14 Sierpnia 2024
Instrukcje zestaw słuchawkowy
Najnowsze instrukcje dla zestaw słuchawkowy
9 Kwietnia 2025
8 Kwietnia 2025
30 Marca 2025
30 Marca 2025
28 Marca 2025
27 Marca 2025
26 Marca 2025
9 Marca 2025
2 Marca 2025
25 Lutego 2025