Instrukcja obsługi Easy Camp Carnival Funster
Przeczytaj poniżej 📖 instrukcję obsługi w języku polskim dla Easy Camp Carnival Funster (2 stron) w kategorii namiot. Ta instrukcja była pomocna dla 9 osób i została oceniona przez 2 użytkowników na średnio 5.0 gwiazdek
Strona 1/2
EASYCAMP.COM
FUNSTER BLACK & WHITE
Scan for video
NL
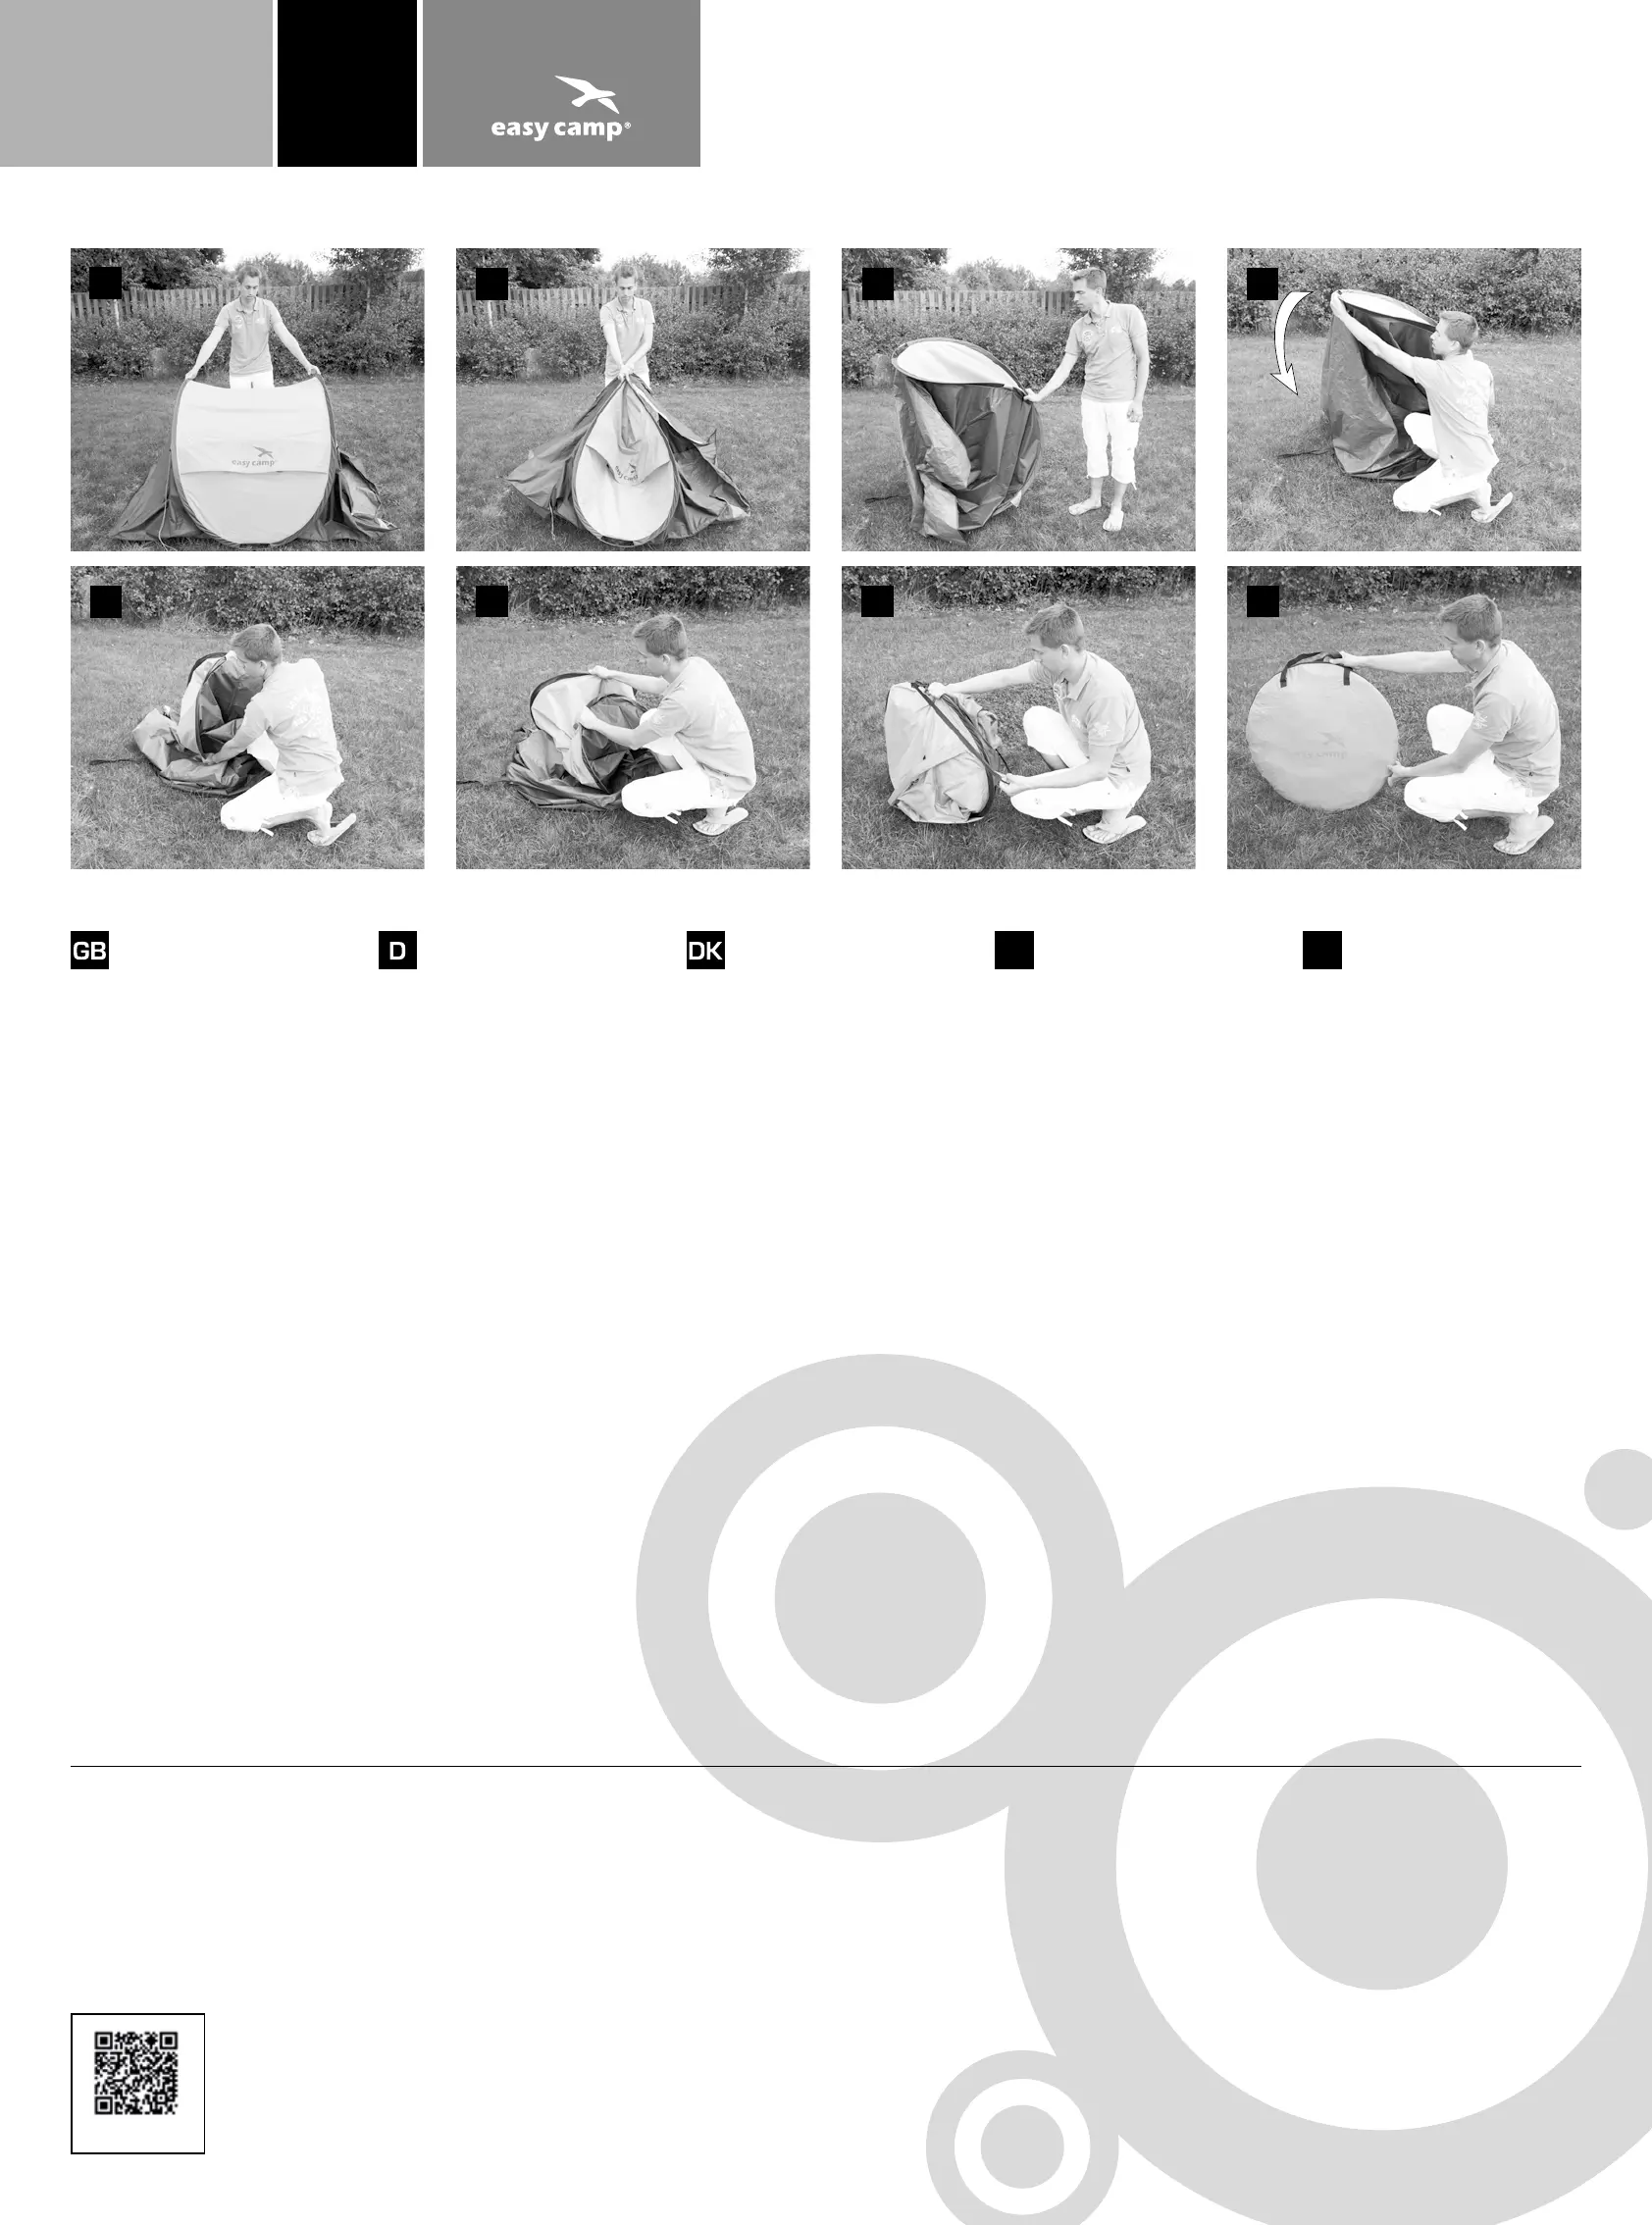
PACKING INSTRUCTIONS
Make sure that the door is not completely
closed in order for the air to get out.
1. Gather all the arches/poles together.
2. Hold the centre of the arches/poles
while gathering them.
3. Keep a rm grip on the centre of the
arches/poles. Lift the tent into an up-
right position with the elastic cord to-
wards the ground.
4. Grip the top of the tent with your other
hand and press the arches downwards
and inwards (without twisting them).
5. The tent will then form two rings.
6. Place the one ring on top of the other.
The two rings become as one.
7. Lift the ring into an upright position.
Secure the elastic cord around the ring
to prevent the tent from popping up
again.
8.
Slide the tent into the carrybag.
ABBAUANLEITUNG
Vergewissern Sie sich, dass der Eingang
nicht vollständig geschlossen ist, so dass
die Luft rauskommen kann.
1. Alle Bogen/Stangen zusammenfassen.
2. Dabei die Bogen/Stangen in der Mitte
fest-halten.
3. Den Gri in der Mitte nicht lockern. Das
Zelt hochkant stellen. Das Gummi seil
muss zur Erde weisen.
4. Mit der anderen Hand das Zeltdach
erfassen, und den Bogen abwärts/ein-
wärts drücken (nicht verwinden!).
5. Das Zelt teilt sich nun in zwei Ringe.
6. Den einen Ring über den anderen legen.
Die beiden Ringe werden nun zu einem
Ring.
7. Den Ring auf hochkant stellen. Das
Gummiseil so um den Ring legen, dass
sich das Zelt nicht wieder entfaltet.
8. Schieben Sie das gefaltete Zelt in den
Packbeutel.
SAMMENPAKNING
Luk ikke teltdøren helt i, så luften kan komme
ud af teltet.
1. Saml alle buerne/stængerne.
2. Hold fast på midten af buerne/
stængerne, mens du samler dem.
3. Fasthold grebet på midten af buerne/
stængerne. Rejs teltet op på højkant.
Elastiksnoren skal vende ned mod jor-
den.
4. Grib fat i toppen af teltet med den anden
hånd og pres buen ned/ind (ingen vrid-
ning).
5. Teltet deler sig nu i to ringe.
6. Læg den ene ring over den anden.
De to ringe bliver nu til en ring.
7. Rejs nu ringen op på højkant.
Elastiksnoren monteres om ringen, så
teltet ikke popper op igen.
8. Pak teltet ned i bæretasken.
AFBREEKINSTRUCTIES
Zorg dat de tent niet helemaal dicht is, zodat
er lucht uit kan ontsnappen.
1. Verzamel alle bogen/stokken bij elkaar.
2. Pak de bogen/stokken in het midden
vast tijdens het verzamelen.
3. Houd de bogen/stokken stevig in het
midden vast. Til de tent met één hand
overeind, met het elastieken koord naar
beneden.
4. Pak de top van de tent vast met de an-
dere hand en druk de bogen omlaag en
naar binnen (zonder ze te wringen).
5. De tent vormt dan twee ringen.
6. Leg de ringen op elkaar.
De twee ringen zien er nu uit als één ring
7. Zet deze ring overeind.
Maak het elastieken koord om de ring
heen vast zodat de tent niet uit zichzelf
weer openspringt.
8. Schuif de tent in de draagtas.
CONSIGNES DE DEPLOIEMENT
Assurez-vous que la porte n’est pas com-
plètement fermée an de laisser l’air sortir.
1. Rassemblez tous les arceaux/mâts.
2. Tenir le centre des arceaux/mâts tandis
que vous les rassemblez.
3. Maintenez fermement le centre des
arceaux/mâts. Relevez la tente jusqu’à
une position verticale grâce au cordon
élastique vers le sol.
4. En même temps, saisir le sommet de
la tente par l’autre main, et poussez
les arceaux par-dessous vers le bas et
l’intérieur (mais sans les tordre).
5. La tente va alors former deux cercles.
6. Placez l’un des cercles par-dessus
l’autre.
Les deux cercles ne font plus qu’un
7. Relevez le cercle jusqu’à une position
verticale.
Maîtrisez le cordon élastique autour du
cercle pour éviter que la tente se déploie
à nouveau.
8. Placez la tente dans son sac de
transport.
FR
876
432
1
5
Easy Camp
®
is a reg. trademark of Oase Outdoors ApS, Denmark, © 09/2013 Oase Outdoors ApS
Please turn over for more info and tips on
maintenance.
Weitere Informationen über Reinigung
und Pege nden Sie auf der Rückseite.
Se yderligere oplysninger og tips til
vedligeholdelse på bagsiden.
Retournez la présente pour lire des ren-
seignements supplémentaires et des con-
seils d’entretien.
Zie de achterzijde voor meer informatie
en tips over onderhoud.
Specyfikacje produktu
| Marka: | Easy Camp |
| Kategoria: | namiot |
| Model: | Carnival Funster |
Potrzebujesz pomocy?
Jeśli potrzebujesz pomocy z Easy Camp Carnival Funster, zadaj pytanie poniżej, a inni użytkownicy Ci odpowiedzą
Instrukcje namiot Easy Camp

23 Września 2024
22 Września 2024
22 Września 2024
22 Września 2024
22 Września 2024
22 Września 2024
22 Września 2024
22 Września 2024
22 Września 2024
22 Września 2024
Instrukcje namiot
Najnowsze instrukcje dla namiot
31 Marca 2025
30 Marca 2025
29 Marca 2025
29 Marca 2025
29 Marca 2025
29 Marca 2025
29 Marca 2025
29 Marca 2025
29 Marca 2025
28 Marca 2025