Instrukcja obsługi Foscam FN3109H
Foscam magnetowid FN3109H
Przeczytaj poniżej 📖 instrukcję obsługi w języku polskim dla Foscam FN3109H (3 stron) w kategorii magnetowid. Ta instrukcja była pomocna dla 27 osób i została oceniona przez 3 użytkowników na średnio 4.6 gwiazdek
Strona 1/3
5467
1 23
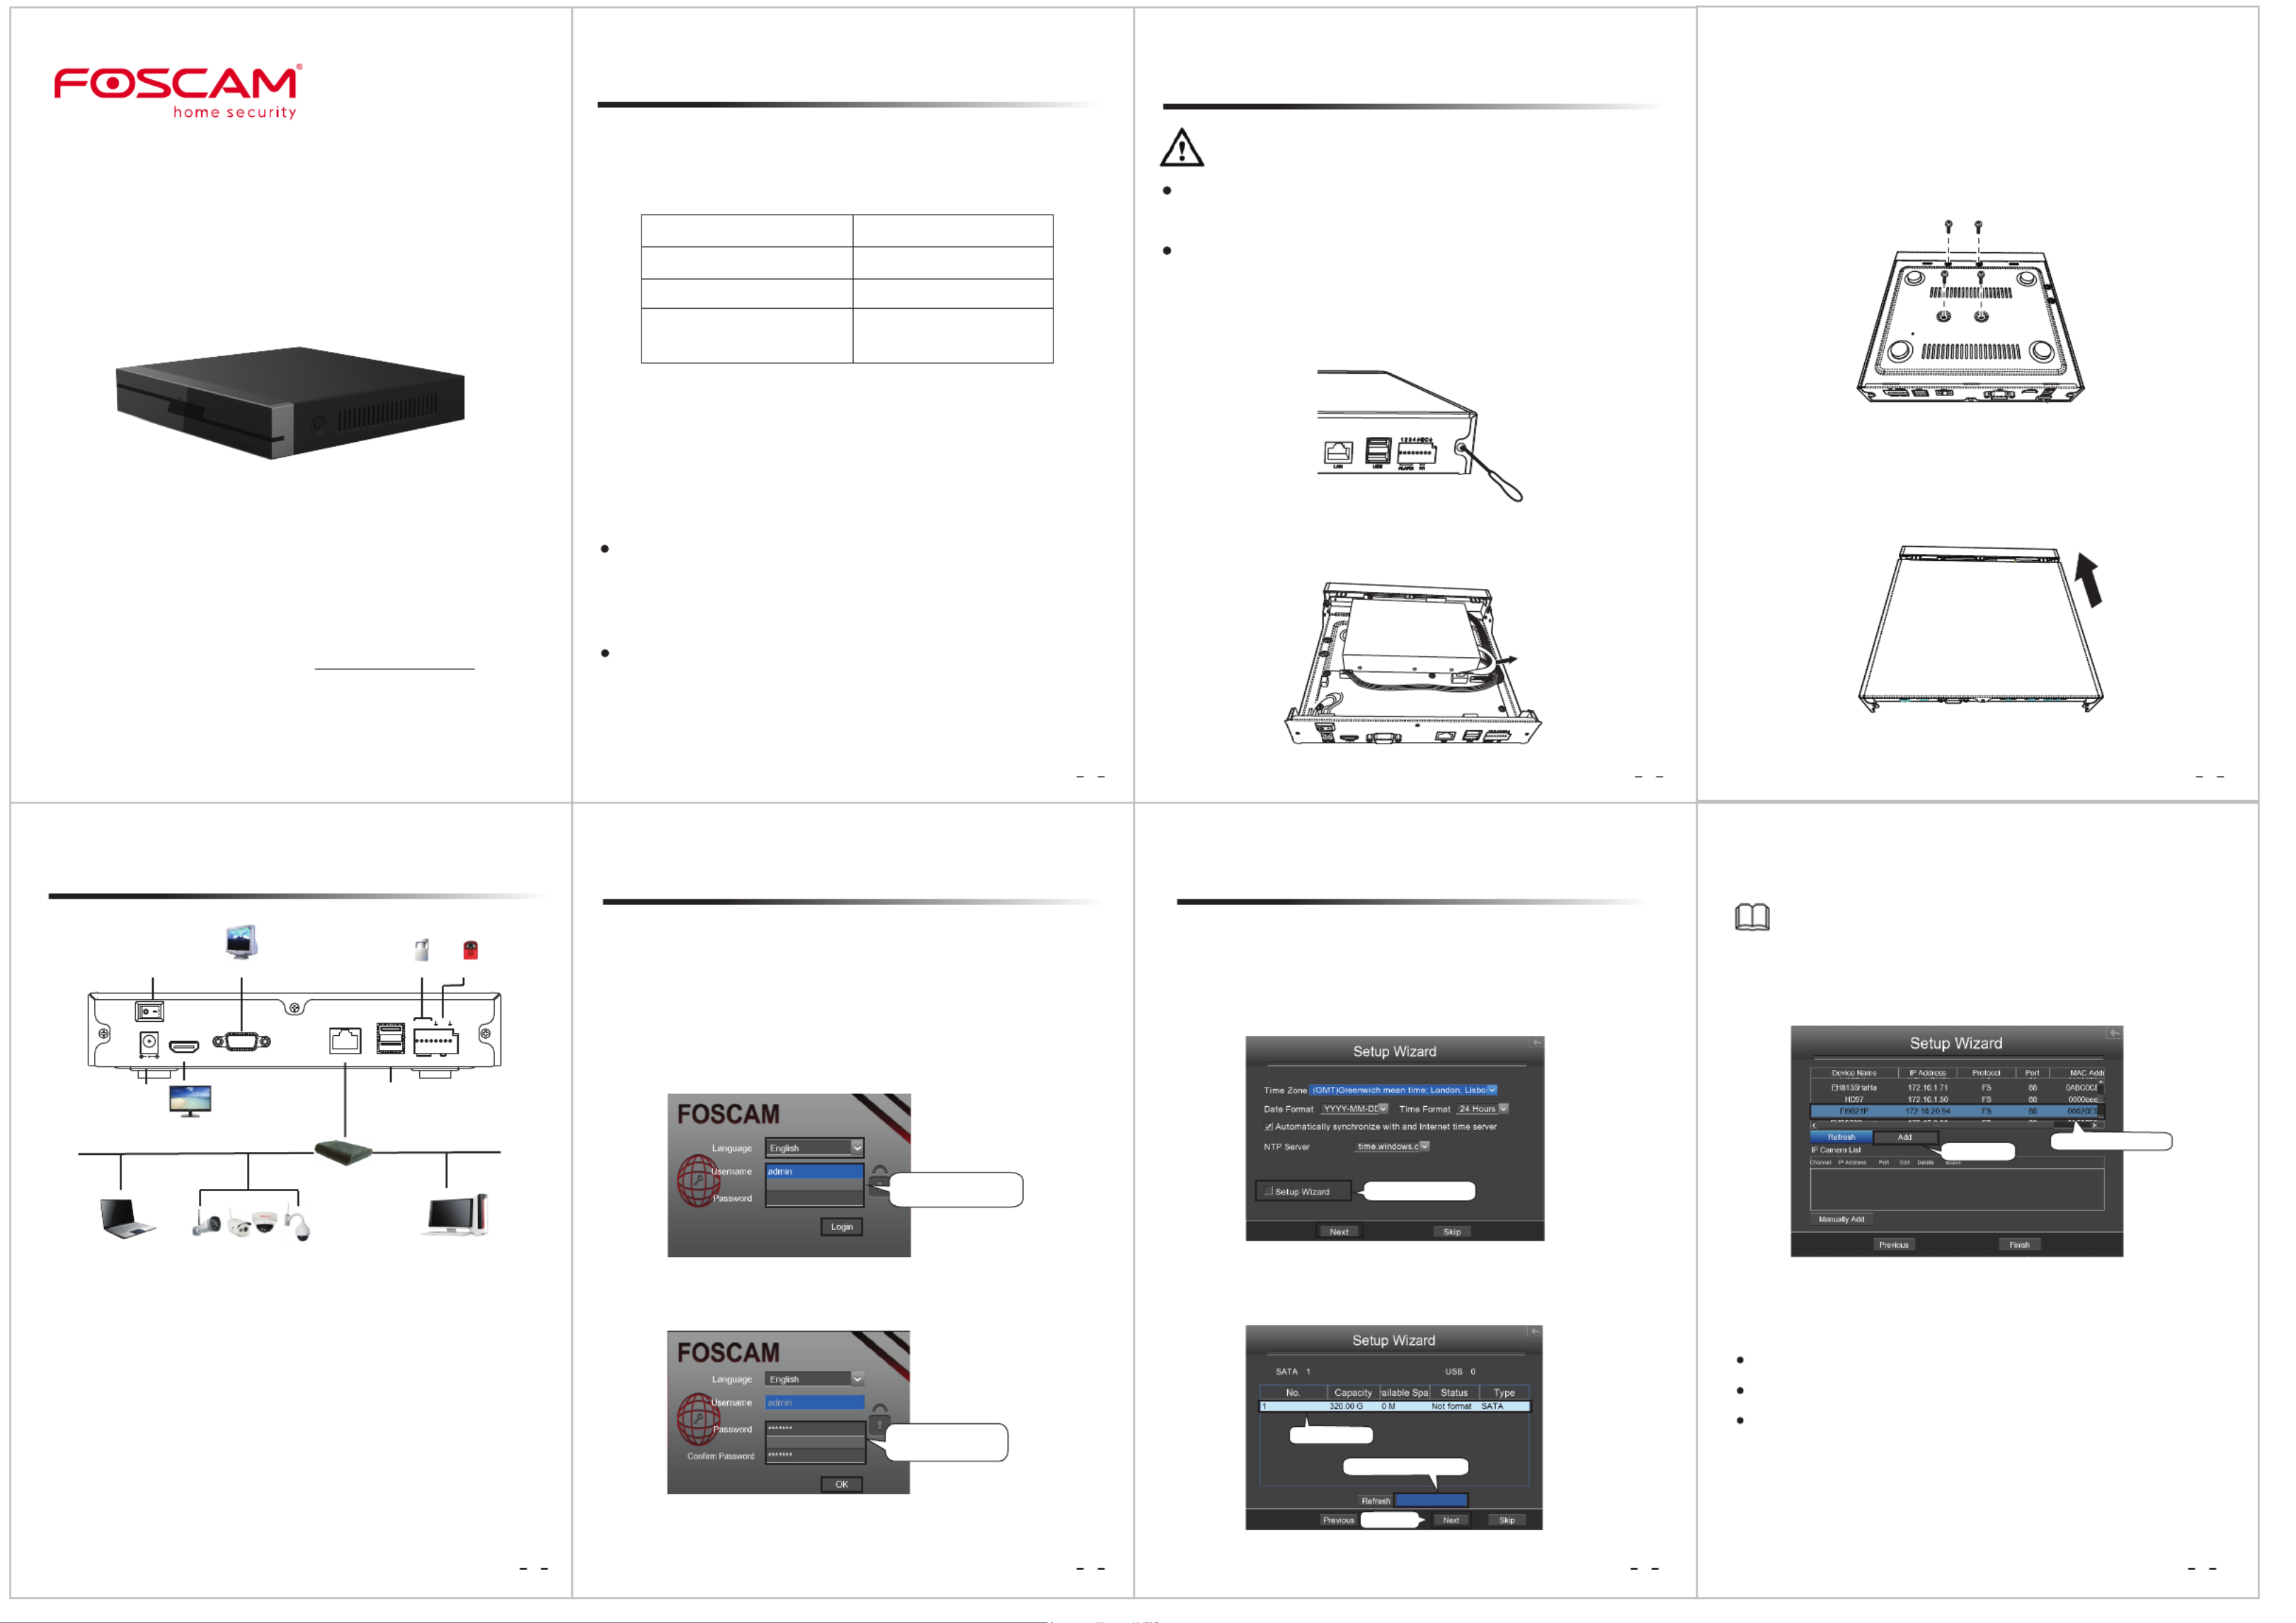
Quick Installation Guide
Network Video Recorder
Model: FN3109H / FN3104H
V1.5.5
WARNING
Before installing a hard disk drive (HDD), please make sure the power
is disconnected from the NVR.
It is recommended that a hard drive be used in 7200 high-speed or
above.
Power cable
HDD
Data cable
It is recommended to use SATA type of hard disk for recording.
Note
1. Remove the cover from the NVR by unfastening the screws on the
rear and side.
2. Connect one end of the data cable and power cable to the
motherboard of NVR and the other end to the HDD.
3. Place the HDD on the bottom of the device and then fasten the
screws on the bottom to x the HDD.
4. Re-install the cover of the NVR and fasten screws.
Internet usersIP Camera
Power Switch
Power Supply
HD-OUT Video Output
VGA Video Output
USB Interfaces
DC 12V
POWER
HD-OUT VGALANUSB ALARM N1
1 2 3 4NOC
Alarm INAlarm OUT
Router
Internet users
Procedure
1. Connect your display to one of the video outputs (VGA or HD-OUT
interface).
2. Connect an external storage device to the USB interface of the NVR as
a backup.
3. Connect a mouse to the USB interface.
4. Connect an alarm input device to alarm input interface and connect
an alarm output device to alarm output interface respectively.
5. Some devices need to connect to your router using an Ethernet cable,
including the NVR, PC and IP Camera.
6. Connect the power adapter to the power input port.
Foscam cameras and NVRs require good security practices to
safeguard your privacy. You should regularly change your
camera or NVR password which is the combination of
numbers, letters and symbols.
You should update your camera or NVR regularly. Make sure
your camera or NVR has the latest rmware installed for your
specic model and better experience.
NVR
Screw Pack
DC Power Adapter
Ethernet Cable
Data Wire and Power Wire
of the Hard Drives
Quick Installation Guide
Warranty Card
USB Mouse
1. Turn on the power switch on the rear panel.
After the NVR starts up successfully, the power LED and HDD LED
indicators will turn green. The startup page is displayed on the screen.
2. Login page.
Select the Language, Enter the and , then click Username Password
on the button.Login
Default username is
admin with no password
Package Contents
Security Warning
1Before You Start2Hard Disk Installation
3. For the initial log in, the system will prompt you to change your
password. Once done, click the button. OK
4. After modifying the password, you will be taken to the Setup
Wizard.
1. Setting the time. If you don’t want to use the Setup Wizard next
time, uncheck the checkbox. Click the button.Setup WizardNext
2. Select the HDD you would like to use, then click the Format Hard
Disk button to set up the HDD. Note that this will delete all les on
the HDD.
Select a protocol depending on which IP Camera you have.
FOSCAM protocol: The High Denition (HD) IP Cameras for Foscam.
MJ protocol: The Standard Denition (SD) IP Cameras for Foscam.
ONVIF protocol: IP Cameras which support ONVIF protocol.
3. You can add an IP Camera that is connected to the internet on the
NVR.
You can congure the following information for your IP Camera.
The Setup Wizard can walk you through some important settings on
the NVR.
1. Select Your IP Camera
2. Click Add
3Device Connection45 Log InSetup Wizard
Input a new password,
then click OK.
Uncheck the checkbox
2. Click Format Hard Disk
3. Click Next
1. Select your HDD
Format Hard Disk
For detailed manuals, tools, etc., please visit foscam.com/downloads.
Specyfikacje produktu
| Marka: | Foscam |
| Kategoria: | magnetowid |
| Model: | FN3109H |
| Wysokość produktu: | 40 mm |
| Szerokość produktu: | 209 mm |
| Głębokość produktu: | 220 mm |
| Gniazdko wyjścia DC: | Tak |
| Zasilacz sieciowy: | Tak |
| Obsługiwane systemy operacyjne Mac: | Tak |
| Prędkość transferu danych przez Ethernet LAN: | 10, 100 Mbit/s |
| Ilość portów Ethernet LAN (RJ-45): | 1 |
| Napięcie operacyjne: | 5 V |
| Zakres temperatur (eksploatacja): | -10 - 55 °C |
| Zakres wilgotności względnej: | 20 - 85 % |
| Obsługiwane formaty plików wideo: | H.264, M-JPEG |
| Przewody: | LAN (RJ-45), SATA |
| Liczba portów USB 2.0: | 2 |
| Pobór mocy: | 12 W |
| Zakres temperatur (przechowywanie): | 0 - 90 °C |
| Instrukcja szybkiej instalacji: | Tak |
| Prąd wyjściowy: | 2 A |
| Liczba obsługiwanych HDD: | 1 |
| Maks. rozdzielczość: | 1920 x 1080 px |
| Rozdzielczość statycznego obrazu: | 1920 x 1080/60Hz, 1280 x 720/60Hz, 1440 x 900/60Hz, 1024 x 768/60Hz |
| Format kompresji zdjęć: | MJPEG |
| Tryb odtwarzania: | Forward, Reverse |
| Obsługiwane przeglądarki: | Microsoft IE8, Firefox, Safari |
| Rozmiar HDD: | 3.5 " |
| PTZ: | Tak |
| Interfejs HDD: | SATA |
| Maksymalna pojemność przchowywania: | 4 TB |
| Tryb nagrywania: | Manual, Schedule |
| Wejścia kanałów wideo: | 9 kan. |
| Wyjście HDMI: | Tak |
| Wyjścia VGA (D-Sub): | 1 |
| Kanały wejścia alarmu: | 4 |
| Kanały wyjścia alarmu: | 1 |
Potrzebujesz pomocy?
Jeśli potrzebujesz pomocy z Foscam FN3109H, zadaj pytanie poniżej, a inni użytkownicy Ci odpowiedzą
Instrukcje magnetowid Foscam

16 Września 2024
29 Sierpnia 2024
27 Sierpnia 2024
Instrukcje magnetowid
Najnowsze instrukcje dla magnetowid
9 Kwietnia 2025
9 Kwietnia 2025
9 Kwietnia 2025
8 Kwietnia 2025
7 Kwietnia 2025
7 Kwietnia 2025
7 Kwietnia 2025
6 Kwietnia 2025
6 Kwietnia 2025
6 Kwietnia 2025