Instrukcja obsługi Geemarc Wake’n’Shake STAR
Geemarc budzik radiowy Wake’n’Shake STAR
Przeczytaj poniżej 📖 instrukcję obsługi w języku polskim dla Geemarc Wake’n’Shake STAR (4 stron) w kategorii budzik radiowy. Ta instrukcja była pomocna dla 40 osób i została oceniona przez 6 użytkowników na średnio 4.4 gwiazdek
Strona 1/4
1234
USER GUIDE
!!! Please refer to our website: www.geemarc.com for an up to date user guide, as
there may be important updates and changes you need to be aware of !!!
BACKUP BATTERY INSTALLATION
Your clock requires one CR2032 lithium battery (not included) to provide backup power to
the clock in the event of a temporary power interruption. Place your unit face down on a flat
surface.
1. Use coins and turn counterclockwise to open the battery door located on the back of the unit.
2. Insert one new CR2032 lithium battery into the battery compartment with the “+” side
facing up as indicated.
3. Place the battery door on the battery compartment, use coins and turn clockwise to lock
the battery door.
It is not necessary to insert a back-up batteryfor the clock to function; however, fitting the
backup battery will keep the time and alarm settings in the event of a power cut or the DC
adaptor being unplugged.
If mains power is interrupted or the adapter is unplugged, the LED clock display will
go off and the alarm will not function.
Please replace the battery every year to ensure that your device is not damaged.
INSTALLATION
Plug the AC/DC adaptor to an AC household outlet, and then plug the DC jack to the back
of the unit. Your clock is ready to work for you.
TO SET TIME AND THE SNOOZE DURATION
1. Press SET once, the hour digits “0” flash. Press or to set the time in hours (hold
to advance rapidly).
2. Press SET again, the minute digits “00” flash. Press
or to set the time in minutes.
(hold to advance rapidly).
3. Press SET again, the display shows “24Hr” and flashes. Press
or to select “12Hr”
or “24Hr” time format. If “12Hr” is selected, the AM will appear on the upper left to
indicate the morning time and PM will appear on the upper right to indicate the afternoon.
4. Press SET again, the display shows “05” and flashes. Press
or to select your
snooze time from 5 to 60 minutes.
5. Press SET again or if no key pressed for approx. 10 seconds to exit the setting mode.
TO SET THE ALARM
1. Press and hold AL SET / SELECT, AL appear and the alarm’s hour digits flash. Press
or to set the alarm in hours. (Hold or to advance rapidly).
2. Press AL SET / SELECT once again, the minute digits flash. Press
or to set the
alarm in minutes. (Hold
or to advance rapidly).
3. Press AL SET / SELECT again, LED displays “HI” (vibration at HI level), press
or
to select “LO” (vibration at Lo level)
4. Press AL SET / SELECT once again, LED displays “F-1 (ex. 800 Hz)” and flash, press
or to select the alarm tone (frequency) :
F-1 (low tone, 800 Hz), F-2 (mid tone, 1 KHz), F-3 (high tone, 1.5 KHz)
5. Press AL SET / SELECT again, LED displays “L1” ( for the Low ringer level), press
or
to select “L3” (for the high ringer level)
6. Press AL SET / SELECT once again or no button around 10 seconds to exit the alarm
setting mode.
TO TURN ON/OFF AND SELECT THE ALARM MODE
1. At normal time display mode, press AL SET / SELECT one at a time to activate the
alarm(s) and turn on corresponding alarm indicator(s) on the lower part of the display:
: only shaker activated
: both sound and shaker alarm activated
: both strobe light and shaker alarm activated
: strobe light, sound and shaker alarm activated
2. Press AL SET/SELECT once more to turn off all the alarms, all , and
alarm indicators are turned off.
Note: To use the shaker alarm, please plug in the shaker plug to the back of the clock. If
user doesn’t want to use the shaker alarm, unplug the shaker plug from the clock.
TO STOP AND RESET THE ALARM TO COME ON THE NEXT DAY
When alarm is sounding, the corresponding alarm indicator flashes. Press AL SET / SELECT
once to stop the alarm and reset it to come on the following day. After that, the corresponding
alarm indicator stays on the display.
TO USE SNOOZE (default snooze duration is 5 minutes)
When alarm is sounding, presses once, the alarm will stop temporarily and the
corresponding alarm indicator keep flashing. The alarm will come on again after the set
snooze duration is over.
TO USE THE HI-MED-LO DIMMER (LED TIME DIGITS)
There is a 3-level brightness control for the LED clock display. Press to adjust the
brightness (HI / MED / LO) of the LED display. This can only be done when the unit is not
alarming. At the start, the brightness is setting on Hi position.
TO USE THE RING OF LED LIGHT
Press and hold button to turn on the ring of LED light, the brightness level of LED
ring (Hi-Med-Lo) corresponds to the time display brightness (Hi-Med-Lo).
When the LED ring lights up, press
button one at a time to adjust time display
brightness and LED ring brightness accordingly.
Press and hold
button to turn off the ring of LED light. (doesn’t forget to readjust
LCD dimmer after).
CHARGE YOUR MOBILE PHONE WITH USB PORT
Connect the charging cable of your mobile phone to the USB port at the back of the clock
and then connect the other end to the micro USB charging socket on your mobile phone.
The clock will charge the mobile phone automatically.
Note: 1.Make sure the cable supplied with your mobile phone is used for charging.
2.Make sure the adaptor supplied with thisclock (5V 1.2A) is used to power it.
3.It is not possible to charge an iPad® or notepad from the USB socket on this clock.
4.No USB charging provided during the alarms are sounding / active.
TEST MODE
Press and hold / TEST button, strobe light flashing, shaker vibrating and buzzer sounding.
TROUBLE SHOOTING
If your clock displays incorrect time or does not function correctly, which may be caused by
electro-static discharge or other interference. Takes heavy current when electric timer on
heater switches on/off (poor mains filtering). The mains adapter for the clock should only
be plugged into a mains wall socket. The mains adapter for the clock should only be
plugged into a mains wall socket–not a mains extension that is shared with electric heater
(or other high wattage equipment).
CARE OF YOUR PRODUCT
1. Place your clock on a stable surface, away from sources of direct sunlight or excessive
heat or moisture.
2. Protect your furniture when placing your unit on a natural wood and lacquered finish by
using a cloth or protective material between the unit and the furniture.
3. Clean your unit with a soft cloth moistened only with mild soap and water. Stronger
agents such as benzene, thinners or similar materials can damage the surface of the
unit. Make sure the unit is unplugged before cleaning.
4. Remove the back-up battery if the clock is not going to be used for a month or longer to
prevent possible corrosion. Should the battery compartment become corroded or dirty,
clean the compartment thoroughly and replace the battery.
SPECIFICATIONS
Alarm duration:1 hou
r
Snooze duration Ad
j
ustable :5 to 60 minutes
Default settings
Time format
24 hou
r
Time
0:00
Alarm
6:00
Alarm and shaker level
Hi
Alarm sound frequency
F-1
Alarm sound level
L1(low)
Snooze duration
05 (5 minutes)
Audible alarm:up to 95 dB at 1m
GUARANTEE
From the moment your Geemarc product is purchased, Geemarc guarantee it for the
period of two years. During this time, all repairs or replacements (at our discretion) are free
of charge. Should you experience a problem then contact our help line or visit our website
at www.geemarc.com.
The guarantee does not cover accidents, negligence or breakages to any parts. The product
must not be tampered with or taken apart by anyone who is not an authorized Geemarc
representative.
The Geemarc guarantee in no way limits your legal rights.
IMPORTANT: YOUR RECEIPT IS PART OF YOUR GUARANTEE AND MUST BE RETAINED
AND PRODUCED IN THE EVENT OF A WARRANTY CLAIM.
Please note: The guarantee applies to the United Kingdom only.
DECLARATIONS:
CE Directives: Geemarc Telecom SA hereby declares that this product is in compliance
with the CE Directive requirements.
The CE declaration of conformity may be consulted at www.geemarc.com
Electrical connection: The apparatus does not incorporate an integral power on/off
switch. To switch off the apparatus, disconnect the power adaptor.
When installing the apparatus, ensure that the mains power socket is readily accessible
Recycling Directives: The WEEE (Waste Electrical and Electronic Equipment) has been
put in place for the products at the end of their useful life are recycled in the best way.
When this product is finished with, please do not put it in your domestic waste bin. Please
use one of the following disposal options:
- Remove the batteries and deposit them in an appropriate WEEE skip.
Deposit the product in an appropriate WEEE skip.
- Or, hand the old product to the retailer. If you purchase a new one, they should accept it.
Thus if you respect these instructions you ensure human health and environmental protection.
For product support and help visit our website at www.geemarc.com
telephone 01707 387602 or fax 01707 832529
MANUEL D’UTILISATION
!!! Veuillez consulter notre site Web :www.geemarc.com car il peut y avoir des mises
à jour importantes et changement dont vous devez être conscient !!!
INSTALLATION DE LA BATTERIE DE SECOURS
Une batterie au lithium CR2032 est requise (non incluse) pour fournir une alimentation
électrique de secours à votre réveil en cas de panne d’électricité temporaire.
Placez votre réveil face vers le bas sur une surface plane.
1. Utilisez une pièce et tournez la dans le sens antihoraire pour ouvrir le compartiment
batterie placé à l’arrière de votre réveil.
2. Insérez la batterie au lithium CR2032 dans le compartiment, avec le signe‘+’ vers le
haut comme indiqué.
3. Remettez le couvercle de batterie en utilisant votre pièce.
Il n’est pas nécessaire d’insérer une batterie de secours pour faire fonctionner le réveil; par
contre en cas de coupure de courant ou du débranchement de l’adaptateur secteur, la
batterie de secours permettra de conserver les réglages de l’heure et de l’alarme.
En cas de coupure d’électricité ou si l’adaptateur est débranché, le réveil s’éteindra et
l’alarme ne fonctionnera pas.
Veuillez remplacer la batterie tous les ans pour garantir le bon fonctionnement de votre
appareil.
INSTALLATION
Branchez l’adaptateur CA/CC dans une prise domestique CA 230V, puis branchez la fiche
CC à l’arrière de l’appareil. Votre réveil est prêt à fonctionner.
REGLAGE HEURE ET DURÉE DU RAPPEL D’ALARME
1. Appuyez une fois sur la touche SET, les chiffres de l’heure ‘0’ se mettent à clignoter. Appuyez
sur
ou sur pour régler l’heure (maintenir la touché enfoncée pour avancer rapidement).
2. Ré appuyez sur SET, les chiffres des minutes ‘00’ se mettent à clignoter. Appuyez sur
ou
sur
pour régler les minutes. (Maintenir la touche enfoncée pour avancer rapidement).
3. Ré appuyez sur SET, l'écran indique ’24 H’ et clignote. Appuyez sur
ou sur pour
sélectionner le format sur ’12 H’ ou ’24 H’. Le voyant lumineux PM apparaît en haut à
droite pour indiquer l’heure de l’après-midi et AM en haut à gauche pour le matin.
4. Ré appuyez sur SET, l'écran indique ‘05’ et clignote. Appuyez sur
ou sur pour
sélectionner la durée du rappel d’alarme, entre 5 et 60 minutes.
5. Ré appuyez sur SET ou patientez environ 10 secondes sans appuyez sur une touche
pour quitter le mode de réglage.
RÉGLAGE DE L’ALARME
1. Maintenez enfoncée la touche AL SET / SELECT, le symbol AL apparait et les chiffres
de l’heure se mettent à clignoter. Appuyez sur
ou sur pour régler l'heure de
l'alarme. (Maintenir la touche enfoncée pour avancer rapidement).
2. Ré appuyez sur la touche AL SET / SELECT, les chiffres des minutes commencent à
clignoter. Appuyez sur
ou sur pour régler les minutes de l’alarme (maintenir la
touche enfoncée pour avancer rapidement).
3. Ré appuyez sur la touche AL SET / SELECT, ‘HI’ s’affiche (haut niveau de vibration),
appuyez sur
ou sur pour sélectionner ‘LO’ (niveau faible de vibrations).
4. Ré appuyez sur la touché AL SET /SELECT, ‘F-1(par ex. 800 Hz)’ s’affiche et commence
à clignoter, appuyez sur
ou pour sélectionner la tonalité de l’alarme (fréquence) :
F-1 (haute tonalité, 800 Hz), F-2 (tonalité moyenne, 1 KHz),
F-3 (basse tonalité, 1.5 KHz)
5. Ré appuyez sur la touche AL SET / SELECT, L1’ s’affiche (niveau faible de sonnerie),
appuyez sur
ou sur pour sélectionner ‘L3’ (niveau fort de sonnerie).
6. Ré appuyez sur la touche AL SET / SELECT ou patientez environ 10 secondes sans
presser de touche pour quitter le mode de réglage de l’alarme.
ACTIVATION / ARRET ET SÉLECTION DU MODE D’ALARME
1. En mode d’affichage normal de l’heure, appuyez sur la touche AL pour activer le type
d’alarme en activant l’indicateur d’alarme correspondant place en bas de l’écran:
: seul le vibreur est actif.
: la sonnerie d’alarme et le vibreur sont actives.
: le flash stroboscopique et le vibreur sont actives.
: le flash stroboscopique, la sonnerie d’alarme et le vibreur sont
actives.
2. Ré appuyez sur la touche AL SET / SELECT pour désactiver toutes les alarmes, tous
les indicateurs d’alarme
, et sont éteints.
Remarque: Pour utiliser le vibreur en alarme, veuillez brancher sa fiche au dos du réveil.
Si vous ne souhaitez pas utiliser le vibreur, déconnectez sa fiche du réveil.
REGLAGE DE L’ALARME ET ARRET JUSQU’AU JOUR SUIVANT
Lorsque l’alarme retenti, l’indicateur d’alarme correspondant clignote. Appuyez une fois sur
la touché AL SET / SELECT et l’alarme se déclenchera le jour suivant. Une fois l'opération
terminée, l'indicateur d'alarme correspondant reste affiché à l'écran.
REGLAGE DE LA FONCTION DE RAPPEL D’ALARME (la durée
par défaut est de 5 minutes)
Lorsque l’alarme retentit, appuyez une fois sur l’alarme s’arrêtera temporairement
et l’indicateur d’alarme correspondant continuera à clignoter. L’alarme se redéclenchera une
fois que la durée de rappel d'alarme aura été dépassée.
REGLAGE LUMINEUX DE L’AFFICHEUR DE L’HEURE
Il existe une fonction de réglage à 3 niveaux de la luminosité de l'écran LED du réveil. Appuyez
sur
pour régler la luminosité (ÉLEVÉE /MOYENNE /BASSE) de l’écran LED. Cette
opération peut être effectuée uniquement lorsque l’alarme ne s'est pas déclenchée.
Au début, la luminosité est réglée sur un niveau élevé.
REGLAGE DE L’ANNEAU LUMINEUX EN MODE LAMPE
Appuyez et maintenir la touche pour allumer l’anneau lumineux, la puissance
lumineuse est sur 3 niveaux (Fort, moyen et faible) ainsi que l’heure d’affichage en
même temps.
Lorsque l’anneau s’allume, appuyez sur la touche
une fois à la fois pour ajuster
la puissance lumineuses de l’anneau et de l’affichage de l’heure.
Appuyez et maintenir la touche
pour éteindre l’anneau lumineux.
Régler de nouveau votre réglage lumineux de l’affichage de l’heure comme il se modifie
en même temps que celui de l’anneau).
CHARGER VOTRE TÉLÉPHONE PORTABLE SUR LE PORT USB
Branchez le câble de charge de votre téléphone portable dans le port USB placé au dos du
réveil, puis connectez la seconde extrémité dans la prise micro USB de votre téléphone
portable. Le réveil chargera automatiquement votre téléphone.
Remarque:
1. Assurez-vous que le câble fourni avec votre téléphone portable est utilisé pour le chargement.
2. Vérifiez que l’adaptateur fourni avec ce réveil (5V 1,2A) correspond pour alimenter en
électricité votre appareil.
3. Il n’est pas possible de charger un iPad® ou un ordinateur bloc-notes depuis la prise
USB de ce réveil.
4. La charge par le connecteur USB est désactivée pendant l’alarme.
MODE DE TEST
Appuyez et maintenir le bouton / TEST, le flash stroboscopique, le vibreur et la sonnerie
sont actives.
DÉPANNAGE
Si l’heure est incorrecte ou le réveil ne fonctionne pas correctement, cela peut être dû à des
décharges électrostatiques ou des interférences sur le secteur. Pour éviter les fluctuations
de tension pouvant provenir d’autres équipements, l’adaptateur secteur du réveil doit être
branché uniquement dans une prise secteur murale et non sur une rallonge partagée avec
un radiateur électrique (ou d’autres appareils très puissants).
SPÉCIFICATIONS
Durée de l’alarme :1 heure
Durée du rappel d’alarme:Réglable en 5 et 60 minutes
Réglages par défaut
Format de l'heure
24 heures
Heure
0:00
Alarme
6:00
Niveau de l’alarme et du vibreur
Élevé
Fréquence d’émission du son de l’alarme
F-1
Durée du rappel d’alarme
05
(
5 minutes
)
Alarme audible :jusqu’à 95 dB à 1m
GARANTIE
Votre produit Geemarc est garanti pendant 2 ans, suivant la date d’achat. Au cours de
cette période, toutes les réparations ou tous les remplacements (à notre seule discrétion)
seront effectués sans frais. En cas de problème, contactez notre service d'assistance ou
rendez-vous sur notre site Web: www.geemarc.com. La garantie ne couvre pas les
accidents, la négligence ou les ruptures de pièces. Le produit ne doit pas être altéré ou
démonté par quiconque n'étant pas un représentant agréé de Geemarc. La garantie de
Geemarc ne limite en aucun cas vos droits légaux.
IMPORTANT: VOTRE FACTURE FAIT PARTIE DE VOTRE GARANTIE ET DOIT ETRE
CONSERVÉE ET PRODUITE LORS D'UNE RÉCLAMATION SOUS GARANTIE.
Veuillez noter: la garantie est applicable en France uniquement.
DÉCLARATION:
Geemarc Telecom SA déclare par la présente que son produit est conforme aux directives
Européennes.
La déclaration de conformité peut être consultée sur www.geemarc.com
Branchement électrique: Pour déconnecter l'appareil, coupez l'alimentation au niveau de
la prise secteur ou débranchez l'adaptateur secteur.
Lors de l'installation de l'appareil, veillez à ce que la prise secteur soit facilement accessible.
DIRECTIVE DE RECYCLAGE
Le système DEEE (déchets des équipements électriques et électroniques) a été mis en
œuvre pour les produits en fin de vie qui seront recyclés de la meilleure manière possible.
Lorsque ce produit ne fonctionne plus, ne le jetez pas avec vos déchets domestiques.
Veuillez utiliser une des options suivantes:
- Retirez les piles et jetez-le dans une benne DEEE appropriée. Jetez le produit dans une
benne DEEE appropriée.
- Ou rapportez-le à votre détaillant. Si vous achetez un nouvel article, l’ancien devrait être
accepté.
Ainsi, en respectant ces instructions, vous contribuez à la santé publique et à la protection
de l'environnement.
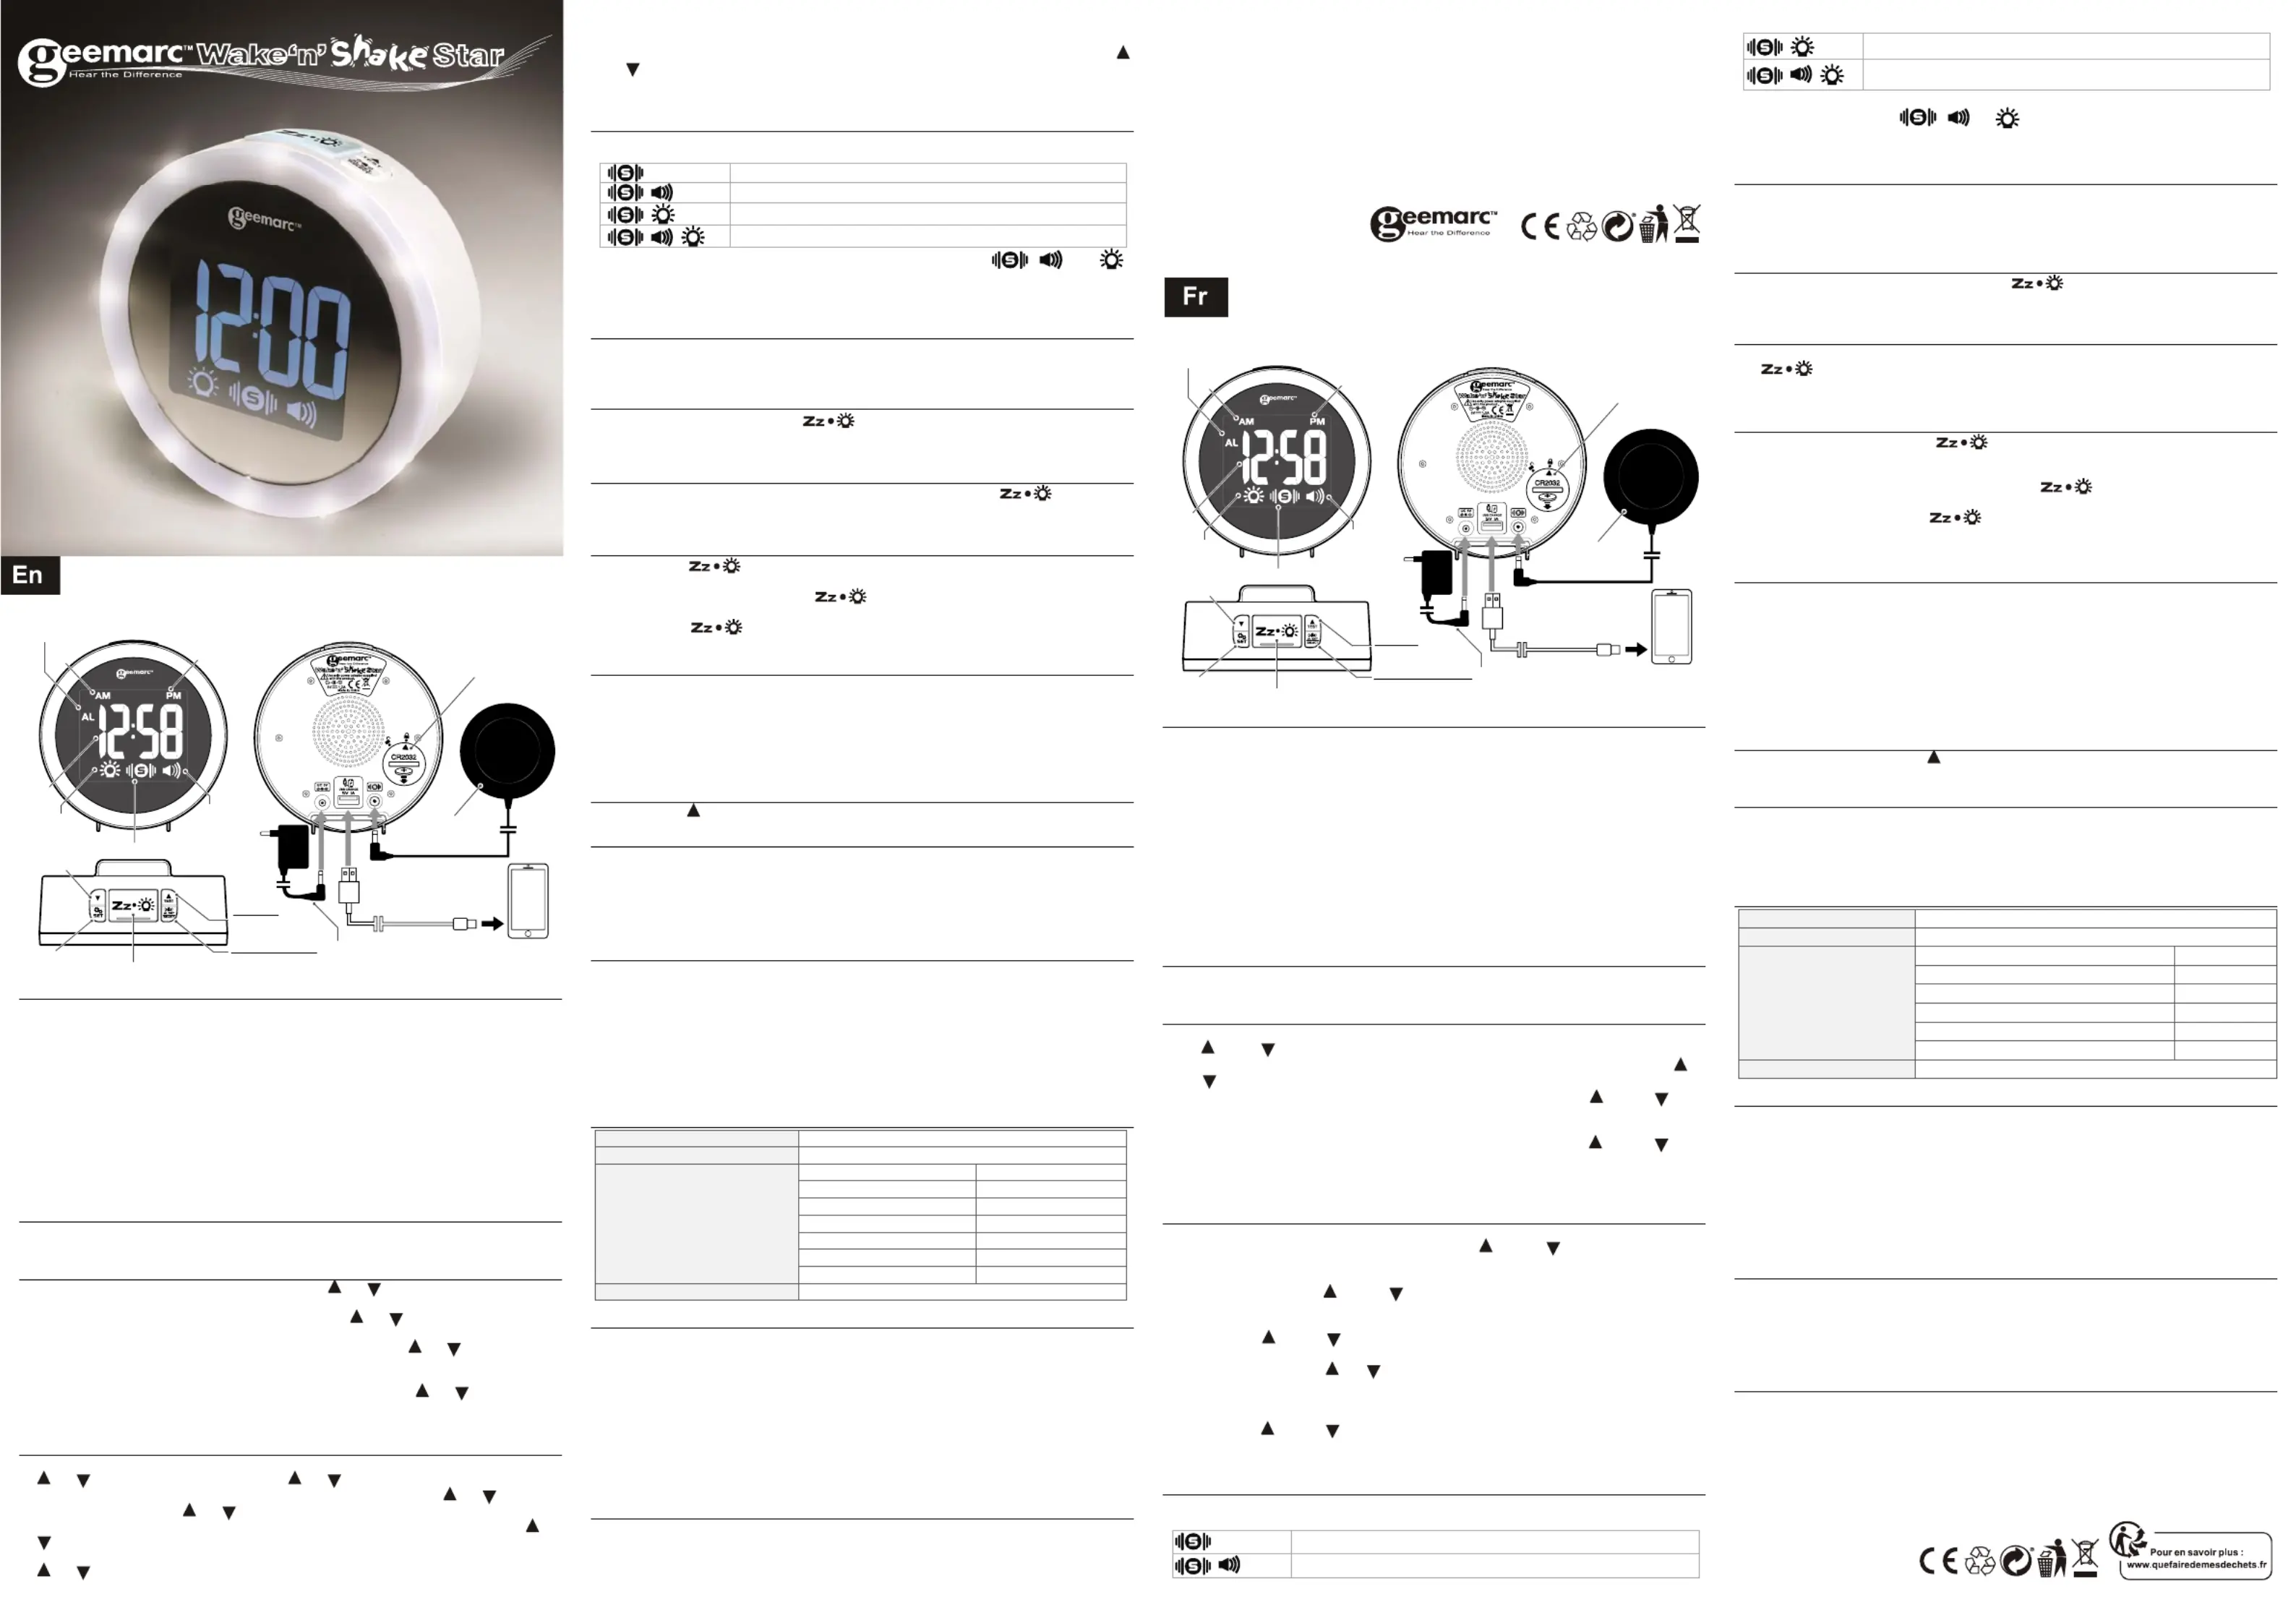
SNOOZE / LIGHT
AM
WAKE-TO-
BUZZER
5
V
-1200 m
A
AC/DC ADAPTOR
USB charging cable
(not included)
BATTERY
COVER
SHAKER
SE
T
ALARM SET MODE
PM
TIME
DOWN
ALARM SET
SELECT
UP
TEST
WAKE-TO-
FLASHINGLED
WAKE-TO- VIBRATION
Snooze / Lumière
Réglage alarme
Select Alarme
5
V
-1200 m
A
adaptateur
Connecteur de charge
USB (non fourni)
Capot batterie
V
ibreu
r
A
M
Mode réglage alarme
Réglage heure
Heure
Diminue
r
A
nneau
lumineux
active
V
ibreur activé
Sonnerie
activé
PM
Haut
Test
Specyfikacje produktu
| Marka: | Geemarc |
| Kategoria: | budzik radiowy |
| Model: | Wake’n’Shake STAR |
Potrzebujesz pomocy?
Jeśli potrzebujesz pomocy z Geemarc Wake’n’Shake STAR, zadaj pytanie poniżej, a inni użytkownicy Ci odpowiedzą
Instrukcje budzik radiowy Geemarc

28 Grudnia 2024
Instrukcje budzik radiowy
Najnowsze instrukcje dla budzik radiowy
9 Kwietnia 2025
9 Kwietnia 2025
8 Kwietnia 2025
7 Kwietnia 2025
7 Kwietnia 2025
6 Kwietnia 2025
3 Kwietnia 2025
3 Kwietnia 2025
3 Kwietnia 2025
3 Kwietnia 2025