Instrukcja obsługi Iluv mySight 2K
Iluv kamera bezpieczeństwa mySight 2K
Przeczytaj poniżej 📖 instrukcję obsługi w języku polskim dla Iluv mySight 2K (1 stron) w kategorii kamera bezpieczeństwa. Ta instrukcja była pomocna dla 19 osób i została oceniona przez 4 użytkowników na średnio 4.5 gwiazdek
Strona 1/1
QSG
iLuv®, and GreeNology® trademarks are the exclusive properties of jWIN Electronics
Corp. and are registered with the U.S. Patent and Trademark Oce, and may be
registered or pending registration in other countries. All other iLuv® trademarks, service
marks, and logos may be registered or pending registration in the U.S. or in other
countries. The Bluetooth word mark and logos are owned by the Bluetooth SIG, Inc.
iPad, iPhone, iPod are trademarks of Apple Inc., registered in the U.S. and other countries.
All other trademarks or registered trademarks are the property of their respective
owners. The illustrated product and specications may dier slightly from that supplied.
© 2015 iLuv Creative Technology. Printed in China.
Thank you for your purchase.
Visit our website at www.iLuv.com or support.iLuv.com for more information.
Please register your product at www.iLuv.com/reg
iLuv Creative Technology
2 Harbor Park Drive, Port Washington, NY 11050
Wi-FiHD Cloud-Based Video Camera
for Home and Business
mySight
™
Caméra Vidéo WiFI HD basée sur le cloud à usage domestique et professionnel
Videocámara HD WiFi basada en la nube para usar en casa y en el trabajo
Wi-Fi HD Videokamera mit Cloud-Technologie für Zuhause und für Unternehmen
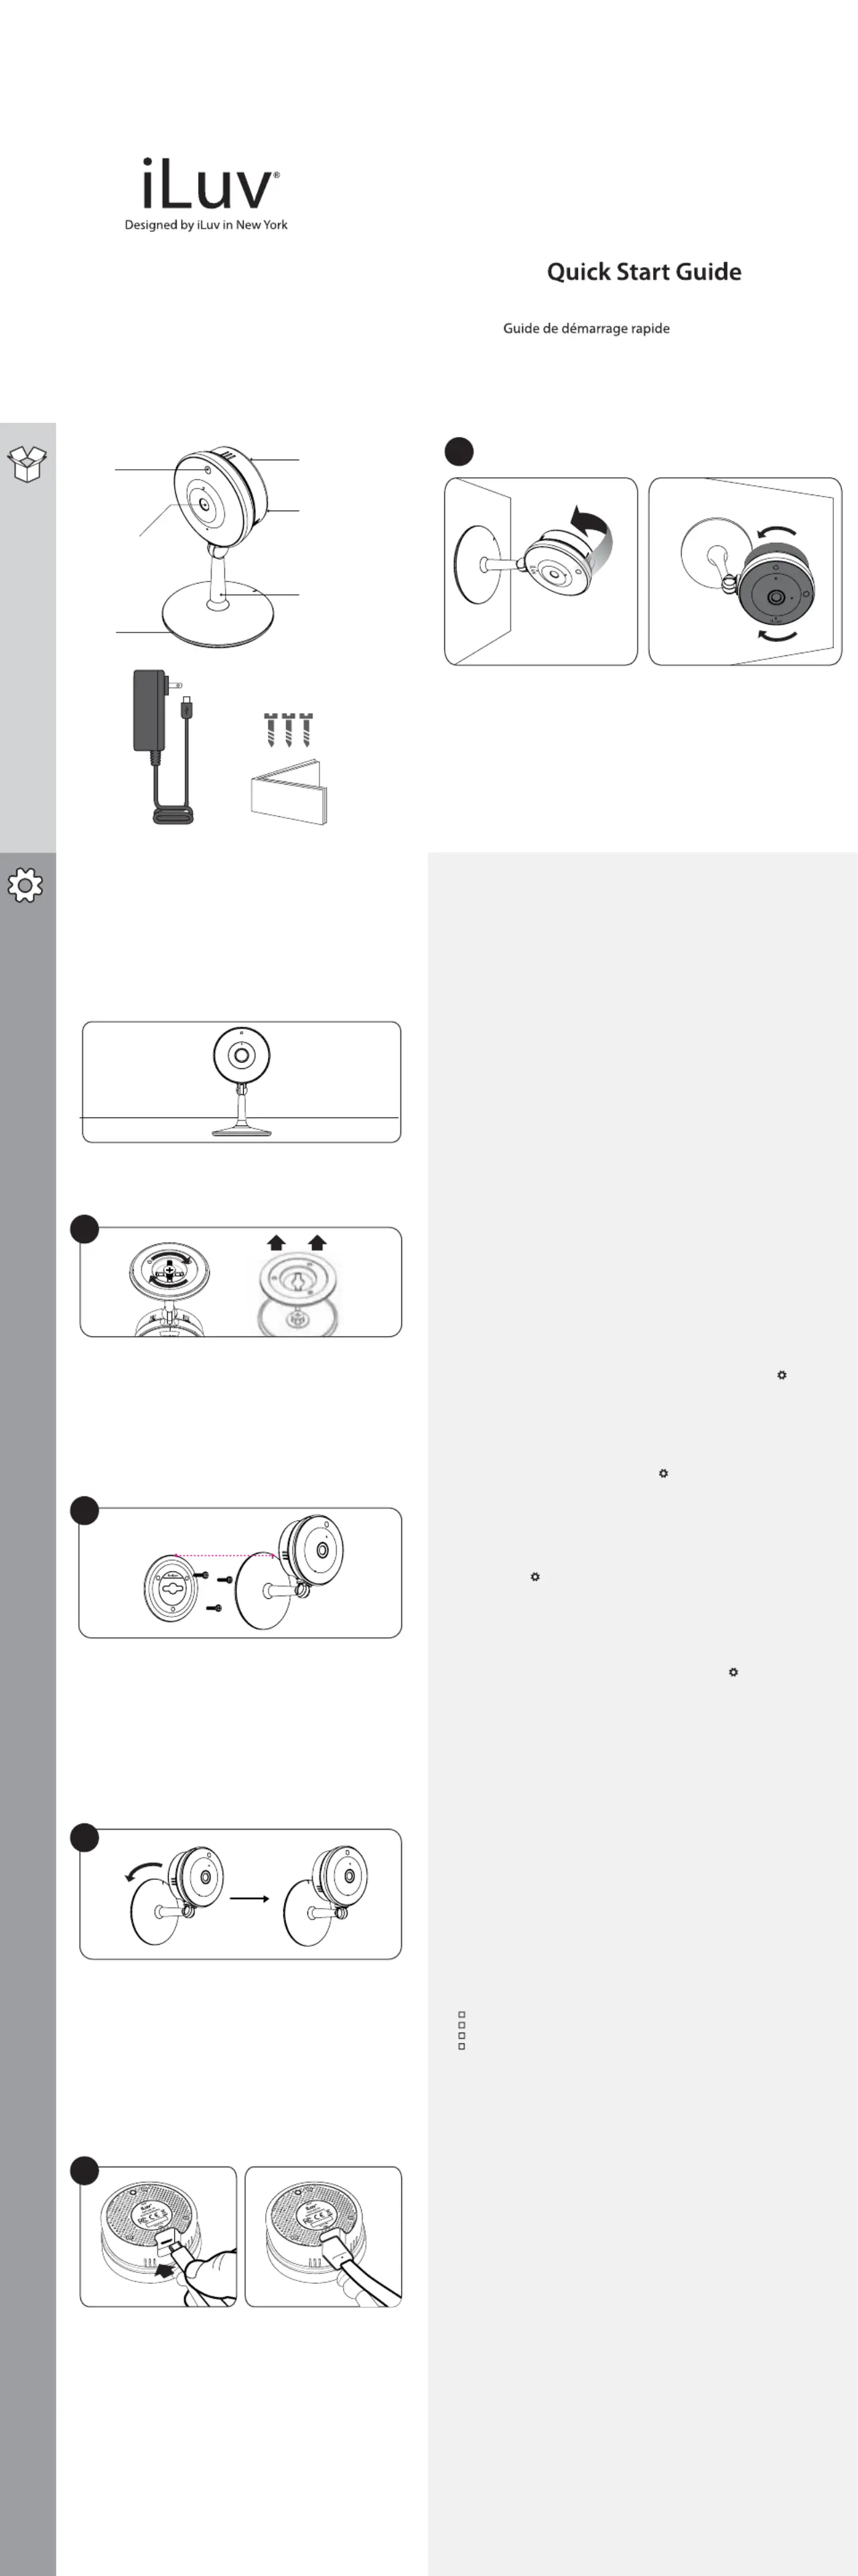
There are two ways to set up mySight™:
To adjust mySight™
Status
indicator
Indicateur d'état
Indicador de
estado
Statusanzeige
Bouton de réinitialisation
Botón de reajuste
Rückstelltaste
Portmicro-USB
Puerto micro-USB
Mikro-USB-Anschluss
Support
Plataforma
Ständer
Optique de la caméra
Lente de la cámara
Kameralinse
Montage
Soporte
Halterung
Camera lens
Stand
Mount
Reset button
1. If mounting to wall, adjust neck until
camera is facing desired direction.
2. Turn the head of the camera (black
area separate from the metal ring) until
logo is facing up so that camera is not
on an angle.
Micro USB port
La caméra mySight peut s'installer de deux façons
Hay dos maneras de congurar mySight
Es gibt zwei Möglichkeiten, die mySight anzubringen
Sur une surface plane / Colóquela en una supercie plana
/ Auf eine ache Oberäche stellen
• Place on a at surface
• Mount to a wall
Fixée au mur / Fíjela en una pared / An der Wand anbringen
Align the mount lock hole with the lock bar to free the mount
from the rest of the unit
Aligner l'orice de blocage du support sur la barre de verrouillage
pour détacher le support du reste de l'unité
Alinea el cerrojo de la montura con la barra de seguridad para separar
la montura del resto de la unidad
Richten Sie das Befestigungsloch mit der Verriegelungsleiste aus, um den
Befestigungsteil vom Rest der Einheit zu trennen.
Position the mount on the wall as shown in the image. Take the three
included screws and drill them into the holes.
Positionnez le support sur le mur comme indiqué par l'illustration. Prenez
les trois vis fournies et insérez-les dans les trous
Sitúe el soporte en la pared tal como se muestra en la imagen. Sujete los
tres tornillos incluidos y taládrelos en los oricios
Positionieren Sie die Halterung an der Wand wie im Bild gezeigt. Befestigen
Sie die Halterung an der Wand mit Hilfe der drei beiliegenden Schrauben
Insert mySight™ over mount and turn until it locks in place
Plug the Micro USB cable from the port at the back of mySight™ to
an electrical outlet.
Branchez le câble USB Micro du port à l'arrière de mySight™ à une prise
électrique.
Enchufa el cable Micro USB desde el puerto en la parte posterior de
mySight™ a una toma eléctrica.
Verbinden Sie das im Port auf der Rückseite von mySight™ eingesteckte
Micro-USB-Kabel mit einer Steckdose.
Introduzca mySight™ en el soporte y después gírelo en sentido contrario a
las agujas del reloj para jarlo en su lugar.
Insérez mySight™ dans le support et tournez le dans le sens inverse des
aiguilles d’une montre pour le xer en place.
Setzen Sie mySight™ in die Halterung ein und drehen Sie es gegen den
Uhrzeigersinn, um es zu xieren.
2
3
4
Global tech support information
Email: support@ivideon.com
Phone: (English Only)
US Toll Free: +1-888-683-8950
Great Britain: +44 330 8080350
Germany: +49 3222 1094781
France: +33 977 550686
Spain: +34 902 906072
Italy: +39 069 4801515
Poland: +48 223 075105
Lithuania: +370 521 40504
Latvia: +371 661 63762
Austria: +43 720 884335
Belgium: +32 784 83945
Netherlands: +31 858 886678
Estonia: +37 266 80345
Portugal: +35 1308 805737
Sweden: +46 108 848917
Finland: +35 8753 252949
Greece: +302 111 985163
For troubleshooting and technical support, please email
support@ivideon.com or call the following toll free numbers:
EN
Pour contacter le service de dépannage ou l'assistance technique, veuillez envoyer
un e-mail à ou appeler les numéros gratuits suivants :support@ivideon.com
FR
Para la resolución de problemas y asistencia técnica, por favor, envíe un e-mail a
support@ivideon.com o llame a los siguientes números gratuitos:
ES
Zur Problembehebung und für technischen Support senden Sie bitte eine
E-Mail an oder rufen Sie die folgenden gebührenfreien support@ivideon.com
Telefonnummern an:
DE
FN
ES
DE
Pour plus d'informations concernant notre service d'enregistrement cloud,
veuillez visiter le site http://www.iluv.com/iot/mysight.asp
Pour acheter un plan d'enregistrement cloud, connectez vous au
http://www.ivideon.com/ ou achetez le directement via l'application Ivideon :
1) Sélectionnez une caméra. 2) Cliquez sur 3) Cliquez sur "Gérer" sous l'onglet
Enregistrement Cloud.
For information about our cloud recording service, please visit
http://www.iluv.com/iot/mysight.asp
To purchase a cloud recording plan, sign in at http://www.ivideon.com/
or purchase it directly on the Ivideon app: 1) Select a camera. 2) Click
3) Click "Manage" under Cloud Recording.
EN
Para obtener información acerca de nuestro servicio de registro en la nube,
por favor visita http://www.iluv.com/iot/mysight.asp
Para adquirir un plan de registro en la nube, regístrate en http://www.ivideon.com/
o adquiérelo directamente en la app de Ivideon: 1) Selecciona una cámara.
2) Haz clic en 3) Haz clic en "Administrar" debajo de Registro en la Nube.
Um einen Cloud-Recording-Plan zu bestellen, loggen Sie sich bei
http://www.ivideon.com/ ein oder tätigen Sie die Bestellung direkt in der
Ivideon-App: 1) Wählen Sie eine Kamera. 2) Klicken Sie auf 3) Klicken Sie
"Verwalten" unter Cloud Recording.
Reorient or relocate the receiving antenna.
Connect the equipment into an outlet on a circuit dierent from that to which the receiver is connected.
Consult the dealer or an experienced radio/TV technician for help.
Increase the separation between the equipment and receiver.
WARNING: Changes or modications to this unit not expressly approved by the party responsible for
compliance could void the user’s authority to operate the equipment.
The device complies with Part 15 of the FCC Rules. Operation is subject to the following two
conditions: (1) this device may not cause harmful interference, and (2) this device must accept any
interference received, including interference that may cause undesired operation.
NOTE: This equipment has been tested and found to comply with the limits for a Class B digital device,
pursuant to Part 15 of the FCC Rules. These limits are designed to provide reasonable protection
against harmful interference in a residential installation. This equipment generates, uses and can
radiate radio frequency energy and, if not installed and used in accordance with the instructions, may
cause harmful interference to radio communications. However, there is no guarantee that interference
will not occur in a particular installation. If this equipment does cause harmful interference to radio or
television reception, which can be determined by turning the equipment o and on, the user is
encouraged to try to correct the interference by one or more of the following measures:
(Device installation)
(Installation de l’appareil)
(Gerätinstallation)
Kurzanleitung
(Instalación del dispositivo)
Guía de inicio rápido
Weitere Informationen zu unserem Cloud-Recording-Dienst sind unter
http://www.iluv.com/iot/mysight.asp erhältlich.
5
Pour une xation au mur, réglez la tête de la caméra
de sorte à l'orienter vers la direction souhaitée
Si se monta en una pared, ajuste el cuello hasta que
la cámara mire en la dirección deseada
Wenn die Halterung an der Wand angebracht wird,
sollte das Halsstück solange justiert werden, bis die
Kamera in die gewünschte Richtung zeigt
Tournez la tête de la caméra (partie noire séparée de
l'anneau métal) et orientez-la vers le haut an que la
caméra ne se trouve pas dans un angle
Gire el cabezal de la cámara (zona negra separada
del anillo metálico) hasta que el logotipo mire hacia
arriba para que la cámara no esté en ángulo
Drehen Sie den Kopf der Kamera (der schwarzer
Bereich kann von dem Metallring abgetrennt
werden) bis das Logo nach oben zeigt und die
Kamera nicht in einem Winkel steht
1
Specyfikacje produktu
| Marka: | Iluv |
| Kategoria: | kamera bezpieczeństwa |
| Model: | mySight 2K |
Potrzebujesz pomocy?
Jeśli potrzebujesz pomocy z Iluv mySight 2K, zadaj pytanie poniżej, a inni użytkownicy Ci odpowiedzą
Instrukcje kamera bezpieczeństwa Iluv

21 Lutego 2025
Instrukcje kamera bezpieczeństwa
Najnowsze instrukcje dla kamera bezpieczeństwa
9 Kwietnia 2025
5 Kwietnia 2025
5 Kwietnia 2025
5 Kwietnia 2025
2 Kwietnia 2025
2 Kwietnia 2025
30 Marca 2025
30 Marca 2025
30 Marca 2025
30 Marca 2025