Instrukcja obsługi ION Tough Sounds
Przeczytaj poniżej 📖 instrukcję obsługi w języku polskim dla ION Tough Sounds (2 stron) w kategorii Słuchawki. Ta instrukcja była pomocna dla 20 osób i została oceniona przez 5 użytkowników na średnio 4.2 gwiazdek
Strona 1/2
Tough Sounds
Quickstart Guide
Box Contents:Tough Sounds, Mini USB Charging Cable, 3.5 mm (1/8”) Stereo Aux
Cable, Quickstart Guide.
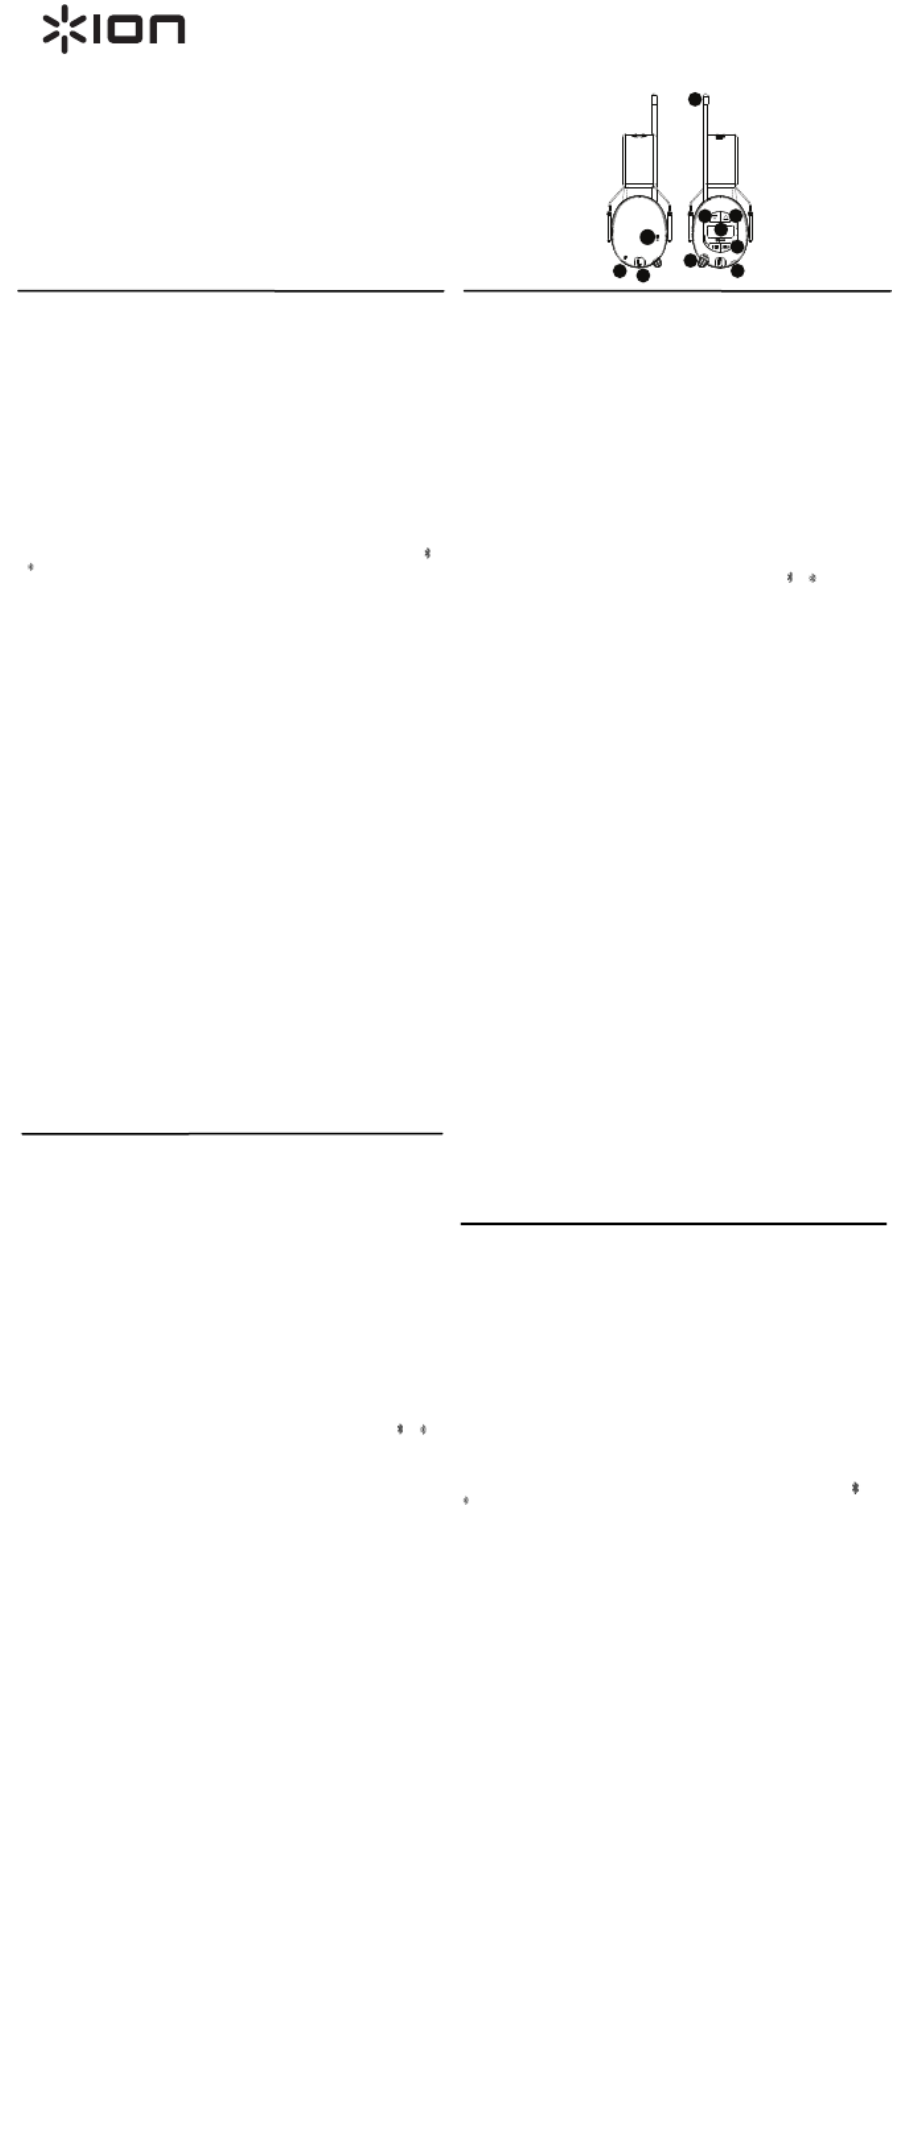
Controls:(1) Antenna, (2) Select Down Button, (3) Select Up Button, (4) LCD, (5)
Source Button, (6) Auxiliary Jack, (7) Volume/On-Off Knob, (8) Microphone, (9) Mini USB
Charge Port, (10) Charge LED.
Charging Tough Sounds: Use the included mini-USB charging cable to connect Tough
Sounds to (A) a USB power adapter connected to a power outlet or your computer (B)
(powered on) for approximately 2 hours. The charge LED is illuminated when Tough
Sounds is currently charging. You will know Tough Sounds is fully charged when this
LED has gone out.
Getting Started:
(1)Turn the Volume/On-Off knob clockwise to power on Tough Sounds. (2)Adjust the
volume as needed on Tough Sounds. button (3)Select the source by tapping the SRC
between FM/ AM/ BT modes. (4) Turn the Volume/On-Off knob counter-clockwise until it
clicks to power off Tough Sounds.
Bluetooth Mode:
(1) Tap the SRCbutton to toggle between AM/FM/BT modes. (2)Select ---- (blinking) to
activate Bluetooth mode and begin pairing. (3) In your Bluetooth device settings, find
Tough Sounds and connect. (4) Once paired, the Bluetooth logo will change fromto
(5)Tap Play/Pauseto play or pause the music. (6)If you're having trouble with your
Bluetooth connection, press and hold the button for 2 seconds to reset the current SRC
Bluetooth connection (this is disabled during a phone call).
Aux-In Mode:
(1)Turn the Volume/On-Off knob clockwise to power on Tough Sounds. (2)To use the
Aux input, plug a 3.5mm (1/8") cable into the Aux-In port on Tough Sounds. (3) Adjust
the volume using the Volume/On-Off knob.
Radio Mode:
(1) Tap the SRC button to toggle AM//FM/BT and set to AM or FM to listen to the radio.
(2) Tap ▲ or ▼ until you reach your desired station. To seek through stations, press (3)
and hold ▲ or ▼ for 2 seconds, then release the button when seeking starts. Seek will
stop on clear radio stations. (4) To save a preset station, hold the Play/Pause button.
Release Play/Pause when “M” and the preset station number are flashing. (5) Tap ▲ or
▼ to save the station to your desired position. (6) Tap the Play/Pause button to confirm
your preset number setting.
Note: The FM antenna works best when set at a 90 degree angle and not put under the
headband.
To select between 9 kHz (Europe) and 10 kHz (US) AM reception setting:
(1) Keep Tough Sounds in the OFF position. (2) Press the SRCbutton for 2 seconds. 9
kHz will be shown on the display. (3) Press ▲ or ▼ to select 10 kHz. (4) Press the SRC
button again to save the setting.
Receiving phone calls:
When Bluetooth-paired with a smartphone, answer an incoming call by tapping
Play/Pause. Tap Play/Pauseto end the current call. To reject an incoming call, tap the
SRC button.
Note: If you are paired to a Bluetooth source, you can still receive and answer calls while
using FM/AM and Aux modes.
Setting the Time:
(1) Turn the Volume/On-Off knob counter-clockwise to power off Tough Sounds. (2) Tap
the Play/Pause button once to set the hours or tap Play/Pause again to set the minutes.
(3) When the selected time is flashing, tap to adjust the time, then tap ▲ or ▼
Play/Pauseto confirm the setting.To change your unit to display military time (24 hour
time), press the Tune Up or Down button when the power is off. If AM or PM is
displayed, then you are in 12 Hour time. If AM or PM is not displayed, then you are in 24
Hour time.
Troubleshooting:
Windows 7 and Windows 8 Users: When Tough Sounds is connected to your computer
through USB, select as the playback device for Headphones – Tough Sounds Stereo
best sound quality.
For the Safety and Warranty manual, visit ionaudio.com/warranty.
ionaudio.com/support
For technical support
Para soporte técnico
Pour obtenir de l’assistance technique
Per assistenza tecnica
Für technischen Support
Voor technische ondersteuning
ionaudio.com/warranty
For complete warranty information
Para información completa sobre la garantía
Pour obtenir toutes les informations relatives à la garantie
Per informazioni complete in merito alla garanzia
Für komplette Garantieinformationen
Voor volledige informatie over de garantie
Manual Version 1.1
Controls
Controles
Commandes
Comandi
Kontrollknappar
Ohjaukset
2
1
3
4
5
6
7
89
10
Contenido de la caja: Tough Sounds, Cable de carga mini USB, Cable auxiliar estéreo
de 3,5 mm (1/8 pulg.), Guía de inicio rápido.
Controles:(1) Antena, (2) Botón de selección hacia abajo, (3) Botón de selección hacia
arriba, (4) LCD, (5) Botón de fuente, (6) Conector auxiliar, (7) Perilla de volumen y
encendido-apagado, (8) Micrófono, (9) Puerto de carga Mini USB, (10) LED de carga.
Carga del Tough Sounds:Utilice el cable mini USB incluido para conectar el Tough
Sounds a (A) un adaptador de corriente USB conectado a una toma de corriente o (B)
su ordenador (encendido) durante aproximadamente 2 horas. El LED de carga se
ilumina cuando Tough Sounds se está cargando. Sabrá cuando el Tough Sounds esté
totalmente cargado cuando se apague este LED.
Para comenzar:
(1) Gire la perilla de volumen y encendido-apagado en sentido horario para encender el
Tough Sounds. (2) Ajuste el volumen del Tough Sounds como sea necesario. (3)
Seleccione la fuente pulsando levemente el botón SRC entre los modos FM/ AM/ BT. (4)
Gire la perilla de volumen y encendido-apagado en sentido antihorario hasta que haga
clic para apagar el Tough Sounds.
Modo Bluetooth:
(1)Pulse levemente el botón SRC para alternar entre los modos AM/FM/BT. (2)
Seleccione ---- (parpadeando) para activar el modo Bluetooth y comenzar el
apareamiento. (3) En la configuración de dispositivo Bluetooth, busque Tough Sounds y
establezca la conexión. (4) Una vez apareado, el logo Bluetooth cambiará de
a (5)
Pulse ligeramente Play/Pause (Reproducir/Pausa) para reproducir la música o hacer
una pausa. Si está teniendo problemas con su conexión Bluetooth, mantenga (6)
pulsado el botón SRC durante 2 segundos para reiniciar la conexión Bluetooth actual (la
cual se deshabilita durante una llamada telefónica).
Modo de entrada auxiliar:
(1) Gire la perilla de volumen y encendido-apagado para encender el Tough
Sounds. (2) Para utilizar la entrada auxiliar, conecte un cable de 3,5 mm (1/8 pulg.) en el
puerto de entrada auxiliar del Tough Sounds. (3) Ajuste el volumen utilizando la perilla
de volumen y encendido-apagado.
Modo radio:
(1)Pulse ligeramente el botón SRC para alternar entre AM//FM/BT y ajústelo en AM o
FM para escuchar radio. (2) Pulse ligeramente ▲ o ▼ hasta encontrar la estación
deseada. (3) Para buscar estaciones, mantenga pulsado ▲ o ▼ durante 2 segundos,
luego suelte el botón cuando comienza la búsqueda. La búsqueda se detendrá en
estaciones de radio con señal clara. (4) Para guardar una estación preseleccionada,
mantenga pulsado el botón Play/Pause. Suelte Play/Pause cuando parpadeen la "M" y
el número de estación preseleccionada. (5) Toque ligeramente ▲ o ▼ para guardar la
estación en la posición deseada. para (6) Toque ligeramente el botón Play/Pause
confirmar el número de estación preseleccionada.Para que su unidad muestre la hora
en formato de 24 horas, pulse el botón Tune Up (Sintonizar hacia arriba) o Down
(Sintonizar hacia abajo) cuando la alimentación esté apagada. Si se muestra AM o PM,
la hora está en formato de 12 horas. Si no se muestra AM o PM, la hora está en formato
de 24 horas.
Nota: La antena de FM funciona mejor cuando se ajusta en un ángulo de 90 grados y
se coloca por fuera de la banda de sujeción.
Para seleccionar el ajuste de recepción AM entre 9 kHz (Europa) y 10 kHz
(EE.UU.):
(1)Mantenga el Tough Sounds en la posición OFF (apagado). (2)Pulse el botón SRC
durante 2 segundos. Se mostrará 9 kHz en la pantalla. (3) Pulse ▲ o ▼ para
seleccionar 10 kHz. (4) Pulse el botón SRC para guardar el ajuste.
Recepción de llamadas telefónicas:
Una vez apareado mediante Bluetooth con un smartphone (teléfono inteligente),
responda las llamadas pulsando ligeramente Play/Pause. Pulse ligeramente
Play/Pausepara terminar la llamada en curso. Para rechazar las llamadas entrantes,
pulse ligeramente el botón SRC.
Nota: Si está apareado con una fuente Bluetooth, aún puede recibir y contestar
llamadas estando en modo FM/AM o Aux.
Ajuste de la hora:
(1) Gire la perilla de volumen y encendido-apagado en sentido antihorario para
apagar el Tough Sounds. (2) Pulse ligeramente el botón Play/Pause una vez para
ajustar la hora o dos veces para ajustar los minutos. (3) Cuando parpadea el tiempo
seleccionado, pulse ligeramente ▲ o ▼ para ajustar el tiempo, luego pulse ligeramente
Play/Pause para confirmar el ajuste.
Solución de problemas: Usuarios de Windows 7 y Windows 8:
Cuando Tough Sounds está conectado a su ordenador mediante USB, seleccione
Headphones – Tough Sounds Stereo(Auriculares - Tough Sounds estéreo) como el
dispositivo de reproducción para una mejor calidad de sonido.
Para obtener el manual sobre la seguridad y garantía visite ionaudio.com/warranty
.
The Bluetooth word mark and logo are owned by the Bluetooth SIG, Inc. and any
use of such marks by ION Audio is under license.
Contenuti della confezione:Tough Sounds, cavo di ricarica Mini USB, cavo stereo
aux da 3,5 mm (1/8”), Guida rapida.
Comandi:(1) Antenna, (2) Tasto Select Down, (3) Tasto Select Up, (4) LCD, (5) Tasto
Source, (6) Jack Aux, (7) Manopola volume/On-Off , (8) Microphone, (9) Porta di
ricarica mini USB, (10) LED di ricarica.
Ricarica del Tough Sounds:Servirsi del cavo mini-USB in dotazione per collegare il
Tough Sounds a (A) un adattatore di alimentazione USB collegato a una presa elettrica
o (B) al computer (acceso) per circa 2 ore. Durante la ricarica del Tough Sounds il LED
di ricarica è illuminato. Quando il LED si spegne, la ricarica del Tough Sounds è
completa.
Primi passi:
(1)Girare la manopola Volume/On-Off knob in senso orario per accendere il Tough
Sounds. (2) Regolare il volume come necessario sul Tough Sounds. (3) Selezionare la
fonte toccando il pulsante SRC tra le modalità FM/ AM/ BT. (4) Girare la manopola
Volume/On-Off knob in senso antiorario fino a quando non scatta per spegnere il
Tough Sounds.
Modalità Bluetooth:
(1) Toccare il pulsante SRC per commutare tra le modalità AM/FM/BT. (2) Selezionare
---- (lampeggiante) per attivare la modalità Bluetooth e iniziare il collegamento. (3)
Sotto le impostazioni del proprio dispositivo Bluetooth, trovare il Tough Sounds e
collegarlo. (4)Una volta collegato, il logo Bluetooth cambierà daa (5) Toccare
Play/Pauseper far riprodurre o mettere in pausa la musica. (6)In caso di problemi con
il collegamento Bluetooth, tenere premuto il tasto SRC per 2 secondi per azzerare
l’attuale collegamento Bluetooth (disabilitato durante una telefonata).
Modalità Aux-in (ingresso ausiliario):
(1)Girare la manopola Volume/On-Off knob in senso orario per accendere il Tough
Sounds. (2) Per utilizzare l'ingresso Aux, collegare un cavo da 3,5mm (1/8") alla porta
Aux-In del Tough Sounds. (3) Regolare il volume utilizzando la manopola Volume/On-
Off.
Modalità radio:
(1)Toccare il tasto SRC per commutare tra AM//FM/BT e impostare AM o FM per
ascoltare la radio. (2) Toccare ▲ o ▼ fino a quando non si raggiunge la stazione
desiderata. (3) Per cercare tra le stazioni, tenere premuto ▲ o ▼ per 2 secondi, quindi
rilasciare il tasto quando la ricerca viene avviata. La ricerca si fermerà sulle stazioni dal
segnale limpido. (4) Per salvare una stazione preset, tenere premuto il tasto
Play/Pause. Lasciare Play/Pausequando “M” e il numero di stazione preset
lampeggiano. (5) Toccare ▲ o ▼ per salvare la stazione alla posizione desiderata. (6)
Toccare il tasto per confermare l'impostazione del numero di preset.Play/Pause Per
modificare l’apparcchio in modo che mostri l’ora militare (24 ore), premere il tasto Tune
Up o Down ad alimentazione spenta. Se AM o PM compaiono a display, ci si trova in
un orario a 12 ore. Se AM o PM non compaiono a display, l’orario sarà a 24 ore.
Nota bene:l'antenna FM funziona al meglio quando posizionata a un angolo di 90
gradi e non inserita sotto l'archetto.
Per selezionare tra le impostazioni di ricezione AM da 9 kHz (Europa) e 10 kHz
(US):
(1)Mantenere il Tough Sounds in posizione OFF. (2) Premere il tasto SRC per 2
secondi. A display comparirà la scritta "9 kHz". (3) Premere ▲ o ▼ per selezionare 10
kHz. (4) Premere nuovamente il tasto SRC per salvare l'impostazione.
Ricezione di telefonate:
Quando si è collegati in Bluetooth con uno smartphone, è possibile rispondere a una
chiamata in arrivo toccando Play/Pause. Toccare Play/Pause per concludere la
chiamata corrente. Per respingere una chiamata in arrivo, toccare il tasto SRC.
Nota bene: se si è collegati a una fonte Bluetooth è comunque possibile ricevere
telefonate e rispondere alle chiamate utilizzando le modalità FM/AM e Aux.
Impostazione dell'ora:
(1) Girare la manopola Volume/On-Off knob in senso antiorario per spegnere il Tough
Sounds. (2) Toccare il tasto una volta per impostare le ore o toccare Play/Pause
nuovamente Play/Pause per impostare i minuti. (3) Quando l'ora selezionata
lampeggia, toccare ▲ o per ▼per regolare l'ora, quindi toccare Play/Pause
confermare l'impostazione.
Risoluzione di problemi:
Utenti Windows 7 e Windows 8: Quando il Tough Sounds è collegato al computer
tramite USB, selezionare Headphones – Tough Sounds Stereo come dispositivo di
riproduzione predefinito per ottenere la migliore qualità sonora.
Per ottenere il manuale di sicurezza e garanzia, recarsi alla pagina
ionaudio.com/warranty
.
Lieferumfang:Tough Sounds, Mini-USB-Ladekabel, 3,5mm (1/8") Stereo-Aux-Kabel, Schnellstart-
Anleitung.
Bedienelemente:(1)Antenne, (2) Wahltaste Abwärts, (3)Wahltaste Aufwärts, (4) LCD, (5)
Quellentaste, (6) Aux-Buchse, (7 ) Regler Lautstärke/Ein/Aus, (8) Mikrofon, (9) Mini-USB-
Ladebuchse, (10) Lade-LED.
Aufladen des Tough Sounds:Verwenden Sie das mitgelieferte Mini-USB-Ladekabel, um Tough
Sounds mit (A) einem USB-Netzteil zu verbinden, das in einer Steckdose steckt oder (B) mit Ihrem
(eingeschalteten) Computer zu verbinden und etwa 2 Stunden lang aufzuladen. Die Lade-LED
leuchtet, wenn Tough Sounds gerade aufgeladen wird. Wenn die LED erloschen ist, zeigt dies an,
dass Tough Sounds vollständig geladen ist.
Erste Schritte:
(1)Drehen Sie den Regler Lautstärke/Ein/Aus im Uhrzeigersinn, um Tough Sounds einzuschalten.
(2) Stellen Sie die Lautstärke am Tough Sounds nach Wunsch ein. (3) Wählen Sie die Quelle, indem
Sie auf die Drehen Sie den SRC-Taste tippen, um zwischen FM/AM/BT-Modi auszuwählen. (4)
Regler Lautstärke/Ein/Aus bis er einrastet gegen den Uhrzeigersinn, um Tough Sounds
abzuschalten.
Bluetooth-Modus:
(1) Tippen Sie auf die SRC-Taste, um zwischen den AM/FM/BT-Modi umzuschalten.
(2)Auswählen ---- (blinkt), um den Bluetooth-Modus zu aktivieren und mit dem Koppeln zu
beginnen. (3) In den Einstellungen Ihres Bluetooth-Geräts wählen Sie Tough Sounds und stellen
eine Verbindung her. (4) Sind die Geräte einmal gekoppelt, wechselt das Bluetooth-Logo vonauf
(5)Tippen Sie auf Wiedergabe/Pause, um die Musik abzuspielen oder zu pausieren. (6)Als u
problemen met uw Bluetooth-verbinding ondervindt, houd de SRC-knop voor 2 seconden ingedrukt
om de huidige Bluetooth-verbinding te resetten (dit wordt tijdens een telefoongesprek
uitgeschakeld).
Aux-In-Modus:
(1)Drehen Sie den Regler Lautstärke/Ein/Aus im Uhrzeigersinn, um Tough Sounds einzuschalten.
(2) Um den Aux-Eingang zu verwenden, stecken Sie ein 3,5mm (1/8") Kabel in den Aux-In-
Anschluss am Tough Sounds. (3) Passen Sie die Lautstärke mit dem Regler Lautstärke/Ein/Aus an.
Radio-Modus:
(1) Tippen Sie auf die SRC-Taste, um zwischen AM/FM und BT zu wechseln und um AM oder FM
einzustellen, um Radio zu hören. (2) Tippen Sie auf ▲ oder ▼ bis Sie den gewünschten Sender
erreichen. (3) Um durch die Sender zu suchen, halten Sie ▲ oder ▼ 2 Sekunden lang gedrückt und
lassen die Taste los sobald die Suche beginnt. Die Suche wird bei Radiostationen, die gut
empfangen werden können, stoppen. (4) Um einen voreingestellten Sender zu speichern, halten Sie
die Taste Wiedergabe/Pause gedrückt. Lassen Sie die Taste W iede rgabe /Pause los, wenn "M"
und die Sendernummer blinken. (5) Tippen Sie auf ▲ oder ▼, um den Sender auf die gewünschte
Position zu speichern. (6) Tippen Sie auf die Taste Wie de rgabe/P ause , um Ihre eingestellte Preset-
Nummer zu bestätigen. Um die Zeitanzeige am Gerät auf Militärzeit (24-Stunden) zu ändern,
drücken Sie auf die Taste Tune-Up oder Down, wenn das Gerät ausgeschaltet ist. Wenn AM oder
PM angezeigt wird, dann befinden Sie sich im 12-Stunden-Modus. Wenn AM oder PM nicht
angezeigt wird, dann befinden Sie sich im 24-Stunden-Modus.
Hinweis: Die FM-Antenne funktioniert am besten, wenn sie in einem 90-Grad-Winkel positioniert ist
und sich nicht unter dem Kopfbügel befindet.
So wechseln Sie zwischen 9 kHz (Europa) und 10 kHz (US) AM-Empfang:
(1)Halten Sie Tough Sounds in der Position AUS. (2) Halten Sie die SRC-Taste 2 Sekunden lang
gedrückt. Am Display wird 9 kHz angezeigt. (3) Drücken Sie ▲ oder ▼, um 10 kHz auszuwählen. (4)
Drücken Sie die SRC-Taste erneut, um die Einstellung zu speichern.
Annahme von Telefonanrufen:
Wenn ein Smartphone via Bluetooth verbunden ist, können Sie einen eingehenden Anruf annehmen,
indem Sie auf die Taste W iedergab e /Pause tippen. Tippen Sie auf Wiedergabe/Pause, um das
aktuelle Gespräch zu beenden. Um einen eingehenden Anruf abzuweisen, tippen Sie auf die SRC-
Taste.
Hinweis: Wenn Sie mit einer Bluetooth-Quelle verbunden sind, können Sie immer noch Anrufe
empfangen und annehmen, auch wenn Sie sich in den FM/AM und Aux-Modi befinden.
Uhrzeit einstellen:
(1) Drehen Sie den Regler Lautstärke/Ein/Aus gegen den Uhrzeigersinn, bis er einrastet, um
Tough Sounds abzuschalten. (2) Tippen Sie einmal auf die Taste Wiedergabe/Pause, um die
Stunden einzustellen oder tippen Sie erneut auf Wiedergabe/Pause, um die Minuten einzustellen. (3)
Wenn die gewählte Zeit blinkt, tippen Sie auf ▲ oder ▼, um die Zeit einzustellen. Tippen Sie dann
auf Wiedergabe/Pause, um die Einstellung zu bestätigen.
Fehlerbehebung:
Windows 7 und Windows 8 Benutzer:
Wenn Tough Sounds über USB mit Ihrem Computer verbunden ist, wählen Sie Headphones -
Tough Sounds Stereo als Wiedergabegerät, um die beste Klangqualität zu erreichen.
Für die Sicherheits- und Garantieinformationen besuchen Sie ionaudio.com/warranty.
Specyfikacje produktu
| Marka: | ION |
| Kategoria: | Słuchawki |
| Model: | Tough Sounds |
Potrzebujesz pomocy?
Jeśli potrzebujesz pomocy z ION Tough Sounds, zadaj pytanie poniżej, a inni użytkownicy Ci odpowiedzą
Instrukcje Słuchawki ION

12 Września 2024
Instrukcje Słuchawki
Najnowsze instrukcje dla Słuchawki
9 Kwietnia 2025
3 Kwietnia 2025
3 Kwietnia 2025
3 Kwietnia 2025
2 Kwietnia 2025
1 Kwietnia 2025
1 Kwietnia 2025
1 Kwietnia 2025
1 Kwietnia 2025
1 Kwietnia 2025