Instrukcja obsługi Lancom R&S UF-T60
Lancom zapora sieciowa (sprzętowa) R&S UF-T60
Przeczytaj poniżej 📖 instrukcję obsługi w języku polskim dla Lancom R&S UF-T60 (2 stron) w kategorii zapora sieciowa (sprzętowa). Ta instrukcja była pomocna dla 25 osób i została oceniona przez 5 użytkowników na średnio 4.9 gwiazdek
Strona 1/2
TECHNICAL DATA
Hardware
Power supplyExternal power supply 2x 12 –36 V
Max. power consumption40 W
Operating environmentTemperature range -20–70 °C; humidity 5–90 %, non-condensing
HousingRobust metal housing with mounting accessories for control cabinet mounting;
Network connections on the front side
FansNone
Dimensions (mm)68.4 x 130 x 150 (W x H x D)
Interfaces
ETH5x 10 / 100 / 1000 Mbps Gigabit Ethernet ports
SFP2x SFP ports
USB2x USB 3.0 ports
Console1x RJ45 configuration interface
Power supply1x 4-pin terminal block connector for connecting the power supply
GPIO1x 5-pin terminal block connector
Declaration of Conformity
Hereby, LANCOM Systems GmbH | Adenauerstrasse 20/B2 | D-52146 Wuerselen, declares that this device is in
compliance with Directives 2014/30/EU, 2014/35/EU, 2011/65/EU, and Regulation (EC) No. 1907/2006. The full text of
the EU Declaration of Conformity is available at the following Internet address: www.lancom-systems.com/doc
Package contents
DocumentationQuick Reference Guide (DE/EN), Quick Install Guide (DE/EN), Service & Support Guide (DE/
EN)
AccessoriesDIN rail mounting accessories
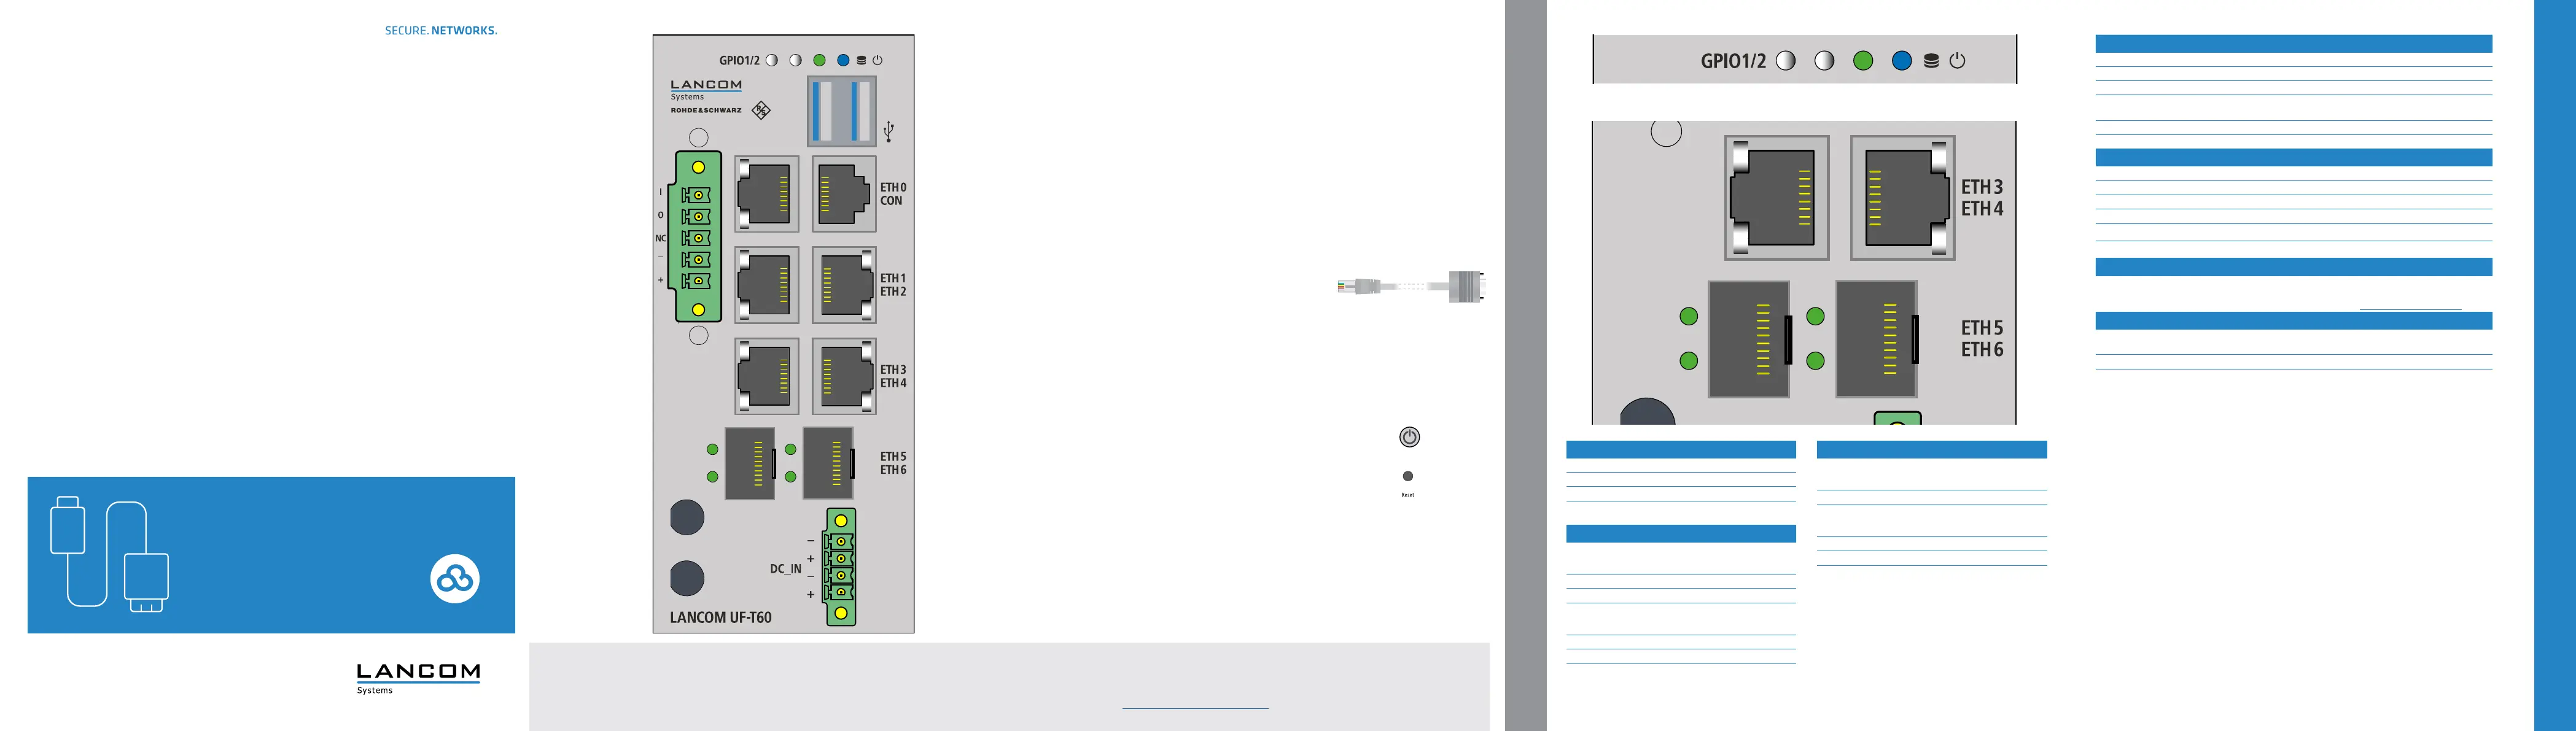
MOUNTING AND CONNECTING THE DEVICE
LANCOM R&S®UF-T60
Quick Reference Guide
Cloud-ready
LANCOM, LANCOM Systems, LCOS, LANcommunity and Hyper Integration are registered trademarks. All other names or descriptions used may be trademarks or registered trademarks of their owners. This document
contains statements relating to future products and their attributes. LANCOM Systems reserves the right to change these without notice. No liability for technical errors and / or omissions. 111998/07/21
4
Please observe the following when setting up the device
AThe mains plug of the device must be freely accessible.
ADo not rest any objects on top of the device and do not stack multiple devices.
AKeep the device’s ventilation slots clear of obstruction.
AMount the device in a free slot of an appropriate control cabinet using the enclosed DIN rail mounting
material.
Before initial startup, please make sure to take notice of the information regarding the intended use under www.lancom-systems.com/safety!
Operate the device only with a professionally installed power supply at a nearby power socket that is freely accessible at all times.
a b LEDs HDD / Power
HDD offNo HDD read / write access
HDD greenHDD read / write access
POWER offDevice switched off
POWER blueDevice ready and accessible
e fLEDs ETH5 - ETH6 - SFP
e LEDs - Link detection
OffNo link detected
Green, permanentlyLink detected
f LEDs - Link activity
Offno link detected
Green, permanentlyLink detected, no port activity
Green, blinkingLink detected, port activity
c dLEDs ETH0 - ETH4 - TP Ethernet
c LEDs - Link speed
OffLink speed 10 Mbps
Green, permanentlyLinkSpeed 1000 Mbps
Orange, permanentlyLink speed 100 Mbps
d LEDs - Link activity
Offno link detected
Green, permanentlyLink detected, no port activity
Green, blinkingLink detected, port activity
a
5-pin GPIO terminal block connector (TTL level)
For connecting DIO_PWR, DIO_GND, GPO0, and GPI0
b
USB 3.0 interfaces
Interfaces for reinstallation of the device software.
Not necessary for initial commissioning.
c
TP Ethernet interfaces ETH0 - ETH4
Connect the ETH0 - ETH4 TP Ethernet interfaces to additional
network components using suitable Ethernet cables.
d
Serial configuration interface RJ45 (CON)
Maintenance interface for expert configuration.
Not necessary for initial commissioning.
e
SFP interfaces ETH5 - ETH6
Connect the ETH5 - ETH6 SFP interfaces to other network
components using suitable SFP modules.
f
4-pin terminal block connector
For connecting the power supply 2x 12 – 36 V (SELV / PELV)
g
Power button (device top)
Press the power button to start up the device.
To power off the device, press the power button for 5 seconds.
h
Reset button (device top)
Short press - device restart
a
b
cd
c
e
f
a
b
e
c
d
c
d
f
e
f
Specyfikacje produktu
| Marka: | Lancom |
| Kategoria: | zapora sieciowa (sprzętowa) |
| Model: | R&S UF-T60 |
Potrzebujesz pomocy?
Jeśli potrzebujesz pomocy z Lancom R&S UF-T60, zadaj pytanie poniżej, a inni użytkownicy Ci odpowiedzą
Instrukcje zapora sieciowa (sprzętowa) Lancom

1 Kwietnia 2025
1 Kwietnia 2025
1 Kwietnia 2025
1 Kwietnia 2025
12 Września 2024
10 Września 2024
9 Września 2024
25 Maja 2024
Instrukcje zapora sieciowa (sprzętowa)
Najnowsze instrukcje dla zapora sieciowa (sprzętowa)
29 Marca 2025
21 Grudnia 2024
1 Października 2024
1 Października 2024
16 Września 2024
16 Września 2024
16 Września 2024
16 Września 2024
14 Września 2024
13 Września 2024