Instrukcja obsługi Livex Lighting La Bella 8815-65
Livex Lighting
Lampa
La Bella 8815-65
Przeczytaj poniżej 📖 instrukcję obsługi w języku polskim dla Livex Lighting La Bella 8815-65 (2 stron) w kategorii Lampa. Ta instrukcja była pomocna dla 9 osób i została oceniona przez 5 użytkowników na średnio 4.7 gwiazdek
Strona 1/2
ASSEMBLING & INSTALLATION INSTRUCTIONS PRODUCT# 8815-65 8910-65
W A R N I N G ! S H U T P O W E R O F F A T F U S E O R C I R C U I T B R E A K E R .
A T T E N T I O N ! C O U P E R L E C O U R A N T A U F U S I B L E O U L E D I S J O N C T E U R .
Carefully unpack your new fixture and lay out all the parts
on a clear area. Make sure not to misplace any small parts
necessary for installation.
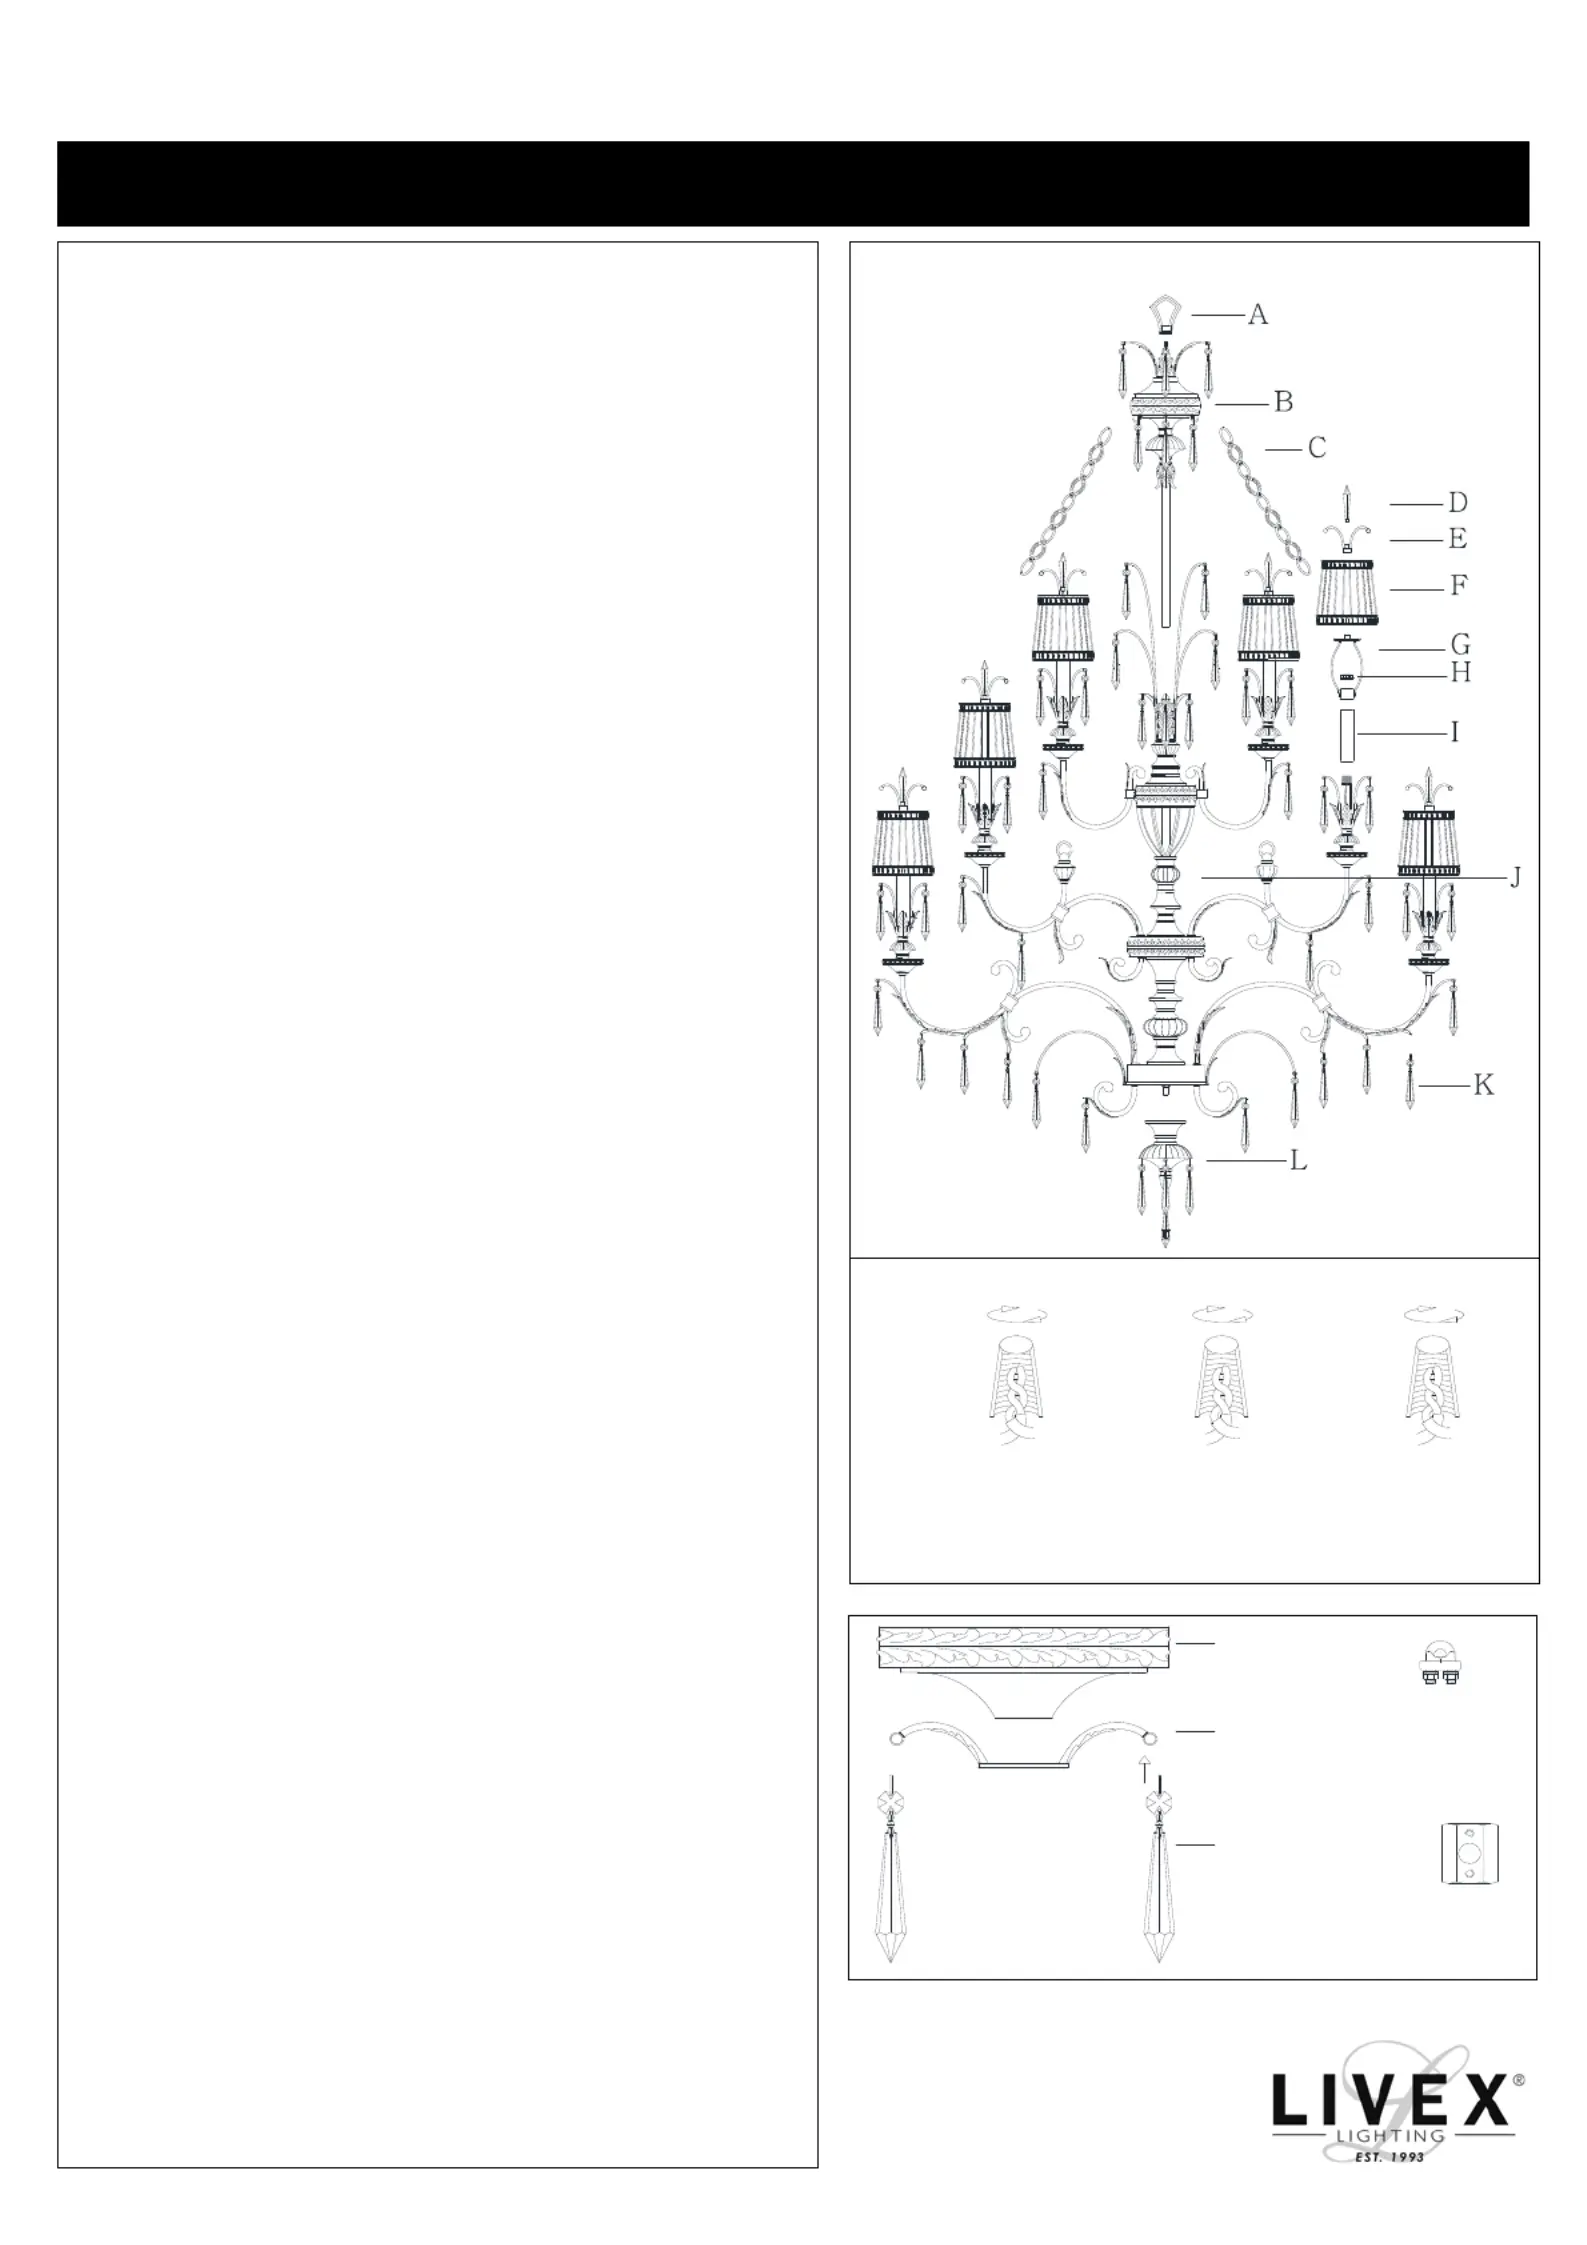
ASSEMBLING THE FIXTURE (Fig.2)
1. Return the ten arms to suitable position.
2. Attach the fixture assembly (B) to the fixture body (J), and attach
the loop (A) to the fixture assembly (B) by turning it clockwise
until tight.
3. Hook the end of chain (C) to the loop on the column of the fixt ure
assembly (B) and the arms of the fixture body (J).
4. Attach the finial (L) to bottom of the fixture body (J).
5. Place the socket sleeve (I)and the harp(G) over the socket of the
fixture body(J),then lock it securely with the check ring (H) .Install
the light bulb and put the glass shade(F)on to the harp(G),then
screw the finial(E)onto the glass shade(F). NOTE: DO NOT
EXCEED THE SPECIFIED WATTAGE!
6. Adsorb the magnet of crystal (D) to the center of the finial (E).
7. Attach the crystal (K) to the fixture assembly (B), the fixture body
(J) and the finial (L).
HANGING THE FIXTURE (Fig.1 Please see the Page.2)
IMPORTANT: For a safe and secure installation, this fixture
must be installed by means of support that is independent of
the junction box.
1. Shut off the power at the circuit breaker and remove old fixture from
ceiling, including the old crossbar.
2. Provide a 1/4” IPS pipe screw with one end securely mounted to a
beam or a structural member. The other end should protrude through
the center of the junction box as shown. The junction box is not
included.
3. Assemble the hex nuts, lock washer, hex coupling, pipe screw and
ceiling loop(product shall prevail) to center 1/4”IPS support pipe
and adjust overall length to allow the lock ring to hold the canopy
flush to the ceiling. When the adjustments have been completed,
secure the three (3) hex nuts, as shown.
4. Attach the chain to the fixture loop. Slip the lock ring and canopy
over the upper end of the chain. Open the open link of the chain and
lift the fixture to attach to en link. the ceiling loop and close the op
5. Lace the fixture wires, ground wire and safety cable through the
chain and loop, exiting through the side of the hex coupling.
6. IMPORTANT: you must, run the safety cable through the
two clamp bolts, then through the top of the junction box and
secure to structural member. NOW, fasten the end of safety
cable through the two clamp bolts(see fig.1), lock them
securely with the four small hex nuts until tight.
CONNECTING THE WIRES (Fig.3)
1. Take the black wire from the ceiling junction box and the smooth
wire leg from the fixture and twist bare ends together. Twist wire
connector onto end of wire until snug.
2. Repeat same process with white junction box wire and ribbed wire
leg of fixture wire. NOTE: Twist wires together in the same direction
you twist the wire connector onto wires.
3. If your junction box has a grounding wire (green or bare copper),
attach this wire and the bare copper wire from the fixture together as
step 1.
4. Tuck these wire connections neatly into the ceiling junction box, then
raise the canopy and crystal shelf all the way to the ceiling. Raise the
lock ring to the bottom of canopy, screw it with until tight.
Your installation is now complete. Return power to
the junction box and test the fixture.
Fig.2
Fig.3
White or
HOUSE
Black
WIRES
(Hot)
Smooth
FIXTURE
WIRES
Black or
Ribbed
WIRES
FIXTURE
Bare Copper
FIXTURE
WIRES
Copper
(Ground)
HOUSE
(Neutral)
WIRES
White
Bare
Green or
WIRES
HOUSE
(Ground)
Canopy
Crystal
Shelf
Crystal
Clamp
Bolt
Hex
Coupling
Page 1 of 2
DOC20141108815
Specyfikacje produktu
| Marka: | Livex Lighting |
| Kategoria: | Lampa |
| Model: | La Bella 8815-65 |
Potrzebujesz pomocy?
Jeśli potrzebujesz pomocy z Livex Lighting La Bella 8815-65, zadaj pytanie poniżej, a inni użytkownicy Ci odpowiedzą
Instrukcje Lampa Livex Lighting

12 Grudnia 2024
Instrukcje Lampa
- InFocus
- Makita
- Livarno Lux
- Artemide
- Lightaccents
- Zhiyun
- Kind LED
- Black Diamond
- Brandson
- Duronic
- Megatron
- Medisana
- Hombli
- Samsung
- Westinghouse
Najnowsze instrukcje dla Lampa

8 Kwietnia 2025

8 Kwietnia 2025

5 Kwietnia 2025

5 Kwietnia 2025

5 Kwietnia 2025

4 Kwietnia 2025

4 Kwietnia 2025

4 Kwietnia 2025

4 Kwietnia 2025

4 Kwietnia 2025