Instrukcja obsługi Noctua NH-D9 DX-4189 4U
Noctua Sprzęt komputerowy NH-D9 DX-4189 4U
Przeczytaj poniżej 📖 instrukcję obsługi w języku polskim dla Noctua NH-D9 DX-4189 4U (2 stron) w kategorii Sprzęt komputerowy. Ta instrukcja była pomocna dla 19 osób i została oceniona przez 3 użytkowników na średnio 4.2 gwiazdek
Strona 1/2
Take the fans off the cooler. Install the NM-XFB8 brackets to the
heatsink using the NM-SCC2 short screws.
Dear customer,
Thank you very much for choosing the Noctua NH-D9 DX-4189 4U.
Our DX line of coolers has become a default choice in high
performance quiet cooling solutions for Intel Xeon processors,
and I’m confident that you will be able to sense some of the
research, attention and care we’ve put into making this product.
Enjoy your NH-D9 DX-4189 4U!
Yours sincerely,
Roland Mossig, Noctua CEO
This manual will guide you through the installation process of the
SecuFirm2™ mounting system step by step.
Prior to installing the cooler, please consult the compatibility
centre on our website (ncc.noctua.at) and verify that the cooler
is fully compatible with your motherboard.
Please also make sure that your PC case offers sufficient clearance for
the cooler and that there are no compatibility issues with any other
components (e.g. tall RAM modules).
Double check that the heatsink and fan clips do not make contact with
the VGA card, other PCIe cards, motherboard heatsinks or any other
components. Noctua cannot be held responsible for any damage
or losses caused by compatibility issues.
Should you encounter any difficulties, please check the FAQs on our
website (www.noctua.at/faqs) and don’t hesitate to contact our
support team at support@noctua.at.
NOCTUA NH-D9 DX-4189 4U
INSTALLATION MANUAL
Required mounting parts:
1x NM-XRF6
plastic CPU carrier frame for
LGA4189-4 (P4)
Installing the brackets1
When attaching the CPU carrier frame to the base of the heatsink,
turn the heatsink upside down so that the base is facing upwards.
Carefully put it down onto the tips of the heatpipes and secure
it with your hand so that it cannot tilt and that the fins cannot
get bent. Remove the plastic protection cover from the base of the
heatsink and be careful not to damage the layer of pre-applied
thermal compound.
Caution: If you are not using the heatsink for the first time and
it therefore doesn’t have a fresh layer of pre-applied thermal
compound anymore, you need to apply a thin layer of thermal
compound to the CPU yourself before clipping it to the heatsink.
If there are residual traces of previous thermal paste or thermal
pads on your CPU or on the heatsink, please clean them off first.
Assembly of carrier frame, CPU and heatsink &
installation to the socket
2
Caution: The supplied plastic CPU carrier frame is for LGA4189-4
(P4) only. LGA4189-5 (P5) systems use the same mounting
mechanism system but require a different CPU carrier frame.
Please contact us at support@noctua.at if you would like to use
the cooler on a LGA4189-5 (P5) type system.
Please follow the official Intel installation manual for how to
attach the CPU carrier frame to the heatsink, insert the CPU to the
carrier frame and install the CPU/heatsink assembly to the socket:
www.intel.com/processorinstall
Note that while the Intel illustrations show a 2U heatsink, the
Noctua NM-XFB8 brackets use the same mounting parts, so the
procedure is identical for Noctua heatsinks.
NOCTUA MOBILE-TAG
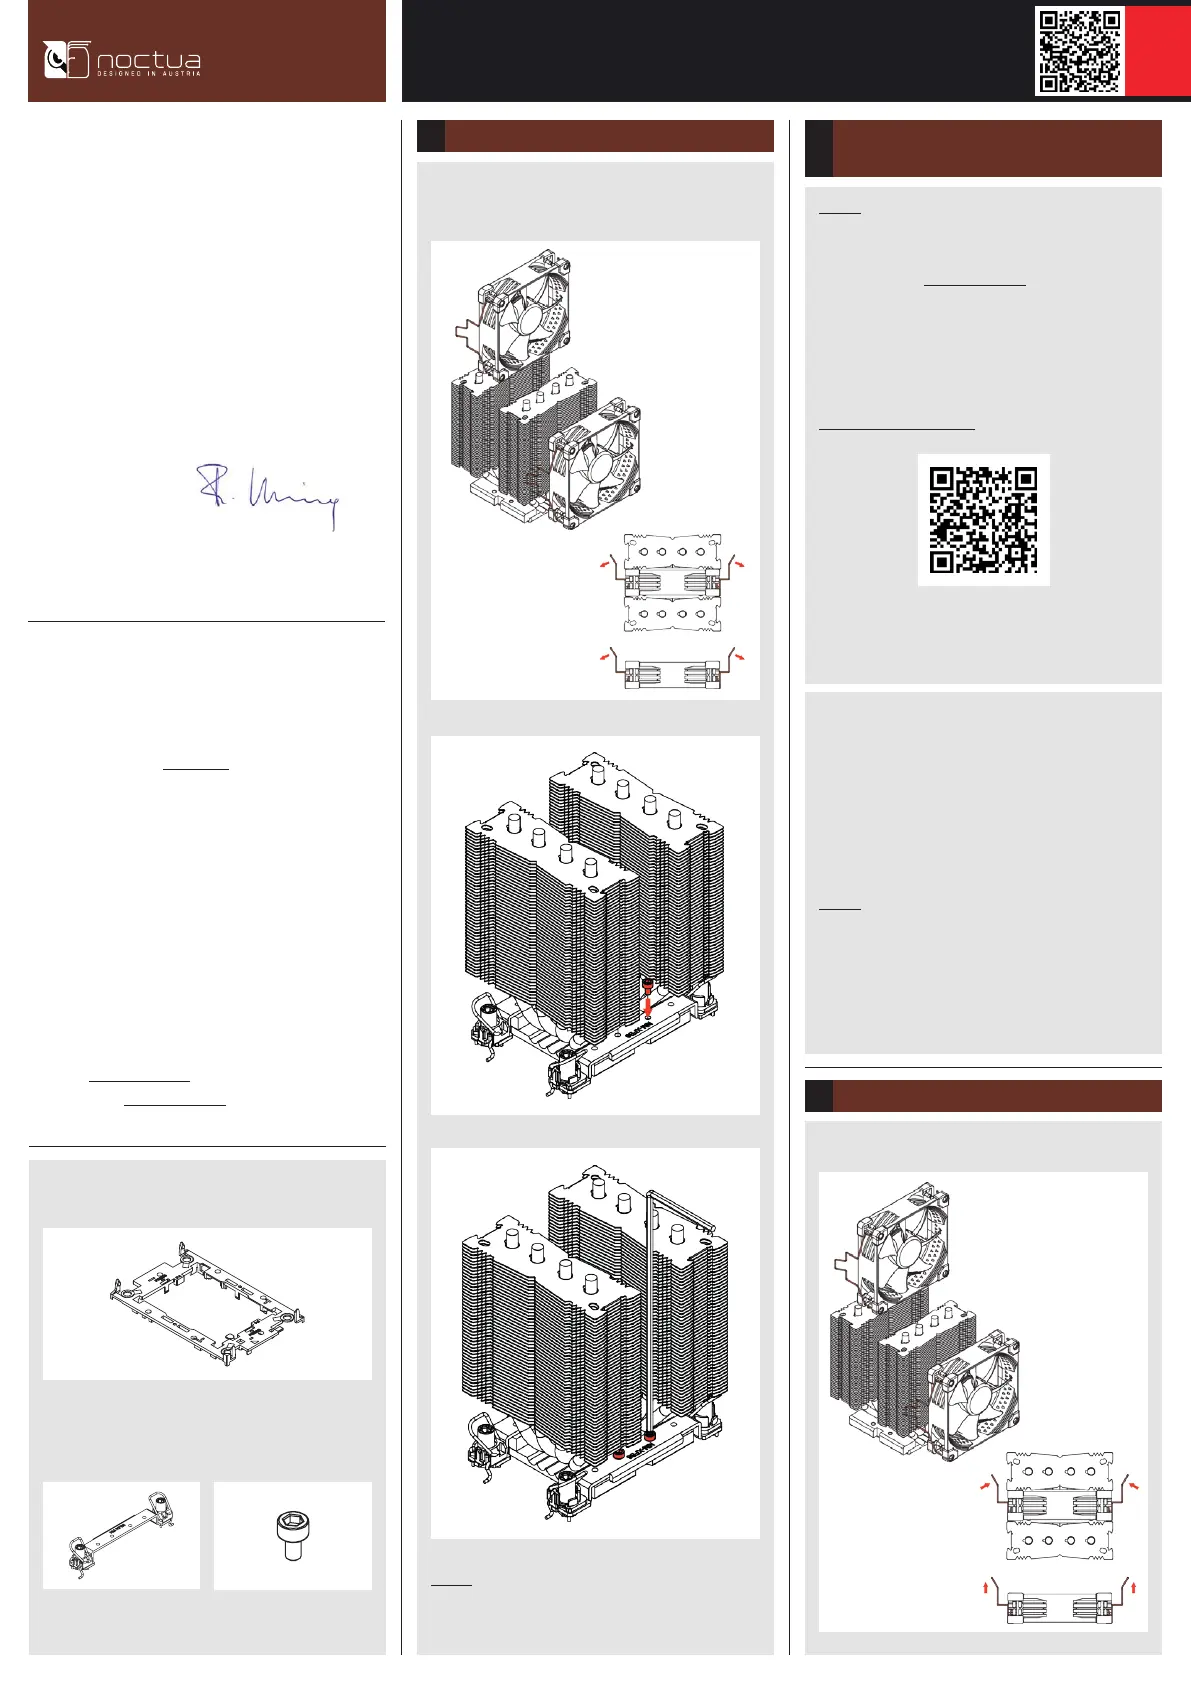
Reattach the fans to the heatsink using the supplied steel clips:
Installing the fans3
4x NM-SSC2
short screws
2x NM-XFB8
brackets
Caution: Gently tighten the screws until they stop, but do not use
excessive force (max. torque 0.6 Nm).
Specyfikacje produktu
| Marka: | Noctua |
| Kategoria: | Sprzęt komputerowy |
| Model: | NH-D9 DX-4189 4U |
| Kolor produktu: | Aluminium, Beige, Brown |
| Odpowiednia lokalizacja: | Procesor |
| Wysokość produktu: | 134 mm |
| Szerokość produktu: | 95 mm |
| Głębokość produktu: | 95 mm |
| Waga produktu: | 584 g |
| Długość kabla: | 0.2 m |
| Pobór mocy: | 1.68 W |
| Napięcie: | 12 V |
| Model: | Chłodnica powietrza |
| Liczba wentylatorów: | 2 went. |
| Procesor: | Intel® Xeon® |
| Zasilanie: | 1.2 W |
| Materiały: | Aluminium, Copper, Nickel |
| Obsługiwane gniazda procesora: | LGA 4189 |
| Poziom hałasu (niska prędkość): | 16.3 dB |
| MTBF (Średni okres międzyawaryjny): | 150000 h |
| Poziom hałasu (wysoka prędkość): | 30.6 dB |
| Średnica czaszy wentylatora: | 92 mm |
| Prędkość obrotowa (min): | 400 RPM |
| Prędkość obrotowa (max): | 2500 RPM |
| Maksymalny przepływ powietrza: | 96.3 ft³/min |
| Typ łożyska: | Self-Stabilising Oil-pressure Bearing (SSO) |
| Wymiary wentylatora (szer. x głęb. x wys.): | 92 x 92 x 25 mm |
| Tworzywo chłodnicy: | Aluminium |
| Wymiary wentylatora 2 (SxGxW): | 92 x 92 x 25 mm |
| Ciężar wentylatora: | 92.5 g |
| Waga wentylatora 2: | 92.5 g |
Potrzebujesz pomocy?
Jeśli potrzebujesz pomocy z Noctua NH-D9 DX-4189 4U, zadaj pytanie poniżej, a inni użytkownicy Ci odpowiedzą
Instrukcje Sprzęt komputerowy Noctua

9 Kwietnia 2025
9 Stycznia 2025
9 Stycznia 2025
9 Października 2024
9 Października 2024
9 Października 2024
9 Października 2024
9 Października 2024
3 Października 2024
3 Października 2024
Instrukcje Sprzęt komputerowy
Najnowsze instrukcje dla Sprzęt komputerowy
9 Kwietnia 2025
9 Kwietnia 2025
8 Kwietnia 2025
8 Kwietnia 2025
8 Kwietnia 2025
8 Kwietnia 2025
8 Kwietnia 2025
8 Kwietnia 2025
8 Kwietnia 2025
8 Kwietnia 2025