Instrukcja obsługi Noctua NH-P1
Noctua Sprzęt komputerowy NH-P1
Przeczytaj poniżej 📖 instrukcję obsługi w języku polskim dla Noctua NH-P1 (6 stron) w kategorii Sprzęt komputerowy. Ta instrukcja była pomocna dla 15 osób i została oceniona przez 4 użytkowników na średnio 4.1 gwiazdek
Strona 1/6
Place the backplate on the rear side of the motherboard so that the
bolts stick through the mounting holes.
Caution: Please make sure that the three cut-outs in the
supplied backplate align with the screws of the motherboard’s
stock backplate.
First put the plastic spacers onto the bolts of the backplate, then
add the NM-IMB2 mounting bars.
Installing the mounting bars3
Noctua NH-P1|
Installation manual
Scan this code to display
multilingual manuals on
you mobile phone.
While the NH-P1 provides first-rate performance for a passive
cooler, it is not suitable for overclocking or CPUs that create high
heat-loads. Please note that the TDP (Thermal Design Power)
rating or amount of heat dissipation that the cooler can handle
not only depends on the chassis and various other factors such as
ambient temperature or other components inside the system, but
also generally varies from CPU model to CPU model.
For this reason, we specify cooling performance using the
Noctua Standardised Performance Rating (NSPR) instead of
giving a general TDP specification. In addition, we refer to our
CPU compatibility list where we indicate how well the cooler can
be expected to work on a particular CPU in a fully optimised
setup (see our setup guidelines):
https://ncc.noctua.at/s/nh-p1-cpus
If necessary, Noctua recommends adding a near-inaudible
120mm fan like the NF-A12x25 LS-PWM to the heatsink for
improved performance headroom.
Dear customer,
Congratulations on choosing the Noctua NH-P1.
The NH-P1 is Noctua’s first passive CPU cooler and has been
custom-designed for fanless operation from ground up: In
enclosures with good natural convection, its six heatpipes and
thick, widely spaced heatsink fins enable it to cool modern
high-end CPUs with low to moderate heat dissipation
completely passively. Please take a look at our setup guidelines
in order to make sure that you will get optimal results.
Enjoy your NH-P1!
Yours sincerely,
Roland Mossig, Noctua CEO
This manual will guide you through the installation process of the
SecuFirm2+™ mounting system step by step.
Prior to installing the cooler, please consult the compatibility list
on our website (www.noctua.at/compatibility) and verify that the
cooler is fully compatible with your motherboard.
Please also make sure that your PC case offers sufficient clearance
for the cooler and that there are no compatibility issues with any
other components (e.g. tall RAM modules).
Double check that the heatsink and fan clips do not make
contact with the VGA card or other PCIe cards.
Noctua cannot be held responsible for any damage or losses caused
by compatibility issues. Should you encounter any difficulties,
please check the FAQs on our website (www.noctua.at/faqs) and
don’t hesitate to contact our support team at support@noctua.at.
Multilingual versions of this manual are available on our website:
www.noctua.at/manuals
LGA115x & LGA1200
!
Caution: In order to get optimal results when building passively
cooled systems using the NH-P1, it is important to follow some
general guidelines.
Please refer to the following page for detailed guidelines and
recommendations on how to set up your system for best results:
https://noctua.at/en/nh-p1-setup-guidelines
The NH-P1 strictly requires either a fanless PC case with good
natural convection, an open benchtable type setup or a PC case
with fans in order to achieve its full performance.
We offer a list of recommended cases for completely fanless
systems using the NH-P1:
https://ncc.noctua.at/s/nh-p1-case-recommendations
Required mounting parts:
4x NM-ITS1-TX
thumb screws
4x NM-IPS1
plastic spacers
1x NM-IBP2
backplate
2x NM-IMB2
mounting bars
In case you want to use the cooler on an assembled system and
your case doesn’t have a cut-out at the rear side of the mother-
board tray, you first have to remove the motherboard from the
case in order to be able to install the supplied backplate.
Removing the motherboard1
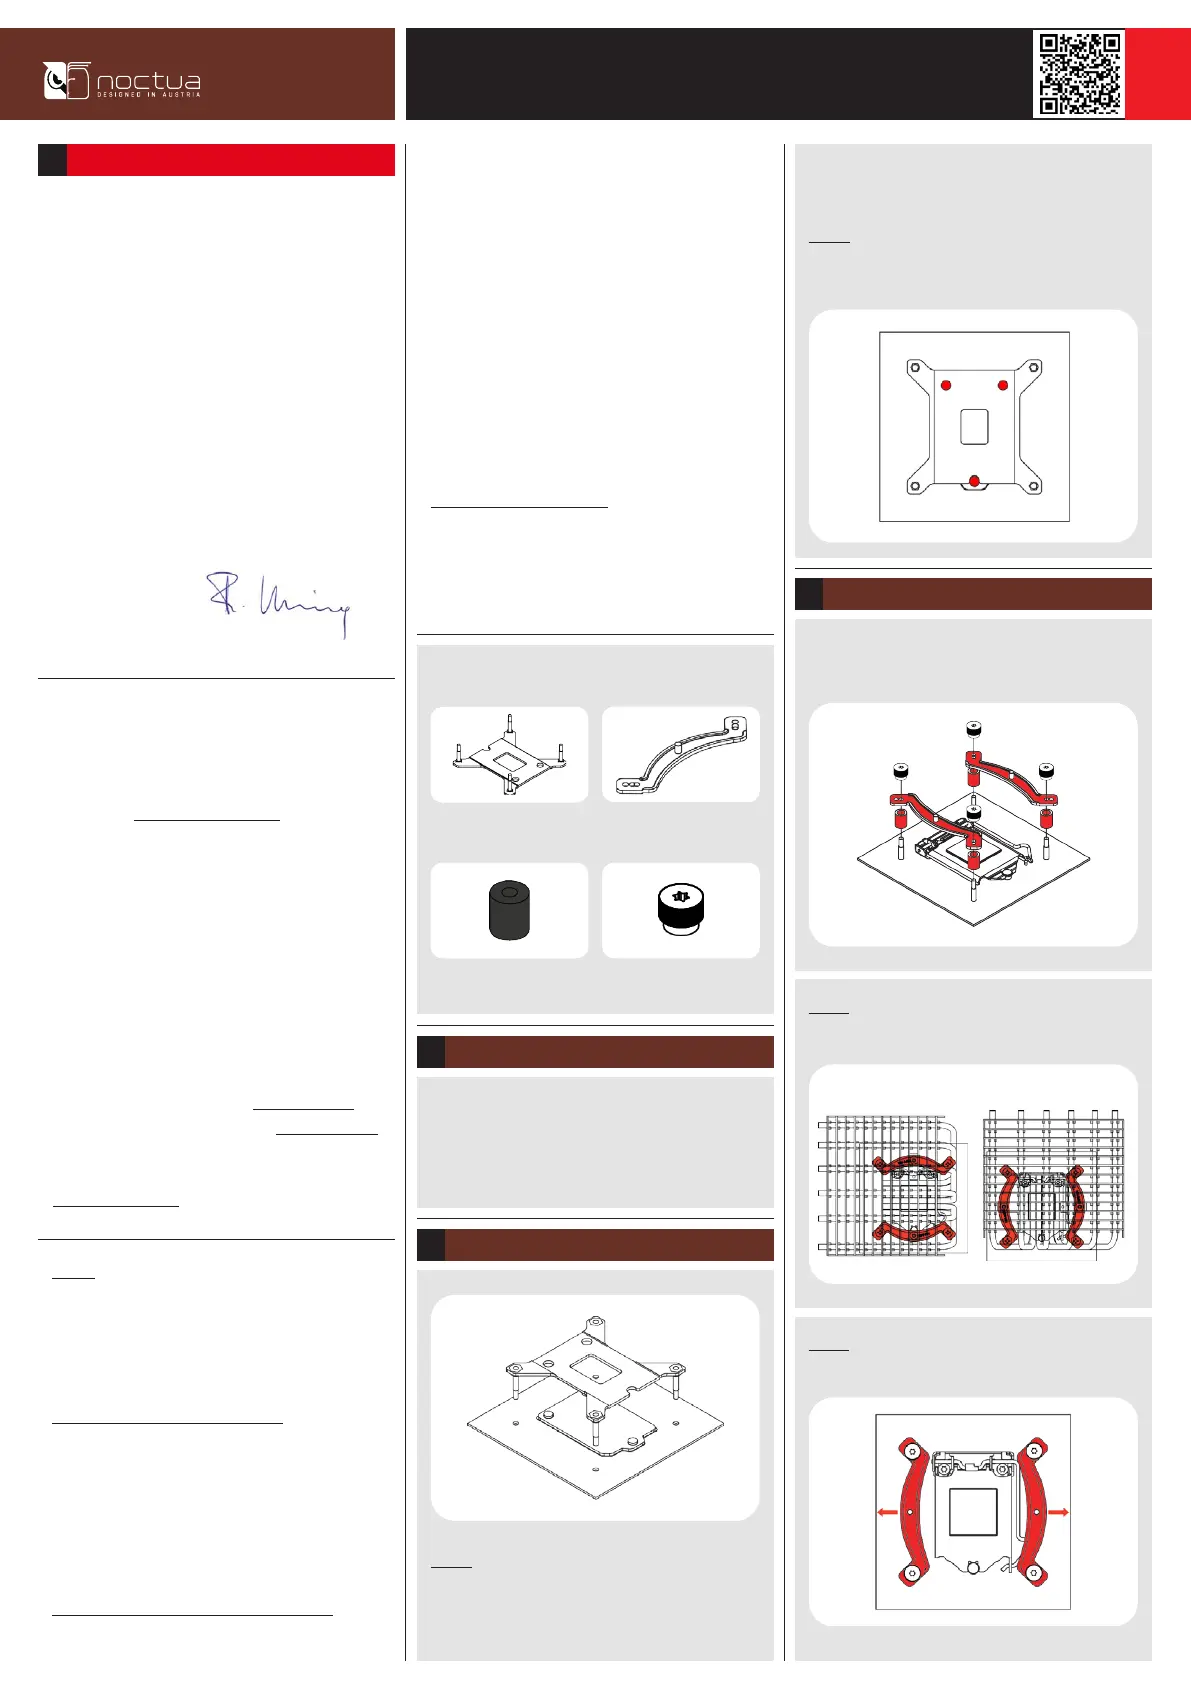
Caution: The supplied backplate will install over the mother-
board’s stock backplate, so the motherboard’s stock backplate
must not be taken off.
Attaching the backplate2
Caution: Choose the alignment of the mounting bars according to the
desired final orientation of the cooler:
Caution: Make sure that the curved sides of the mounting bars are
pointing outwards.
Orientation AOrientation B
Specyfikacje produktu
| Marka: | Noctua |
| Kategoria: | Sprzęt komputerowy |
| Model: | NH-P1 |
Potrzebujesz pomocy?
Jeśli potrzebujesz pomocy z Noctua NH-P1, zadaj pytanie poniżej, a inni użytkownicy Ci odpowiedzą
Instrukcje Sprzęt komputerowy Noctua

9 Kwietnia 2025
9 Stycznia 2025
9 Stycznia 2025
9 Października 2024
9 Października 2024
9 Października 2024
9 Października 2024
9 Października 2024
3 Października 2024
3 Października 2024
Instrukcje Sprzęt komputerowy
Najnowsze instrukcje dla Sprzęt komputerowy
9 Kwietnia 2025
9 Kwietnia 2025
8 Kwietnia 2025
8 Kwietnia 2025
8 Kwietnia 2025
8 Kwietnia 2025
8 Kwietnia 2025
8 Kwietnia 2025
8 Kwietnia 2025
8 Kwietnia 2025