Instrukcja obsługi Noctua NH-U9DO A3
Noctua Sprzęt komputerowy NH-U9DO A3
Przeczytaj poniżej 📖 instrukcję obsługi w języku polskim dla Noctua NH-U9DO A3 (1 stron) w kategorii Sprzęt komputerowy. Ta instrukcja była pomocna dla 12 osób i została oceniona przez 6 użytkowników na średnio 4.6 gwiazdek
Strona 1/1
Caution:When using the (U.)L.N.A., check the temperature
of your CPU using appropriate software (e.g. the respective
applications of your mainboard manufacturer), in order to
evade automatic throttling of the CPU due to the increased
temperature. If the cooling performance is insufficient, please
increase case ventilation or remove the (U.)L.N.A.
Thank you very much for choosing a Noctua cooler for your
AMD Opteron system. Please install the cooler according to
this manual.
Should you encounter any difficulties, please check the FAQs
on our website and don’t hesitate to contact our support team
at support@noctua.at. Noctua cannot be held responsible for
any damage or losses caused by compatibility issues.
NH-U9DO A3
|
Installation Manual(for NH-U12DO A3, see reverse side)
Applying thermal paste
Step 2:
If there are residual traces of thermal paste or thermal pads on
your CPU, please clean them off first. Press a small drop (4-5mm
diameter) of NT-H1 onto the centre of the heat-spreader.
Caution: Applying too much thermal paste will lower the heat
conductivity and cooling performance!
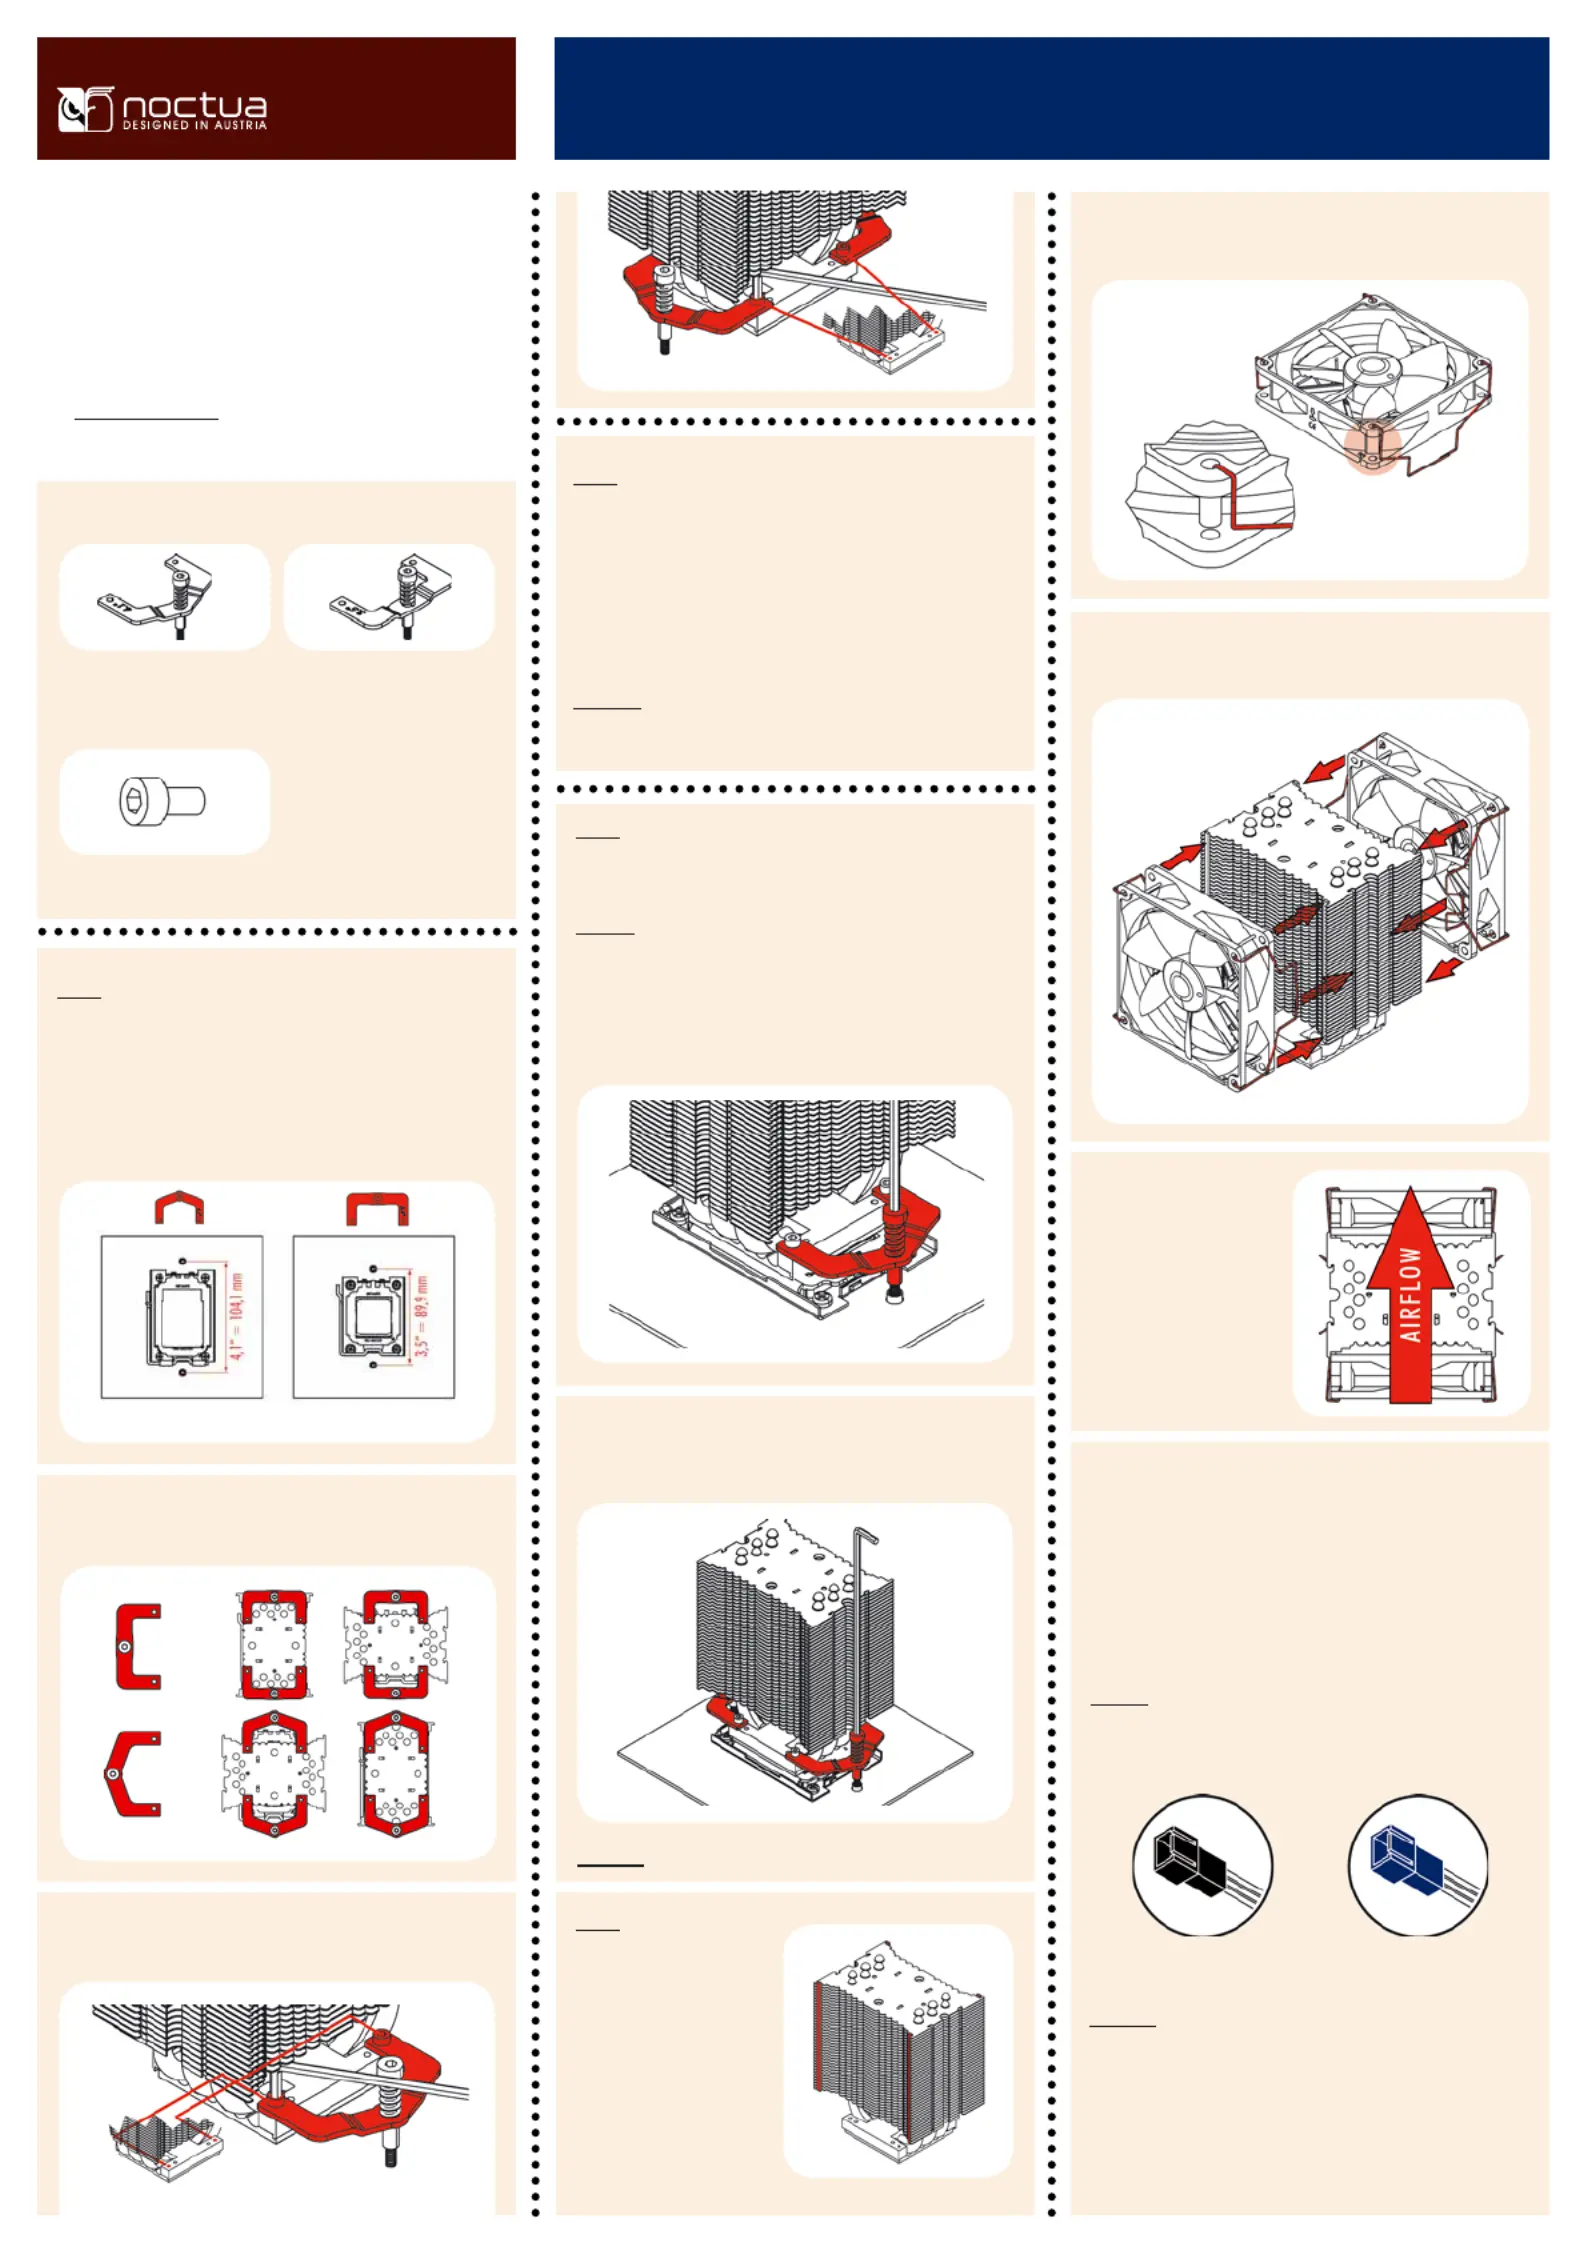
Step 1:
Attaching the fastening brackets
The NH-U9DO A3 includes fastening brackets for mainboards
with 3.5” and 4.1” hole spacing. Please choose the appropri-
ate set of fastening brackets for your mainboard:
Caution: Please take off the protection cover at the bottom side
of the heatsink first!
Put the heatsink onto the CPU and tighten the two spring-
loaded screws until they stop.
Step 3:
Fastening the cooler to the CPU
Required mounting parts:
1x NT-H1 thermal compound
2x NF-B9 92mm fan
4x anti-vibration-strips
1x screwdriver
4x fan clips
4x short screws
2x 4,1”
fastening brackets
2x 3,5”
fastening brackets
Step 4:
Stick the 2 anti-vi-
bration strips onto the
cooling fins in order to
dampen minor vibra-
tions emitted by the
fan.
Attaching the fan(s)
When installing the cooler turned by 90°, please use the sup-
plied screwdriver to tighten the screws.
Caution: Gently tighten the screws until they stop
Low-Noise Adapter (L.N.A.)
1300 RPM, 13.1 dB(A)
Ultra-Low-Noise Adapter (U.L.N.A.)
1000 RPM, 7.9 dB(A)
BlackBlue
Please install the fastening brackets according to the desired
orientation of the cooler:
Then attach the fan(s) to the heatsink using the steel clips,
placing it so that it blows onto the heatsink.
Install two of the steel clips onto the fan by putting the ends of the
steel clips into the mounting holes of the fan as shown below.
Add the second NF-B9
fan sucking air off the
rear side of the heatsink
for extra performance
(average gains 1-3°C).
Please make sure that
both fans are aligned in
the same direction.
Screw the fastening brackets to the base of the heastink using
the 4 short screws. Please use the outer set of mounting holes.
Socket G34 / Socket FSocket C32 / Socket F
Connect the fan(s) to the mainboard, power supply or fan con-
troller. Use the supplied y-split cable to connect both fans to
one fan header. Depending on your CPU and the temperature
inside the case, you may interconnect the supplied Low-Noise
Adapter (L.N.A.) or Ultra-Low-Noise Adapter (U.L.N.A.) in or-
der to further reduce the fan’s operating noise.
Caution: Please use one adaptor per fan when running two
fans with adaptors. Never use one adaptor for two fans by
putting it before the y-split cable.
Specyfikacje produktu
| Marka: | Noctua |
| Kategoria: | Sprzęt komputerowy |
| Model: | NH-U9DO A3 |
| Kolor produktu: | Brown, White |
| Odpowiednia lokalizacja: | Procesor |
| Waga produktu: | 540 g |
| Pobór mocy: | 1.32 W |
| Napięcie: | 12 V |
| Model: | Chlodnica/wentylator |
| Wymiary produktu (SxGxW): | 95 x 71 x 125 mm |
| Zasilanie: | DC |
| Obsługiwane gniazda procesora: | Socket C32, Socket F (1207), Socket G34 |
| MTBF (Średni okres międzyawaryjny): | 150000 h |
| Szybkość obrotowa: | 1600 RPM |
| Średnica czaszy wentylatora: | 120 mm |
| Przepływ powietrza: | 64, 3 m³/h |
| Technologia łożysk: | SSO |
Potrzebujesz pomocy?
Jeśli potrzebujesz pomocy z Noctua NH-U9DO A3, zadaj pytanie poniżej, a inni użytkownicy Ci odpowiedzą
Instrukcje Sprzęt komputerowy Noctua

9 Kwietnia 2025
9 Stycznia 2025
9 Stycznia 2025
9 Października 2024
9 Października 2024
9 Października 2024
9 Października 2024
9 Października 2024
3 Października 2024
3 Października 2024
Instrukcje Sprzęt komputerowy
Najnowsze instrukcje dla Sprzęt komputerowy
9 Kwietnia 2025
9 Kwietnia 2025
8 Kwietnia 2025
8 Kwietnia 2025
8 Kwietnia 2025
8 Kwietnia 2025
8 Kwietnia 2025
8 Kwietnia 2025
8 Kwietnia 2025
8 Kwietnia 2025