Instrukcja obsługi Odys Connect 8+
Przeczytaj poniżej 📖 instrukcję obsługi w języku polskim dla Odys Connect 8+ (1 stron) w kategorii tabletka. Ta instrukcja była pomocna dla 27 osób i została oceniona przez 7 użytkowników na średnio 4.6 gwiazdek
Strona 1/1
ODYSCONNECT8+QUICKSTARTGUIDE
Introduction
ODYS
CONNECT8+isaMIDwithfullcolorscreen.
Althoughthisproductissafe,pleaseobservetheinformationandwarningsfromtheusermanual.
Theusermanualisinstalledatthedevicesinternalmemoryandcanbeaccessedoverthe
mainmenu.Pleaserefertotheusermanualfordetailedinstructions,conformityand
supportinformation.
‐Toopentheuser’s
manualpleasetaponthemanualiconyoucanseeatthehomescreen
toopenthefolderwherethemanualsarestoredin.
TurningOn/Off
Toturnonthedevice,pressandholdthePowerbuttonontheunituntilyou‐seethebootupscreen
thenmayrelease.Ittakeafewminutestothestartupsystem,pleasewaitbeforeyouproceed.
Toturnoffthedevice,pressandholdthePowerbuttonuntil
youseetheoption“PowerOff”,tapon
“PowerOff”andtapthenon“OK”.
Tip:Thisdevicewillsleepwiththescreenoffifitstaysinactiveforafewseconds.Youcanbrieflypress
thethePowerbuttontoturnonscreenandwakeitup.
PowerOnandOfftheDisplay
‐Shortlypressthe[Power]buttontoturnoffthedisplay.
‐Pressthe[Power]buttonagainshortlyturnthedisplayonagain.
LanguageSetting
‐ConfirmthetworequestsatthetapingatbeginningbyOK.
‐Tapon[Settings]andselect[Language&Input]
‐
Tapon[Language]andselectyourdesiredlanguageontherightside.
GettingStarted
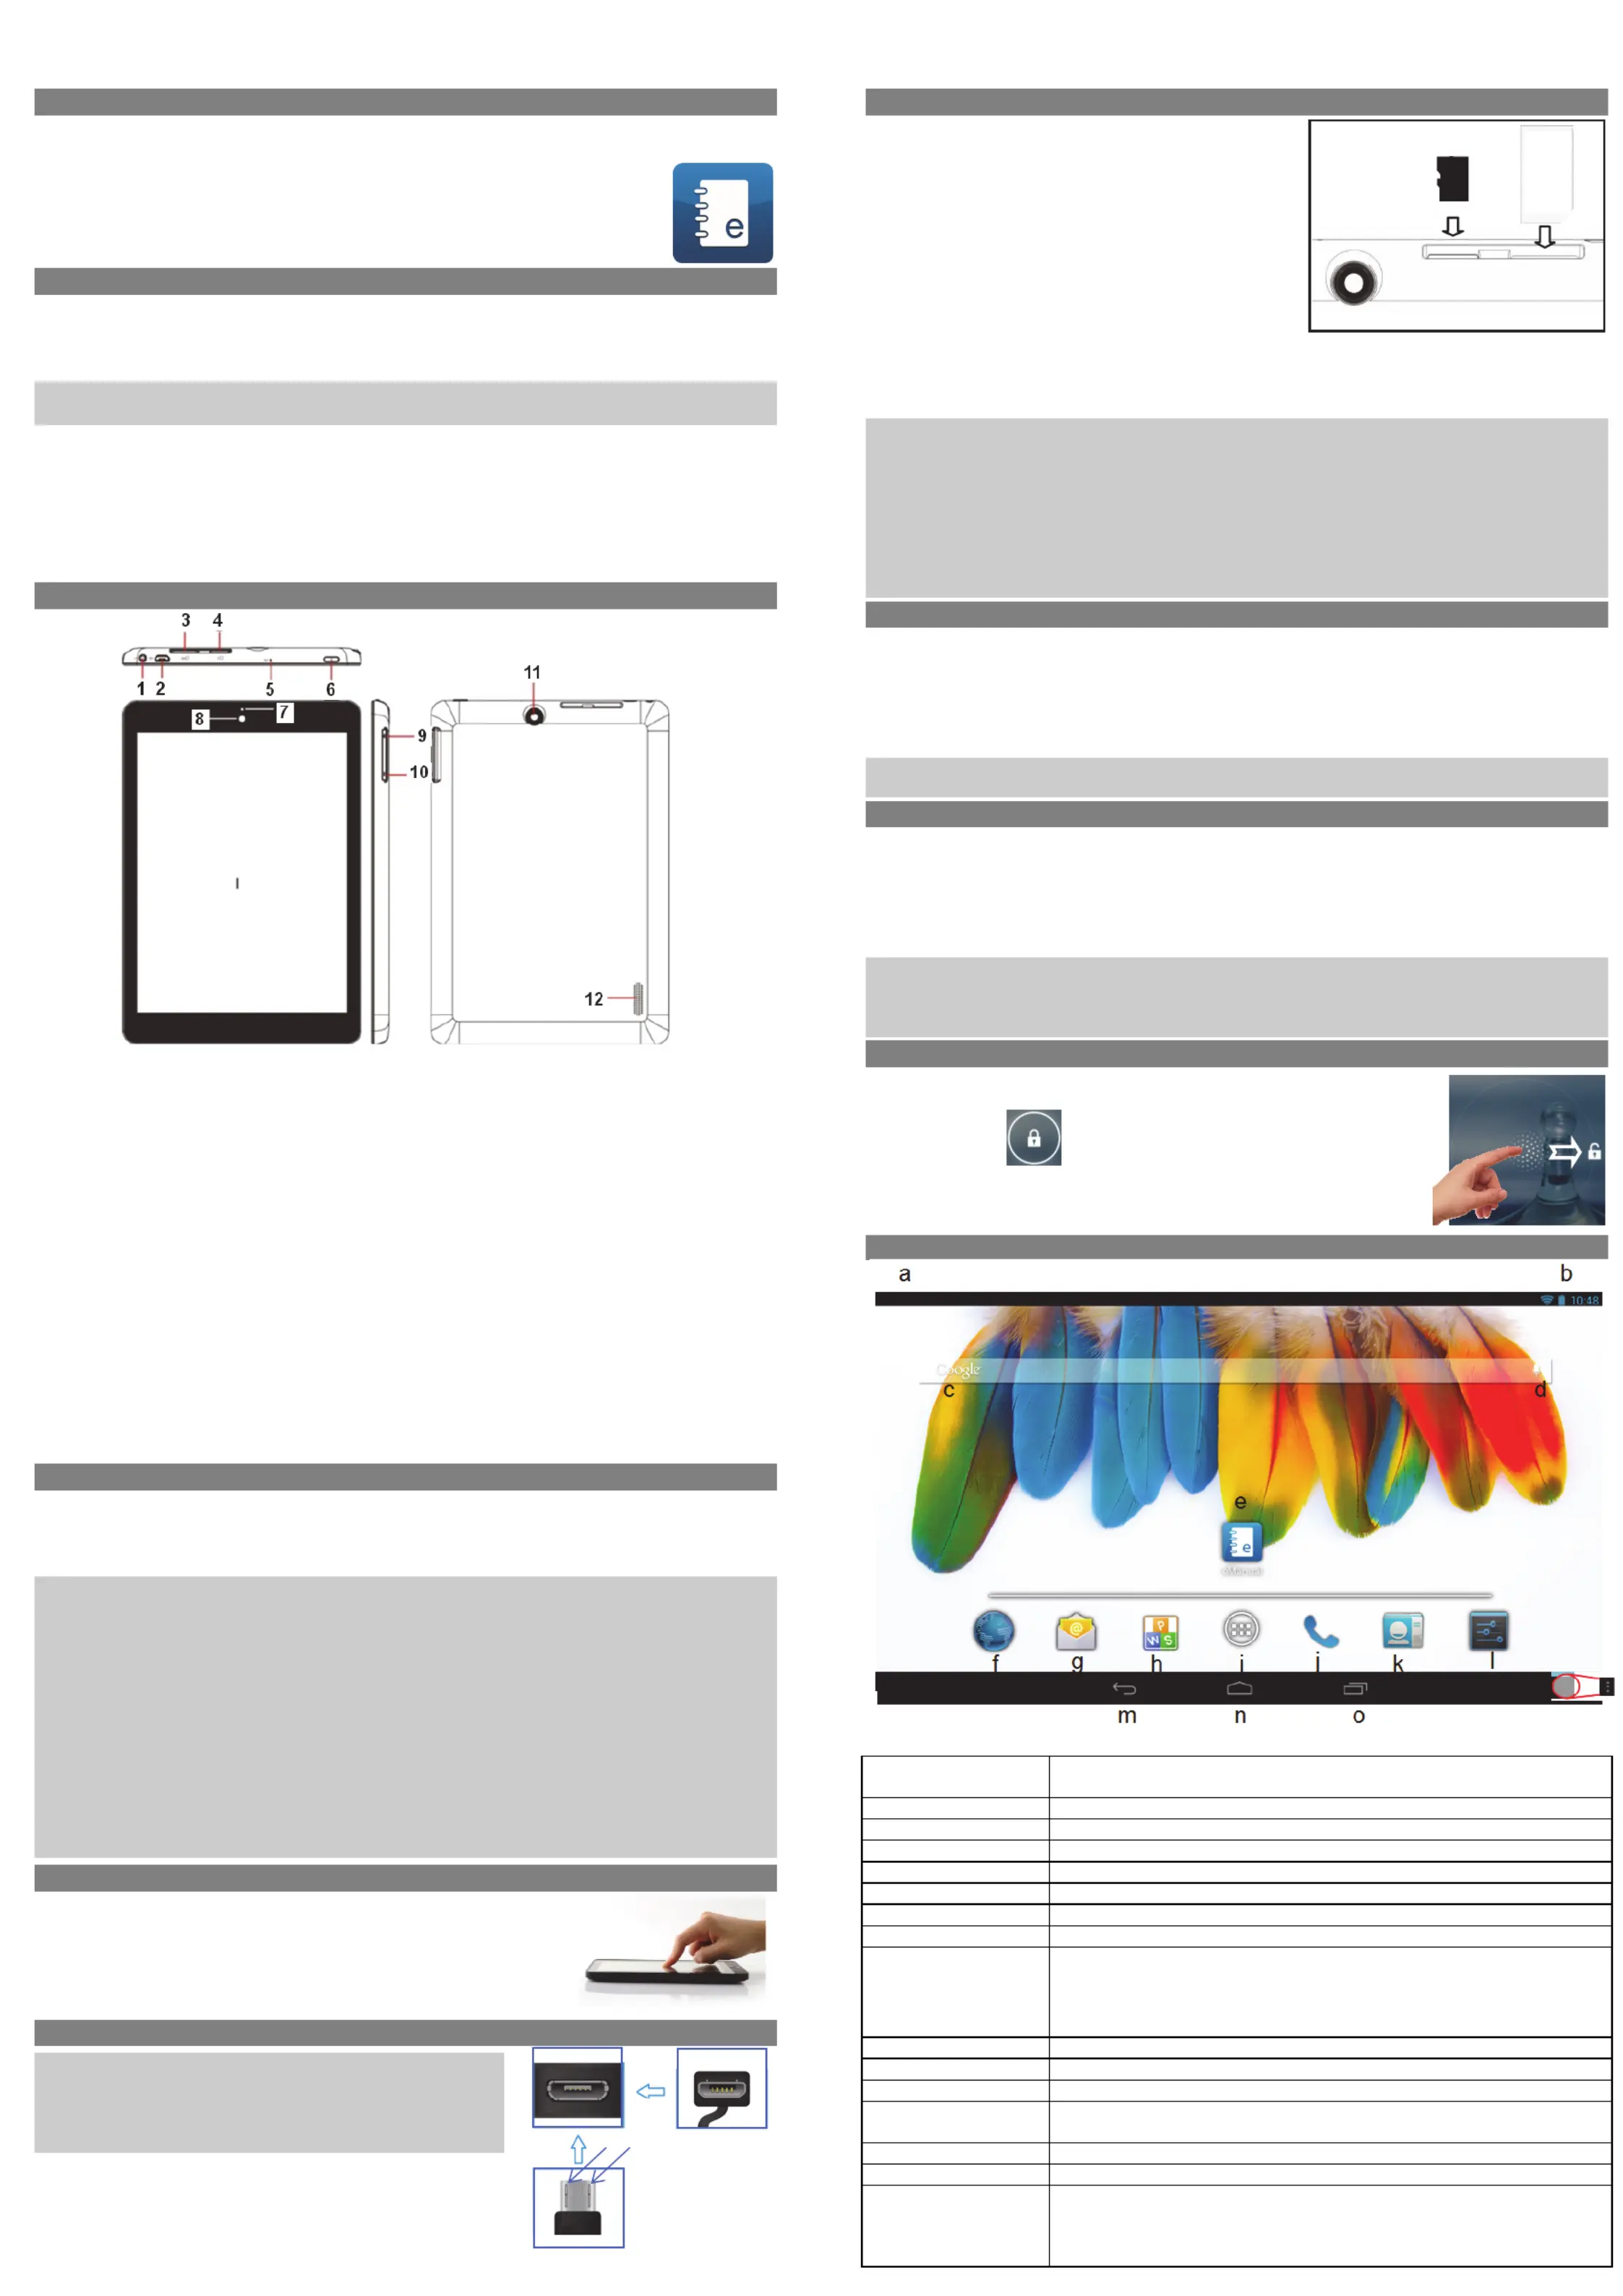
1.HeadphonejackAudiooutputconnectionforhead‐phones
Note:Speakeroutputisautomaticallydisabledwhenheadphonesare
connectedtotheplayer.
2.2.0MicroUSBHi‐
speed
Connecttodataacomputertotransfer(e.g.,music,videos,photos,files).
SupportUSBstick,Surfstick,KeyBoardandMouse.
Note:
A
OTGsupportingadaptorcableisrequired(optional)
3.SimCardSlotAccommodatesanySimCard.
4.MicroSDCardSlotAccommodatesanystandardSD/SDHCmemorycard.
5.Microphone
6.PowerButtonPressandtoturntheholdthepowerswitchonoffordevice;
Brieflypresstheswitchtoturnthescreenonoroff.
Pressandtoholdfor10Secondsresetandrestartthedeviseifitfreezes
orotherwisebehavesabnormal.
7.ChargeIndicator
8.FrontCameraFront‐facingcamerafortakingavatarpictures
9.Volumekey+Shortlypresstoincreasevolumelevel.
10.Volumekey‐Shortlypresstodecreasevolumelevel.
11.RearCameraRear‐facingcamerafortakingpictures
12.Speaker
ChargingBattery
Thedevicehas‐abuiltinrechargeablebattery.Noextrabatteryinstallationisrequired.Justcharge
thebattery.devicewhenitindicateslow
Tochargethethebattery,connectthetodeviceanystandardwalloutletviaUSBportusingthe
poweradaptor.aboutIttakes5hourstofullycharge
thebattery.
Note:
a.adviceWetouseonlythedeliveredpoweradapterwiththistablet.
b.Youcanoperatethedeviceevenwhenitisbeingcharged.Butforextendedbatterylife,itis
suggestedNOTtousethedevicewhenitischarging.
c.Itisrecommendedtothechargethebatterybeforeyouusethedeviceforfirsttime.
d.beusedFormaximumperformance,lithiumion‐batteriesneedtooften.Ifyoudon’tusethe
deviceoften,besuretorechargethebatteryatleastoncepermonth.
e.Shouldtherechargeablebatteryofthedevicedischargecompletely,connectthedevice(usingthe
adapter)tothemainpowersourceforapproximately‐510minutesbeforeattemptingnormal
operation.
f.someIncases,deviceswhichhavebeenchargedforlongerperiodsoftimemaynotbeabletobe
switchedbackandon.ShouldthisoccuryouhavetomakeaReset.Pressholdfor10Secondsto
resetandrestartthedevice.
Touchscreen
Thetouchscreenisacapacitivedisplayanddesignedforprecisionand
respondsbestwhentouchedwiththesmallestpointpossible.Usethe
flatpadofyourfingertotouchthescreen.
ConnectviaUSB
Pleasenote:Onlyuseconnectingcablewithamaximumlengthof
80cm.PleasemakesurewhenconnectingtheUSBadapteror
connectorcablesattentiontothecorrectalignmentoftheconnector
beforeinsertingitintotheUSBsocketinsertionontheunit.Incorrect
maycausedamagetoplugandsocket.
Onthesideofoftheplugthereareusuallysmallsizeshooks
thatsecurethefixation.
Payspecialattentiononofthepositionthehooks,theyshow
upwardswhenconnectingcableswhilethescreenisabove.
InstallingMemoryCard
Thisdevicecanreadfilesdirectlyfrommemorycardand
USBmemory.
Tousememoryacard,cardfindtheslotatthesideof
thedeviceandtheninsertthememorycardintotheslot
inthecorrectorientationorConnectUSBMemoryusing
theprovidedUSBadaptorcable.To
accessthefiles
storedinthethememorycard,enterExplorermodeby
tappingtheExplorericonandselectthe“SDCard”
directory.
‐CheckthattheMicroSDcardisinthecorrectposition
withthecontactpinfacingdownwardsasillustrated.You
maydamagethecardandthereader
ifMicroSDcardisnotinsertedincorrectposition.
‐PushtheMicroSDcardintothecardslotuntilitclicks.
‐ToremoveMicroSDcard,pushthecardonceagainuntilitclicks.
Note:WerecommendusingonlyMicroSDorSDHCcardsupto32GBcapacity.
‐WhenaMicroSDcardisinsertedfrominorejectedthedevice,itmaytakethefewsecondsfor
devicetoupdatethecontent.
‐PleaseavoidinsertingorejectingMicroSDcardwhenotheroperationisrunningasthismaycause
thesystemhang.
‐DoNotremovethecardifthecontentcardinsidetheisbeingplayed.Thiswillhaltthe
operationofthedeviceandmightcauseasystemhang.
‐OnlyusetheprovidedUSBadaptorcabletoattachUSBmemorydevices.
‐Pleaseuseyourfingernailstoproperlyinsertorremovethecard.
InstallingSIMcard
TouseaSIMSIMcard,findthetheandcardslotatbacksideofthedevicetheninsertthecardinto
thetheslotincorrectorientation
‐CheckthattheSIMcardisinthecorrectpositionwiththecontactpinfacingdownwardsas
illustrated.Youmaydamagethe
cardandtheposition.readerifisSIMcardnotinsertedincorrect
‐PushtheSIMcardintothecardslotuntilitclicks.
‐ToremoveSIMcard,pushtheSIMcardonceagainuntilitclicks.
Note:TheSIMCardcanonlyberecognizedifthedevicewasturnedoffwhileinserting.
MicroSIMCardsarenotsupported.
TransferringFiles
Beforereadingorplayingfiles,youneedtototransfermediafilesfromacomputerthedevice.
(1)suppliedConnectthedevicetotheacomputerwithUSBcable.
(2)Onceconnected,oneremovablediskItdrivewillshowonyourcomputer.representstheinternal
memoryofthethedeviceand
memorycardinsertedintothedevice.Nowyoucancopyfilesfromor
toasthesediskdrivejustyouwouldonyourharddrive.
3)Disconnectthethedevicefromcomputer.
Note:‐ThepreinstalledapplicationsandAndroidOSoccupyaconsiderablepartofcapacity–nearlymorethan
1GB,itisnormalhugethatyouseedifferencebetweenavailablememoryspaceandtotalcapacity.
Caution!ThedevicesupportsAdobeDRMcontents.AdobeDigitalEditions(ADE)isrequired.Pleaserefertothe
user’smanualforcloserinformation’sonhowtouseDRMprotectedfiles.
Screenlock
Thescreenautomaticallyturnsoffandafterlocksitselfasetperiodoftime.
Whenthescreenturnedoff,pressthethePowerbuttontolightupscreen.
Pushthelockicon
anddragittotheopenlockattherightsideto
unlock.
Home Screen
a.SystemHintsInformstheuserifattachedmemoryorupdatesareandavailableothersystem
statusinformation’s
b.Systemsettings
c.GoogleSearchBar
d.GoogleVoiceSearch
e.ebookeManualManualinformat
f.BrowserTaptotolaunchtheBrowservisityourfavoritewebsites.
g.E‐MailToopenthemailclient
h.KingsoftOffice
i.ApplicationsiconTaponthisicontorevealallapplicationsinstalledonyourTablet
- YoucancopytheapplicationsontotheHomescreenbypressing
andholdingontheiricons.
- YoucandeletetheapplicationfromtheHomeScreenbydragging
theiriconstotheCrossthatappearsatthetopofthescreen.
j.Telephone
k.Contacts
l.SystemSettings
m.BacksoftkeyTaptotothethethereturnpreviousscreen.Ifkeyboardisonscreen,taptoclose
thekeyboard.
n.HomesoftkeyTaptotothereturnhomescreen.
o.RunningappsShowappswhicharecurrentlyrunninginbackground.
p.MenusoftKeyTaptoviewtheoptionmenu
Note:WhenyouTaptheMenukeyfromwithinanapplication,youwillseethe
optionsforthatapplication.Butyouwillnotseethemonstartscreen.
Caution!Someappsmayshowthisiconatthetoprightcorner.
v1.0
Top
Bottom
Hooks
Screen
p
Backside
SimSlotCardMicroSDSlot
Camera
Provicer
523503423048WD
MC
UM
TS/GSM
SIM
Specyfikacje produktu
| Marka: | Odys |
| Kategoria: | tabletka |
| Model: | Connect 8+ |
Potrzebujesz pomocy?
Jeśli potrzebujesz pomocy z Odys Connect 8+, zadaj pytanie poniżej, a inni użytkownicy Ci odpowiedzą
Instrukcje tabletka Odys

3 Października 2024
3 Października 2024
3 Października 2024
3 Października 2024
3 Października 2024
Instrukcje tabletka
Najnowsze instrukcje dla tabletka
9 Kwietnia 2025
3 Kwietnia 2025
3 Kwietnia 2025
3 Kwietnia 2025
1 Kwietnia 2025
1 Kwietnia 2025
1 Kwietnia 2025
1 Kwietnia 2025
31 Marca 2025
30 Marca 2025