Instrukcja obsługi Oyen Digital CB3-54-1000-BK
Oyen Digital zewnętrzny dysk twardy CB3-54-1000-BK
Przeczytaj poniżej 📖 instrukcję obsługi w języku polskim dla Oyen Digital CB3-54-1000-BK (1 stron) w kategorii zewnętrzny dysk twardy. Ta instrukcja była pomocna dla 29 osób i została oceniona przez 5 użytkowników na średnio 4.8 gwiazdek
Strona 1/1
MiniPro Hard Drive Series
User Guide
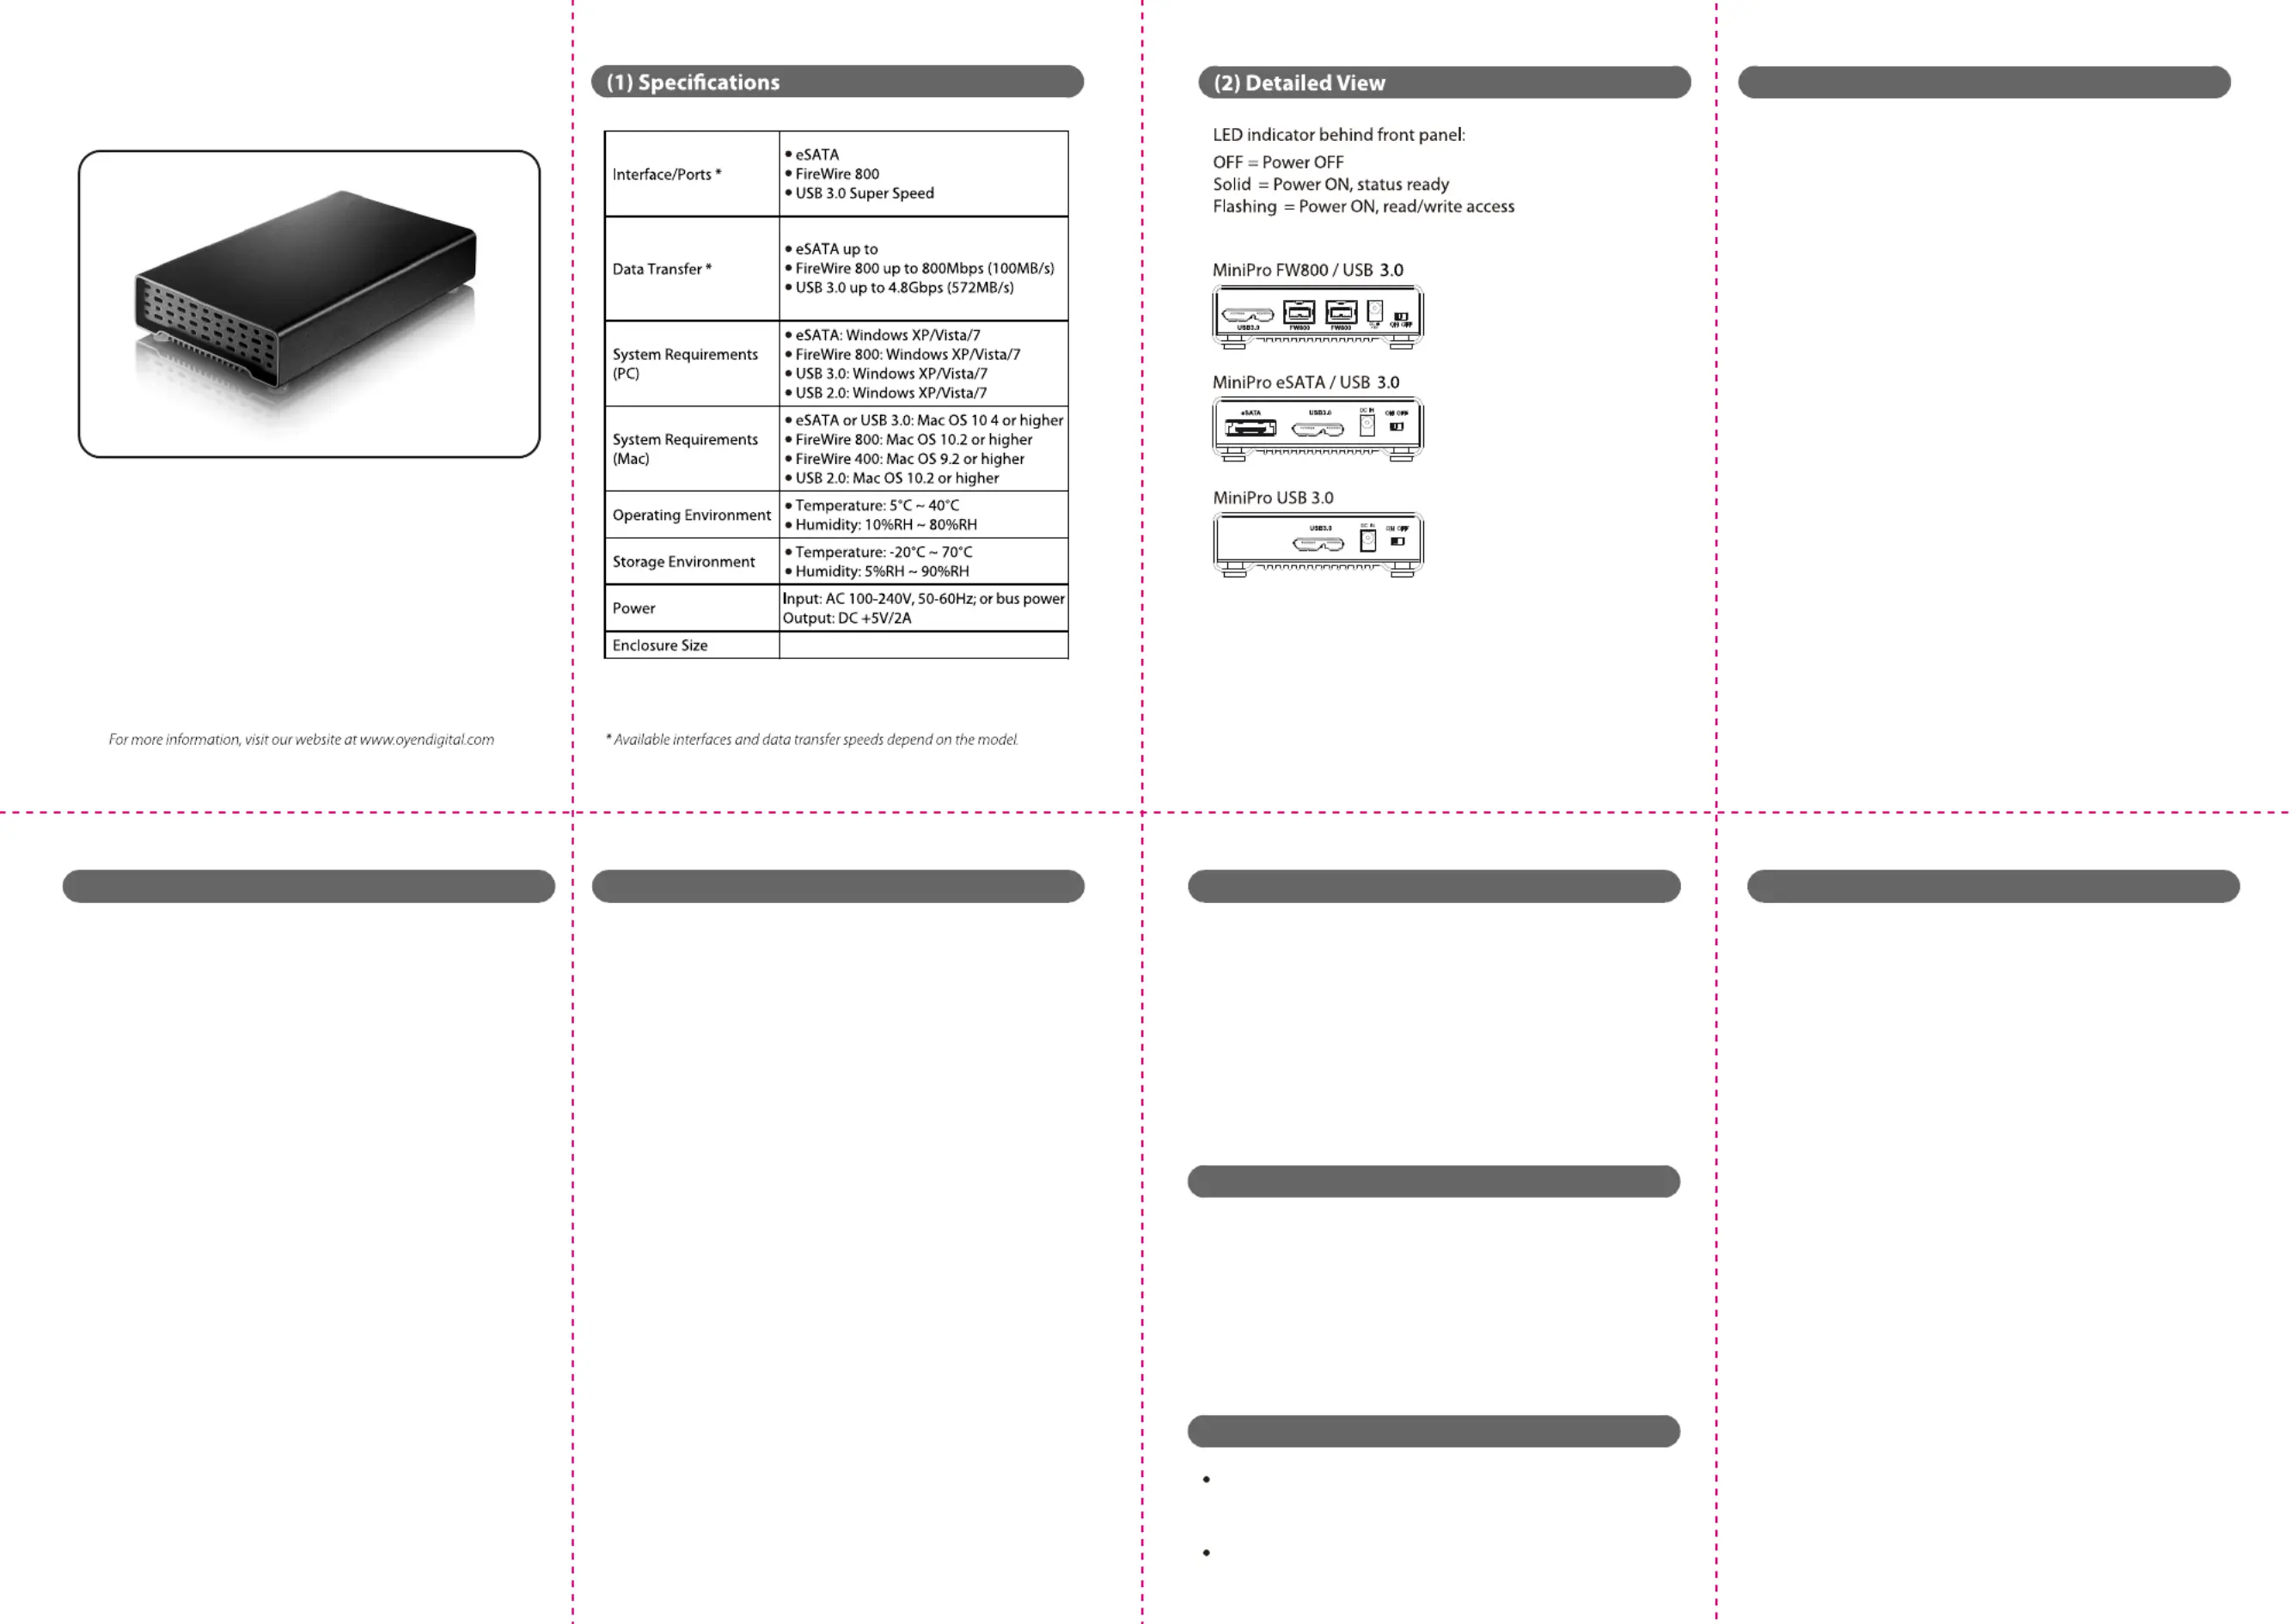
(3) Connecting the Hard Drive
Connecting using USB:
1) Connect the USB connector from the USB cable to a USB port on
your computer. (If your drive includes a USB y-cable, we recommend
connecting both USB connectors for maximum power. This is generally
not necessary if connecting to a USB 3.0 integrated port.)
2) Connect the other end of the USB cable to the hard drive.
3) Turn the power switch on. Wait 5-20 seconds for the computer
to recognize the drive.
Notes:
a) Front USB ports on a desktop may not be able to provide adequate power.
b) If connecting to a USB Hub, make sure it is a powered hub (uses AC adapter).
Connecting using FireWire:
1) Connect the appropriate FireWire cable to a FireWire port on
your computer.
2) Connect the other end of the FireWire cable to the hard drive.
3) Turn the power switch on. Wait 5-20 seconds for the computer
to recognize the drive.
Connecting using eSATA:
1) Connect the eSATA cable to the eSATA port on your computer.
2) Connect the other end of the cable to the hard drive.
3) Connect power to the drive using one of the following options:
• AC Power Adapter
• DC to USB Power Cable
• eSATAp Power Cable (not included)
4) Turn the power switch on. Wait 5-20 seconds for the computer
to recognize the drive.
Note: The drive should only be connected to your computer via
one interface at a time.
The drive is pre-formatted as either NTFS (Win) or Mac OS
Extended (Mac) depending on the software included.
For users who wish to reformat the drive, please visit our
website for instructions.
To reformat using Windows:
http://oyendigital.com/FAQs.html#10
To reformat using MAC OS:
http://oyendigital.com/FAQs.html#8
Note: The drive can be used on both Windows and Mac
systems by formatting the drive as “MS-DOS (FAT32).”
Instructions are provided in the Mac OS link above.
(4) Formatting the Hard Drive(5) Using the Hard Drive(6) Disconnecting the Hard Drive
(7) Warranty Information
(9) FAQs
(8) Safety Information
Using the MiniPro with the included software
The MiniPro includes software (via download) that allows you to
easily backup your important les. The software is not required in
order to use the drive. To install the software, simply follow the
steps on the included glossy card.
Using the MiniPro without software
1) Look for the MiniPro drive in My Computer (Win) or Finder (Mac).
2) Click and hold down the mouse button on the le/folder that you
want to copy to the MiniPro drive.
3) Drag the mouse over the icon representing the MiniPro drive.
4) Let go of the mouse button and the le will copy to the MiniPro.
5) The task is complete. This is known as a "drag-and-drop" action.
Using the MiniPro with Apple Time Machine (Mac Users Only)
1) Make sure the drive is formatted as Mac OS Extended (Journaled)
as described in the “Formatting the Hard Drive” section.
2) Go to the Apple Menu > System Preferences and click on the
Time Machine icon. The Time Machine panel will then launch.
3) Click On to enable Time Machine.
4) Select the MiniPro hard drive and choose “Use for Backup.”
5) You can set additional options by clicking the Options button.
6) Time Machine is now backing up your Mac automatically to the
MiniPro hard drive.
.
The disk drive contained in your MiniPro is a delicate
electronic device and is susceptible to damage due to
excessive physical shock. Please handle the unit with care.
Avoid moving the drive while it is reading/writing data.
Doing so can cause corruption and/or damage to the drive.
Q: Can I use my drive with bus power only?
A: Yes, in the majority of cases bus power is adequate. However, if you
are using the drive with a hub, make sure that it is a powered hub
(uses AC adapter).
Q: Why does my computer show that the external hard drive
has less capacity than advertised?
A: In the hard drive industry the partitioned size will be less than the
printed capacity on the label. This is due to the fact that computers
calculate capacity based on a binary (base 2) method, where
1GB = 1024 MB. The hard drive industry calculates using a decimal
method, where 1GB = 1000 MB. This is why the two dierent industries
will report dierent capacities for the same drive.
Q: How do I boot in MAC OS X using the external hard drive?
A: Open Disk Utility, click the drive and select “Partition” in menu on
the right. Choose “Mac OS Extended (Journaled).” 2) Click “Options”.
If you have an Intel Mac, select “GUID” as the partition scheme. If you
have a Power PC Mac, select “Apple Partition Map.” 3) Click “Partition” ;
upon completion, install the Operating System on the external drive.
5) Upon completion, eject the external drive and reboot the Mac as
normal. 6) After reboot, connect the external drive to the computer.
Open System Preferences and click “Startup Disk.” Choose the external
drive. Conrm and click restart.
For other questions please contact tech support or visit the FAQ
section of our Web site (www.oyendigital.com/support.html).
Technical Support: tech@oyendigital.com
This product includes a three (3) year repair/replacement
warranty provided by Oyen Digital. This warranty is non-
transferable and is limited to the original purchaser. Warranty
service may be requested by completing the form at the
following link: www.oyendigital.com/rma-request-form.html
For our complete warranty policy, visit:
www.oyendigital.com/warranty.html
Windows: Close all windows and applications that are accessing
the drive. Click the green “Eject Hardware” (Safely Remove
Hardware) icon in the system tray and highlight the external drive.
Wait for a few seconds until the system prompts “You may safely
remove this device.”
MAC: Close all windows and applications that are accessing the
drive. Drag the external drive to the Trash/Eject icon to dismount it.
After the disk icon has disappeared from the desktop, you may
safely disconnect the external hard drive.
/8
/8
/8
/8
4.9 x 3.1 x 1.0 inches
6Gbps
Specyfikacje produktu
| Marka: | Oyen Digital |
| Kategoria: | zewnętrzny dysk twardy |
| Model: | CB3-54-1000-BK |
Potrzebujesz pomocy?
Jeśli potrzebujesz pomocy z Oyen Digital CB3-54-1000-BK, zadaj pytanie poniżej, a inni użytkownicy Ci odpowiedzą
Instrukcje zewnętrzny dysk twardy Oyen Digital

5 Października 2024
5 Października 2024
4 Października 2024
4 Października 2024
4 Października 2024
4 Października 2024
4 Października 2024
4 Października 2024
Instrukcje zewnętrzny dysk twardy
Najnowsze instrukcje dla zewnętrzny dysk twardy
3 Stycznia 2025
2 Stycznia 2025
2 Stycznia 2025
1 Stycznia 2025
31 Grudnia 2025
31 Grudnia 2025
31 Grudnia 2025
30 Grudnia 2025
30 Grudnia 2025
30 Grudnia 2025