Instrukcja obsługi PowerA Enhanced Wireless Controller
Przeczytaj poniżej 📖 instrukcję obsługi w języku polskim dla PowerA Enhanced Wireless Controller (4 stron) w kategorii Kontroler. Ta instrukcja była pomocna dla 31 osób i została oceniona przez 9 użytkowników na średnio 4.1 gwiazdek
Strona 1/4
ENGLISH
CONTENTS
• Enhanced Wireless Controller for Nintendo Switch™
• 10ft (3m) USB-C Charge Cable
• User Guide
SET UP
Check for system update. Nintendo Switch system
update version 6.0.1 or later is required for use of
PowerA Wireless controllers.
1. Connect your Nintendo Switch to the Internet
2. Typically, system updates will be downloaded
automatically when connected online.
3. Select ‘System Settings’ from HOME menu, then
scroll down to ‘System’ to see System Update version
and automatically check for system update.
For additional help, search ‘system update’ from
Nintendo Support website.
RECHARGEABLE 900 MAH INTERNAL BATTERY
Controller was charged at the factory, but if top LED is
flashing red, plug in USB cable to charge prior to initial
pairing. Get up to 30 hours of game play when fully
charged (other variables affect play time).
NOTE: Remember to charge controller at least once
every 45-60 days (regardless of use) so battery retains
ability to charge. Battery capacity will gradually reduce
over time with repeated charging.
WIRELESS PAIRING
From the HOME Menu, select ‘Controllers,’ then
‘Change Grip and Order.’ While the following screen is
displayed, press and hold down the SYNC Button for at
least one second on the controller you wish to pair.
NOTE: After controller is paired once, it will auto-
connect next time.
UNDERSTANDING LED INDICATORS
1. The top LED near the USB port will flash Red when
the internal battery is near depletion. Plug in
USB cable to charge once indicator is flashing for
uninterrupted game play. LED will turn solid red
during charging, and off once fully charged.
2. The front LED (between Capture and Home buttons)
indicates controller will flash during programming of
Advanced Gaming Buttons.
3. The four LEDs on the bottom indicate Power & player
number 1-8, and will cycle from left to right during
wireless pairing.
ASSIGNING ADVANCED GAMING BUTTONS
1. Press the Program Button on the bottom of the
controller. The Advanced Gaming Button Program
Status LED will flash, signaling the controller is in
assign mode.
2. Press 1 of the following buttons (A/B/X/Y/L/R/ZL/ZR/
Left Stick Press/Right Stick Press/D-pad) to re-assign.
Then press the Advanced Gaming Button (AGR or AGL)
that you wish to assign. The Advanced Gaming Button
Program Status LED will stop flashing, signaling the
Advanced Gaming Button has been set.
3. Repeat for the remaining Advanced Gaming Button.
NOTE: Advanced Gaming Button assignments will
remain in memory even after disconnected.
RESETTING ADVANCED GAMING BUTTONS
1. Hold the program button down for 2-3 seconds. The
Advanced Gaming Button Program Status LED will
slowly flash, signaling the controller is in program mode.
2. Press and hold the Assign Program Button for 5
seconds to reset to no function.
TROUBLESHOOTING
Q1. My Wireless Controller is not pairing.
A1. Confirm batteries are charged by plugging in
USB-C cable.
A2. Confirm you are following the ‘Wireless Pairing’
process.
A3. Insert paper clip into Factory Reset Hole as marked
above to reset controller to factory settings.
For latest FAQs, visit PowerA.com/Support
BATTERY WARNING
Don’t attempt to replace the rechargeable battery
yourself - you may damage the battery, which could
cause overheating, fire, and injury. The Lithium-ion
battery in your device should be serviced or recycled by
PowerA or an authorized provider and must be recycled
or disposed of separately from household waste.
Dispose of batteries according to your local
environment laws and guidelines.
Don’t use or leave the product containing recharegeable
batteries exposed to very high temperatures (e.g. at
strong direct sunlight or in a vehicle in extremely hot
weather). Otherwise, it can overheat, catch fire, or the
performance will degenerate, and the service life will
be shortened.
Don’t use the rechargeable battery item in a location
where static electricity is rich, otherwise, the internal
safety devices may be damaged, causing a harmful
situation.
In case the electrolyte gets into the eyes due to the
leakage of battery, do not rub eyes. Rinse eyes with
clean running water and seek medical attention
immediately. Otherwise, it may injure eyes or cause a
loss of sight.
If the battery gives off an odor, generates heat, or in
any way appears abnormal during use, recharging or
storage, immediately remove it from battery charger
and place it in a contained vessel such as a metal box.
Be aware discarded batteries may cause fire, do not
heat the controller or throw it into fire.
MOTION WARNING
Playing video games can make your muscles, joints,
skin or eyes hurt. Follow these instructions to avoid
problems such as tendinitis, carpal tunnel syndrome,
skin irritation or eyestrain:
• Avoid excessive play. Take a 10 to 15 minute break
every hour, even if you don’t think you need it.
Parents should monitor their children for appropriate
play.
• If your hands, wrists, arms or eyes become tired or
sore while playing, or if you feel symptoms such as
tingling, numbness, burning or stiffness, stop and
rest for several hours before playing again.
• If you continue to have any of the above symptoms
or other discomfort during or after play, stop playing
and see a doctor.
FCC STATEMENT
This device complies with Part 15 of the FCC Rules.
Operation is subject to the following two conditions:
1. this device may not cause harmful interference, and
2. this device must accept any interference received,
including interference that may cause undesired
operation
WARNING: Changes or modifications to this unit
not expressly approved by the party responsible for
compliance could void the user’s authority to operate
the equipment.
NOTE: This equipment has been tested and found
to comply with the limits for Class B digital device,
pursuant to Part 15 of the FCC Rules.
These limits are designed to provide reasonable
protection against harmful interference in a residential
installation. This equipment generates, uses and can
radiate radio frequency energy and, if not installed
and used in accordance with the instructions, may
cause harmful interference to radio communications.
However, there is no guarantee that interference will
not occur in a particular installation. If this equipment
does cause harmful interference to radio or television
reception, which can be determined by turning the
Customer Service
Service client
Kundendienst
Servicio a clientes
Assistenza clienti
Apoio ao Cliente
Two year limited warranty
For warranty details or support with your authentic PowerA accessories, please visit .PowerA.com/Support
Beschränkte 2-Jahre-Garantie Informationen zur Garantie oder Unterstützung zu Ihrem PowerA-Originalzubehör
nden Sie unter PowerA.com/Support.
Garantía limitada de dos años Si quieres más información sobre la garantía o necesitas ayuda con tus accesorios
originales de PowerA, visita PowerA.com/Support.
Garantie limitée de deux ans Pour plus de détails sur la garantie ou pour obtenir une assistance pour vos accessoires
PowerA d’origine, veuillez consulter le site PowerA.com/Support.
Garanzia limitata di due anni Per i dettagli sulla garanzia o per richiedere assistenza per i tuoi accessori PowerA
autentici, visita la pagina PowerA.com/Support.
Garantia limitada de dois anos Para mais informações sobre a garantia ou os acessórios originais da PowerA, visita
PowerA.com/Support.
PowerA.com/Support
BDA, LLC.
15525 Woodinville-Redmond Rd NE
Woodinville, WA 98072
ENHANCED
WIRELESS
CONTROLLER
USER MANUAL
Manuel de l’utilisateur
Bedienungsanleitung
Manual de usuario
Manuale per l’uso
Manual do usuário
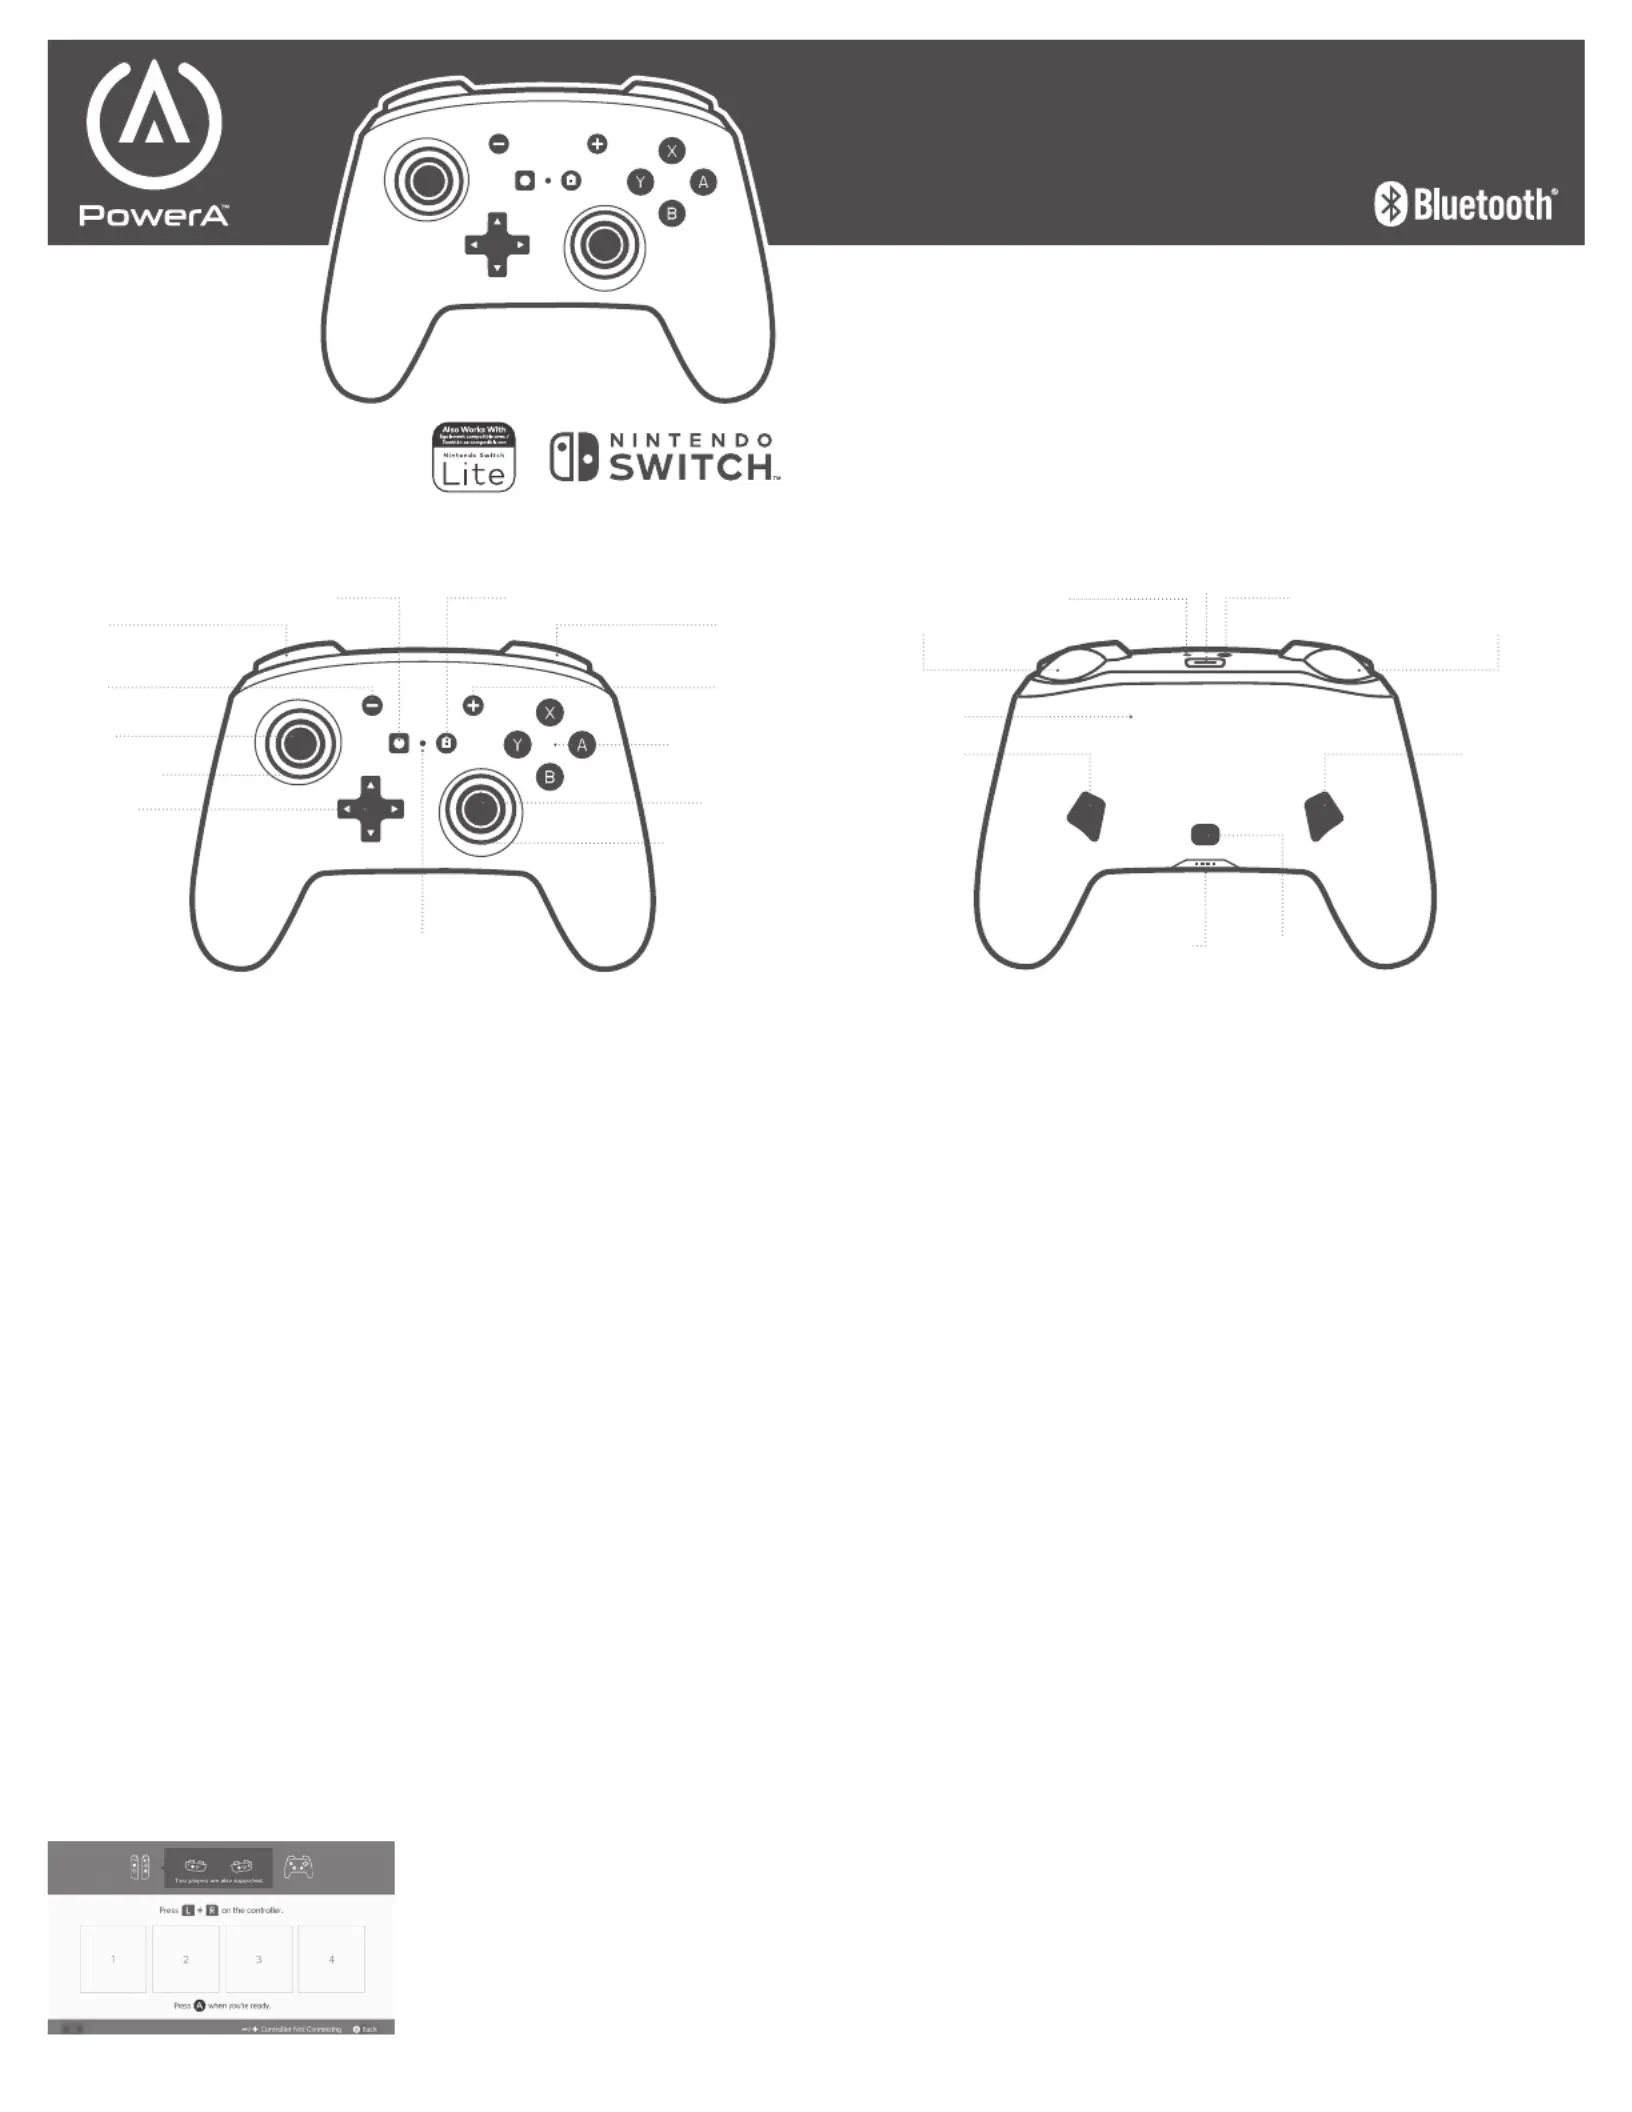
Anti-Friction Ring
Factory Reset Hole
+Control Pad
- Button
Left Stick
L Button
Capture Button
+ Button
R Button
Right Stick
Anti-Friction Ring
A/B/X/Y Buttons
Home Button
ZL Button
Sync Button
AGR Button
Recharge LED
Program ButtonPower & Player LED
ZR Button
AGL Button
USB
-
C Charging Port
Advanced Gaming Button
Program Status LED
Specyfikacje produktu
| Marka: | PowerA |
| Kategoria: | Kontroler |
| Model: | Enhanced Wireless Controller |
Potrzebujesz pomocy?
Jeśli potrzebujesz pomocy z PowerA Enhanced Wireless Controller, zadaj pytanie poniżej, a inni użytkownicy Ci odpowiedzą
Instrukcje Kontroler PowerA

26 Lutego 2025
19 Lutego 2025
19 Lutego 2025
20 Września 2024
14 Września 2024
14 Września 2024
Instrukcje Kontroler
Najnowsze instrukcje dla Kontroler
2 Kwietnia 2025
30 Marca 2025
30 Marca 2025
30 Marca 2025
30 Marca 2025
30 Marca 2025
28 Marca 2025
27 Marca 2025
26 Marca 2025
2 Marca 2025