Instrukcja obsługi Primo 406
Przeczytaj poniżej 📖 instrukcję obsługi w języku polskim dla Primo 406 (2 stron) w kategorii telefon komórkowy. Ta instrukcja była pomocna dla 19 osób i została oceniona przez 6 użytkowników na średnio 5.0 gwiazdek
Strona 1/2
Tip: Some features require extra
memory, to expand your phone’s storage
capacity, install a micro SD card.
3. Micro-SD card
(optional)
Lightly press the
card holder and
push it carefully
toward the corner
of the
compartment. The card holder can
now be ipped up vertically. Place the
memory card in the black plastic
bracket. Make sure that the memory
card contacts face down and that the
card is placed in accordance with the
marked area (see gure). Do not
scratch or bend the card contacts.
Push the metal holder back down,
press it at and slide it until it snaps
into place.
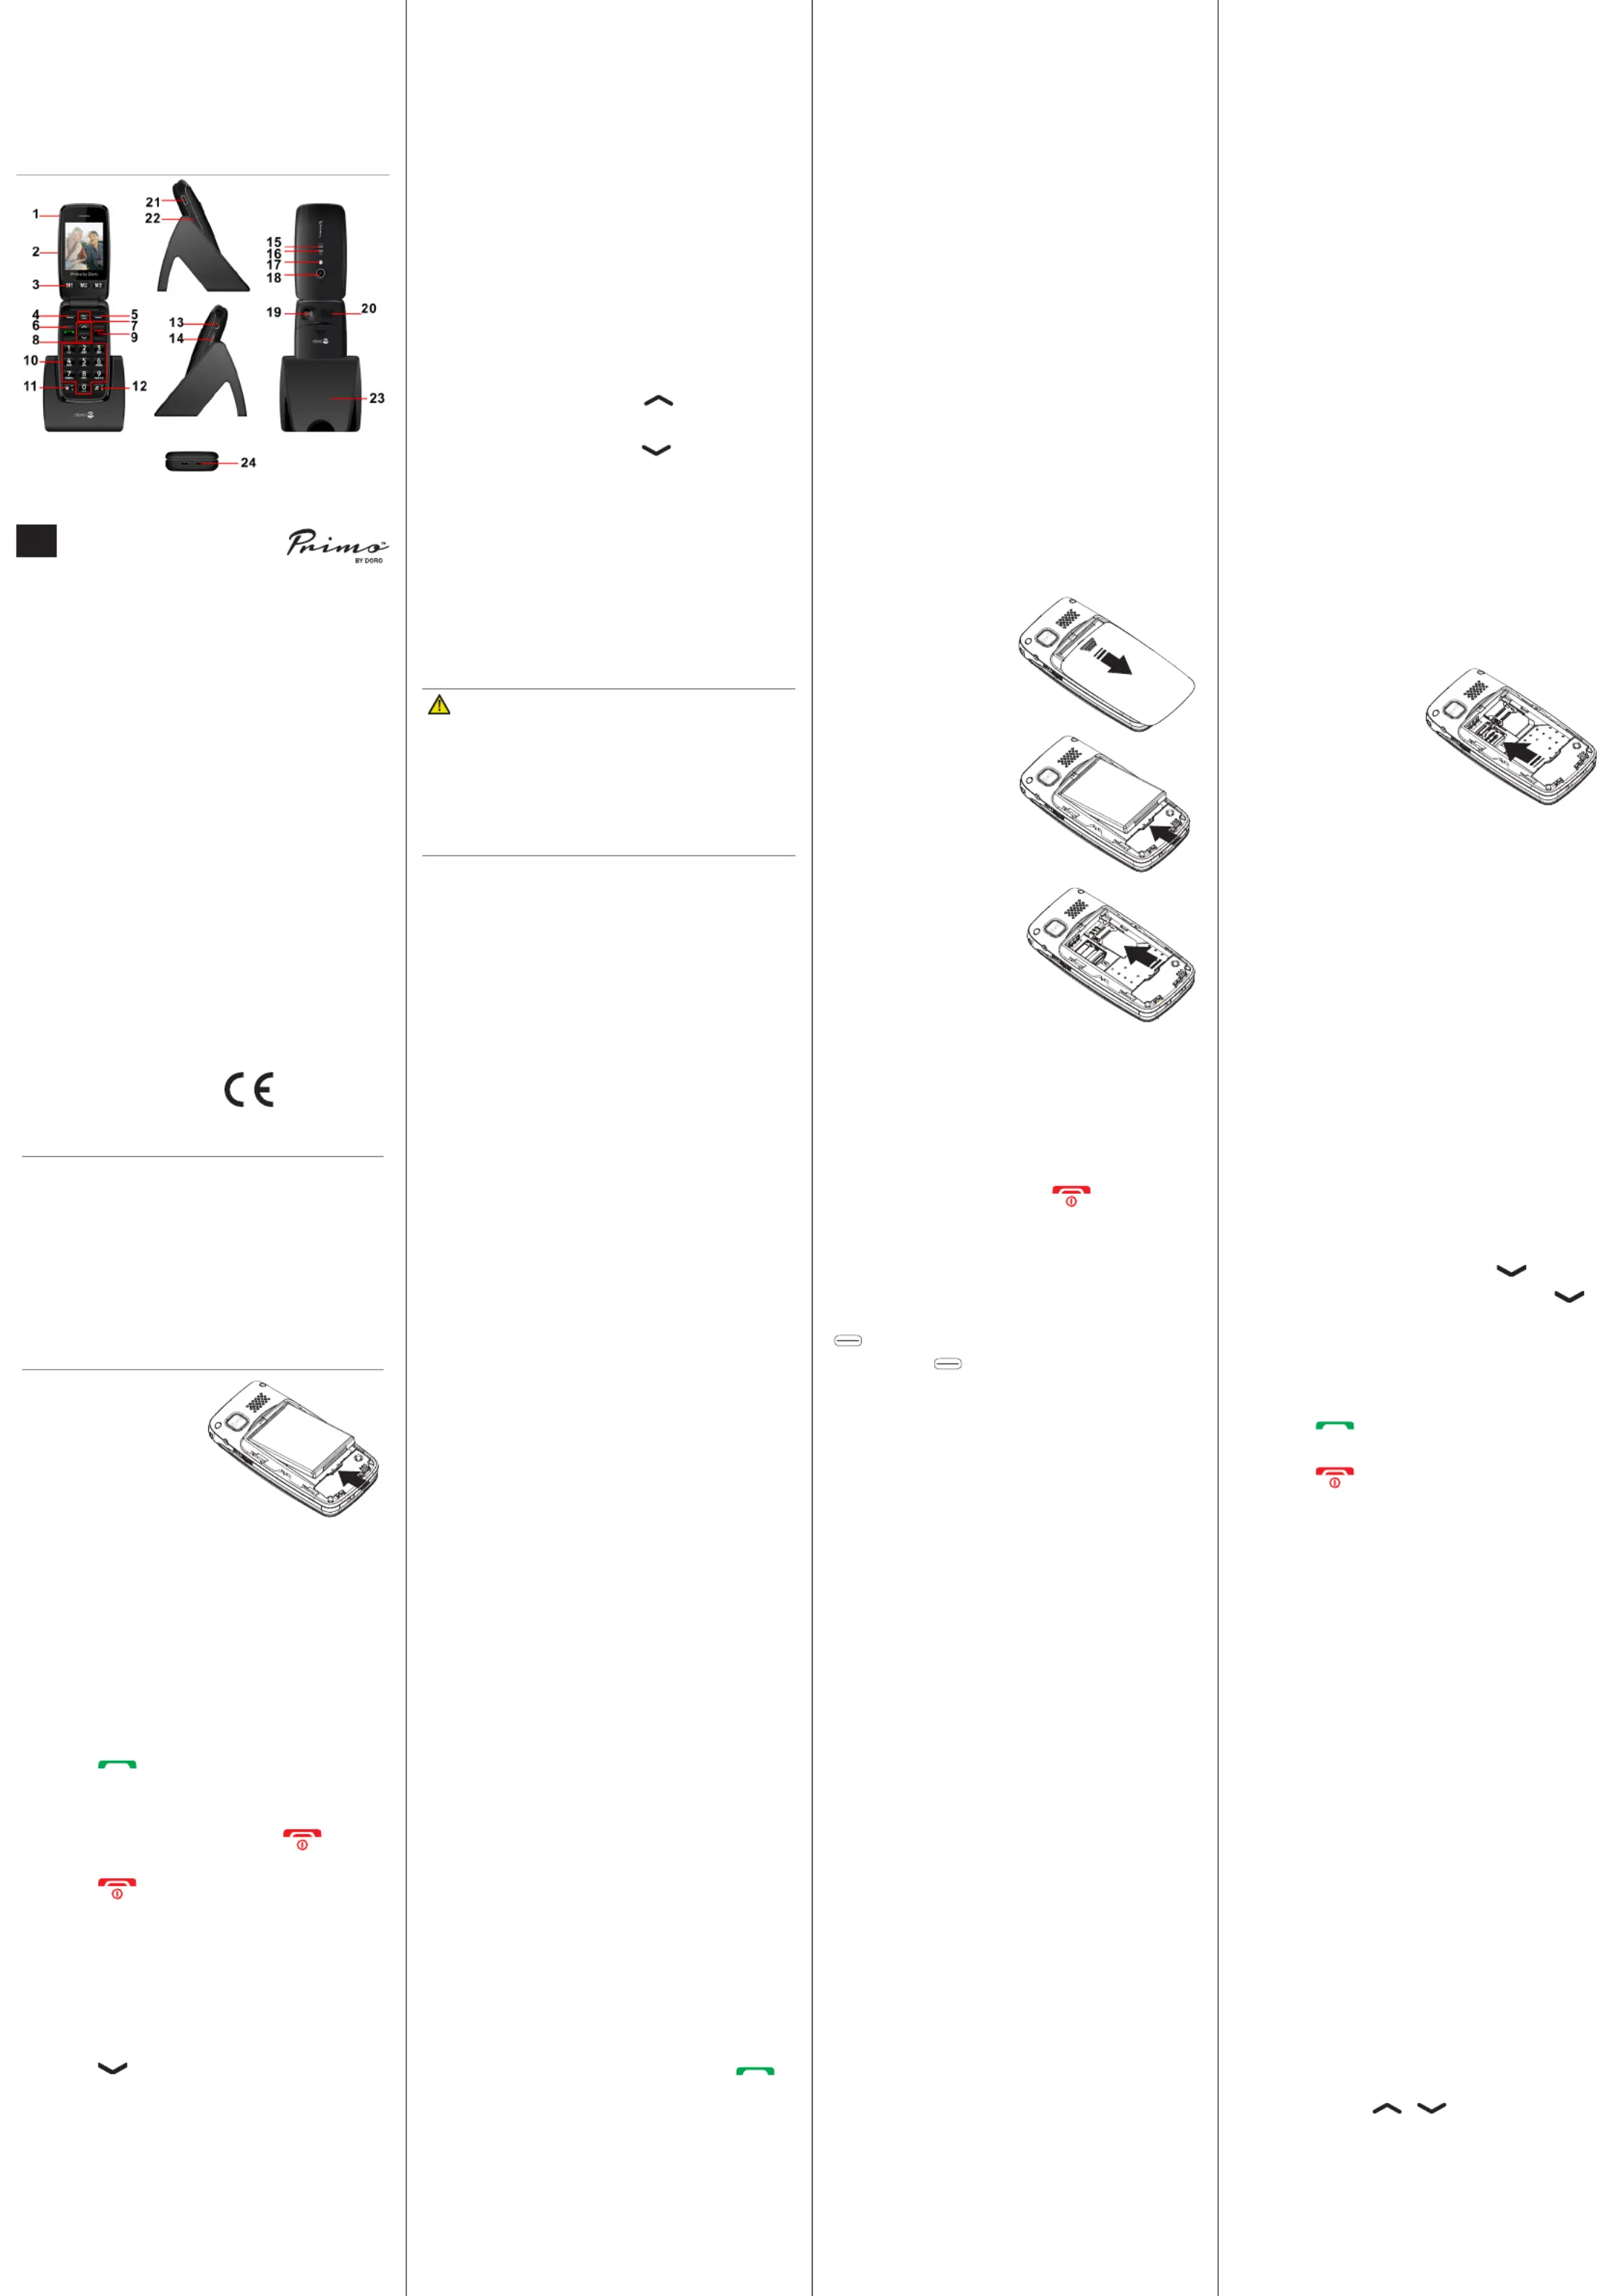
1. Receiver/
loudspeaker
Make calls holding the
phone to your ear
2. Display
3. Speed dials
Speed dial the num-
bers saved under M1,
M2 and M3
4. Left soft key
Press to open main
menu
5. Right soft key
press to open phone-
book
6. Call key
Make and answer
calls;
Press once to open
the call log
7. Camera key
8. Arrow keys
Press to open
shortcut functions;
press to open
messages;
scroll up and down in
menus and lists
9. End key
Press to end a call;
press to return to
standby;
press and hold to turn
the
phone on or off
10. Numerical
keys
Press to enter num-
bers;
long press key 1, to
call your voice mail-
box (phone number
must be stored);
when writing, press
to input numbers or
characters
11.
*
key
Press to enter
“*”/ “+” / “P”/“W“;
when writing, press to
enter special charac-
ters
12.
#
key
Long press to toggle
between Silent and
normal mode
13. Headset
socket
For 3.5 mm standard
headset
14. Torch key
Switch torch on and
off
15. LED
Blue = battery full
16. LED
Red = battery charg-
ing
17. Camera LED and torch
18. Camera lens
19. SOS button
20. Loudspeaker
21. Micro-USB
port
For charger
22. + and - keys
Adjust ring volume
and loudspeaker
volume
23. Charging cradle
24. Cradle contacts
Install the SIM card, memory card and
battery
The SIM card and memory card holders are
located inside the battery compartment.
CAUTION
Only use batteries, charger and
accessories that have been approved for
use with this particular model. Connecting
other accessories may be dangerous and
may invalidate the phone’s type approval
and guarantee.
1. Remove the cover
by placing your
thumb on the back
of the phone casing
and pushing the
cover downwards.
If the battery is
installed, slide your
ngernail in the
notch next to the
battery to lift it up.
2. Insert the SIM card
(required)
Inser the SIM card
by carefully slide it
under the metal
bracket. Make sure
the contacts on the
SIM card face down and the cut off
corner is aligned with the immersed
shape of the bracket. Do not scratch or
bend the card contacts. Try not to
touch the contacts with your ngers.
English
© IVS GmbH 2015 • All rights reserved
QSG_Primo_by_Doro_406_en_A3(A7)_v1.0
English
Version 1.0
1313
Specications
Network:
GSM 900/1800 MHz
Dimensions:
102 mm x 50 mm x 20 mm
Weight:
115 g
Battery:
3.7V/1050 mAh Li-ion
battery
Operating ambient
temperature:
Min: 0°C (32°F)
Max: 40°C (104°F)
Charging ambient
temperature:
Min: 0°C (32°F)
Max: 40°C (104°F)
Storage
temperature:
Min: -20°C (-4°F)
Max: 60°C (140°F)
Changes and errors excepted.
EN
IMPORTANT!
Use only compatible memory cards
with this device. Compatible card type:
microSD, microSDHC.
Incompatible cards may damage the
card itself, the device and corrupt any
data stored on the card. Depending on
the market some phones may have a
pre-installed memory card.
4. Insert the battery
(required)
Push it into the
battery
compartment.
Ensure that the
three contacts on
the battery touches the three spring
contacts in the battery compartment.
5. Replace the cover and press it all the
way around to make sure it is closed.
When the battery performance is low and
the phone is still on, the empty battery
symbol ashes to indicate the battery state
and an alarm signal will sound. To recharge
the battery, connect the mains adapter to
the micro USB connector on the bottom
side of the phone.
Alternatively you can place the telephone in
the charge cradle connected to the mains
adapter via the USB cable.
During charge, the red charge LED is on.
The battery charge icon moves during
charge (visible in the upper right corner
of the display). It takes approximately 3
hours to fully charge the battery. When fully
charged the charge icon stops moving.
Power on the phone
Press and hold the red key on the
phone at least 2 seconds to turn it on or off.
If the SIM card is valid and protected with a
PIN code (Personal Identication Number),
Enter PIN
is displayed.
Enter the SIM PIN code and press
OK
( upper left corner of keypad). Delete
with
Delete
( upper right corner of
keypad).
Set the language
By default the phone’s menu language
is determined by the SIM card. You can
always switch between the languages
supported by the phone.
1. Press
Menu
â
Settings
â
OK
.
2. Select
Phone settings
â
OK
.
3. Select
Language
â
OK
.
4. Select language from the list â
OK
.
Answer a call
1. Press or
Answer
to accept the call
or press
Reject
to reject the call (busy
signal).
Alternatively, you can press to
reject the call directly.
2. Press to end the call.
Create phonebook entry
1. Press
Menu
â
Phonebook
â
OK
.
2. Select
Add new contact
â
OK
.
3. Select whether you want to save the
contact on the SIM card or in the phone.
4. Enter a name for the contact.
5. Press .
6. Enter the phone number including the
area code.
7. Then press
Options
â
Save
â
OK
.
Tip:For international calls, always enter a
+ symbol before the country code to be
able to use the phonebook optimally in
any country.
Press the
*
key twice to enter the inter-
national area code .+
Speed dial (M1, M2)
Note!
The contacts for the speed dial keys
must already be stored in the Phonebook.
M1 and M2 setup
1. Press
Menu
â
Contacts
â
OK
.
2. Select a contact for
M1
or
M2
keys.
3. Press
Options
â
Speed dial
â
OK
.
4. Select the line
M1
or
M2
â
Save
.
5. Conrm the
Save?
with
Yes
.
SOS calls
As long as the phone is switched on, it is
always possible to place an SOS call by
entering the main local emergency number
for your present location followed by .
Some networks accept calls to emergency
numbers without a valid SIM card. Contact
your service provider for more information.
Note! Credit is NOT required - but the SIM
card must be registered and activated.
Emergency numbers are only intended
for urgent assistance, and should only
Set time and date
1. Press
Menu
â
Settings
â
OK
.
2. Select
Time and date
â
OK
.
3. Select
Set time/date
â
OK
.
4. Enter the time (HH:MM) â.
5. Enter the date (DD.MM.YYYY) â.
6. Select
OK
.
Make a call
1. Enter the phone number with the area
code. You can delete digits with
Clear
.
2. Press to dial. Press
Abort
to
cancel the call.
3. Press to end the call.
Tip:For international calls, always enter a
+ symbol before the country code to be
able to use the phonebook optimally in
any country.
Press the
*
key twice to enter the inter-
national area code .+
be called in an emergency. Please do
not misuse the emergency number as
this may prevent someone with a real
emergency from getting through.
Volume control
You can adjust the volume during a call
using the side keys
+/-
. The volume level is
shown on the display.
Enter text
Select character
• Press a numerical key repeatedly until
the desired character is shown.
• Wait a few seconds (until the blue or
yellow background of the character has
disappeared) before entering the next
character.
Special characters
• Press
*
to view a list of special
characters.
• Select the desired character with
*
or
#
(to move left and right) and press
OK
to
enter.
Move the cursor within text
• Use the keys
/
to move the
cursor within the text.
Upper case, lower case and numerals
• Press
#
to choose the input mode.
The symbol at the top left in the display
indicates the input mode.
Primo
™
406
Instructions
Specyfikacje produktu
| Marka: | Primo |
| Kategoria: | telefon komórkowy |
| Model: | 406 |
Potrzebujesz pomocy?
Jeśli potrzebujesz pomocy z Primo 406, zadaj pytanie poniżej, a inni użytkownicy Ci odpowiedzą
Instrukcje telefon komórkowy Primo

10 Marca 2025
Instrukcje telefon komórkowy
Najnowsze instrukcje dla telefon komórkowy
3 Kwietnia 2025
3 Kwietnia 2025
3 Kwietnia 2025
3 Kwietnia 2025
3 Kwietnia 2025
3 Kwietnia 2025
3 Kwietnia 2025
2 Kwietnia 2025
1 Kwietnia 2025
1 Kwietnia 2025