Instrukcja obsługi Roland DAP-3
Roland komputer perkusyjny DAP-3
Przeczytaj poniżej 📖 instrukcję obsługi w języku polskim dla Roland DAP-3 (2 stron) w kategorii komputer perkusyjny. Ta instrukcja była pomocna dla 36 osób i została oceniona przez 9 użytkowników na średnio 4.7 gwiazdek
Strona 1/2
1
03896190 2TM
Owner’s Manual
Thank you, and congratulations on your
choice of the Roland Drum Throne DT-30.
202
Copyright © 2004 ROLAND CORPORATION
All rights reserved. No part of this publication may
be reproduced in any form without the written
permission of ROLAND CORPORATION.
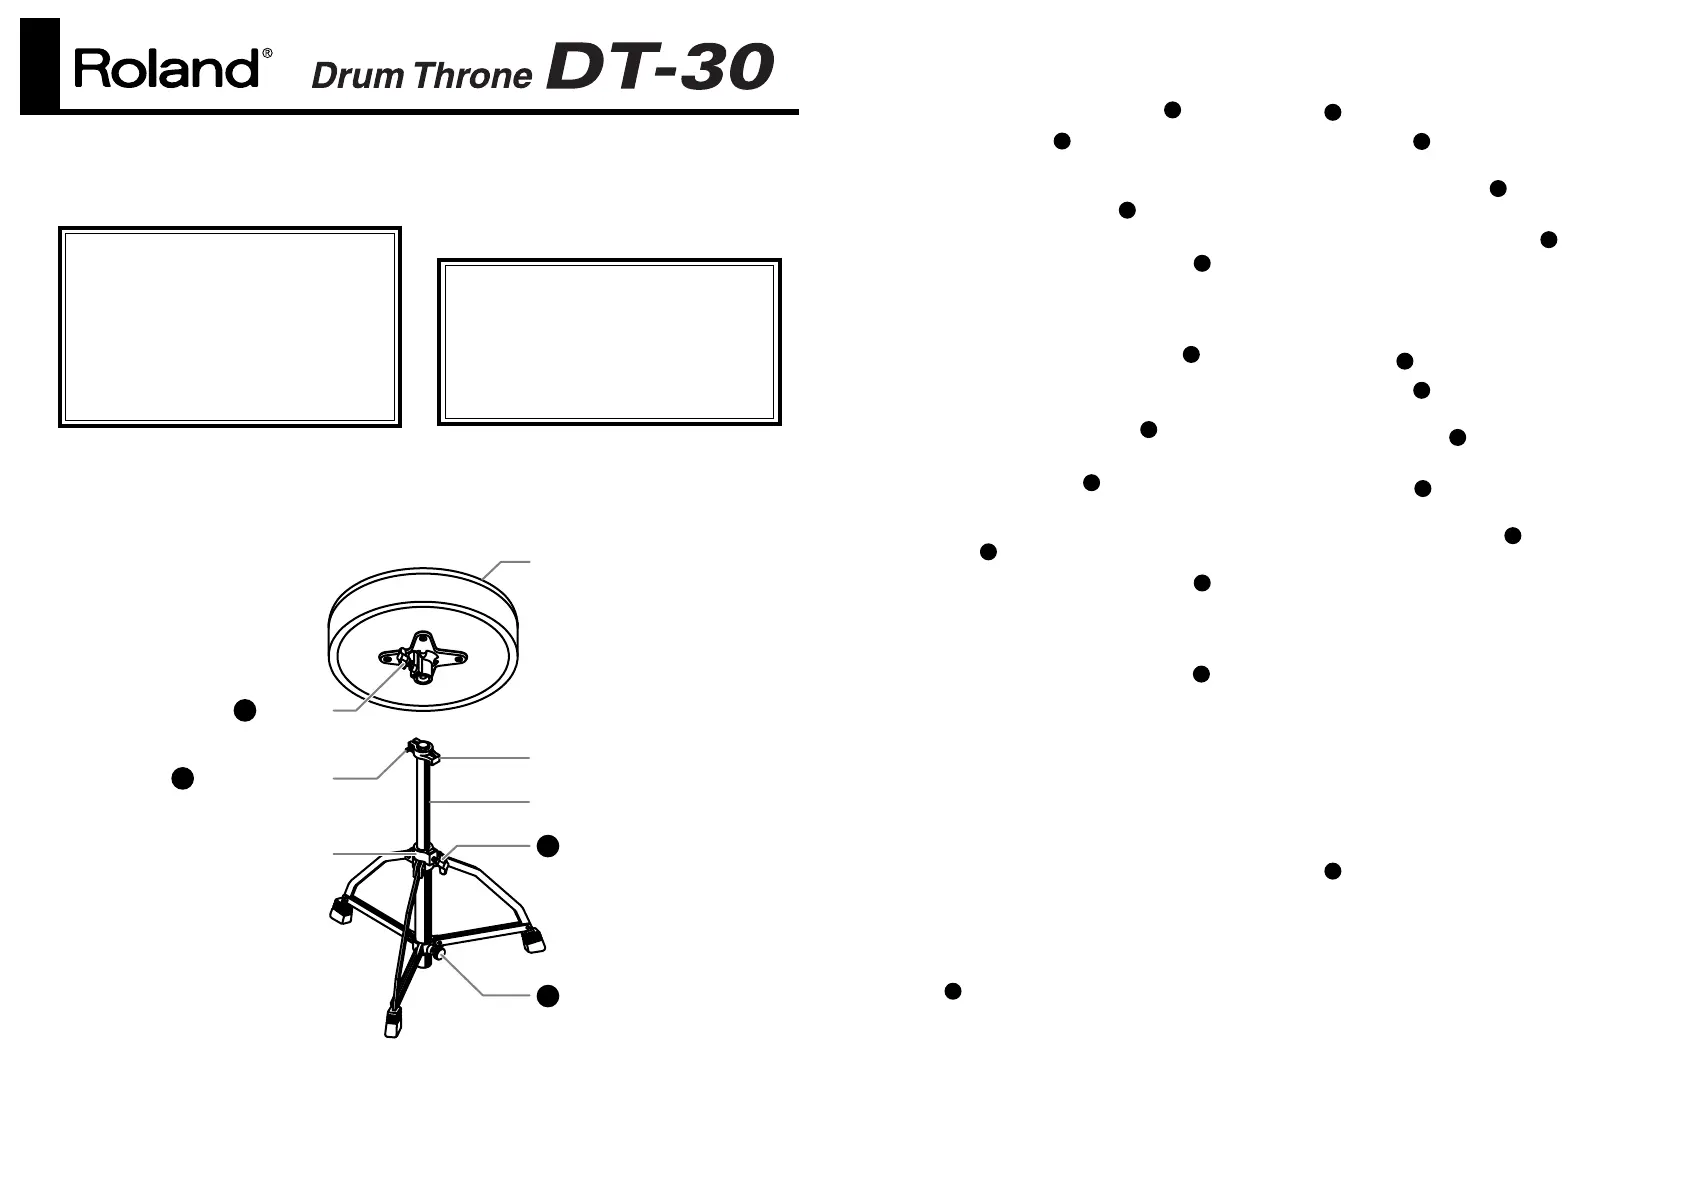
Part Names
//
//
各各
各各
部部
部部
のの
のの
名名
名名
称称
称称
962a
*In the interest of product improvement, the specifications
and/or appearance of this unit are subject to change
without prior notice.
Before using this unit, carefully read the
sections entitled: “USING THE UNIT SAFELY”
and “IMPORTANT NOTES” (back page). These
sections provide important information
concerning the proper operation of the unit.
Additionally, in order to feel assured that you
have gained a good grasp of every feature
provided by your new unit, Owner’s Manual
should be read in its entirety. The manual
should be saved and kept on hand as a
convenient reference.
Seat
シート部
T-Bolt
T型ボルト
Square-Headed Bolt
角頭ボルト
T-Bolt
T型ボルト
Round Bolt
ラウンド・ボルト
Memory Lock
キー・ロック
Die-Cast Pipe Joint
ダイキャスト・ジョイント
Upper Tube
上段パイプ
1
2
3
4
1.
Open the legs of the tripod base and
then tighten the round bolt .
2.
Loosen t-bolt and pull up the
upper tube high enough so the tripod
stand is able to stand flat on the floor.
Slightly tighten t-bolt (you will
tighten it fully later).
3.
Loosen the square-headed bolt of
the memory lock with a standard
drum key (sold separately). Then
lower the memory lock to the middle
of the upper tube and tighten
slightly.
4.
Place the seat on the upper tube.
Firmly tighten the t-bolt of the
drum seat.
5.
Loosen the t-bolt and adjust the
height of the seat to the desired
position, and then firmly tighten the t-
bolt .
6.
Loosen the square-headed bolt of
the memory lock and lower the
memory lock to the top of the die-cast
pipe joint. Use a standard drum key to
tighten the square-headed bolt of
the memory lock firmly.
The memory lock helps preventing
the upper tube from declining while
in use.
*Keeping the memory lock in the position
allows you to set up much more quickly
from next time as the memory lock
“memorizes” the desired height.
7.
If you need to make further height
adjustments, repeat steps
5
and
6
.
Once the desired height is achieved,
firmly tighten the square-headed bolt
of the memory lock.
1
2
2
3
3
4
2
2
3
3
3
取扱説明書
このたびは、ローランド・ドラム・スロー
ンDT-30をお買い上げいただき、まことに
ありがとうございます。
202
©
2004 ローランド株式会社 本書の一部、もしくは
全部を無断で複写・転載することを禁じます。
962a
※製品の仕様および外観は、改良のため予告なく変更
することがあります。
この機器を正しくお使いいただくために、ご使用
前に裏面の「安全上のご注意」と「使用上のご注
意」をよくお読みください。また、この機器の優
れた機能を十分ご理解いただくためにも、取扱説
明書をよくお読みください。取扱説明書は必要な
ときにすぐに見ることができるよう、手元に置い
てください。
1.
三脚部を開き、ラウンド・ボルト
をしっかりと締めます。
2.
T型ボルトを緩め、上段パイプを
適当な高さまで上げ、パイプが落ちな
いようにT型ボルトを仮締めしま
す。
3.
キー・ロックの角頭ボルトを
チューニング・キー(別売)で緩め、
適当な位置までキー・ロックを下ろし
ます。
4.
シート部を上段パイプに取り付け、T
型ボルトをしっかりと締めます。
5.
T型ボルトを緩め、好みの高さに
調整します。好みの高さが決まった
ら、T型ボルトをしっかりと締め
て固定します。
6.
角頭ボルトを緩め、ダイキャス
ト・ジョイントの位置までキー・ロッ
クを下げ、角頭ボルトをしっかり
と締めて固定します。
キー・ロックは上部パイプとダイキャ
スト・ジョイントとの固定力を高め、
演奏中に高さが下がるトラブルを防ぎ
ます。
※キー・ロックをこのようにセットして
おくと、好みの椅子の高さがメモリー
され、次回以降のセッティングが容易
になります。
7.
高さを調節し直すときは、手順
5
と
6
を繰り返します。
調整後は、キー・ロックの角頭ボルト
をしっかりと締め直してくださ
い。
1
2
2
3
4
2
2
3
3
3
Specyfikacje produktu
| Marka: | Roland |
| Kategoria: | komputer perkusyjny |
| Model: | DAP-3 |
Potrzebujesz pomocy?
Jeśli potrzebujesz pomocy z Roland DAP-3, zadaj pytanie poniżej, a inni użytkownicy Ci odpowiedzą
Instrukcje komputer perkusyjny Roland

11 Stycznia 2025
10 Grudnia 2024
10 Grudnia 2024
10 Grudnia 2024
10 Grudnia 2024
7 Października 2024
3 Października 2024
3 Października 2024
3 Października 2024
3 Października 2024
Instrukcje komputer perkusyjny
Najnowsze instrukcje dla komputer perkusyjny
4 Marca 2025
30 Stycznia 2025
15 Grudnia 2024
15 Grudnia 2024
3 Października 2024
2 Października 2024
29 Września 2024
19 Września 2024
17 Września 2024
12 Września 2024