Instrukcja obsługi Scanstrut ROKK Active Qi
Scanstrut nieskategoryzowany ROKK Active Qi
Przeczytaj poniżej 📖 instrukcję obsługi w języku polskim dla Scanstrut ROKK Active Qi (6 stron) w kategorii nieskategoryzowany. Ta instrukcja była pomocna dla 37 osób i została oceniona przez 7 użytkowników na średnio 5.0 gwiazdek
Strona 1/6
1
4a
7
Input voltage range : 10-30V DC (12/24V system)
Input current max: 1.5A
Output power: 5W (5V, 1A)
Standby current draw: < 0.03W
Waterproof rating: IPX6 front and back
Certications: Qi, CE, FCC, ROHS,
UNECE R10 E24
5
6
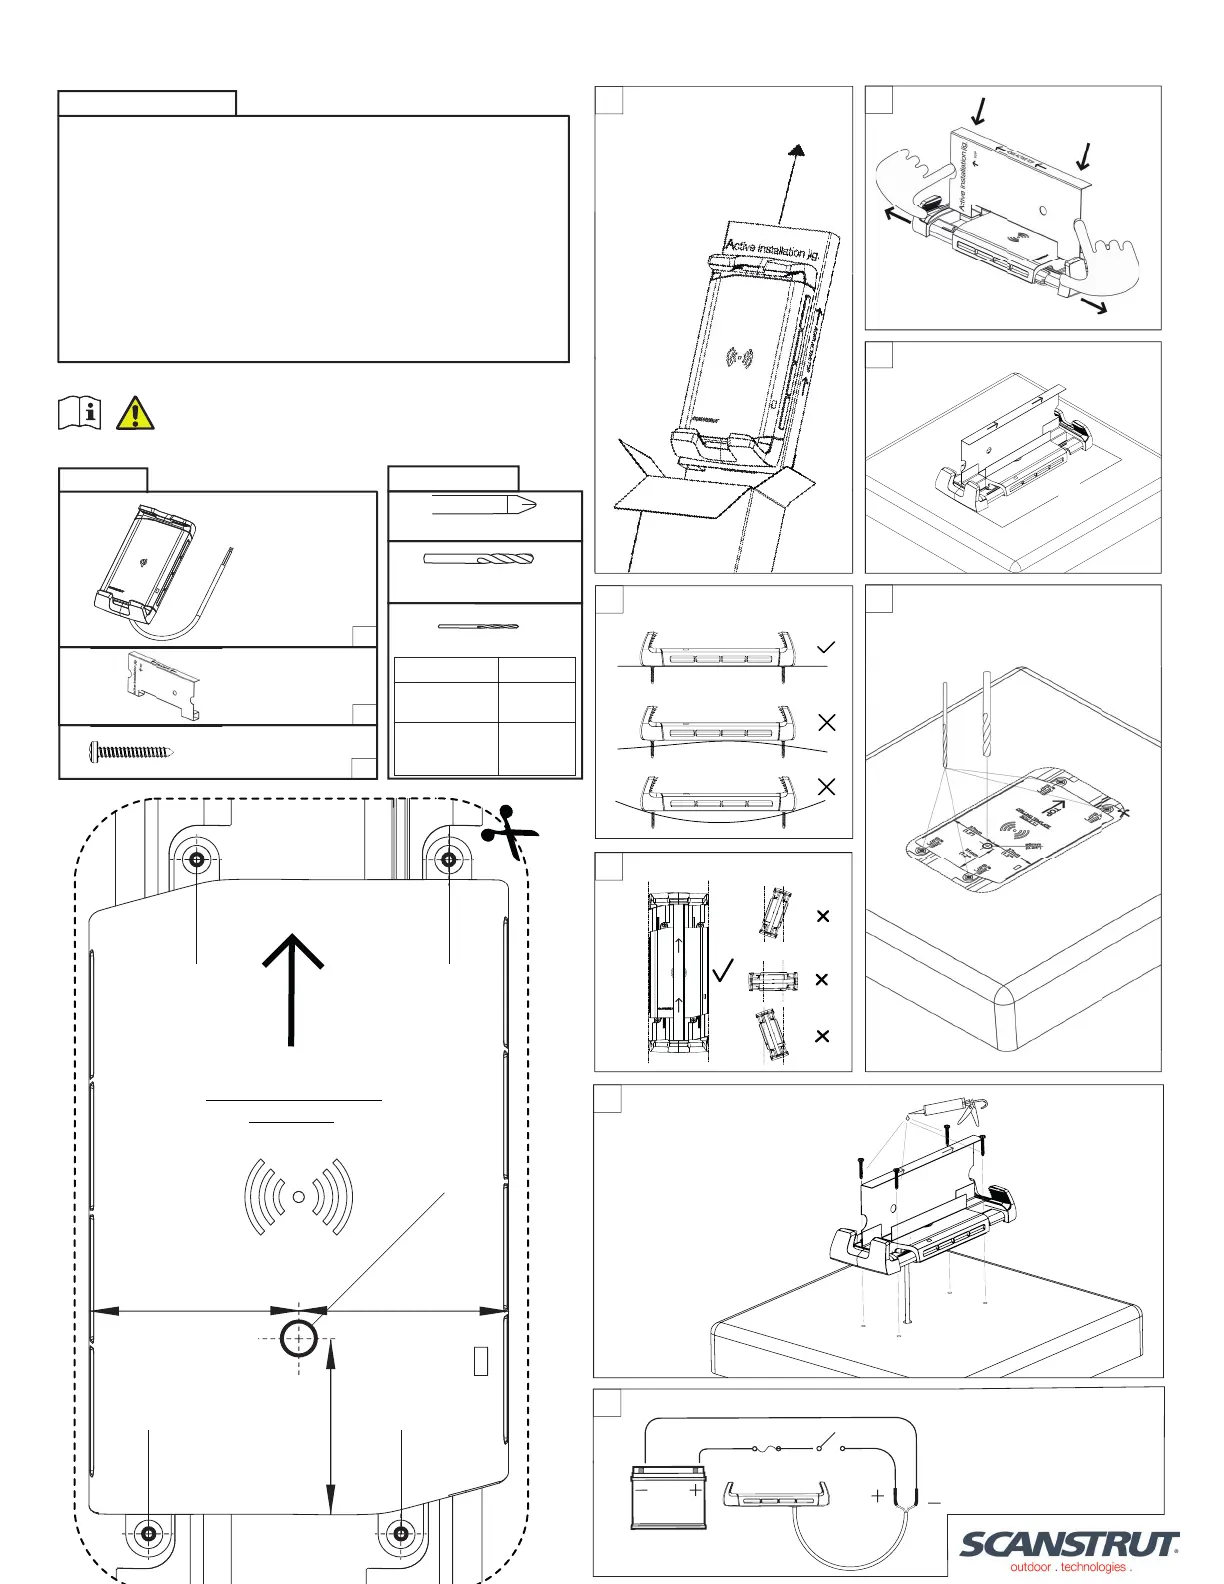
Retain installation jig to use in step 2.
Insert the installation jig.
Ensure there is sufcient clearance in chosen
installation area.
205mm
(8”)
- Feed cable through the hole.
- Apply sealant to p1-x4 screws.
- Screw product in place.
- Remove installation jig.
Connect wires to 12/24V supply,
ensuring a waterproof connection. Fuse
according to input voltage and current.
4b
Ensure ROKK Active is vertical.
Use drilling template to drill ø6mm (0.24”)
cable hole and p1-x4 pilot holes
(see tools required table).
Ensure installation area is at.
ROKK ACTIVE TOP
RO
K
K
A
CT
I
VE
TOP
R
O
KK
ACT
I
VE
TOP
I
nsert the installation jig
.
Tools required.
Pozi screwdriver
6mm (0.24”) drill bit
Drill bit (for pilot hole)
DRILLING TEMPLA
TE
SCALE 1:
1
ø6mm
ø
2
m
m
TOP
(0.07”)
(0.24”)
ø
2
m
m
(0.07”)
ø
2
m
m
(0.07”)
ø
2
m
m
(0.07”)
37mm
(1.5”)
37mm
(1.5”)
31mm
(1.2”)
Material No. 4 Screw
Soft Material
E.g plywood
2mm
(5/64”)
Hard Material
E.g Fiberglass
acrylic, hardwood
2.5mm
(3/32”)
Parts list.
ROKK Wireless
Active
x1
x4
No. 4 x 3/4” (18mm)
self-tapping screw
x1
Installation jig
No
4
Installation instructions.
ROKK Wireless - Active (SC-CW-04E)
26-06-2020 (Issue 7)
Technical information.
READ IMPORTANT SAFETY INFORMATION
LEAFLET BEFORE INSTALLING.
2
3
For latest tech info visit: www.scanstrut.com/rokk-wireless
Specyfikacje produktu
| Marka: | Scanstrut |
| Kategoria: | nieskategoryzowany |
| Model: | ROKK Active Qi |
Potrzebujesz pomocy?
Jeśli potrzebujesz pomocy z Scanstrut ROKK Active Qi, zadaj pytanie poniżej, a inni użytkownicy Ci odpowiedzą
Instrukcje nieskategoryzowany Scanstrut

26 Września 2024
26 Września 2024
26 Września 2024
26 Września 2024
26 Września 2024
26 Września 2024
26 Września 2024
26 Września 2024
26 Września 2024
26 Września 2024
Instrukcje nieskategoryzowany
Najnowsze instrukcje dla nieskategoryzowany
28 Października 2024
28 Października 2024
27 Października 2024
27 Października 2024
27 Października 2024
27 Października 2024
27 Października 2024
27 Października 2024
27 Października 2024
27 Października 2024