Instrukcja obsługi Solac BV5712
Przeczytaj poniżej 📖 instrukcję obsługi w języku polskim dla Solac BV5712 (4 stron) w kategorii mikser. Ta instrukcja była pomocna dla 65 osób i została oceniona przez 3 użytkowników na średnio 4.9 gwiazdek
Strona 1/4
ESPAÑOLes
Indicaciones de Seguridad
•Este aparato es sólo para uso doméstico, no industrial. Cualquier uso diferente al indicado
podría ser peligroso.
•Este aparato pueden utilizarlo niños con edad de 8
años y superior y personas con capacidades
físicas, sensoriales o mentales reducidas o falta de
experiencia y conocimiento si se les ha dado la
supervisión o instrucción apropiadas respecto al
uso del aparato de una manera segura y
comprenden los peligros que implica. Los niños no
deben jugar con el aparato. La limpieza y el
mantenimiento a realizar por el usuario no deben
realizarlos los niños sin supervisión.
•No realice ninguna modificación ni reparación en el aparato. Ante cualquier anomalía en el
aparato, no lo use y acuda a un servicio de asistencia autorizado.
•No utilice piezas o accesorios no suministrados o recomendados por SOLAC.
•Antes de enchufar el aparato a la red eléctrica, compruebe que el voltaje indicado coincide con
el de su hogar.
•Desenchufe el aparato siempre después de su uso
y antes de desmontar o montar piezas y realizar
cualquier tarea de mantenimiento o limpieza.
Desenchúfelo también en caso de apagón. Cuando
enchufe o desenchufe el aparato, debe estar
desconectado.
•No tire nunca del cable ni cuelgue el aparato por él. Desenchufe el aparato tirando siempre de
la clavija, nunca del cable.
•Evite que el cable de alimentación entre en contacto con aristas cortantes o superficies
calientes. No deje el cable colgando por el borde de la mesa o encimera, para evitar que los
niños tiren de él y hagan caer el aparato.
•Si el cable de alimentación está dañado, debe ser
sustituido por el fabricante, por su servicio post-
venta o por personal cualificado similar con el fin de
evitar un peligro.
•Retire todas las bolsas de papel o de plástico, láminas plásticas, cartones y pegatinas
eventuales que se encuentran dentro o fuera del aparato que sirvieron como protección de
transporte o promoción de venta.
•No deje la batidora en funcionamiento sin vigilancia.
A
No introduzca nunca el cuerpo principal del aparato en agua u otro líquido,
ni en el lavavajillas.
•No toque el aparato con las manos húmedas cuando esté en funcionamiento.
•No use el aparato nunca sobre superficies mojadas ni en el exterior.
•Las cuchillas están muy afiladas. Tenga mucho
cuidado al manipularlas. No las manipule con el
aparato enchufado. Durante el funcionamiento,
mantenga las manos, el pelo, la ropa y cualquier
utensilio alejado de las cuchillas en movimiento.
•Utilice la batidora sólo con la tapa colocada sobre la
jarra. No utilice nunca la batidora en vacío.
•La jarra no es apta para microondas.
•Para evitar situaciones de peligro debido al reajuste involuntario del disyuntor térmico, no
conecte nunca el aparato a un interruptor con temporizador.
•Asegúrese de que el aparato está desconectado de la
alimentación y las cuchillas completamente paradas
antes de colocar o retirar el accesorio filtro (8).
b
¡¡ATENCION!!: Cuando desee desprenderse del aparato, NUNCA lo deposite en la
basura, sino que acuda al PUNTO LIMPIO o de recogida de residuos mas cercano a su
domicilio, para su posterior tratamiento. De esta manera, está contribuyendo al cuidado
del medio ambiente.
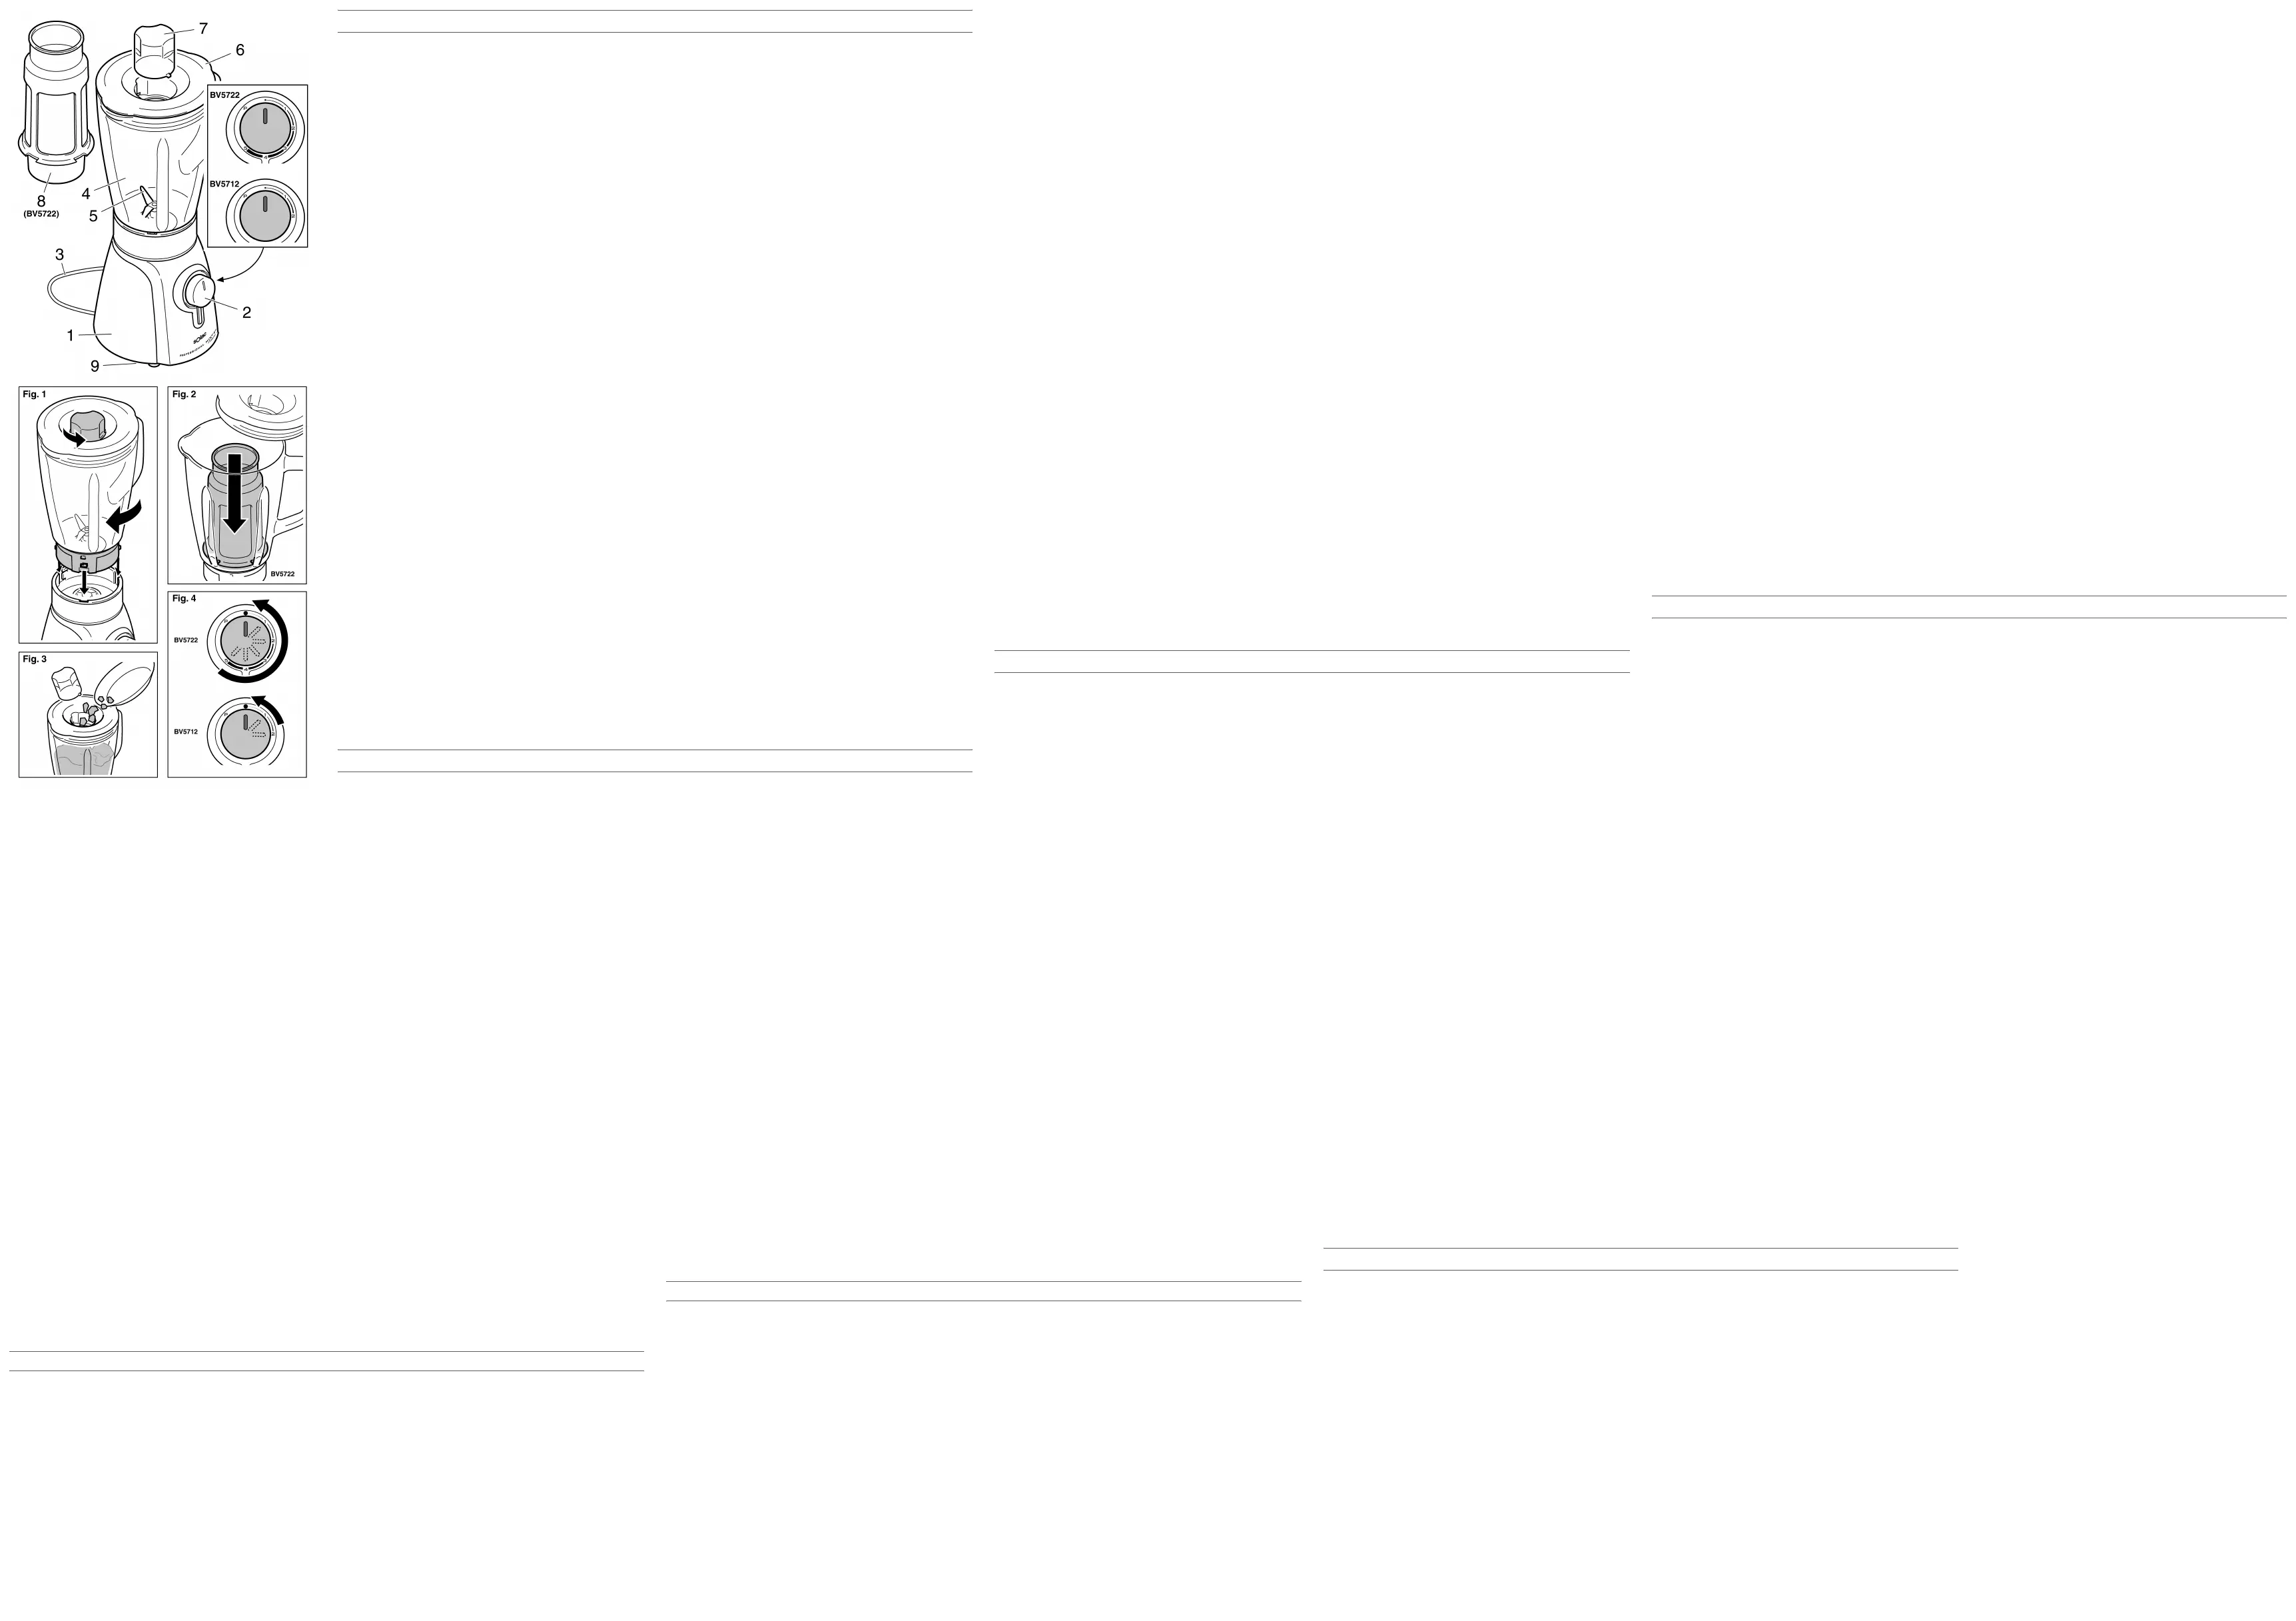
1Descripción
Partes principales
2Montaje
Z
Trabaje sobre una superficie estable, lisa y limpia, sin posibilidad de que resbale.
1Encaje la jarra sobre el cuerpo principal. Para ello, coloque la jarra (4) sobre el cuerpo (1) de modo
que coincidan los salientes de la jarra con las ranuras del cuerpo.
2Gire la jarra en el sentido de las agujas del reloj hasta que quede perfectamente encajada. (fig. 1).
i
Asegúrese de encajar correctamente la jarra sobre el cuerpo de lo contrario no se pondrá
en funcionamiento.
Z
Si desea utilizar la batidora como exprimidor de zumo, coloque el filtro (8) alrededor de la
cuchilla (5) (fig. 2) (modelo BV5722).
3Utilización
Z
Este aparato p1-ha sido diseñado para batir líquidos como productos lácteos, salsas,
zumos de fruta, sopas, mezclar bebidas, batidos…. Es posible su uso para mezclar
alimentos blandos o hacer puré con ingredientes cocidos, por ejemplo, zanahorias o
ingredientes de comida para bebé. También es posible realizar cócteles con hielo
picado, aunque no es recomendable introducir más de 10 hielos a la vez.
Z
En ningún caso es conveniente tener el aparato en funcionamiento durante más tiempo que el
necesario. Después del uso continuo del aparato durante dos minutos, déjelo enfriar a
temperatura ambiente, para evitar su sobrecalentamiento. Puede volver a utilizarlo transcurridos
30 segundos.
‹
No introduzca nunca objetos de madera, plástico, cristal, metal o similares dentro de la
jarra.
1Monte la batidora como se explica en el apartado “2 Montaje”. Asegúrese de que está montada
correctamente.
2Introduzca los alimentos en la jarra sin rebasar los 2/3 de la capacidad máxima (borde superior).
3Coloque la tapa (6).
4Coloque el tapón (7) girándolo en el sentido contrario a las agujas del reloj. (fig. 1).
5Enchufe el cable a la red.
6Con el selector de velocidad elija la posición de
velocidad deseada (1, 2, 3, 4 o 5, según modelo) o
P posición turbo, deberá mantener esta posición
durante el tiempo que desee prolongar el
funcionamiento del aparato (máximo 2 minutos de
funcionamiento continuo).
Z
Durante el funcionamiento sujete la tapa firmemente con las 2 manos.
7Si desea añadir algún ingrediente durante el funcionamiento, retire el tapón dosificador y añada
los ingredientes por el orificio de la tapa (fig. 3).
‹
NUNCA retire la tapa durante el funcionamiento.
8Cuando obtenga el resultado deseado elija la posición de apagado en el selector de velocidad (fig.
4).
9Desenchufe el cable de la red y espere a que la cuchilla haya dejado de girar.
10Retire la jarra del cuerpo principal y vacíela.
Funcionamiento como exprimidor (BV5722)
1Introduzca la fruta pelada en el interior del filtro (8). La pulpa de la fruta permanecerá en el interior
del filtro y el zumo saldrá al exterior permaneciendo almacenado en el interior de la jarra.
iConsejos de Uso
•No utilice la jarra para almacenar alimentos ni objetos.
•Se aconseja no verter en la jarra alimentos muy calientes para evitar posibles quemaduras.
•Es recomendable añadir los ingredientes poco a poco en lugar de todo a la vez.
•En primer lugar triture los alimentos más sólidos y a continuación añada los más blandos. De
esta forma es más fácil conseguir una mezcla homogénea.
•La velocidad más lenta se recomienda para batir o mezclar alimentos de consistencia líquida.
La velocidad más rápida se recomienda para triturar o mezclar alimentos más sólidos o
consistentes.
•Los alimentos gruesos y fibrosos deben ser cortados en cubos de 2 o 3 cm como máximo.
•Para realizar cócteles con hielo picado, introduzca primero los ingredientes, después el hielo y
por último el líquido necesario o un poco de agua.
•Al picar hielo es recomendable utilizar la velocidad alta o turbo durante unos instantes, para
impulsar los hielos hacia arriba y evitar que se queden bloqueados abajo.
•Si durante el mezclado los alimentos se pegan a las paredes de la jarra o quedan fuera del
alcance de las cuchillas, apague el aparato y retire la jarra del cuerpo principal. Retire la tapa y
con una espátula desplace los alimentos cuidadosamente hacia la cuchilla. Tape la jarra,
colóquela en el cuerpo principal y concluya el mezclado de los alimentos.
•No exceda el nivel máximo indicado en la jarra de la batidora.
4Limpieza y Conservación
‹
Las cuchillas están muy afiladas. Evite tocar las cuchillas con las manos al limpiar y secar
el interior de la jarra.
Z
No sumerja nunca el cuerpo principal (1) en agua ni lo lave en el lavavajillas.
1Limpie el aparato antes del primer uso, inmediatamente después de cada uso y tras un largo
periodo de tiempo sin usar.
2Limpie la jarra y otros elementos plásticos inmediatamente después de su uso, p1-ya que algunos
alimentos (por ejemplo la zanahoria) son muy difíciles de limpiar una vez secos.
Limpieza rápida
1Con la batidora completamente montada, levante la tapa y vierta en la jarra agua templada con un
poco de detergente líquido.
2Coloque la tapa y el tapón dosificador.
3Sitúe el selector de velocidad en posición P durante unos segundos.
4Coloque el selector de velocidad en posición 0 y desenchufe el aparato.
5Retire la jarra y enjuáguela con agua templada.
Limpieza profunda
1Vacíe la jarra y desmonte la batidora.
2Limpie el cuerpo principal y el cable de conexión
con un paño húmedo.
3Limpie los demás elementos con agua jabonosa y
aclárelos con abundante agua bajo el grifo. No los
introduzca en el lavavajillas.
4Monte la batidora como se explica en el apartado “2 Montaje”.
ENGLISHen
Safety Instructions
•This appliance is exclusively for household use and not for industrial use. It is dangerous to use
it for any purpose other than the one indicated.
1Cuerpo principal (base)
2Selector de velocidad
BV5712
1
media,
2
máxima,
P
Posición turbo
BV5722
1 minima, 2, 3 media, 4, 5 máxima,
P Posición turbo
3Cable de conexión a la red
4Jarra
5Cuchilla
6Tapa
7Tapón/vaso dosificador
8Filtro para zumo
9Recogecables
•This appliance can be used by children aged from 8
years and above and persons with reduced
physical, sensory or mental capabilities or lack of
experience and knowledge if they have been given
supervision or instruction concerning use of the
appliance in a safe way and understand the hazards
involved. Children shall not play with the appliance.
Cleaning and user maintenance shall not be made
by children without supervision.
•Do not modify or repair the appliance. In the event of any anomaly in the appliance, do not use
it and take it to an authorised assistance service.
•Do not use any parts or accessories not supplied or recommended by SOLAC.
•Before plugging the appliance into the mains, check that the indicated voltage is the same as in
your home.
•Always unplug the appliance after use and before
assembling or removing parts, and performing any
maintenance or cleaning operations. Also unplug it in
the case of a power cut. The appliance must be switched
off before plugging or unplugging it into the mains
•Never pull the cord or use it to hang up the appliance. Always unplug the appliance by pulling
the connection pin, and not the cord.
•Make sure the cord does not come into contact with sharp edges or hot surfaces. Do not leave
the cord hanging over the edge of a table or worktop, to prevent children from pulling it and
causing the appliance to fall.
•If the power cord is damaged, it should be replaced
by the manufacturer or by your after-sales service
shop or similar qualified personnel to prevent
possible hazards.
•Remove all elements from the inside or outside of the appliance used for protection during transport
or for sales promotions, such as paper or plastic bags, plastic sheets, cardboard and stickers.
•Do not leave the appliance unattended while in operation.
A
Never immerse the main body of the appliance in water or any other liquid, or
place it in a dishwasher.
•Do not touch the appliance with wet hands when in operation.
•Do not use the appliance on wet surfaces or outdoors.
•The blades are very sharp. Be very careful when
handling them. Do not handle them when the
appliance is plugged in. While it is operating, keep
hands, hair, clothes and any utensil away from the
moving blades.
•Only use the blender with the lid fitted on the jar.
Never use the blender when it is empty.
•The jar is not suitable for use in microwave ovens.
•In order to avoid dangerous situations related to the involuntary resetting of the circuit breaker,
never plug the appliance into a switch with a timer.
•Be sure that the appliance is disconnected from the
power supply and that the blades have stopped
moving completely before installing or removing the
filter accessory (8).
b
WARNING!!: When you want to dispose of the appliance, NEVER throw it in the rubbish
bin. Instead, go to the nearest RECYCLING CENTRE or waste collection point, where it
will receive subsequent treatment. You will thus be helping to take care of the
environment.
1Description
Main parts
2Assembly
Z
Work on a stable, flat and clean surface that is non-slip.
1Fit the jug on the main body. To do so, position the jug (4) over the body (1) so that the protrusions
from the jug align with the grooves of the body.
2Turn the jug clockwise until it fits snugly. (Fig. 1).
i
Be sure to fit the jug correctly on the body, otherwise the appliance will not turn on.
Z
If you would like to use the blender as a juicer, place the filter (8) around the blade (5) (Fig. 2)
(model BV5722).
3Operation
Z
This appliance has been designed to blend liquids such as dairy products, sauces, fruit juices,
soups; to mix drinks, shakes, etc. It can be used to mix soft foods or to make purées with cooked
ingredients, such as carrots or baby food ingredients. You can also use it to make cocktails with
crushed ice, although it is not advisable to insert more than 10 ice cubes at the same time.
Z
In no event is it advisable to leave the appliance operating longer than necessary. After
continuous use of the appliance for two minutes, let it cool to ambient temperature to prevent
overheating. You can use it again after 30 seconds.
‹
Do not put any wooden, plastic, glass, metal or similar objects in the jar.
1Assemble the blender as explained in section 2 “Assembly”. Be sure that it is assembled correctly.
2Put food into the jar without exceeding 2/3 of the maximum capacity (upper edge).
3Put on the lid (6).
4Put on the lid (7), turning it in an anti-clockwise direction. (fig. 1).
5Plug in the power cord.
6Use the speed selector to choose the desired
speed position (1, 2, 3, 4 or 5, depending on the
model) or the "P" position for turbo. You must
press and hold this position for the time that you
want the appliance to continue operating
(maximum of 2 minutes of continuous operation).
Z
During operation hold the lid on firmly using both hands.
7If you want to add any ingredient during the blending process, remove the dispenser cap and add
ingredients through the hole in the lid (fig. 3).
‹
NEVER remove the lid while the appliance is operating.
8When you obtain the desired result, place the speed selector in the off position (fig. 4).
9Unplug the cable from the mains and wait until the blade has stopped turning.
10Remove the jar from the main body and empty it.
Operation as a juicer (BV5722)
1Place peeled fruit inside the filter (8). The fruit pulp will remain inside the filter, while the juice will
flow out and remain stored inside the jug.
iImportant Tips
•Do not use this jar to store food or other objects.
•It is not advisable to pour very hot food in the jar to avoid the danger of burning yourself.
•We recommend adding the ingredients little by little instead of all at once.
•First blend the harder ingredients and then add the softer ones. This makes it easier to obtain an
even mix.
•The slower speed is more suitable for beating or mixing foods with a liquid consistency. The
faster speed is recommended for mincing or mixing more solid or thicker foods.
•Coarse and fibrous foods must be cut into 2 or 3 cm cubes at most.
•To make cocktails with crushed ice, first put in the ingredients then the ice, and lastly the liquid
needed or a little water.
•
When crushing ice, it is recommendable to use high speed or turbo for a few seconds in
order to push the ice up and prevent it from becoming stuck at the bottom.
•If the foods stick to the walls of the jar during blending or remain out of the range of the blades,
switch off the appliance, remove the jar from the base and take off the lid. Remove the lid and
carefully push the food towards the blades with a spatula. Put the lid on the jar, place it on the
main body and carry on blending the ingredients.
•Do not exceed the maximum level indicated on the blender jar
4Cleaning and Storage
‹
The blades are very sharp. Avoid touching the
blades with your hands while cleaning and drying
the inside of the jug.
Z
Never submerse the main body (1) in water or wash it in the dishwasher.
1Clean the appliance before using it for the first time, immediately after use and after not being used
for a long period of time.
2Clean the jar and other plastic pieces immediately, given that some foods (such as carrots) are
very difficult to clean once they are dry.
Quick cleaning
1With the blender assembled, open the lid and pour in some warm water with a drop of liquid
detergent.
2Fit the lid and the dispenser cap.
3Put the speed selector in the P position for a few seconds.
4Put the speed selector in position 0 and unplug the appliance.
5Remove the jar and rinse with warm water.
Thorough cleaning
1Empty the jar and dismantle the blender.
2Clean the main body and the mains cable with a
damp cloth.
3Clean the other parts with soapy water and rinse
thoroughly under the tap. Never wash them in the
dishwasher.
4Assemble the blender as explained in paragraph “2. Assembly”.
FRANÇAISfr
Instructions de sécurité
•Cet appareil est destiné uniquement à un usage domestique, non industriel. Tout usage autre
que celui indiqué pourrait s’avérer dangereux .
•Cet appareil peut être utilisé par les enfants de plus
de 8 ans, par toute personne présentant un
handicap physique, sensoriel ou psychique, ou par
toute personne non familiarisée avec l’appareil mais
l’utilisant de manière responsable et consciente des
risques que suppose son utilisation, sous la
supervision d’une autre personne ou en respectant
les instructions d’utilisation. Les enfants ne doivent
pas jouer avec l’appareil. Les enfants ne doivent
pas nettoyer et intervenir sur l’appareil sans la
supervision d’un adulte.
•Ne modifiez ni ne réparez jamais l’appareil. Si vous constatez une anomalie sur l’appareil, ne
l’utilisez pas et amenez-le à un centre de service technique agréé.
•N’utilisez pas de pièces ni d'accessoires non fournis ou recommandés par SOLAC.
•Avant de brancher l’appareil au secteur, vérifiez que la tension indiquée correspond bien à celle
de votre logement.
•Débranchez toujours l’appareil après usage et
avant de démonter ou de monter des pièces et
d'effectuer toute opération d’entretien ou de
1Main body (base)
2Speed selector
BV5712
1
medium, 2maximum, P Turbo setting
BV5722
1 minimum, 2, 3
medium, 4,
5
maximum, PTurbo setting
3Power cord
4Jar
5Blade
6Lid
7Dispenser cup/lid
8Juice filter
9Cord winder
nettoyage. Débranchez-le également en cas de
coupure de courant.
•Ne tirez jamais sur le câble et ne suspendez pas l’appareil par le câble. Débranchez l’appareil
en tirant toujours sur la prise, jamais sur le cordon.
•Prenez garde à ce que le cordon d'alimentation n'entre pas en contact avec des éléments
tranchants ou des surfaces chaudes.
•Si le câble d’alimentation est endommagé, il doit
être remplacé par le fabricant, son service après
vente ou une personne de qualification similaire afin
d’éviter un danger.
•Retirez tous les sachets en papier ou en plastique, les films plastiques, les cartons et
autocollants éventuels apposés sur l'appareil ou à l'extérieur lui servant de protection pendant
le transport ou pour sa promotion.
•Ne laissez jamais l’appareil branché sans surveillance.
A
Ne plongez pas l'appareil dans l'eau ou dans un liquide et ne le mettez pas
au lave-vaisselle.
•Ne touchez pas l'appareil en marche avec les mains humides.
•Ne l'utilisez jamais sur des surfaces mouillées ni à l'extérieur.
•Les lames sont très tranchantes. Faites très
attention en les manipulant. Ne les touchez pas
lorsque l’appareil est branché. Pendant le
fonctionnement, maintenez les mains, les cheveux,
les vêtements et tout ustensile éloigné des lames
en mouvement.
•Utilisez le mixeur uniquement lorsque le couvercle est
placé sur le bol. N’utilisez jamais le mixeur à vide.
•Le bol ne doit pas être placé au micro-ondes.
•Pour éviter des situations dangereuses dues au réajustement involontaire du disjoncteur
thermique, ne branchez jamais l’appareil à un interrupteur à temporisateur.
•Vérifiez que l'appareil est débranché et que les lames
sont à l'arrêt avant de placer ou de retirer le filtre (8).
b
ATTENTION!: Lorsque vous souhaitez vous débarrasser de l'appareil, ne le jetez
JAMAIS à la poubelle, mais amenez-le au POINT VERT ou de recyclage des déchets le
plus proche de votre domicile pour son traitement ultérieur. Vous contribuerez ainsi à la
préservation de l’environnement.
1Description
Principaux éléments
2Montage
Z
Travaillez sur une surface stable, lisse et propre sur laquelle l'appareil ne peut pas glisser.
1Emboîtez le bol mélangeur sur le bloc principal. Pour cela,
placez le bol (4) sur le bloc (1) de sorte que les parties saillantes du bol coïncident avec les
rainures du bloc.
2Tournez le bol dans le sens des aiguilles d’une montre jusqu’à ce qu’il se bloque. (fig. 1).
i
Vérifiez que le bol est correctement inséré dans le bloc. Dans le cas contraire, l'appareil
ne démarrera pas.
Z
Si vous souhaitez utiliser le bol pour réaliser des jus de fruits, placez le filtre (8) autour de la lame
(5) (fig. 2) (modèle BV5722).
3Utilisation
Z
Cet appareil a été conçu pour battre des liquides tels que produits laitiers, sauces, jus de fruit,
soupes, pour mélanger des boissons, des milk-shakes… Il peut être utilisé pour mélanger des
aliments mous ou écraser en purée des ingrédients cuits comme des carottes ou des aliments
pour bébé. Il est également possible de préparer des cocktails avec de la glace pilée, même s’il
n’est pas recommandé d’introduire plus de 10 glaçons à la fois.
Z
L'appareil ne doit en aucun cas fonctionner plus longtemps que la durée maximale indiquée.
Après un usage prolongé de l’appareil pendant deuxminutes, laissez-le refroidir à température
ambiante pour éviter une surchauffe. Vous pouvez le réutiliser au bout de 30 secondes.
‹
N’introduisez jamais d’objets en bois, en plastique, en verre, en métal ou similaires dans le
bol.
1Montez le mixeur tel qu’il est indiqué dans la section «2: montage ». Assurez-vous qu’il est monté
correctement.
2Introduisez les aliments dans le pichet bol sans dépasser les deux tiers de sa capacité maximum
(bord supérieur).
3Mettez le couvercle (6).
4Placez le bouchon (7) en le tournant dans le sens contraire à celui des aiguilles d’une montre. (fig.
1).
5Branchez le câble.
6Au moyen du sélecteur de vitesse, choisissez la
position souhaitée (1, 2, 3, 4 ou 5, selon le modèle)
ou P position turbo; maintenez cette position
pendant la durée que vous estimez nécessaire (au
maximum 2 minutes de fonctionnement continu).
Z
Pendant le fonctionnement, maintenez fermement le couvercle avec les deux mains.
7Si vous souhaitez ajouter un ingrédient en cours le fonctionnement, retirez le bouchon doseur et
incorporez les ingrédients par l'orifice du couvercle (fig. 3).
‹
NE JAMAIS retirer le couvercle en cours de fonctionnement.
8Une fois obtenu le résultat désiré, sélectionnez la position arrêt sur le sélecteur de vitesse (fig. 4).
9Débranchez le cordon d’alimentation et attendez que la lame ait fini de tourner.
10Retirez le bol du corps principal et videz-le.
Fonctionnement comme centrifugeuse (BV5722)
1Introduisez les fruits pelés dans le filtre (8). Seule la pulpe reste à l'intérieur du filtre tandis que le
jus est maintenu à l'intérieur du bol.
iConseils d’utilisation
•N’utilisez pas le pichet pour garder des aliments ou des objets.
•Il est recommandé de ne pas verser des aliments très chauds dans le pichet pour éviter
d’éventuelles brûlures.
•Il est recommandé d’ajouter les ingrédients petit à petit au lieu de tout à la fois.
•Tout d’abord, mixez les aliments les plus solides et ensuite ajoutez les plus tendres. Vous
obtiendrez ainsi un mélange plus homogène.
•La vitesse la plus lente est recommandée pour battre ou mélanger des aliments à la
consistance liquide. La vitesse la plus rapide est recommandée pour mixer ou mélanger des
aliments plus solides ou consistants.
•Les aliments en gros morceaux ou fibreux doivent être coupés en cubes de 2 à 3 cm maximum.
•Pour réaliser des cocktails à la glace pilée, introduisez d’abord les ingrédients, puis la glace et
ensuite le liquide nécessaire ou un peu d’eau.
•
Lorsque vous mixez de la glace, il est recommandé d’utiliser la vitesse élevée ou turbo
pendant quelques instants, pour faire monter les glaçons vers le haut et éviter qu’ils ne
restent bloqués au fond du bol.
•Si pendant le mixage, les aliments viennent se coller aux parois du pichet ou s'écartent de la
portée des lames, arrêtez l'appareil et retirez le pichet du socle. Retirez le couvercle et à l’aide
d’une spatule déplacez soigneusement les aliments vers la lame. Couvrez le pichet, placez-le
sur le corps principal et achevez de réaliser le mélange des aliments.
•Ne dépassez pas le niveau maximum indiqué sur le bol du mixeur.
4Nettoyage et entretien
‹
Les lames sont très tranchantes. Évitez de toucher
les lames avec les mains lorsque vous nettoyez et
séchez l’intérieur du bol mélangeur.
Z
Ne plongez jamais le bloc principal (1) dans l’eau et ne le lavez jamais au lave-vaisselle.
1Nettoyez l’appareil avant la première utilisation, immédiatement après chaque utilisation et après
une longue période d’inutilisation.
2Nettoyez le bol et les autres éléments en plastique immédiatement après les avoir utilisés:
certains aliments comme la carotte sont en effet très difficiles à nettoyer une fois qu'ils sont secs.
Nettoyage rapide
1Lorsque le mixeur est complètement monté, levez le couvercle et versez de l’eau tiède avec un
peu de liquide vaisselle dans le pichet.
2Placez le couvercle et le bouchon doseur.
3Placez le sélecteur de vitesse sur la position P pendant quelques secondes.
4Placez le sélecteur de vitesse sur la position 0 et débranchez l’appareil.
5Retirez le pichet et rincez-le à l’eau tiède.
Nettoyage profond
1Videz le pichet et démontez le mixeur.
2Nettoyez le corps principal et le câble
d’alimentation à l’aide d’un chiffon humide.
3Nettoyez les autres éléments à l’eau savonneuse
et rincez-les abondamment à l’eau du robinet. Ne
les mettez pas au lave-vaisselle.
4Montez le mixeur tel qu’il est indiqué
DEUTSCHde
Sicherheitshinweise
•Dieses Gerät ist ausschließlich für den Hausgebrauch und nicht für gewerbliche Zwecke
bestimmt. Jede andere Verwendung als die vorgesehene kann gefährlich sein.
•Dieses Gerät darf von Kindern ab 8 Jahren sowie
Personen mit eingeschränkten körperlichen,
sensorischen oder geistigen Fähigkeiten bzw. ohne
ausreichende Erfahrung und Kenntnisse benutzt
werden, sofern die Verwendung unter Aufsicht oder
der entsprechenden Anleitung einer
sicherheitsverantwortlichen Person erfolgt und sie
über die möglichen Gefahren aufgeklärt wurden.
Kinder dürfen das Gerät nicht als Spielzeug
verwenden. Die benutzerseitige Reinigung und
Instandhaltung darf nicht von Kindern ohne
entsprechende Aufsicht vorgenommen werden.
•Nehmen Sie keine Änderungen oder Reparaturen am Gerät vor. Benutzen Sie das Gerät im
Falle eines Defekts nicht und bringen Sie es zu einem autorisierten Kundendienst.
•Verwenden Sie ausschließlich von SOLAC gelieferte oder empfohlene Teile bzw. Zubehör.
•Vergewissern Sie sich vor dem Netzanschluss des Geräts, dass die angegebene Netzspannung
mit derjenigen Ihres Haushalts übereinstimmt.
•Trennen Sie das Gerät nach dem Gebrauch, vor
dem Abnehmen bzw. Aufsetzen eines Teils sowie
vor jeder Reinigung oder Wartung stets vom Netz.
Bei Stromausfall ebenfalls vom Netz trennen.
•Ziehen Sie nicht am Kabel bzw. hängen Sie das Gerät nicht am Kabel auf. Ziehen Sie stets am
Netzstecker, nicht am Kabel, wenn Sie das Gerät vom Netz trennen.
•Achten Sie darauf, dass das Netzkabel nicht mit scharfen Kanten oder heißen Flächen in
Berührung kommt.
•Sollte das Netzkabel beschädigt sein, darf es
vorsichtshalber nur vom Hersteller, seinem
autorisierten Kundendienst oder ähnlichem
Fachpersonal ausgetauscht werden.
•Entfernen Sie alle Papier- und Kunststoffbeutel, Kunststofffolien, Kartons bzw. Aufkleber in oder
am Gerät, die als Transportschutz oder Werbungselemente dienen.
1Bloc principal (base)
2Speed selector
BV5712
1
moyenne, 2maximum,
P
Position turbo
BV5722
1 minimale, 2, 3
moyenne, 4,
5
maximum, PPosition turbo
3Cordon d’alimentation
4Bol
5Lame
6Couvercle
7Bouchon/verre doseur
8Filtre pour jus
9Enrouleur de câble
•Das Gerät nicht unbeaufsichtigt eingeschaltet lassen.
A
Das Gerät nicht in Wasser oder andere Flüssigkeiten tauchen und nicht in
der Spülmaschine reinigen
•Das Gerät während des Betriebs nicht mit feuchten Händen berühren.
•Stellen Sie das Gerät niemals auf nassen Oberflächen oder im Freien auf.
•Die Messer sind sehr scharf. Vorsicht bei der
Handhabung. Messer nicht bei angeschlossenem
Gerät berühren. Halten Sie während des Betriebs
Hände, Haare, Kleidung sowie jegliche
Gegenstände von den Messern fern.
•Verwenden Sie den Standmixer nur mit
geschlossenem Becher. Schalten Sie den Mixer
niemals mit leerem Becher ein.
•Der Becher ist nicht mikrowellenfest.
•Zur Vermeidung von Gefahrensituationen durch ein unbeabsichtigtes Rücksetzen des
Thermoschalters das Gerät niemals an einen Timer-Schalter anschließen.
•Stellen Sie sicher, dass das Gerät vom Netz
getrennt ist und die Messer vollständig still stehen,
bevor Sie den Filter (8) einsetzen oder entfernen.
b
ACHTUNG!! Das Gerät KEINESFALLS über den Hausmüll entsorgen, sondern zum
nächstgelegenen WERTSTOFFHOF oder zur Abfallannahmestelle zur
Weiterverwertung bringen. So leisten Sie einen Beitrag zum Umweltschutz.
1Beschreibung
Hauptbestandteile
2Montage
Z
Arbeiten Sie auf einer stabilen, glatten, sauberen und rutschfesten Oberfläche.
1Setzen Sie den Behälter auf das Gehäuse Hierfür
stellen Sie den Behälter (4) so auf das Gehäuse (1), dass die Vorsprünge des Behälters in die
Einkerbungen des Gehäuses einrasten.
2Drehen Sie den Behälter im Uhrzeigersinn, bis er vollständig einrastet. (Abb. 1).
i
Stellen Sie sicher, dass der Behälter richtig eingerastet ist. Andernfalls lässt sich das
Gerät nicht in Betrieb nehmen.
Z
Wenn Sie den Mixer als Saftpresse verwenden möchten, so setzten Sie den Filter (8) um das
Messer (5) ein (Abb. 2) (Modell BV5722).
3Verwendung
Z
Dieses Gerät ist zum Mixen von Flüssigkeiten wie Milchprodukten, Saucen, Fruchtsäften,
Suppen, Mixgetränken usw. vorgesehen. Es eignet sich zum Zerkleinern weicher
Nahrungsmittel oder zur Herstellung von Püree mit gekochten Zutaten wie Karotten oder auch
Babynahrung. Zudem lassen sich Cocktails mit zerstoßenem Eis zubereiten (nicht mehr als 10
Eiswürfel auf einmal in den Becher geben).
Z
Lassen Sie das Gerät niemals länger als nötig in Betrieb. Lassen Sie das Gerät nach einem
Dauerbetrieb von 2 Minuten auf Umgebungstemperatur abkühlen, um eine Überhitzung zu
vermeiden. Nach 30 Sekunden kann es wieder verwendet werden.
‹
Geben Sie keine Holz-, Kunststoff-, Glas-, Metallgegenstände o.ä. in den Mixbecher.
1Setzen Sie die Geräteteile nach Anleitung unter Punkt 2 „Montage“ zusammen. Stellen Sie sicher,
dass alle Teile korrekt montiert wurden.
2Füllen Sie die Lebensmittel in den Becher bis max. 2/3 des Fassungsvermögens (oberer Rand) ein.
3Setzen Sie den Deckel (6) auf.
4Setzen Sie den Stopfen (7) ein, und drehen Sie ihn gegen den Uhrzeigersinn. (Abb. 1).
5Schließen Sie den Mixer an das Netz an.
6Stellen Sie den Geschwindigkeitswahlschalter auf
die gewünschte Stufe (1, 2, 3, 4 oder 5 je nach
Modell) oder Turbofunktion P. Die gewählte Stufe
darf während des Betriebs des Geräts (max. 2
Minute Dauerbetrieb) nicht gewechselt werden.
Z
Halten Sie den Deckel während des Betriebs mit beiden Händen fest nieder.
7Möchten Sie während des Mixvorgangs weitere Zutaten hinzufügen, so entnehmen Sie den
Dosierstopfen und füllen die Zutaten durch die Deckelöffnung ein (Abb. 3).
‹
Nehmen Sie NIEMALS den Deckel während des Betriebs ab.
8Wenn Sie mit dem Mixvorgang fertig sind, stellen Sie den Geschwindigkeitsschalter auf die AUS-
Position (Abb. 4).
9Ziehen Sie den Netzstecker und warten Sie, bis das Messer stillsteht.
10Nehmen Sie den Becher vom Sockel und entleeren Sie den Inhalt.
Option Saftpresse (BV5722)
1Geben Sie die geschälte Frucht in den Filter (8). Das Fruchtfleisch bleibt im Filter, während der
ausgepresste Saft in den Behälter läuft.
iTipps zur Verwendung
•Verwenden Sie den Behälter nicht zur Aufbewahrung von Lebensmitteln oder Gegenständen.
•Füllen Sie keine allzu heißen Lebensmittel in den Behälter, um eine eventuelle
Verbrennungsgefahr zu vermeiden.
•Füllen Sie die Zutaten nach und nach ein, anstatt alle auf einmal.
•Beginnen Sie mit dem Zerkleinern der festeren Zutaten und fügen Sie danach die weicheren
hinzu. Auf diese Weise erzielen Sie ein gleichmäßiges Mischergebnis.
•Die niedrige Geschwindigkeitsstufe empfiehlt sich zum Mixen bzw. Verarbeiten flüssiger
Lebensmittel. Die hohe Geschwindigkeitsstufe empfiehlt sich zum Zerkleinern bzw. Verarbeiten
von Lebensmitteln mit festerer Konsistenz.
•Dicke und faserhaltige Lebensmittel in höchstens 2-3 cm. große Stücke schneiden.
•Zum Mixen von Cocktails mit zerstoßenem Eis füllen Sie zuerst die Zutaten, dann das Eis und
zuletzt die erforderliche Flüssigkeit bzw. etwas Wasser in den Behälter.
•
Beim Zerkleinern von Eis empfiehlt es sich, kurz die hohe Geschwindigkeitsstufe bzw.
Turbostufe zu verwenden, um die Eiswürfel nach oben zu stoßen und zu vermeiden, dass
sie am Boden bleiben.
•Bleiben die Zutaten während des Mixvorgangs an den Wänden des Behälters haften oder
werden sie nicht vom Messer erfasst, so schalten Sie das Gerät aus und nehmen den Behälter
vom Sockel. Nehmen Sie den Deckel ab und schieben Sie die Zutaten vorsichtig mithilfe eines
Spatels zum Messer. Verschließen Sie den Behälter wieder, setzen Sie ihn auf den Sockel und
führen Sie den Mixvorgang zu Ende.
•Achten Sie beim Befüllen darauf, dass die oberste Markierung des Mixbechers nicht
überschritten wird.
4Reinigung und Aufbewahrung
‹
Die Messer sind sehr scharf. Achten Sie darauf,
die Messer beim Reinigen und Trocknen des
Becherinnenraums nicht zu berühren.
Z
Tauchen Sie das Gehäuse (1) niemals in Wasser und geben Sie es nicht in die Spülmaschine.
1Reinigen Sie das Gerät vor der ersten Verwendung sowie unmittelbar nach jeder Verwendung,
und wenn Sie es längere Zeit nicht benutzt haben.
2Reinigen Sie den Becher und die anderen Kunststoffelemente stets sofort nach der
Verwendung, da sich einige Lebensmittel (z.B. Karotten) nur sehr schwer entfernen
lassen, wenn sie eingetrocknet sind.
Schnelle Reinigung
1Lassen Sie den Behälter (inkl. Messer) auf dem Sockel, nehmen Sie den Deckel ab und füllen Sie
lauwarmes Wasser mit etwas Spülmittel ein.
2Setzen Sie den Deckel und die Verschlusskappe auf den Behälter.
3Stellen Sie den Geschwindigkeitsregler einige Sekunden lang auf die Position „P“.
4Stellen Sie den Geschwindigkeitsregler auf „0“ und trennen Sie das Gerät vom Netz.
5Nehmen Sie den Behälter ab und spülen Sie ihn mit lauwarmem Wasser aus.
Gründliche Reinigung
1Entleeren Sie den Behälter und zerlegen Sie den Mixer in seine Hauptbestandteile.
2Reinigen Sie das Gehäuse und Netzkabel mit
einem feuchten Tuch.
3Reinigen Sie die restlichen Teile mit Spülmittel und
spülen Sie sie anschließend unter reichlich
fließendem Wasser ab. Nicht in der Spülmaschine
reinigen.
4Setzen Sie die Geräteteile nach Anleitung unter Punkt 2 „Montage“ zusammen.
PORTUGUÊSpt
Indicações de segurança
•Este aparelho destina-se apenas à utilização doméstica, não industrial. Qualquer utilização
diferente da indicada poderia ser perigosa.
•Este aparelho pode ser utilizado por crianças com 8
anos de idade e mais, e pessoas com capacidades
físicas, sensoriais ou mentais reduzidas ou falta de
experiência e conhecimento se forem vigiadas ou
receberem instruções adequadas relativamente à
utilização do aparelho de uma forma segura e que
compreendem os perigos que implica. As crianças
não devem brincar com o aparelho. A limpeza e a
manutenção não devem ser realizadas por crianças
sem vigilância.
•Não realize qualquer modificação ou reparação ao aparelho. Perante qualquer anomalia no
aparelho, não o utilize e contacte um serviço de assistência autorizado.
•Não utilize peças ou acessórios que não tenham sido fornecidos ou recomendados pela
SOLAC.
•Antes de ligar o aparelho à rede eléctrica, verifique se a tensão indicada é igual à da sua
residência.
•Desligue sempre o aparelho depois da utilização e
antes de desmontar ou montar peças e realizar
qualquer tarefa de manutenção ou limpeza.
Desligue-o também em caso de corte de energia.
•Nunca puxe nem pendure o aparelho pelo cabo. Desligue o aparelho da tomada puxando
sempre pela ficha, nunca pelo cabo.
•Evite que o cabo de ligação entre em contacto com arestas cortantes ou superfícies quentes.
•Se o cabo de alimentação estiver danificado, deve
ser substituído pelo fabricante, pelo seu serviço de
pós-venda ou por pessoal qualificado semelhante,
com o fim de evitar riscos.
•Retire todas as embalagens de papel ou de plástico, lâminas plásticas, cartões e eventuais
autocolantes que se encontrem dentro ou fora do aparelho e que serviram como protecção de
transporte ou promoção de venda.
•Não deixe o aparelho em funcionamento sem vigilância.
A
Não coloque nunca o aparelho na água ou em outro líquido, nem no lava-
loiça
•Não toque no aparelho com as mãos húmidas quando este estiver a funcionar.
•Não utilize o aparelho sobre superfícies molhadas nem no exterior.
•As lâminas estão muito afiadas. Tenha muito
cuidado ao manuseá-las. Não deverão ser
manuseadas com o aparelho ligado. Durante o
funcionamento, mantenha as mãos, o cabelo, a
roupa e qualquer utensílio afastado das lâminas em
movimento.
•Use o liquidificador apenas com a tampa colocada
no jarro. Não utilize nunca o liquidificador vazio.
•O jarro não é apto para microondas.
1Gehäuse (Sockel)
2Geschwindigkeitswahlschalter
BV5712
1
Mittelstufe, 2Höchststufe,
P
Turbo-Position
BV5722
1 Niedrigste Stufe, 2, 3
Mittelstufe, 4,
5 m
Höchststufe, PTurbo-Position
3Netzkabel
4Becher
5Messer
6Deckel
7Stopfen/Messbecher
8Saftfilter
9Kabelfach
•Para evitar situações de perigo devido ao reacerto involuntário do disjuntor térmico, não ligue o
aparelho a um interruptor com temporizador.
•Assegure-se de que o aparelho está desligado da
alimentação elétrica e de que as lâminas estão
totalmente paradas antes de colocar ou retirar o
acessório filtro (8).
b
ATENÇÃO!!: Quando eliminar o aparelho, NUNCA o deite no caixote do lixo, faça-o no
seu ECOPONTO ou no ponto de recolha de resíduos mais perto de sua casa, para que
possa ser tratado posteriormente. Desta forma, está a contribuir para a protecção do
meio ambiente.
1Descrição
Partes principais
2Montagem
Z
Trabalhe sobre uma superfície estável, lisa e limpa, sem possibilidade de resvalar.
1Encaixe o jarro no corpo principal. Para isso, coloque o jarro (4) sobre o corpo (1) de modo a que
as saliências do jarro coincidam com as ranhuras do corpo.
2Rode o jarro no sentido dos ponteiros do relógio até ficar totalmente encaixado. (fig. 1).
i
Assegure-se de que encaixa corretamente o jarro no corpo, caso contrário não
funcionará.
Z
Se desejar utilizar a batedora como espremedor de sumo, coloque o filtro (8) à volta da lâmina
(5) (fig. 2) (modelo BV5722).
3Utilização
Z
Este aparelho foi concebido para bater líquidos como produtos lácteos, molhos, sumos de fruta,
sopinhas, misturar bebidas, batidos…. Pode ser utilizada para misturar alimentos suaves ou
para fazer puré com ingredientes cozidos, por exemplo, cenouras ou ingredientes de comida
para bebé. Também pode fazer cocktails com gelo picado, apesar de não recomendarmos
utilizar mais de 10 pedras de gelo de cada vez.
Z
Em nenhum caso é conveniente ter o aparelho em funcionamento durante mais tempo que o
necessário. Depois da utilização contínua do aparelho durante dois minutos, deixe-o arrefecer
à temperatura ambiente, para evitar o sobreaquecimento. Pode voltar a utilizar após 30
segundos.
‹
Nunca introduza objectos de madeira, plástico, vidro, metal ou semelhantes dentro do jarro.
1Monte o liquidificador como explicado na secção "2 Montagem". Certifique-se que a montagem
está correcta.
2Introduza os alimentos no jarro sem ultrapassar 2/3 da capacidade máxima (orla superior) do
recipiente.
3Coloque a tampa (6).
4Coloque a tampa (7), gire-a no sentido contrário ao dos ponteiros do relógio. (Fig. 1).
5Ligue o fio na rede eléctrica.
6Com o seletor de velocidade escolha a posição de velocidade desejada (1, 2, 3, 4 ou 5, conforme
o modelo) ou P posição turbo; deve manter esta posição durante o tempo que deseja prolongar o
funcionamento do aparelho (máximo 2 minutos de funcionamento contínuo).
Z
Durante o funcionamento, fixe a tampa firmemente com as 2 mãos.
7Se deseja acrescentar algum ingrediente durante o funcionamento, retire a tampa doseadora (1)
e acrescente os ingredientes pelo orifício da tampa (fig. 3).
‹
NUNCA remova a tampa durante o funcionamento.
8Quando obtiver o resultado desejado, escolha a posição de desligado no selector de velocidade (fig. 4).
9Desligue-a da rede e espere a que a lâmina pare de girar.
10Remova o jarro do corpo principal e esvazie-o.
Funcionamento como espremedor (BV5722)
1Introduza a fruta descascada no interior do filtro (8). A polpa da fruta permanecerá no interior do
filtro e o sumo sairá para o exterior permanecendo armazenado no interior do jarro.
iConselhos de Utilização
•Não utilize o jarro para guardar alimentos ou objectos.
•Recomenda-se não deixar alimentos muito quentes no jarro com o fim de prevenir queimaduras.
•Recomenda-se acrescentar os ingredientes aos poucos ao invés de tudo de uma vez.
•Primeiramente, triture os alimentos mais sólidos e seguidamente adicione os mais moles. Desta
forma é mais fácil conseguir uma mistura homogénea.
•Recomenda-se utilizar a velocidade mais lenta para bater ou misturar alimentos com
consistência líquida. Recomenda-se utilizar a velocidade mais rápida para triturar ou misturar
alimentos com consistência mais sólida.
•Os alimentos grossos e com fibra têm de ser cortados em quadrados de 2 ou 3 cm como máximo.
•Para os cocktails com gelo triturado introduza primeiro os ingredientes, depois o gelo e, por
último, o líquido necessário ou um pouco de água.
•
Quando picar gelo recomenda-se utilizar a velocidade alta ou turbo durante alguns
instantes para empurrar os pedaços de gelo para cima para que não fiquem presos em
baixo.
•Se durante o processo de mistura, os alimentos se agarrarem às paredes da jarra ou ficarem
fora do alcance das lâminas, apague o aparelho e remova o jarro do corpo principal. Remova a
tampa e mova os alimentos cuidadosamente na direcção da lâmina. Tampe o jarro, coloque-o
no corpo principal e termine a mistura dos alimentos.
•Não exceda o nível máximo indicado no jarro do liquidificador.
4Limpeza e conservação
‹
As lâminas estão muito afiadas. Evite tocar nas
lâminas com as mãos ao limpar e enxugar o
interior da jarra.
Z
Não submergir o corpo principal (1) na água nem o lave na máquina de lavar loiça.
1Limpe o aparelho antes da primeira utilização, imediatamente após cada utilização e após um
longo período de tempo sem usar.
2Limpe o copo e outros elementos plásticos imediatamente à sua utilização, já que alguns
alimentos (por exemplo a cenoura) são muito difíceis de limpar uma vez secos.
Limpeza rápida
1Levante a tampa com o liquidificador montado e deite água tépida com um pouca de detergente líquido.
2Coloque a tampa (2) e a tampa doseadora (1).
3Coloque o selector de velocidade na posição P durante alguns segundos.
4Coloque o selector de velocidade na posição 0 e desligue o aparelho.
5Remova o jarro e enxagúe-o com água tépida.
Limpeza profunda
1Esvazie o jarro e desmonte o liquidificador.
2Limpe o corpo principal e o cabo de ligação com
um pano húmido.
3Limpe os demais elementos com água e sabão e
enxagúe com água abundante sob água corrente.
Não os introduza no lava-loiça.
4Monte o liquidificador como explicado na secção “2 Montagem”.
ITALIANOit
Indicazioni di sicurezza
•Il presente apparecchio è destinato unicamente all'uso domestico e non industriale. Per evitare
pericoli, non utilizzare l'apparecchio per scopi diversi da quelli a cui è destinato.
•Questo apparecchio può essere utilizzato da
bambini di età superiore agli otto anni, da persone
inesperte o con capacità fisiche, sensoriali o mentali
compromesse solo in presenza di adeguata
supervisione o se adeguatamente istruiti in merito
all’uso in condizioni di sicurezza, e se in grado di
comprendere i pericoli connessi all’uso. Non
permettere ai bambini di giocare con l’apparecchio.
I bambini possono occuparsi della pulizia e
manutenzione solo in presenza di un adulto.
•Non apportare modifiche né riparazioni di sorta all’apparecchio. In presenza di qualunque
anomalia dell’apparecchio, non utilizzarlo e consultare un servizio di assistenza autorizzato.
•Non usare pezzi o accessori non forniti o non raccomandati da SOLAC.
•Prima di collegare l’apparecchio alla rete elettrica, verificare che il voltaggio indicato coincida con
quello della sua abitazione.
•Scollegare sempre l’apparecchio dalla rete elettrica
dopo l’uso e prima di smontare o montare dei pezzi
o svolgere qualsiasi attività di manutenzione o
pulitura. Scollegare l’apparecchio dalla rete elettrica
anche in caso di black-out.
•Non tirare mai il cavo né appendere l’apparecchio allo stesso. Scollegare l’apparecchio dalla rete
elettrica impugnando sempre la spina e non il cavo di alimentazione.
•Evitare che il cavo entri in contatto con schegge taglienti o superfici calde.
•Se il cavo di alimentazione è danneggiato farlo
sostituire dal produttore, da un servizio di
assistenza post-vendita o da personale qualificato
per evitare pericoli.
•Rimuovere tutti i sacchetti di carta o di plastica, i pezzi di plastica, i cartoncini ed eventuali adesivi
che si trovano dentro o fuori l'apparecchio e che sono stati utilizzati per proteggerlo durante il
trasporto o per promuoverne la vendita.
•Non lasciare l'apparecchio in funzione senza controllo.
A
Non immergere mai il corpo principale dell'apparecchio in acqua o in altro
liquido, né lavarlo in lavastoviglie.
•Non toccare l'apparecchio con le mani umide quando è in funzione.
•Non utilizzare mai l'apparecchio su superfici umide e all'aperto.
•Le lame sono molto affilate. Fare molta attenzione
durante l'uso. Non toccarle se l'apparecchio è
collegato alla rete elettrica. Durante il
funzionamento, tenere mani, capelli, indumenti e
utensili lontani dalle lame in movimento.
•Utilizzare il frullatore esclusivamente con il
coperchio sul bicchiere. Non utilizzare mai il
frullatore a vuoto.
•Il bicchiere non è adatto all'uso nel forno a microonde.
•Al fine di evitare situazioni pericolose derivanti dal ripristino involontario del disgiuntore termico,
non collegare mai l’apparecchio a un interruttore dotato di timer.
•Controllare che l'apparecchio sia scollegato dalla rete
elettrica e attendere che le lame siano completamente
ferme prima di togliere o mettere il filtro (8).
b
ATTENZIONE!!: non smaltire MAI l'apparecchio insieme ai rifiuti domestici. Portarlo
presso il CENTRO DI SMALTIMENTO o di raccolta più vicino perché possa essere
smaltito adeguatamente. In questo modo si contribuirà alla tutela dell'ambiente.
1Corpo principal (base)
2Selector de velocidade
BV5712
1média, 2máxima, PPosição turbo
BV5722
1 mínima, 2, 3
média, 4, 5máxima
PPosição turbo
3Fio de ligação à rede
4Jarro
5Lâmina
6Tampa
7Tampa/copo doseador
8Filtro para sumo
9Recolhe-fios
1Descrizione
Componenti principal
2Montaggio
Z
Utilizzare l'apparecchio su una superficie stabile, liscia e pulita che non ne consenta la caduta.
1Innestare il bicchiere sul corpo principale. A questo scopo appoggiare il bicchiere (4) sul corpo (1)
in modo che le sporgenze sul bicchiere corrispondano alle scanalature sul corpo.
2Girare il bicchiere in senso orario finché non rimane perfettamente bloccato (fig. 1).
i
Perché l'apparecchio funzioni il bicchiere deve essere perfettamente inserito sul corpo.
Z
Per utilizzare il frullatore come centrifuga per succhi di frutta e verdura collocare il filtro (8) intorno
alle lame (5) (fig. 2) (modello BV5722).
3Uso
Z
L’apparecchio è stato progettato per sbattere liquidi come, per esempio, prodotti a base di latte,
salse, succhi di frutta, zuppe, mescolare bibite, frullati…. Può essere utilizzato per mescolare
alimenti morbidi o per fare purè con ingredienti lessati come le carote, o con ingredienti tipici per
gli alimenti per bambini. È anche possibile fare dei cocktail con ghiaccio tritato, anche se è
consigliabile non introdurre più di 10 cubetti di ghiaccio alla volta.
Z
Non è mai consigliato tenere l'apparecchio in funzione per un periodo superiore al necessario.
Dopo aver utilizzato l'apparecchio per due minuti, lasciarlo raffreddare a temperatura ambiente
per evitarne il surriscaldamento. È possibile utilizzarlo di nuovo dopo 30 secondi.
‹
Non introdurre mai nel bicchiere oggetti di legno, plastica, vetro, metallo o simili.
1Montare il frullatore come spiegato nel paragrafo 2, "Montaggio". Accertarsi che l'apparecchio sia
montato correttamente.
2Introdurre gli alimenti nel bicchiere senza superare i 2/3 della sua capacità massima (bordo
superiore).
3Posizionare il coperchio (6).
4Posizionare il tappo (7) ruotandolo in senso antiorario. (fig. 1).
5Collegare il cavo alla rete.
6Tramite il selettore della velocità, scegliere la
velocità desiderata (1, 2, 3, 4 o 5 a seconda del
modello) o P (turbo). Sarà necessario mantenere
questa posizione per tutto il tempo in cui si
desidera tenere l'apparecchio in funzione (al
massimo 2 minuti di funzionamento continuo).
Z
Durante il funzionamento tenere il coperchio ben saldo con entrambe le mani.
7Per aggiungere un ingrediente durante il funzionamento dell'apparecchio, rimuovere il tappo
dosatore e aggiungere gli ingredienti attraverso il foro del coperchio (fig. 3).
‹
Non togliere MAI il coperchio durante il funzionamento.
8Una volta ottenuto il risultato desiderato, portare il selettore di velocità nella posizione di
spegnimento (fig. 4).
9Scollegare il cavo dalla rete e aspettare che la lama abbia smesso di girare.
10Rimuovere il bicchiere dal corpo principale e svuotarlo.
Funzionamento come centrifuga (BV5722)
1Introdurre la frutta sbucciata nel filtro (8). La polpa della frutta rimarrà nel filtro, mentre il succo
uscirà all'esterno e verrà raccolto nel bicchiere.
iConsigli per l'uso
•Non utilizzare il bicchiere per riporvi alimenti o cose.
•Si consiglia di non versare alimenti molto caldi nel bicchiere, per evitare possibili scottature.
•Si consiglia di aggiungere gli ingredienti poco alla volta piuttosto che tutti insieme.
•Tritare innanzitutto gli alimenti più duri, quindi aggiungere quelli più morbidi. In questo modo è
più facile ottenere un composto omogeneo.
•La velocità più bassa è raccomandata per frullare o mescolare alimenti di consistenza liquida.
La velocità più alta è raccomandata per tritare o mescolare alimenti più solidi o consistenti.
•Tagliare gli alimenti più grossi e fibrosi in dadi da 2 o 3cm al massimo.
•Per preparare cocktail con ghiaccio tritato introdurre prima gli ingredienti, quindi il ghiaccio e
infine il liquido necessario o un po' d'acqua.
•
Per tritare il ghiaccio si consiglia di utilizzare la velocità alta o turbo per qualche istante.
Questo spingerà i cubetti di ghiaccio verso l'alto e impedirà che rimangano bloccati sul
fondo del bicchiere.
•Se, durante la miscelazione, gli alimenti aderiscono alle pareti del bicchiere o rimangono lontani
dalle lame, fermare l'apparecchio ed estrarre il bicchiere dal corpo principale. Togliere il
coperchio e, con una spatola, spostare delicatamente gli alimenti verso la lama. Coprire il
bicchiere, ricollocarla sul corpo principale e completare la miscelazione degli alimenti.
•Non superare il livello massimo indicato nel bicchiere del frullatore.
4Pulizia e conservazione
‹
Le lame sono molto affilate. Evitare di toccare le
lame con le mani quando si pulisce e si asciuga
l’interno della caraffa
Z
Non immergere mai il corpo principale (1) in acqua né lavarlo in lavastoviglie.
1Pulire l'apparecchio precedentemente al primo utilizzo, immediatamente dopo ogni utilizzo e dopo
lunghi periodi di inattività.
2Pulire il bicchiere e gli altri elementi di plastica immediatamente dopo l’uso, in quanto alcuni
alimenti, come ad esempio le carote, sono molto difficili da pulire una volta seccati.
Pulizia rapida
1A frullatore completamente montato sollevare il coperchio e versare acqua tiepida e poco
detergente liquido nel bicchiere.
2Collocare il coperchio e il tappo dosatore.
3Portare il selettore di velocità in posizione P per qualche secondo.
4Riportare quindi il selettore di velocità in posizione 0 e spegnere l'apparecchio.
5Estrarre il bicchiere e sciacquarlo in acqua tiepida.
Pulizia profonda
1Svuotare il bicchiere e smontare il frullatore.
2Pulire il corpo principale e il cavo di alimentazione
con un panno umido.
3Pulire gli altri elementi con acqua e sapone e
sciacquarli con abbondante acqua sotto il
rubinetto. Non lavare in lavastoviglie.
4Montare il frullatore come spiegato nel paragrafo 2, "Montaggio".
NEDERLANDSnl
Veiligheidsinstructies
•Het apparaat is uitsluitend bedoeld voor huishoudelijk gebruik; niet voor bedrijfsmatig gebruik.
Elk ander gebruik dan hier vermeld kan gevaarlijk zijn.
•Dit apparaat mag alleen door kinderen ouder dan
acht jaar en door personen met lichamelijke,
zintuiglijke of geestelijke beperkingen, of met een
gebrek aan ervaring en kennis gebruikt worden, als
zij voor het gebruik van dit apparaat onder toezicht
staan of passende aanwijzingen hebben gekregen
voor het veilige gebruik van dit apparaat en zij de
mogelijke gevaren van dit apparaat begrijpen. Laat
kinderen nooit met dit apparaat spelen. Door de
gebruiker te verrichten reiniging en onderhoud mag
in geen geval door kinderen uitgevoerd worden als
zij daarbij niet onder toezicht staan.
•Voer geen enkele wijziging of reparatie aan het apparaat uit.Bij defecten aan het apparaat, het
apparaat niet gebruiken maar naar een erkende technische dienst brengen
•Gebruik geen onderdelen of hulpstukken die niet door SOLAC geleverd of aanbevolen zijn.
•Kijk, alvorens het apparaat op het lichtnet aan te sluiten, of het aangegeven voltage
overeenkomt met de netspanning bij u thuis.
•Trek altijd na gebruik de stekker uit het stopcontact
en ook vóórdat u onderdelen verwijdert of
aanbrengt of onderhouds- of
reinigingswerkzaamheden aan het apparaat
verricht. Trek de stekker er ook bij stroomuitval uit.
•Trek nooit aan het snoer of laat het apparaat nooit aan het snoer hangen. Neem de stekker uit
het stopcontact door aan de stekker, nooit aan het snoer, te trekken.
•Zorg ervoor dat het netsnoer niet in contact komt met scherpe kanten of hete oppervlakken.
•Laat als het netsnoer beschadigd is, dit door de
fabrikant, zijn klantenservice of door vergelijkbaar
opgeleid personeel vervangen, om evt. risico’s te
vermijden.
•Verwijder alle papieren of plastic zakken, kunststof plaatjes, kaartjes en stickers die evt. aan de
binnen- of buitenkant van het apparaat aangebracht werden ter bescherming tijdens het
transport of voor reclamedoeleinden.
•Laat het apparaat niet onbeheerd achter wanneer het in werking is.
A
Dompel dit apparaat niet in water of in andere vloeistoffen onder en stop het
evenmin in de vaatwasser. Laat dit apparaat bij het reinigen niet met water in
aanraking komen
•Raak het apparaat niet met natte handen aan als het aan staat.
•Gebruik dit apparaat nooit op een natte ondergrond of buitenshuis.
•De messen zijn uiterst scherp. Wees voorzichtig als
u ze aanraakt. Raak ze niet aan wanneer het
apparaat aan staat. Houd tijdens gebruik de
handen, het haar, de kleding en alle
gebruiksvoorwerpen verwijderd van de bewegende
messen.
•Gebruik de blender alleen met het deksel op de kan.
Gebruik de blender nooit als deze leeg is.
•De kan is niet geschikt voor in de magnetronoven.
•Om gevaarlijke situaties als gevolg van een onbedoelde reset (herinstelling) van de
thermoschakelaar te vermijden het apparaat nooit koppelen aan een tijdschakelaar.
•Controleer of het apparaat uit staat en of de messen
volledig tot stilstand zijn gekomen, alvorens het
filterelement aan te brengen of te verwijderen (8).
b
LET OP!: Deponeer het apparaat als u het wilt afdanken NOOIT in de vuilnisbak, maar
wend u tot het dichtstbijzijnde INZAMELPUNT of ophaaldienst in uw woonplaats voor
verdere verwerking. Op deze wijze draagt u bij tot het behoud van het milieu.
1Corpo principale (base)
2Selettore della velocità
BV5712
1
media, 2massima, P Posizione turbo
BV5722
1 minima, 2, 3media, 4, 5massima
PPosizione turbo
3Cavo di collegamento alla rete
4Bicchiere
5Lama
6Coperchio
7Tappo/Bicchiere dosatore
8Filtro per centrifuga
9Avvolgicavo
1Beschrijving
Belangrijkste onderdelen
2Montage
Z
Werk op een stevige, vlakke en schone ondergrond waarop het apparaat niet kan wegschuiven.
1Zet de kan op het voetstuk van het apparaat. Zet hiervoor de kan (4) op het voetstuk (1) zodat de
uitsteeksels aan de kan samenvallen met de gleuven van het voetstuk.
2Draai de kan rechtsom totdat deze helemaal vastklikt. (Afb. 1).
i
Zorg ervoor dat de kan goed in het voetstuk past. Anders zal deze niet werken.
Z
Wilt u de mixer als een sapcentrifuge gebruiken, plaats het filter (8) dan rond het mes (5) (Afb.
2) (model BV5722).
3Gebruik
Z
Dit apparaat is ontworpen voor het mengen van vloeistoffen, zoals melkproducten, sauzen,
vruchtensappen, soepen, het mixen van dranken, milkshakes… Het apparaat kan gebruikt
worden voor het mixen van zachte voedingsmiddelen of het pureren van gekookte
ingrediënten, bijvoorbeeld wortels of babyvoeding. Ook kunnen cocktails gemaakt worden
met gemalen ijs, maar het is niet aan te bevelen om meer dan 10 ijsblokjes tegelijk in de
blender te doen.
Z
Laat het apparaat niet langer aan dan strikt noodzakelijk. Laat na twee minuten ononderbroken
gebruik het apparaat tot kamertemperatuur afkoelen om oververhitting te voorkomen. Na 30
seconden kunt u het weer gebruiken.
‹
Plaats nooit houten, kunststof, glazen, metalen of soortgelijke voorwerpen in de kan.
1Monteer de blender zoals in hoofdstuk “2 Montage” beschreven is. Zorg ervoor de het apparaat
correct gemonteerd is.
2Doe de voedingsmiddelen in de kan zonder 2/3 van de maximale inhoud (bovenste rand) te overschrijden.
3Plaats het deksel (6).
4Draai het deksel (7) naar links vast (tegen de wijzers van de klok in). (Afb. 1).
5Sluit het snoer aan op het lichtnet.
6Zet de snelheidsregelaar op de gewenste stand (1,
2, 3, 4 of 5, naargelang het model) of de P-
turbostand. Houd deze stand aan zolang als u het
apparaat wilt laten werken (maximaal 2 minuten
onafgebroken).
Z
Tijdens de werking van de blender het deksel met 2 handen stevig op de kan gedrukt houden.
7Indien u tijdens het mixen nog andere ingrediënten wilt toevoegen, opent u de bijvuldop en voegt
u de ingrediënten toe via de vulopening (afb. 3).
‹
Verwijder NOOIT het deksel wanneer de blender in werking is.
8Wanneer het gewenste resultaat is verkregen, zet u de snelheidsregelaar op de uit-stand (afb. 4).
9Neem de stekker uit het stopcontact en wacht tot het mes stilstaat.
10Haal de kan uit de blender en schenk hem leeg.
Als sapcentrifuge gebruiken (BV5722)
1Stop geschild fruit in het filter (8). Het vruchtvlees blijft in het filter en het sap vloeit eruit in de kan.
iTips
•Gebruik de kan niet om er levensmiddelen of voorwerpen in te bewaren.
•Aanbevolen wordt geen hete levensmiddelen in de kan te doen om de kans op brandwonden te
vermijden.
•Aangeraden wordt de ingrediënten beetje bij beetje toe te voegen in plaats van in één keer.
•Vermaal eerst de hardste voedingsmiddelen en voeg er vervolgens de zachtere aan toe. Dit is
de beste manier om een homogene massa te krijgen.
•De laagste snelheid is het meest geschikt om te kloppen of vloeibare levensmiddelen te mengen.
De hoogste snelheid dient voor het vermalen of mengen van vaste levensmiddelen.
•Dikke en vezelachtige levensmiddelen moeten in blokjes van maximaal 2 of 3 cm worden gesneden.
•Voor het bereiden van cocktails met gehakt ijs dient u eerst de ingrediënten, vervolgens
het ijs en als laatste de benodigde vloeistof of wat water toe te voegen.
•
Voor het hakken van ijs wordt aanbevolen enkele seconden de hoge snelheid of de
turboknop te gebruiken om het ijs omhoog te stuwen en te voorkomen dat het onderin vast
komt te zitten.
•Blijven de ingrediënten tijdens het mixen tegen de wanden van de kan plakken of komen ze niet
in aanraking met het mes, schakel het apparaat uit, neem de kan uit het apparaat en verwijder
het deksel. Verwijder het deksel en schuif de levensmiddelen met een spatel voorzichtig naar
het mes. Zet het deksel op de kan, zet de kan in het apparaat en ga verder met het mixen van
de levensmiddelen.
•Overschrijd nooit het maximale vulniveau dat is aangegeven op de kan van de blender.
4Reiniging en onderhoud
‹
De messen zijn uiterst scherp. Vermijd bij het
reinigen en drogen van de binnenkant van de kan
elke aanraking van de messen met de handen.
Z
Dompel het voetstuk (1) nooit onder in water en was het nooit in de vaatwasser.
1Reinig het apparaat voordat u het voor het eerst in gebruik neemt, onmiddellijk na elk gebruik en
na een lange periode ongebruikt te zijn geweest.
2Maak de kan en andere plastic elementen onmiddellijk schoon na gebruik, aangezien sommige
voedingsmiddelen (b.v. wortels) in opgedroogde toestand erg moeilijk schoon te maken zijn.
Snelle reiniging
1Verwijder het deksel van de volledig gemonteerde blender en giet lauw water met wat afwasmiddel in de kan.
2Zet het deksel (2) met de doseerdop (1) erop.
3Zet de snelheidsregelaar een paar seconden in stand P.
4Zet de snelheidsregelaar in stand 0 en haal de stekker uit het stopcontact.
5Verwijder de kan en spoel deze na met lauw water.
Grondige reiniging
1Maak de kan leeg en demonteer de blender.
2Maak de romp en het netsnoer met een vochtige
doek schoon.
1Sokkel (voetstuk)
2Snelheidsregelaar
BV5712
1Gemiddelde snelheid,
2
Hoogste snelheid, P Turbostand
BV5722
1
minimum, 2, 3Gemiddelde snelheid, 4,
5
Hoogste snelheid, PTurbostand
3Netsnoer
4Kan
5Mes
6Deksel
7Deksel/doseerdop
8Sapfilter
9Snoeropbergplaats
DESPLEGABLE_BV5712_BV5722.fm Page 1 Monday, June 11, 2012 12:00 PM
Specyfikacje produktu
| Marka: | Solac |
| Kategoria: | mikser |
| Model: | BV5712 |
Potrzebujesz pomocy?
Jeśli potrzebujesz pomocy z Solac BV5712, zadaj pytanie poniżej, a inni użytkownicy Ci odpowiedzą
Instrukcje mikser Solac

26 Września 2024
26 Września 2024
26 Września 2024
26 Września 2024
26 Września 2024
26 Września 2024
26 Września 2024
26 Września 2024
26 Września 2024
26 Września 2024
Instrukcje mikser
Najnowsze instrukcje dla mikser
2 Kwietnia 2025
1 Kwietnia 2025
1 Kwietnia 2025
1 Kwietnia 2025
1 Kwietnia 2025
1 Kwietnia 2025
29 Marca 2025
24 Marca 2025
24 Marca 2025
18 Marca 2025