Instrukcja obsługi StarTech.com MONSTND
StarTech.com nieskategoryzowany MONSTND
Przeczytaj poniżej 📖 instrukcję obsługi w języku polskim dla StarTech.com MONSTND (2 stron) w kategorii nieskategoryzowany. Ta instrukcja była pomocna dla 36 osób i została oceniona przez 8 użytkowników na średnio 4.7 gwiazdek
Strona 1/2
Quick-Start Guide
To view manuals, FAQs, videos, drivers, downloads, technical drawings, and more, visit www.startech.com/support.
Manual Revision: March 25, 2019 2:04 PM
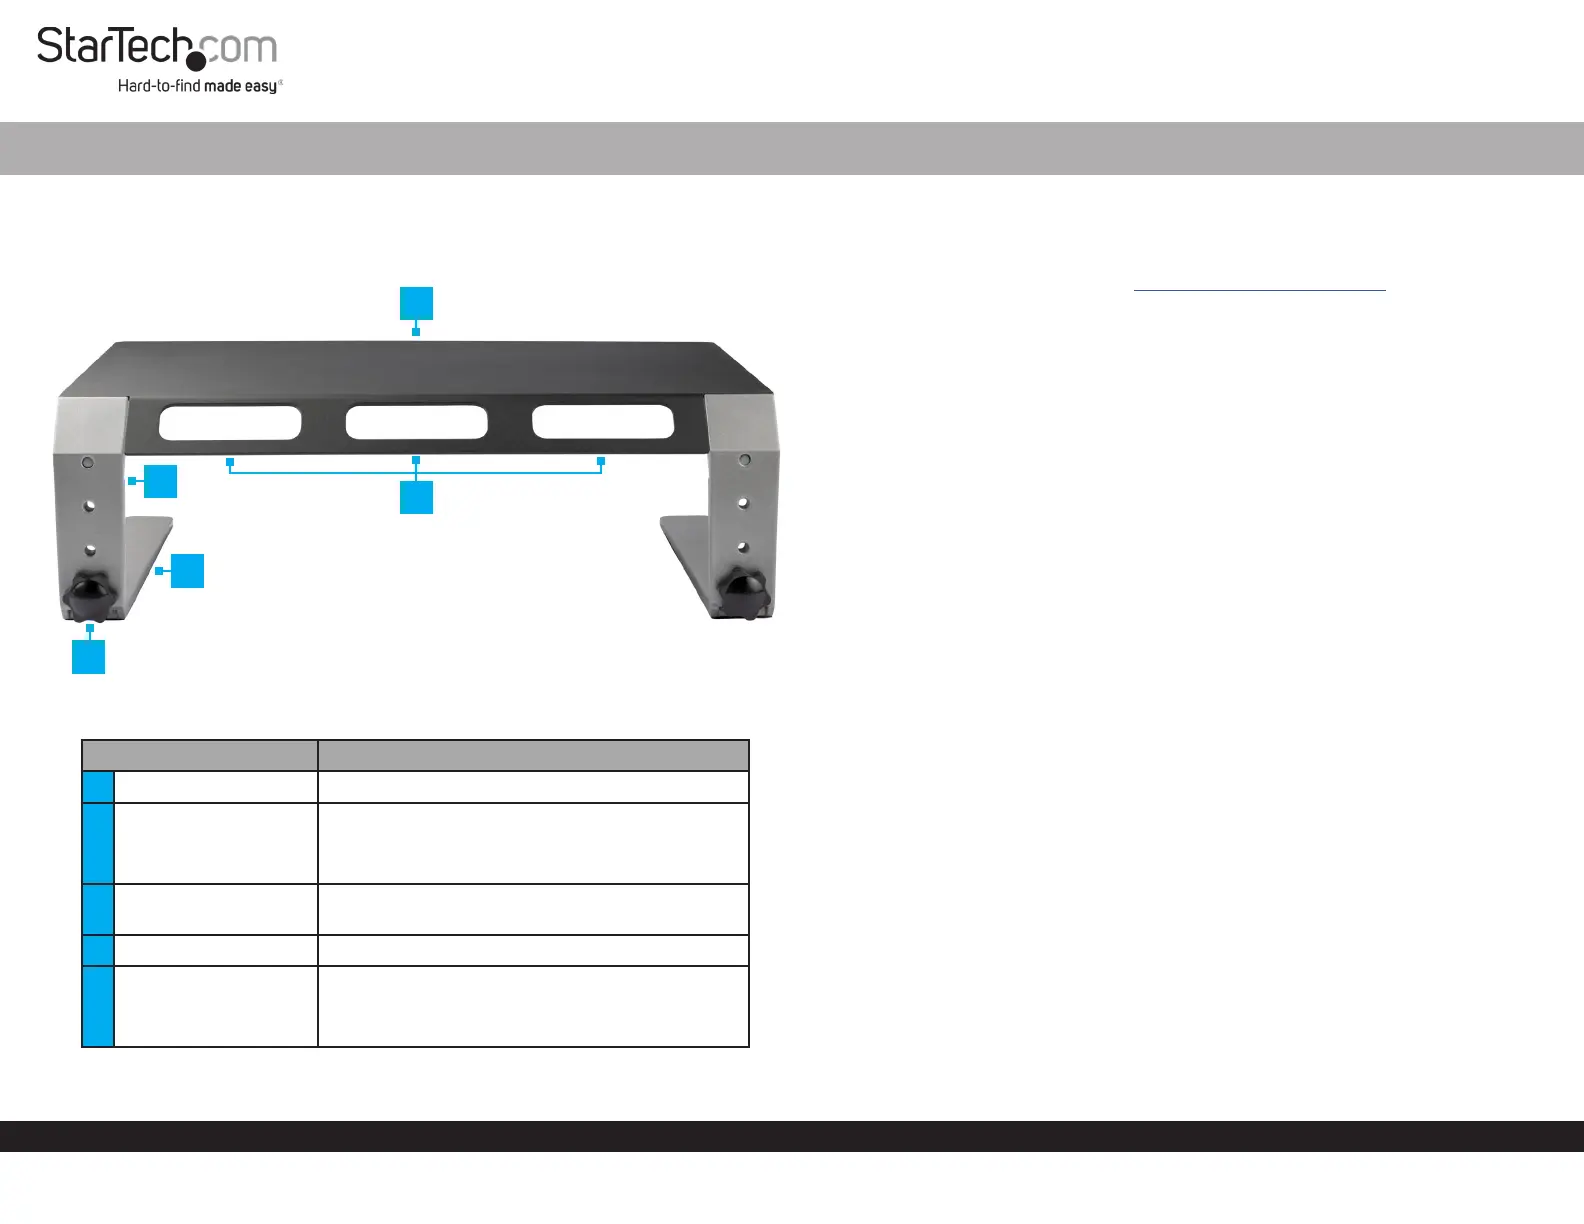
Product Diagram (MONSTND)
Rear View
PartFunction
1Top Plate• Used as a platform for a Monitor or Laptop
2Upper Leg
• Attaches to the Top Plate
• Congurable with three height-adjustment
settings
3
Cable-Management
Slots
• Used for organizing and routing Cables
4Lower Leg• Attaches to the Upper Leg
5
Height-Adjustment
Screw
• Used to secure the Upper Legs and Lower
Legs together
• Can be removed to adjust height settings
Monitor Riser - Metal - Height Adjustable
1
Requirements
• Clean, Flat, and Stable Surface x 1
For the latest requirements please visit: www.startech.com/MONSTND.
Installation
Assembly
1. Place the Top Plate, top side down, onto a Clean, Flat, and Stable Surface.
2. Place the Upper Legs onto the Top Plate. Ensure the Holes in the Upper Legs are
aligned with the Holes in the Top Plate. The slanted portion of the Upper Legs
should be aligned with the slanted portion of the Top Plate.
3. Secure the Upper Legs to the Top Plate, using two M6x10 mm Screws for each
side. Fasten the M6x10 mm Screws using the 4 mm Hex Key.
4. Align the Lower Leg against the Upper Leg at the desired Monitor height setting.
5. Insert the Height-Adjustment Screw through the Upper Leg and into the Lower
Leg, then hand-tighten.
Note: Tighten the Height-Adjustment Screws by hand. Do not over-tighten.
6. Repeat steps 4 and 5 to attach the second Lower Leg.
7. Turn the Monitor Riser Assembly upright.
Operation
Height Adjustment
1. Place the assembled Monitor Riser, top side down, on a Clean, Flat, and Stable
Surface.
2. Remove the Height-Adjustment Screws.
3. Adjust the height of the Lower Legs to the desired height.
4. Insert the Height-Adjustment Screws through the Upper Legs and into the Lower
Legs, then hand-tighten.
5. Turn the Monitor Riser Assembly upright.
2
5
4
3
Specyfikacje produktu
| Marka: | StarTech.com |
| Kategoria: | nieskategoryzowany |
| Model: | MONSTND |
| Kolor produktu: | Czarny, Srebrny |
| Opcja regulacji wysokości: | Tak |
| Wysokość produktu: | 125 mm |
| Szerokość produktu: | 305 mm |
| Głębokość produktu: | 405 mm |
| Waga produktu: | 3200 g |
| Szerokość opakowania: | 354 mm |
| Wysokość opakowania: | 78 mm |
| Głębokość opakowania: | 460 mm |
| Certyfikat środowiskowy (zrównoważonego rozwoju): | CE, RoHS |
| Kod zharmonizowanego systemu (HS): | 94038900 |
| Waga wraz z opakowaniem: | 3700 g |
| Liczba obsługiwanych wyświetlaczy: | 1 |
| Przewodnik użytkownika: | Tak |
| Regulacja wysokości: | 125 - 175 mm |
| Maksymalna waga: | 10 kg |
| Tworzywo ramy: | Aluminium, Steel |
| Dołączone śruby: | Tak |
| Zgodność z zasadami zrównoważonego rozwoju: | Tak |
| Maksymalna wielkość ekranu: | 32 " |
| Zarządzanie okablowaniem: | Tak |
| Liczba śrub: | 6 |
| Typ klucza: | Klucz sześciokątny |
Potrzebujesz pomocy?
Jeśli potrzebujesz pomocy z StarTech.com MONSTND, zadaj pytanie poniżej, a inni użytkownicy Ci odpowiedzą
Instrukcje nieskategoryzowany StarTech.com

27 Maja 2024
25 Maja 2024
25 Maja 2024
23 Maja 2024
23 Maja 2024
23 Maja 2024
22 Maja 2024
21 Maja 2024
21 Maja 2024
21 Maja 2024
Instrukcje nieskategoryzowany
Najnowsze instrukcje dla nieskategoryzowany
28 Października 2024
28 Października 2024
27 Października 2024
27 Października 2024
27 Października 2024
27 Października 2024
27 Października 2024
27 Października 2024
27 Października 2024
27 Października 2024