Instrukcja obsługi Sunding JOY-651
Sunding Nie skategoryzowane JOY-651
Przeczytaj poniżej 📖 instrukcję obsługi w języku polskim dla Sunding JOY-651 (2 stron) w kategorii Nie skategoryzowane. Ta instrukcja była pomocna dla 22 osób i została oceniona przez 3 użytkowników na średnio 4.2 gwiazdek
Strona 1/2
3~5mm
TIRESIZE
CIRC
TIRESIZE
CIRC
12x1.75 935
12x1.95 940
14x1.50 1020
14x1.75 1055
16x1.50 1185
16x1.75 1195
16x2.00 1245
16x1-1/8 1290
16x1-3/8 1300
17x1-1/4 1340
18x1.50 1340
18x1.75 1350
20x1.25 1450
20x1.35 1460
20x1.50 1490
20x1.75 1515
20x1.95 1565
22x1-3/8 1770
22x1-1/2 1785
24x1.75 1890
24x2.00 1925
24x2.125 1965
24x1(520) 1753
24x/34Tubular 1785
24x1-1/8 1795
24x1-1/4 1905
26x1(599) 1913
26x1.25 1950
26x1.40 2005
26x1.50 2010
26x1.75 2023
26x1.95 2050
26x2.10 2068
26x2.25 2070
26x2.35 2083
26x3.00 2170
26x1-1/8 1970
26x1-3/8 2068
26x1-1/2 2100
650C Tubular
26x7/8 1920
650x20C 1938
650x23C 1944
650x25C
26x1(571) 1952
650x38A 2125
650x38B 2105
27x1(630) 2145
27x1-1/8 2155
27x1-1/4 2161
27x1-3/8 2169
27.5x1.50 2079
27.5×1.95 2090
27.5x2.1 2148
27.5x2.25 2182
700x18C 2070
700x19C 2080
700x20C 2086
700x23C 2096
700x25C 2105
700x28C 2136
700x30C 2146
700x32C 2155
700Tubular 2130
700x35C 2168
700x38C 2180
700x40C 2200
700x42C 2224
700x44C 2235
700x45C 2242
700x47C 2268
29x2.1 2288
29x2.2 2298
29x2.3 2326
MAXSPD
AVSSPD
MAXTMP
MINTMP
1
1.Speedmeter 2Front Light 3Anti-Theft 4Speaker 5Powe Bank....
2
3
4
5
6
1
2
3
4
5
6
1
3
4
SET(1)
0
MODE2()
LIGHT
2
7
7
-SPD CURRENT SPEED
-ODO ODOMETER
-DST TRIP DISTANCE
-MXS MAXIMUM SPEED
-AVS AVERAGE SPEED
-TM TRIP TIME
-TTM TOTAL TRIP TIME
-CLK CLOCK 12H/24H
-Th TEMPERATURE
-MAX Th MAXIMUM TEMPERATURE
-MIN Th MINIMUM TEMPERATURE
- “ ” “ ” COMPARATOR
-Km/Mile SELECTION
-SLEEP MODE
- “ “ MAINTENANCE ALERT
- SETTING TYRE CIRCUMFERENCE
-SETTING LAST VALUE OF ODOMETER/ODO
-SETTING TTM
- BACK LIGHT
-AUTO WAKE UP
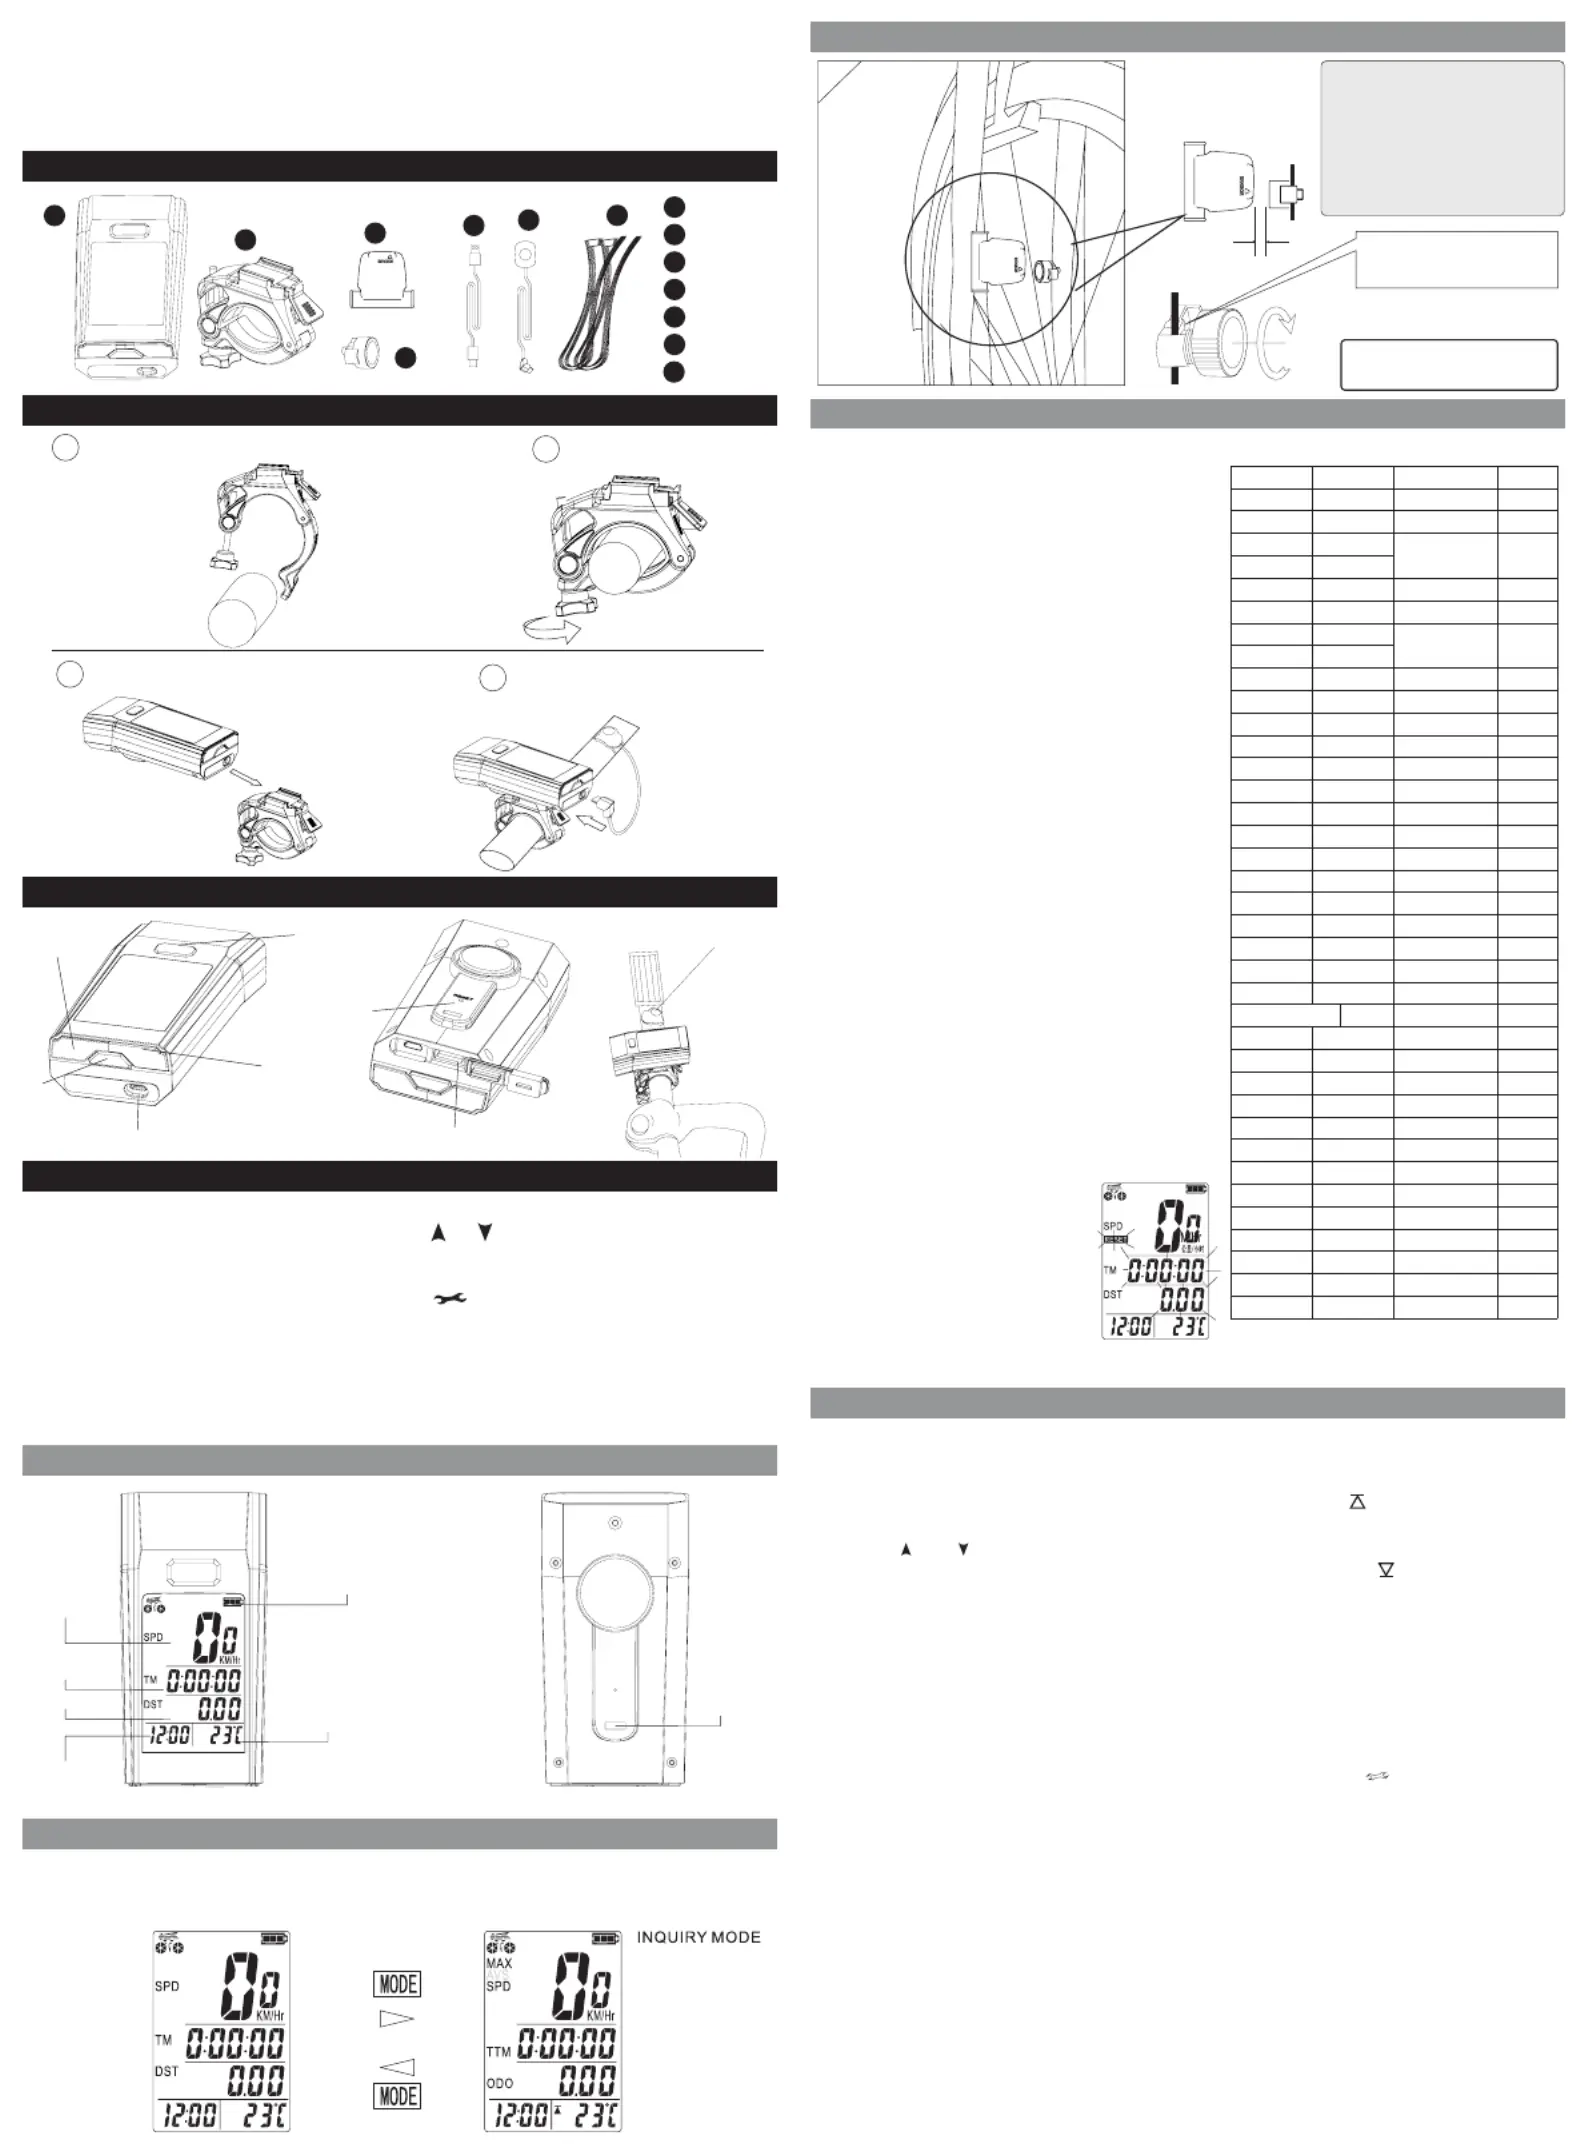
To attach the speedometer sensor, use
the ties to secure it to the front fork.
Make sure the computer and the sensor
are on the same side of the fork and no
more than 60cm apart. The sensor
should have an arrow pointing at the
magnet. Follow the figure to install the
magnet on a spoke. The gap between
the sensor and the magnet should be
3 mm.
Notice
The magnet is designed for spokes
that are less than 2mm thick
Pass bicycle spokes through the
plastic hole on the bottom of the
magnet and tighten to secure
Installation diagram of magnet and Sensor
Computer
Magnet
Mounting Shoe
Sensor
Ties
SPD
The screen always shows the speed, which can go up to
99.9 km/h (m/h) with an accuracy of +/- 0.1 km/h (m/h).
SPD Comparator
During riding,“ ” and “ ”on screen indicates the current
speedis higher or lower than average speed(AVS)
ODO
The screen shows the total distance in ODO mode, which
can be 0 to 99999 km (mile). The value resets to 0 after
reaching the maximum limit.
DST
The bottom line shows the single trip distance in DST
mode, which can be 0 to 9999 km (m). The value resets to
0 after reaching the maximum limit.
TM
After resetting the data, the trip time starts from zero and
counts up to 999 hours. After that, it resets to zero and
counts again.
TTM
Total riding time for one trip .TTM ranges 0~99999hr.
Temperature
Shows the ambient temperature in Celsius or Fahrenheit.
TheCelsius range is -20 to 70 degrees. The Fahrenheit
range is -4 to 158 degrees.
SleepMode
If there is no signal input within 100 seconds, the meter will
automatically enter the sleep state.The screen will only display
the clock and power level. You can turn on the screen by
shaking the bike or pressing any key, the computer unit will
return to the last used mode and preseve all the datacollected.
Care Reminder
When the riding distance is greater, than the set
maintenance distance. the icon will appear.
Auto Wake Up
When the device is in sleep mode, it willenter working mode
when viberation beingdetected.
Auto Backlight
COMPRTER UNIT INTERFACE
Clear All Data
InmodepresstheSETbutton any ,
for3secondstoclearallthedata
includingthatforDSTMAX/ AVSTM / / /
MAX TH/ MIN TH. ( exceptthatfor
CLKODORAT\ \ )
To set maintenance alert, press the MODE button to adjust the
flashing value. The adjustment values are: 200, 400, 600, 800. After
setting the alert, press the SET button to enter the. Anti-theft alarm
function password setting, see the back page for details of the
setting method. Maintenance symbol clearing: click MODE
button + SET button at the same time to clear the maintenance
symbol.
Maintenance Aalert Setting
To set the total riding time, press the MODE button to cycle through
the flashing digits and press the SET button to move to the next
digit. The default value is 00:00:00 and it can range from 0 to 9999
hours. After setting the total riding time, press the SET button to go
to the maintenance alert setting mode.
TTM (Single Trip Time) Setting
Odometer Setting
To set the odometer, press the MODE button to cycle through the
flashing digits and press the SET button to move to the next digit.
The default value is 0000 and it can range from 0 to 99999 km or
miles. After setting the odometer, press the SET button to go to the
total riding time setting mode.
Speed Unit Setting (KM/H)/(MILE/H)
To choose between kilometers per hour (km/h) or miles per hour (m/h)
for the speed unit, press the MODE button in the speed unit setting
mode. Then press the SET button to go to thetire circumference
setting mode.
To set the tire circumference, use the chart to the right to find
the data for your tire size. The default value is 2080 mm. Press
MODE button to cycle through the flashing digit and Press SET
button to confirm and move to next digit. The value can range
from 0 to 9999 mm. After finishing circurence setting, press
SET button to go to the odometer setting mode.
Tire Circumference Setting
In temperature unit setting modepress the MODE button to
select between Celsius or Fahrenheit . Then press the SET button
to go to the speed unit setting
Temperature Unit (C/F°) Setting
Time Format (24H) SETTING
Press and hold MODE key + SET key for 6
seconds, after the screen displaysSLEEP,
computer will enter deep sleep mode.
Deep Sleep Setting
Deep Sleep Mode
Press and hold the mode key for 4 seconds to turn on
Backlight long Bright. Press and hold the mode key for 4
seconds and the Backlight long Bright will turn off. After the
computer enters the sleep mode the Backlight long Bright is
turned off.
Backlight Long Bright
The Smart Backlight will activate when there is insufficient
light. Press any button to turn on the Backlight for 5 seconds.
FRONTBACK
SPEED
TIME
TRIP TIME
TRIP DISTANCE
TEMPERATURE
JOY-651 V0.1 Instruction Manual
FUNCTIONS
HEAD UNIT ILLUSTRATION
COMPONENT ILLUSTRATIONS
BICYCLE COMPUTER FUNCTIONS
Remote Control
Charging cable
Tighten nut to scure the unIt.
MODE INSTRUCTION
DISPLAY MODE
Lean the base against the handlebars.
Push into the base in the direction of the
arrow, and the base snaps into place
Secure the horn button next to the
handlebar, and plug the cable
into the port on the speedmeter.
Buttons & Socket Description Diagram
Reset
Horn remote switch button
Horn connecting,Charing port
External device charging port
Battery indicator
Clip
The screen is in display mode when riding, press MODE button to enter the query mode. 5 seconds later, it will return to
display mode automatically. When there is no signal input In the query mode, the top row switches between maximum speed
and average speed, and returns to the display mode automatically after 14 seconds.
Parameter setting
At the same time, press and hold MODE key + SET key for 4
seconds, then release the key, the meter will enter the clock setting
mode.In the clock setting mode, press MODE the hour digit will
blink, then press MODE key to adjust the value, press SET key to
confirm and enter the minute setting, after finishing, press SET key
to enter into temperature unit setting.
Maximum riding speed to the present after the single trip
value reset.
Average riding speed to the present after the single trip
value reset.
In the query mode, the maximum and minimum temperatures
are displayed in the lower right corner and are switched in a
frequency of 3 seconds. " " indicates the maximum
temperature.
In the query mode, when the " " symbol is displayed in the
lower right corner, it is the minimumtemperature.
The screen displays SLEEP, the wireless reception and auto
wake-up function is off.Press any key to enter the working
mode.
Functions
Specyfikacje produktu
| Marka: | Sunding |
| Kategoria: | Nie skategoryzowane |
| Model: | JOY-651 |
Potrzebujesz pomocy?
Jeśli potrzebujesz pomocy z Sunding JOY-651, zadaj pytanie poniżej, a inni użytkownicy Ci odpowiedzą
Instrukcje Nie skategoryzowane Sunding

31 Stycznia 2025
31 Stycznia 2025
31 Stycznia 2025
31 Stycznia 2025
Instrukcje Nie skategoryzowane
Najnowsze instrukcje dla Nie skategoryzowane
9 Kwietnia 2025
9 Kwietnia 2025
9 Kwietnia 2025
9 Kwietnia 2025
9 Kwietnia 2025
9 Kwietnia 2025
9 Kwietnia 2025
9 Kwietnia 2025
9 Kwietnia 2025
9 Kwietnia 2025