Instrukcja obsługi Sussex DBSHMSH
Przeczytaj poniżej 📖 instrukcję obsługi w języku polskim dla Sussex DBSHMSH (6 stron) w kategorii Dźwig. Ta instrukcja była pomocna dla 19 osób i została oceniona przez 8 użytkowników na średnio 4.6 gwiazdek
Strona 1/6
AS/NZS 3718:2005
LIC. 20081
WATER
RATING
LicenceNo.LicenceNo.0124
WaterConsumption
Themore
starsthemore
waterefficient
www.waterrating.gov.au
litresperminute
WhentestedinaccordancewithStardardAS/NZS6400
Formoreinformationandtocompare
products,referto:
5
Ajointgovernmentandindustryprogram
WATER
RATING
WaterConsumption
Themore
starsthemore
waterefficient
www.waterrating.gov.au
litresperminute
WhentestedinaccordancewithStandardAS/NZS6400
Formoreinformationandtocompare
products,
referto:
8.5
Ajointgovernmentandindustryprogram
LicenceNo.LicenceNo.0124
WATER
RATING
WaterConsumption
Themore
starsthemore
waterefficient
www.waterrating.gov.au
litresperminute
WhentestedinaccordancewithStandardAS/NZS6400
Formoreinformationandtocompare
products,referto:
7.5
Ajoint government andindustryprogram
LicenceNo.0124
POL Basin Set
POL Basin Mixer
POL Basin Mixer Extended
POL Sink Mixer
( Twin Handle )
WATER
RATING
LicenceNo.LicenceNo.0124
WaterConsumption
Themore
starsthemore
waterefficient
www.waterrating.gov.au
litresperminute
WhentestedinaccordancewithStardardAS/NZS6400
Formoreinformationandtocompare
products,referto:
5.5
Ajointgovernmentandindustryprogram
POL Sink Mixer
( Single Lever )
POL Shower Head
POL Hand Held Shower
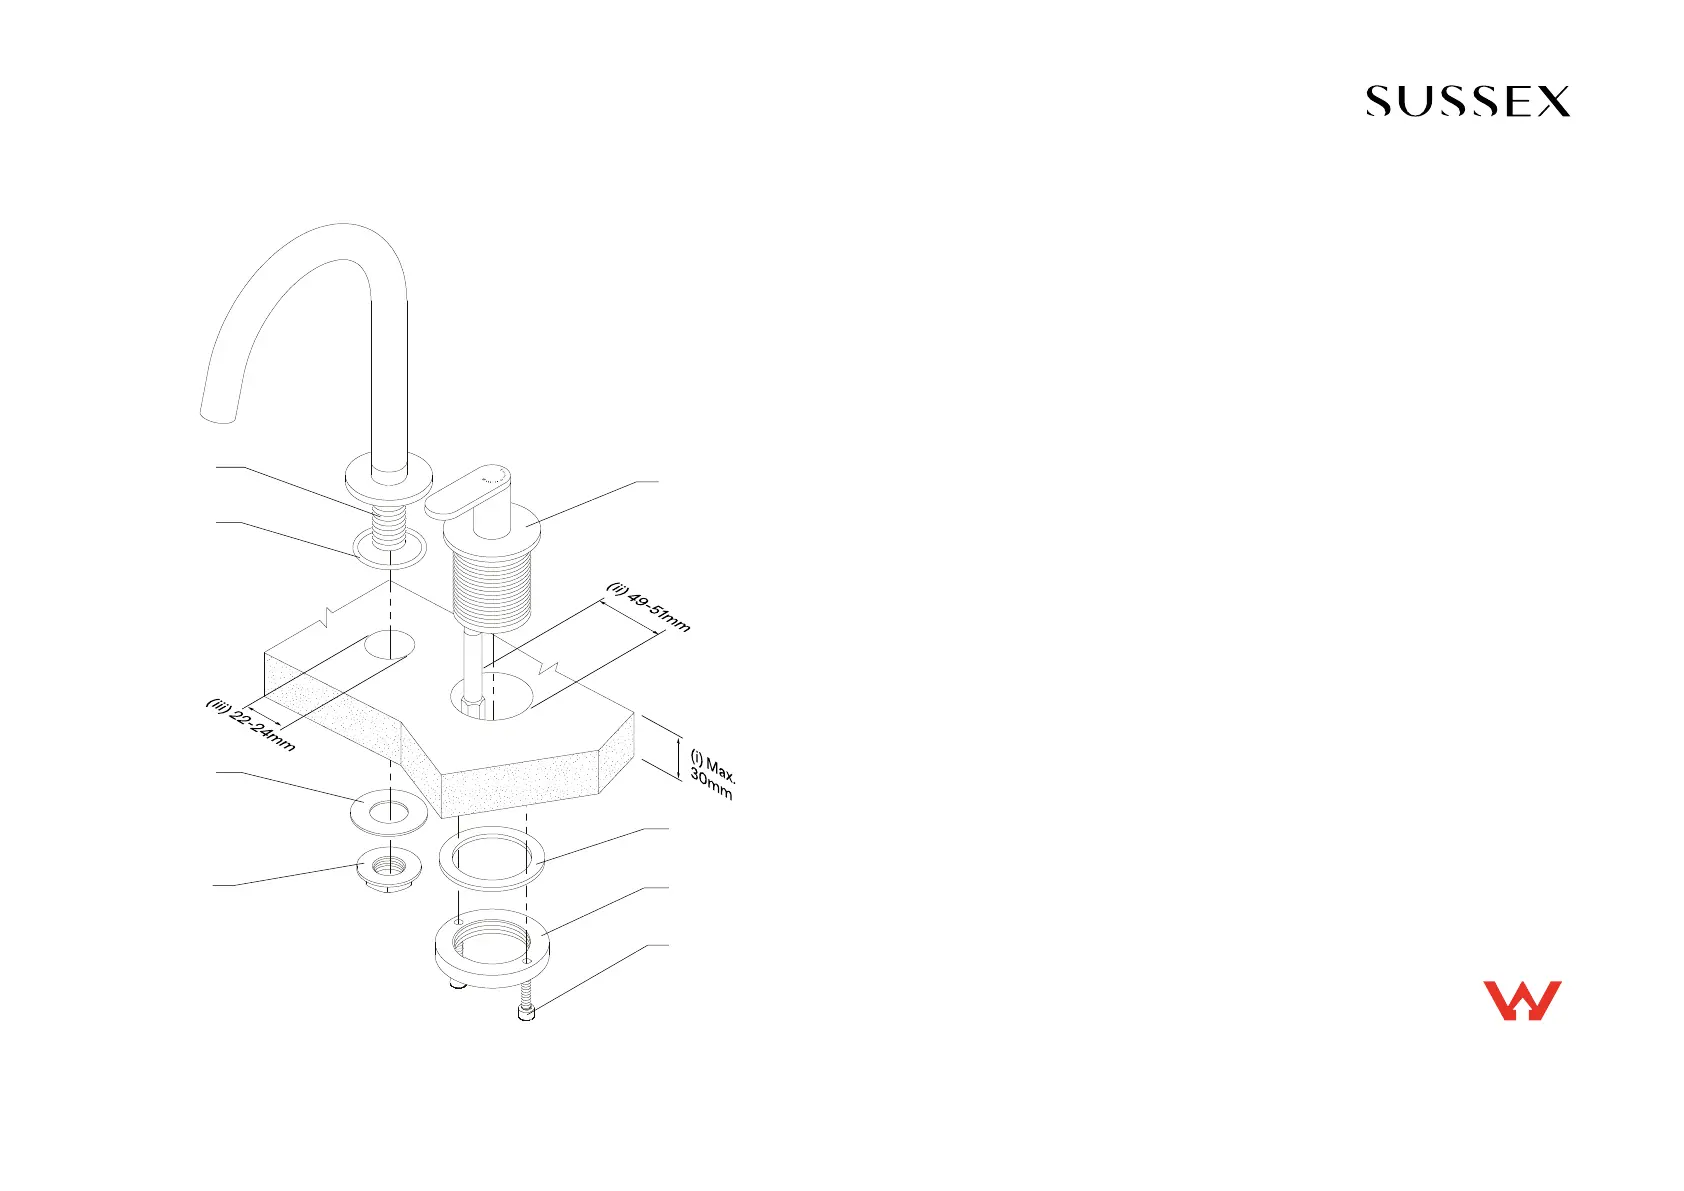
-Maximum Mounting Surface thickness is 30mm. (i)
-Hob Mixer: 49mm - 51mm Clearance Hole. (ii)
-Outlet: 22mm - 24mm Clearance Hole. (iii)
-Mounting Surface must be flat and level.
-Prior to installing remove:
- (B) Clamping Ring
- (C) Clamping Plate
- (F) Outlet Washer
- (G) Locknut
-Tapware is to be installed by a Licensed Plumber in accordance with AS/NZS 3500:2021
-Recommended working water pressure 300 - 500 Kpa. Maximum water temperature is 65°C
-After installation, ensure that tapware functions correctly without leaks.
-Please ensure a copy of the Installation Instructions are left with the end user for future reference.
DBSHMSL
DBSHMSH
Duet
Basin Sink Hob Mixer Set
Product code
Install Preparation:
Plumbers note:
A
C
B
D
-(A) Hob Mixer
-(B) Clamping Ring
-(C) Clamping Plate
-(D) Fixing Screws
-(E) Outlet
-(F) O-Ring
-(G) Outlet Washer
-(H) Locknut
Product parts:
H
E
G
F
While we aim to ensure the specifications shown are correct at time of printing, Sussex Taps reserves the right to make modifications without prior notice.
Always use the physical product for accurate measurements. Dimensions are subject to change without notice. All measurements are shown in millimetres.
Copyright © Sussex Taps sussextaps.com.au
Specyfikacje produktu
| Marka: | Sussex |
| Kategoria: | Dźwig |
| Model: | DBSHMSH |
Potrzebujesz pomocy?
Jeśli potrzebujesz pomocy z Sussex DBSHMSH, zadaj pytanie poniżej, a inni użytkownicy Ci odpowiedzą
Instrukcje Dźwig Sussex

7 Kwietnia 2025
7 Kwietnia 2025
7 Kwietnia 2025
7 Kwietnia 2025
7 Kwietnia 2025
7 Kwietnia 2025
9 Października 2024
9 Października 2024
3 Października 2024
3 Października 2024
Instrukcje Dźwig
Najnowsze instrukcje dla Dźwig
7 Kwietnia 2025
7 Kwietnia 2025
7 Kwietnia 2025
7 Kwietnia 2025
7 Kwietnia 2025
7 Kwietnia 2025
7 Kwietnia 2025
7 Kwietnia 2025
7 Kwietnia 2025
5 Kwietnia 2025